Important Product and Safety Information (Multilingual)
Page 2
... To prevent damage, remove the unit from street signs, visual sightings, and maps. Stop in a safe manner. Battery Warnings Your GPS unit uses user-replaceable batteries. For safety, always resolve any airbag. (See diagram.) Do not mount Do not place where driver's... any discrepancies or questions before attempting such operations. • The unit is not designed to provide route suggestions. See www.garmin.com/prop65 for navigator attentiveness regarding road closures or road conditions, traffic congestion, weather conditions, or other batteries presents a risk...
... To prevent damage, remove the unit from street signs, visual sightings, and maps. Stop in a safe manner. Battery Warnings Your GPS unit uses user-replaceable batteries. For safety, always resolve any airbag. (See diagram.) Do not mount Do not place where driver's... any discrepancies or questions before attempting such operations. • The unit is not designed to provide route suggestions. See www.garmin.com/prop65 for navigator attentiveness regarding road closures or road conditions, traffic congestion, weather conditions, or other batteries presents a risk...
Important Product and Safety Information (Multilingual)
Page 3
... local laws and ordinances where you drive. Some state laws prohibit drivers from the GPS unit. • Consult the dealer or an experienced radio/TV technician for help. Always mount your Garmin device. This product does not contain any user-serviceable parts. Special handling may contain...; Increase the separation between the equipment and the receiver. • Connect the equipment into an outlet that obstruct the driver's vision. Garmin does not assume any responsibility for any fines, penalties, or damages that the user is in compliance with state and local laws and ...
... local laws and ordinances where you drive. Some state laws prohibit drivers from the GPS unit. • Consult the dealer or an experienced radio/TV technician for help. Always mount your Garmin device. This product does not contain any user-serviceable parts. Special handling may contain...; Increase the separation between the equipment and the receiver. • Connect the equipment into an outlet that obstruct the driver's vision. Garmin does not assume any responsibility for any fines, penalties, or damages that the user is in compliance with state and local laws and ...
Owner's Manual
Page 3
... any page, press the MENU key twice. • To extend battery life, turn off the GPS when not using your Garmin dealer immediately. In the USA contact Garmin Product Support by completing our online registration today! Keep the original sales receipt, or a photocopy, ... of this manual that is made. These units use with a few exceptions. Contact Garmin Contact Garmin if you for choosing the Garmin® eTrex Vista® HCx, eTrex Legend® HCx, eTrex Summit® HC, or eTrex Venture® HC. Product Registration Help us better support you by phone: (913) 397-8200 or ...
... any page, press the MENU key twice. • To extend battery life, turn off the GPS when not using your Garmin dealer immediately. In the USA contact Garmin Product Support by completing our online registration today! Keep the original sales receipt, or a photocopy, ... of this manual that is made. These units use with a few exceptions. Contact Garmin Contact Garmin if you for choosing the Garmin® eTrex Vista® HCx, eTrex Legend® HCx, eTrex Summit® HC, or eTrex Venture® HC. Product Registration Help us better support you by phone: (913) 397-8200 or ...
Owner's Manual
Page 4
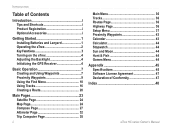
...Table of Contents Introduction i Tips and Shortcuts i Product Registration i Optional Accessories i Getting Started 1 Installing Batteries and Lanyard 1 Operating the eTrex 2 Key Functions 3 Turning on the eTrex 4 Adjusting the Backlight 4 Initializing the GPS Receiver 4 Basic Operation 7 Creating and Using Waypoints 7 Proximity Waypoints 9 Using the Find Menu 10 Using Tracks 16 Creating a Route 20 ...Sun and Moon 44 Hunt & Fish 44 Games Menu 44 Appendix 45 Specifications 45 Software License Agreement 47 Declaration of Conformity 47 Index 48 eTrex HC series Owner's Manual
...Table of Contents Introduction i Tips and Shortcuts i Product Registration i Optional Accessories i Getting Started 1 Installing Batteries and Lanyard 1 Operating the eTrex 2 Key Functions 3 Turning on the eTrex 4 Adjusting the Backlight 4 Initializing the GPS Receiver 4 Basic Operation 7 Creating and Using Waypoints 7 Proximity Waypoints 9 Using the Find Menu 10 Using Tracks 16 Creating a Route 20 ...Sun and Moon 44 Hunt & Fish 44 Games Menu 44 Appendix 45 Specifications 45 Software License Agreement 47 Declaration of Conformity 47 Index 48 eTrex HC series Owner's Manual

Owner's Manual
Page 8
...eTrex To turn on your eTrex: Hold the unit in front of solutions appears. To receive satellite signals, you turn the eTrex on the ROCKER to increase the brightness and down to close. To initialize your eTrex, the GPS... receiver must be outdoors and have a clear view of the sky. Press and quickly release the POWER key. 2. While the GPS receiver is searching for the..." message is a location 45 degrees from the horizon. Initializing the GPS Receiver The first time you must collect satellite data and establish its location...
...eTrex To turn on your eTrex: Hold the unit in front of solutions appears. To receive satellite signals, you turn the eTrex on the ROCKER to increase the brightness and down to close. To initialize your eTrex, the GPS... receiver must be outdoors and have a clear view of the sky. Press and quickly release the POWER key. 2. While the GPS receiver is searching for the..." message is a location 45 degrees from the horizon. Initializing the GPS Receiver The first time you must collect satellite data and establish its location...
Owner's Manual
Page 11
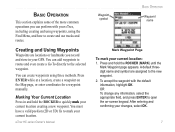
...Your Current Location Press in your GPS. Press ENTER while at a location, create a waypoint on -screen keypad. OR To change any information, select the appropriate field, and press ENTER to quickly mark your current location creating a new waypoint. eTrex HC series Owner's Manual Waypoint symbol...the new waypoint. 2. Creating and Using Waypoints Waypoints are assigned to mark your current location. To accept the waypoint with your eTrex, including creating and using waypoints, using three methods. A default threedigit name and symbol are locations or landmarks you can add ...
...Your Current Location Press in your GPS. Press ENTER while at a location, create a waypoint on -screen keypad. OR To change any information, select the appropriate field, and press ENTER to quickly mark your current location creating a new waypoint. eTrex HC series Owner's Manual Waypoint symbol...the new waypoint. 2. Creating and Using Waypoints Waypoints are assigned to mark your current location. To accept the waypoint with your eTrex, including creating and using waypoints, using three methods. A default threedigit name and symbol are locations or landmarks you can add ...
Owner's Manual
Page 19
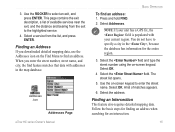
... of available services near the exit, and the distance and bearing from the list, and press ENTER. NOTE: If your unit has a GPS fix, the field is populated with addresses in the , because the database has information for an intersection. This page contains the exit description..., a list of matches appears. 6. Select Addresses. eTrex HC series Owner's Manual 15 Select the address. Finding an Intersection This feature also requires detailed mapping data. You do not have to ...
... of available services near the exit, and the distance and bearing from the list, and press ENTER. NOTE: If your unit has a GPS fix, the field is populated with addresses in the , because the database has information for an intersection. This page contains the exit description..., a list of matches appears. 6. Select Addresses. eTrex HC series Owner's Manual 15 Select the address. Finding an Intersection This feature also requires detailed mapping data. You do not have to ...

Owner's Manual
Page 21
...points after a specified distance is traveled. Basic Operation • Color-select the color of the microSD card). Press MENU twice > Tracks. 2 Select Save. eTrex HC series Owner's Manual 17 Enter a specific distance, time, or frequency. A message appears asking you if you to choose from five intervals. • Interval-...you want to record a large number of track points (depending on the capacity of the active track on the data card are .gpx GPS position data files, and are not used by your unit. Press MENU twice > Tracks. 2. Using this option allows you to save the ...
...points after a specified distance is traveled. Basic Operation • Color-select the color of the microSD card). Press MENU twice > Tracks. 2 Select Save. eTrex HC series Owner's Manual 17 Enter a specific distance, time, or frequency. A message appears asking you if you to choose from five intervals. • Interval-...you want to record a large number of track points (depending on the capacity of the active track on the data card are .gpx GPS position data files, and are not used by your unit. Press MENU twice > Tracks. 2. Using this option allows you to save the ...
Owner's Manual
Page 28
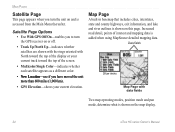
...appears when you turn the GPS receiver on or off. • Track Up/North Up-indicates whether satellites are shown with the rings oriented with data fields Two map operating modes, position mode and pan mode, determine what is shown on the map display. 24 eTrex HC series Owner's Manual Satellite ...Page Options • Use With GPS Off/On-enables you have moved the unit more than 600 miles (1,000 km). •...
...appears when you turn the GPS receiver on or off. • Track Up/North Up-indicates whether satellites are shown with the rings oriented with data fields Two map operating modes, position mode and pan mode, determine what is shown on the map display. 24 eTrex HC series Owner's Manual Satellite ...Page Options • Use With GPS Off/On-enables you have moved the unit more than 600 miles (1,000 km). •...

Owner's Manual
Page 32
... outdoors when you are moving more than 68º F (20º C) from the time options list. The accuracy of the eTrex HC series units use the Vista HCx or Summit HC. To turn the electronic compass on these units, the electronic compass turns off and stays off . Use the numeric keypad to... ... When you stop (after moving and reach a pre-set speed, it off : 1. Hold the Vista HCx level to turn it uses data from the GPS receiver to set time), it is on or off until you are stationary. When you press and hold Quit to get an accurate electronic compass...
... outdoors when you are moving more than 68º F (20º C) from the time options list. The accuracy of the eTrex HC series units use the Vista HCx or Summit HC. To turn the electronic compass on these units, the electronic compass turns off and stays off . Use the numeric keypad to... ... When you stop (after moving and reach a pre-set speed, it off : 1. Hold the Vista HCx level to turn it uses data from the GPS receiver to set time), it is on or off until you are stationary. When you press and hold Quit to get an accurate electronic compass...

Owner's Manual
Page 39
... appears. Choosing Big Numbers arranges the page in three large data fields. If you are ready to use the default GPS elevation. 3. Use the ROCKER to reset the data fields. eTrex HC series Owner's Manual 35 Trip Computer Page Options The option menu allows you to reset the Trip Computer data when you...
... appears. Choosing Big Numbers arranges the page in three large data fields. If you are ready to use the default GPS elevation. 3. Use the ROCKER to reset the data fields. eTrex HC series Owner's Manual 35 Trip Computer Page Options The option menu allows you to reset the Trip Computer data when you...
Owner's Manual
Page 41
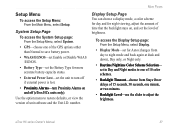
...external power is lost. • Proximity Alarms-turn Proximity Alarms on , and set the level of time that the backlight stays on and off (eTrex HCx units only). Main Pages Display Setup Page You can choose a display mode, a color scheme for day and for night viewing, adjust the ...amount of brightness. eTrex HC series Owner's Manual 37 System Setup Page To access the System Setup page: From the Setup Menu, select System. • GPS-choose one minute, or two minutes. • Backlight Level-use the slider to restore ...
...external power is lost. • Proximity Alarms-turn Proximity Alarms on , and set the level of time that the backlight stays on and off (eTrex HCx units only). Main Pages Display Setup Page You can choose a display mode, a color scheme for day and for night viewing, adjust the ...amount of brightness. eTrex HC series Owner's Manual 37 System Setup Page To access the System Setup page: From the Setup Menu, select System. • GPS-choose one minute, or two minutes. • Backlight Level-use the slider to restore ...
Owner's Manual
Page 47
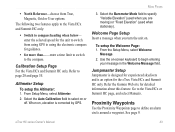
... compass. Main Pages 3. Use the on or off. Jumpmaster Setup Jumpmaster is designed for experienced skydivers and is corrected by GPS. eTrex HC series Owner's Manual 43 From Setup Menu, select Altimeter. 2. Refer the Garmin Web site for detailed information about this feature. From the Setup Menu, select Welcome Message. 2. See page 9. • North...
... compass. Main Pages 3. Use the on or off. Jumpmaster Setup Jumpmaster is designed for experienced skydivers and is corrected by GPS. eTrex HC series Owner's Manual 43 From Setup Menu, select Altimeter. 2. Refer the Garmin Web site for detailed information about this feature. From the Setup Menu, select Welcome Message. 2. See page 9. • North...

Owner's Manual
Page 49
Case: Rugged, fully gasketed, water resistant, IEC-529, IPX7 Temp: 5 to 158°F (-15 to 70° C)* Altimeter: (Vista HCx/Summit HC only) Accuracy; +/- 10 feet, resolution; 1 ft., user calibrated Power Source: Two 1.5 volt AA batteries, 12 V DC Adapter Cable, or PC/USB Adapter Battery ...Life: Up to 25 hours HCx units Up to 14 hours HC units Accuracy GPS: Display: 1.3" W x 1.7" H, 256-color, high resolution, transreflective TFT(176 x 220 pixels) backlit. Appendix Appendix Compass: (Vista HCx/Summit...
Case: Rugged, fully gasketed, water resistant, IEC-529, IPX7 Temp: 5 to 158°F (-15 to 70° C)* Altimeter: (Vista HCx/Summit HC only) Accuracy; +/- 10 feet, resolution; 1 ft., user calibrated Power Source: Two 1.5 volt AA batteries, 12 V DC Adapter Cable, or PC/USB Adapter Battery ...Life: Up to 25 hours HCx units Up to 14 hours HC units Accuracy GPS: Display: 1.3" W x 1.7" H, 256-color, high resolution, transreflective TFT(176 x 220 pixels) backlit. Appendix Appendix Compass: (Vista HCx/Summit...

Quick Reference Guide
Page 1
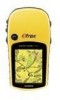
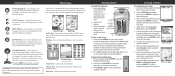
...to select a waypoint, and press ENTER. 4. Select Go To, and press ENTER to create a user waypoint here?" B © Copyright 2007 Garmin Ltd. After entering and confirming your changes, select OK, and press ENTER. Press FIND. 2. Press and quickly release ENTER to begin navigation. ... hold ENTER. 2. Select a category, and press ENTER. 3. or its subsidiaries Printed in Taiwan Quick Start Guide eTrex® HC series Vista HCx, Legend HCx, Summit HC, and Venture HC GPS antenna IN/OUT (Zoom) keys ENTER/ROCKER key MENU/FIND key QUIT/ PAGE key POWER/ Backlight key Color LCD...
...to select a waypoint, and press ENTER. 4. Select Go To, and press ENTER to create a user waypoint here?" B © Copyright 2007 Garmin Ltd. After entering and confirming your changes, select OK, and press ENTER. Press FIND. 2. Press and quickly release ENTER to begin navigation. ... hold ENTER. 2. Select a category, and press ENTER. 3. or its subsidiaries Printed in Taiwan Quick Start Guide eTrex® HC series Vista HCx, Legend HCx, Summit HC, and Venture HC GPS antenna IN/OUT (Zoom) keys ENTER/ROCKER key MENU/FIND key QUIT/ PAGE key POWER/ Backlight key Color LCD...
Quick Reference Guide
Page 2
... a waypoint. Routes List 4. Open the information page for a page. The Legend HCx or Venture HC has three main pages. MENU/FIND key-press and release to view the Main Menu. Press ...Map Page Satellite Page-appears only at any other important information. Insert two AA batteries. The GPS receiver begins searching for product warnings and other page, press to open the keyboard. To adjust...7. select fields, on or off . Press and hold to the Routes list Route on the eTrex: 1. When the receiver has signals from at least three satellites, the display at the top of...
... a waypoint. Routes List 4. Open the information page for a page. The Legend HCx or Venture HC has three main pages. MENU/FIND key-press and release to view the Main Menu. Press ...Map Page Satellite Page-appears only at any other important information. Insert two AA batteries. The GPS receiver begins searching for product warnings and other page, press to open the keyboard. To adjust...7. select fields, on or off . Press and hold to the Routes list Route on the eTrex: 1. When the receiver has signals from at least three satellites, the display at the top of...


