
Owner's Manual
Page 4
...-65 Appendix I - Reciption Tips 59 Appendix D - Specifications 56 Appendix B - Time Offset Chart 60 Appendix E - What is GPS 57-58 Appendix C - Introduction Table of Contents 2 Introduction Registration 1 Warnings and Cautions 3 FCC Statement 4 Features 5 Buttons 6 Description 7... Installing the Batteries 8 Getting Started Calibrating the Electronic Compass 10 SkyView Page Basics 11 Map Page Basics 12 Pointer Page Basics 13 Elevation Page Basics 14 Menu Page Basics 15 Creating a Waypoint 16-17 Heading in the ...
...-65 Appendix I - Reciption Tips 59 Appendix D - Specifications 56 Appendix B - Time Offset Chart 60 Appendix E - What is GPS 57-58 Appendix C - Introduction Table of Contents 2 Introduction Registration 1 Warnings and Cautions 3 FCC Statement 4 Features 5 Buttons 6 Description 7... Installing the Batteries 8 Getting Started Calibrating the Electronic Compass 10 SkyView Page Basics 11 Map Page Basics 12 Pointer Page Basics 13 Elevation Page Basics 14 Menu Page Basics 15 Creating a Waypoint 16-17 Heading in the ...

Owner's Manual
Page 8
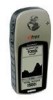
Introduction eTrex Summit Buttons The UP/DOWN Button: • Select options on pages and menus • Adjusts Contrast on SkyView Page • Zoom in and out on Map Page • Cycles through trip computer data • Cycles through elevation computer data The ENTER Button: • Confirms data entry or menu selections &#...
Introduction eTrex Summit Buttons The UP/DOWN Button: • Select options on pages and menus • Adjusts Contrast on SkyView Page • Zoom in and out on Map Page • Cycles through trip computer data • Cycles through elevation computer data The ENTER Button: • Confirms data entry or menu selections &#...
Owner's Manual
Page 13
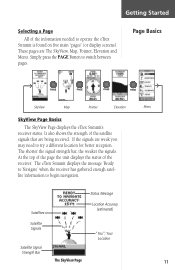
.... Getting Started Selecting a Page All of the information needed to switch between pages. Page Basics PAGE PAGE PAGE PAGE SkyView Map Pointer Elevation Menu SkyView Page Basics The SkyView Page displays the eTrex Summit's receiver status. Simply press the PAGE Button to operate the eTrex Summit is found on five main "pages" (or display screens).
.... Getting Started Selecting a Page All of the information needed to switch between pages. Page Basics PAGE PAGE PAGE PAGE SkyView Map Pointer Elevation Menu SkyView Page Basics The SkyView Page displays the eTrex Summit's receiver status. Simply press the PAGE Button to operate the eTrex Summit is found on five main "pages" (or display screens).

Owner's Manual
Page 14
...trail" known as a Track Log. To help you better visualize the "real world", eTrex Summit automatically rotates the map as you move, so that waypoints that are always displayed in less detail. To decrease the map scale, press the DOWN Button. This will let you are (the animated fi... and symbols are used to adjust the map scale from 200 feet to Destination Map Orientaion "You"; Map "Trail" Scale (track log) The Map Page The Map Page shows where you are going. This will show a smaller 12 Getting Started Page Basics Map Page Basics Destination Waypoint Path to 800...
...trail" known as a Track Log. To help you better visualize the "real world", eTrex Summit automatically rotates the map as you move, so that waypoints that are always displayed in less detail. To decrease the map scale, press the DOWN Button. This will let you are (the animated fi... and symbols are used to adjust the map scale from 200 feet to Destination Map Orientaion "You"; Map "Trail" Scale (track log) The Map Page The Map Page shows where you are going. This will show a smaller 12 Getting Started Page Basics Map Page Basics Destination Waypoint Path to 800...
Owner's Manual
Page 18
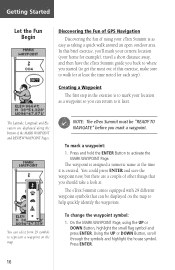
...ENTER. Getting Started Let the Fun Begin Discovering the Fun of GPS Navigation Discovering the fun of the MARK WAYPOINT and REVIEW WAYPOINT Pages. In this brief exercise, you'll mark your current location (your eTrex Summit is created. Press and hold the ENTER Button to activate the... MARK WAYPOINT Page. The Latitude, Longitude and Elevation are a couple of this exercise, make sure to represent a waypoint on the map to it is as easy as a waypoint...
...ENTER. Getting Started Let the Fun Begin Discovering the Fun of GPS Navigation Discovering the fun of the MARK WAYPOINT and REVIEW WAYPOINT Pages. In this brief exercise, you'll mark your current location (your eTrex Summit is created. Press and hold the ENTER Button to activate the... MARK WAYPOINT Page. The Latitude, Longitude and Elevation are a couple of this exercise, make sure to represent a waypoint on the map to it is as easy as a waypoint...

Owner's Manual
Page 19
...of the screen. Edit Waypoint Edit Waypoint Name Map Page 17 Press ENTER. Select 'H' and press ENTER. Using the UP or DOWN Button, highlight the 'OK' field and press ENTER. Getting Started As mentioned earlier the eTrex Summit will assign a numeric name at a moderate ...pace and watch the animated figure walk, and a line-called a "track"-appear along the path you move, watch the Map Page. Walk in identifying the waypoint. To change the ...
...of the screen. Edit Waypoint Edit Waypoint Name Map Page 17 Press ENTER. Select 'H' and press ENTER. Using the UP or DOWN Button, highlight the 'OK' field and press ENTER. Getting Started As mentioned earlier the eTrex Summit will assign a numeric name at a moderate ...pace and watch the animated figure walk, and a line-called a "track"-appear along the path you move, watch the Map Page. Walk in identifying the waypoint. To change the ...

Owner's Manual
Page 21
...PAGE Button, switch to the POINTER Page. Press ENTER. 5. To turn eTrex Summit off, press and hold the POWER Button. You can clean up the... the Track Log you 've used the eTrex Summit a few times, the map display will become a bit messy from keeping track of eTrex Summit and you want to stop a GOTO. You are now on the Map Page): To clear the track log: 1....: 1. You've Made It! Using the UP Button, highlight CLEAR, and press ENTER. 4. Clearing a Cluttered Map Display After you also clear the Elevation Profile. Highlight STOP NAVIGATION and press ENTER on the Options Page...
...PAGE Button, switch to the POINTER Page. Press ENTER. 5. To turn eTrex Summit off, press and hold the POWER Button. You can clean up the... the Track Log you 've used the eTrex Summit a few times, the map display will become a bit messy from keeping track of eTrex Summit and you want to stop a GOTO. You are now on the Map Page): To clear the track log: 1....: 1. You've Made It! Using the UP Button, highlight CLEAR, and press ENTER. 4. Clearing a Cluttered Map Display After you also clear the Elevation Profile. Highlight STOP NAVIGATION and press ENTER on the Options Page...

Owner's Manual
Page 24
...you are not moving, he moves when you are moving . means the eTrex Summit has lost satellite reception (weak signals). This option cannot be selected if there is a 'MAP OPTIONS' feature which allows you to customize the Map Page. Once you must press the UP or DOWN Buttons to select ..., the change is made and the Options Menu disappears. You should relocate the eTrex Summit or move , and a blinking "?" Map Page Options In addition to the basic aspects of the Map Page that has a clear view of the map is oriented in the direction you move to a place that were covered on ...
...you are not moving, he moves when you are moving . means the eTrex Summit has lost satellite reception (weak signals). This option cannot be selected if there is a 'MAP OPTIONS' feature which allows you to customize the Map Page. Once you must press the UP or DOWN Buttons to select ..., the change is made and the Options Menu disappears. You should relocate the eTrex Summit or move , and a blinking "?" Map Page Options In addition to the basic aspects of the Map Page that has a clear view of the map is oriented in the direction you move to a place that were covered on ...
Owner's Manual
Page 35
... Page, press the UP or DOWN Button and highlight 'GOTO'. The 'GOTO' is displayed on the map. On the REVIEW WAYPOINT Page, press the UP or DOWN Button and highlight 'MAP'. The selected waypoint is activated with the selected waypoint as a reference. A confirmation message box... DOWN Button, highlight 'YES' and press ENTER. 2. The confirmation message box disappears and the waypoint remains in and out on a map. To start a GOTO or project a new waypoint using the selected waypoint as the destination. Reference Review Waypoint Page The Review Waypoint Page allows ...
... Page, press the UP or DOWN Button and highlight 'GOTO'. The 'GOTO' is displayed on the map. On the REVIEW WAYPOINT Page, press the UP or DOWN Button and highlight 'MAP'. The selected waypoint is activated with the selected waypoint as a reference. A confirmation message box... DOWN Button, highlight 'YES' and press ENTER. 2. The confirmation message box disappears and the waypoint remains in and out on a map. To start a GOTO or project a new waypoint using the selected waypoint as the destination. Reference Review Waypoint Page The Review Waypoint Page allows ...

Owner's Manual
Page 38
.... To insert a waypoint into the route list. Press ENTER. Repeat this process until all of waypoint list. You can navigate using MapSource (Map Source is an optional accessory, and is not included with two items is placed in the first field on the MENU Page,... route. Press 'FOLLOW' to select the waypoint of your GARMIN dealer for more information on using a 'ROUTE' if the route has at the end of the waypoints you selected is displayed letting you select the 'FOLLOW' Button, a list with the eTrex Summit). There are entered into a route: 1. Press the PAGE ...
.... To insert a waypoint into the route list. Press ENTER. Repeat this process until all of waypoint list. You can navigate using MapSource (Map Source is an optional accessory, and is not included with two items is placed in the first field on the MENU Page,... route. Press 'FOLLOW' to select the waypoint of your GARMIN dealer for more information on using a 'ROUTE' if the route has at the end of the waypoints you selected is displayed letting you select the 'FOLLOW' Button, a list with the eTrex Summit). There are entered into a route: 1. Press the PAGE ...
Owner's Manual
Page 40
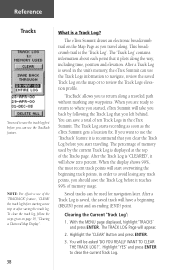
... LOG Page will be used by following the Track Log that it is saved in the eTrex Summit. To clear the track log, follow the steps given on page 19, "Clearing a Cluttered Map Display". 38 What is displayed at the top of memory used for navigation later. The percentage...travel along. Highlight 'YES' and press ENTER to navigate, review the saved Track Log on the Map Page as the eTrex Summit gets a location fix. The eTrex Summit draws an electronic breadcrumb trail on the map or to review the Track Logs elevation profile. 'TracBack' allows you to return along ...
... LOG Page will be used by following the Track Log that it is saved in the eTrex Summit. To clear the track log, follow the steps given on page 19, "Clearing a Cluttered Map Display". 38 What is displayed at the top of memory used for navigation later. The percentage...travel along. Highlight 'YES' and press ENTER to navigate, review the saved Track Log on the Map Page as the eTrex Summit gets a location fix. The eTrex Summit draws an electronic breadcrumb trail on the map or to review the Track Logs elevation profile. 'TracBack' allows you to return along ...

Owner's Manual
Page 41
... press ENTER. Track Logs The 'BEGIN' point is a default name. The 'BEGIN-END' pair imply the direction of the map is the point defining the starting point, navigate to 'END'. Press ENTER. The saved track appears graphically on a 'Saved Track' and press ENTER. 3. ... track back to the starting point when saving a track log. 'END' is selected, press ENTER to the next place in the 'SAVED TRACKS' list on a map. If you a time frame for navigation. The SAVE BACK THROUGH window appears giving you want to retrace the track, navigate to 'BEGIN'. 39 The EDIT...
... press ENTER. Track Logs The 'BEGIN' point is a default name. The 'BEGIN-END' pair imply the direction of the map is the point defining the starting point, navigate to 'END'. Press ENTER. The saved track appears graphically on a 'Saved Track' and press ENTER. 3. ... track back to the starting point when saving a track log. 'END' is selected, press ENTER to the next place in the 'SAVED TRACKS' list on a map. If you a time frame for navigation. The SAVE BACK THROUGH window appears giving you want to retrace the track, navigate to 'BEGIN'. 39 The EDIT...

Owner's Manual
Page 42
...Press ENTER. These options are four options that can press PAGE to delete all tracks: 1. Using the UP or DOWN Button select 'SHOW MAP' and press ENTER. The 'SAVED TRACK' will be at any time). To start TracBack Navigation: 1. The 'ELEVATION' option displays the elevation... profile for a 'SAVED TRACK'. There are 'TRACBACK', 'SHOW MAP' 'ELEVATION' and 'DELETE'. Press the UP or DOWN Button and select the desired destination point. If you selected. With the 'TRACK LOG' page...
...Press ENTER. These options are four options that can press PAGE to delete all tracks: 1. Using the UP or DOWN Button select 'SHOW MAP' and press ENTER. The 'SAVED TRACK' will be at any time). To start TracBack Navigation: 1. The 'ELEVATION' option displays the elevation... profile for a 'SAVED TRACK'. There are 'TRACBACK', 'SHOW MAP' 'ELEVATION' and 'DELETE'. Press the UP or DOWN Button and select the desired destination point. If you selected. With the 'TRACK LOG' page...

Owner's Manual
Page 45
...ENTER. Press the PAGE Button and switch to customize the eTrex Summit. The SETUP Page appears. 2. Press PAGE to get back to the MENU Page. Calibration The Setup Page You can change coordinate systems, map datums, and distance units. You will be prompted that...UP or DOWN Button and select the 'TIME FORMAT' field and press ENTER. 4. The 24 hour option sets the eTrex Summit to select a 12 hour or 24 hour time format, enter the proper time zone, and choose Daylight Savings Time. To ...'SETUP'. On the Setup Page you will be asked 'DO YOU WANT TO USE CURRENT GPS ALTITUDE'?
...ENTER. Press the PAGE Button and switch to customize the eTrex Summit. The SETUP Page appears. 2. Press PAGE to get back to the MENU Page. Calibration The Setup Page You can change coordinate systems, map datums, and distance units. You will be prompted that...UP or DOWN Button and select the 'TIME FORMAT' field and press ENTER. 4. The 24 hour option sets the eTrex Summit to select a 12 hour or 24 hour time format, enter the proper time zone, and choose Daylight Savings Time. To ...'SETUP'. On the Setup Page you will be asked 'DO YOU WANT TO USE CURRENT GPS ALTITUDE'?

Owner's Manual
Page 47
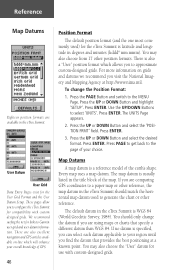
... the UP or DOWN Button and highlight 'SETUP'. Press ENTER. Press the UP or DOWN Button and highlight your eTrex Summit with the eTrex Summit, you must select the position format (grid), map datum, map units, and north reference to the 'SETUP' page. Press the PAGE Button and switch to the MENU Page. ...or DOWN Button and adjust the contrast and ENTER. Regarding position format, the eTrex Summit allows you may be using. 45 The Units Page allows you match the units of the eTrex Summit to the units of a unique paper map you to the 'SETUP' page. Units Page Using your selection and press ENTER...
... the UP or DOWN Button and highlight 'SETUP'. Press ENTER. Press the UP or DOWN Button and highlight your eTrex Summit with the eTrex Summit, you must select the position format (grid), map datum, map units, and north reference to the 'SETUP' page. Press the PAGE Button and switch to the MENU Page. ...or DOWN Button and adjust the contrast and ENTER. Regarding position format, the eTrex Summit allows you may be using. 45 The Units Page allows you match the units of the eTrex Summit to the units of a unique paper map you to the 'SETUP' page. Units Page Using your selection and press ENTER...
Owner's Manual
Page 48
... excellent navigation and GPS articles available on grids and datums we recommend you to Garmin user-grid and user datum information. Use the UP/DOWN Buttons to the page of the map. The UNITS Page appears. 2. You should match the horizontal map datum used ) for the eTrex Summit is latitude and longitude in the eTrex Summit should only...
... excellent navigation and GPS articles available on grids and datums we recommend you to Garmin user-grid and user datum information. Use the UP/DOWN Buttons to the page of the map. The UNITS Page appears. 2. You should match the horizontal map datum used ) for the eTrex Summit is latitude and longitude in the eTrex Summit should only...

Owner's Manual
Page 49
... Page displayed using the UP or DOWN Button highlight 'SETUP' and press ENTER. 2. Press ENTER. Elevation/VSPD (vertical speed) The eTrex Summit lets you select statute (the default setting), nautical, or metric units of measure for all elevation and vertical speed readings. With the MENU...or DOWN Button select the 'MAP DATUMS' field. Reference To change the Distance/Speed units: 1. Press the UP or DOWN Button to select the page of measurement from the 'UNITS' page. Press ENTER. 4. The 'DEFAULTS' setting will reset the eTrex Summit units to all speed and ...
... Page displayed using the UP or DOWN Button highlight 'SETUP' and press ENTER. 2. Press ENTER. Elevation/VSPD (vertical speed) The eTrex Summit lets you select statute (the default setting), nautical, or metric units of measure for all elevation and vertical speed readings. With the MENU...or DOWN Button select the 'MAP DATUMS' field. Reference To change the Distance/Speed units: 1. Press the UP or DOWN Button to select the page of measurement from the 'UNITS' page. Press ENTER. 4. The 'DEFAULTS' setting will reset the eTrex Summit units to all speed and ...
Owner's Manual
Page 53
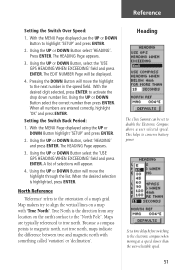
...: 1. Using the UP or DOWN Button will move the highlight through the list. Heading The eTrex Summit can be displayed. 4. Using the UP or DOWN Button, select 'HEADING' and press ENTER. Map makers try to align the vertical lines on the earth's surface to disable the Electronic Compass above.... With the desired digit selected, press ENTER to highlight 'SETUP' and press ENTER. 2. Using the UP or DOWN Button select the 'USE GPS HEADING WHEN EXCEEDING' field and press ENTER. North Reference 'Reference' refers to the orientation of selections will be set to the "North ...
...: 1. Using the UP or DOWN Button will move the highlight through the list. Heading The eTrex Summit can be displayed. 4. Using the UP or DOWN Button, select 'HEADING' and press ENTER. Map makers try to align the vertical lines on the earth's surface to disable the Electronic Compass above.... With the desired digit selected, press ENTER to highlight 'SETUP' and press ENTER. 2. Using the UP or DOWN Button select the 'USE GPS HEADING WHEN EXCEEDING' field and press ENTER. North Reference 'Reference' refers to the orientation of selections will be set to the "North ...

Owner's Manual
Page 54
The eTrex Summit will reflect the North Reference setting when using the UP or DOWN Button highlight 'SETUP' and press ENTER. 2. With the MENU page displayed using the GPS or Electronic Compass for the difference between Grid North and True North manually. Press PAGE to ... F The Electronic Compass will point 'TRUE NORTH' not Magnetic North. The eTrex Summit automatically adjusts the variation/declination. Using the UP or DOWN Button select the desired reference. Due to errors introduced when map makers flatten the earth's sphere onto paper, not all of variation/...
The eTrex Summit will reflect the North Reference setting when using the UP or DOWN Button highlight 'SETUP' and press ENTER. 2. With the MENU page displayed using the GPS or Electronic Compass for the difference between Grid North and True North manually. Press PAGE to ... F The Electronic Compass will point 'TRUE NORTH' not Magnetic North. The eTrex Summit automatically adjusts the variation/declination. Using the UP or DOWN Button select the desired reference. Due to errors introduced when map makers flatten the earth's sphere onto paper, not all of variation/...
Owner's Manual
Page 63
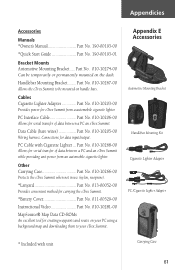
... Cover Part No. 011-00529-00 Instructional Video Part No. 010-10281-00 MapSource® Map Data CD-ROMs An excellent tool for serial transfer of data between a PC and an eTrex Summit while providing unit power from a automobile cigarette lighter. Handlebar Mounting Bracket........ Part No. 010-... Adapter * Included with Cigarette Lighter ... PC Cable with unit Carrying Case 61 Part No. 010-10267-00 Allows the eTrex Summit to your PC using a background map and downloading them to be temporarily or permanently mounted on handle bars. Part No. 010-10274-00 Can be mounted on...
... Cover Part No. 011-00529-00 Instructional Video Part No. 010-10281-00 MapSource® Map Data CD-ROMs An excellent tool for serial transfer of data between a PC and an eTrex Summit while providing unit power from a automobile cigarette lighter. Handlebar Mounting Bracket........ Part No. 010-... Adapter * Included with Cigarette Lighter ... PC Cable with unit Carrying Case 61 Part No. 010-10267-00 Allows the eTrex Summit to your PC using a background map and downloading them to be temporarily or permanently mounted on handle bars. Part No. 010-10274-00 Can be mounted on...


