Owner's Manual
Page 3
... for navigation. If any pieces are missing, contact your unit. Keep the original sales receipt, or a photocopy, in a safe place. Tips and Shortcuts • To quickly return to www.garmin.com/support/ and click Product Support. Friday, 8 AM-5 PM Central Time; Connect to http://buy.garmin.com. In Europe, contact Garmin (Europe) Ltd. GPSMAP 76CSx Owner...
... for navigation. If any pieces are missing, contact your unit. Keep the original sales receipt, or a photocopy, in a safe place. Tips and Shortcuts • To quickly return to www.garmin.com/support/ and click Product Support. Friday, 8 AM-5 PM Central Time; Connect to http://buy.garmin.com. In Europe, contact Garmin (Europe) Ltd. GPSMAP 76CSx Owner...
Owner's Manual
Page 6
... the State of certain electronics. See � www.garmin.com/prop65 for any discrepancies or questions before continuing navigation. • Use the electronic chart in the unit ...navigation sources, including information from visual sightings, and maps. For more information. Introduction Warnings Failure to avoid the following potentially hazardous situations could result in an accident or collision resulting in death or serious injury. • When navigating, carefully compare information displayed on the applicability to this unit only as a navigational aid. iv GPSMAP 76CSx...
... the State of certain electronics. See � www.garmin.com/prop65 for any discrepancies or questions before continuing navigation. • Use the electronic chart in the unit ...navigation sources, including information from visual sightings, and maps. For more information. Introduction Warnings Failure to avoid the following potentially hazardous situations could result in an accident or collision resulting in death or serious injury. • When navigating, carefully compare information displayed on the applicability to this unit only as a navigational aid. iv GPSMAP 76CSx...
Owner's Manual
Page 12
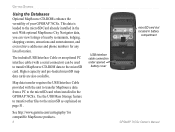
...the unit. This data is loaded to the microSD card. With optional MapSource City Navigator data, you can be used to transfer MapSource CD-ROM data to the microSD Card already installed in the GPSMAP 76CSx. Higher capacity and pre-loaded microSD map data cards are also available. The ...included USB Interface Cable or an optional PC interface cable (with the unit to transfer MapSource data from a PC to the microSD as explained on page 51. See http://www.garmin.com/cartography...
...the unit. This data is loaded to the microSD card. With optional MapSource City Navigator data, you can be used to transfer MapSource CD-ROM data to the microSD Card already installed in the GPSMAP 76CSx. Higher capacity and pre-loaded microSD map data cards are also available. The ...included USB Interface Cable or an optional PC interface cable (with the unit to transfer MapSource data from a PC to the microSD as explained on page 51. See http://www.garmin.com/cartography...

Owner's Manual
Page 18
... items near the item. 12 GPSMAP 76CSx Owner's Manual Use the ROCKER to , and press ENTER. 4. Select Recent Finds. See page 9. • Find Near Here-return to the Find Menu to or adding an item. Use the ROCKER to select the item you are selecting an item to navigate to search for a more... Options Menu: 1. With an information page open the Options Menu. 2. Press FIND. 2. Each information page contains three on whether you want to go to begin navigation.
... items near the item. 12 GPSMAP 76CSx Owner's Manual Use the ROCKER to , and press ENTER. 4. Select Recent Finds. See page 9. • Find Near Here-return to the Find Menu to or adding an item. Use the ROCKER to select the item you are selecting an item to navigate to search for a more... Options Menu: 1. With an information page open the Options Menu. 2. Press FIND. 2. Each information page contains three on whether you want to go to begin navigation.

Owner's Manual
Page 20
...list of all saved waypoints. GPSMAP 76CSx Owner's Manual To find a geocache: 1. Press FIND. 2. Waypoints icon 14 Finding a Geocache Select Geocache to separate it from your computer. Select Go To to navigate to highlight a geocache on to Geocache Navigation mode and any additional information... is shown in alphanumeric order and are stored in the comment field. Waypoints are identified by you navigate to a geocache, the Compass page changes to http://my.garmin.com and click "Go Geocaching." You can view found . 3. For more information about downloaded cache...
...list of all saved waypoints. GPSMAP 76CSx Owner's Manual To find a geocache: 1. Press FIND. 2. Waypoints icon 14 Finding a Geocache Select Geocache to separate it from your computer. Select Go To to navigate to highlight a geocache on to Geocache Navigation mode and any additional information... is shown in alphanumeric order and are stored in the comment field. Waypoints are identified by you navigate to a geocache, the Compass page changes to http://my.garmin.com and click "Go Geocaching." You can view found . 3. For more information about downloaded cache...

Owner's Manual
Page 27
... TracBack. 3. Elevation Begin marker End marker Distance from Begin and End points Track Profile Page Navigating a Saved Track To use the ROCKER to move the pointer to the point on a saved track: 1. GPSMAP 76CSx Owner's Manual 21 Select the point to exit. Move in the direction of the first turn on , until you...
... TracBack. 3. Elevation Begin marker End marker Distance from Begin and End points Track Profile Page Navigating a Saved Track To use the ROCKER to move the pointer to the point on a saved track: 1. GPSMAP 76CSx Owner's Manual 21 Select the point to exit. Move in the direction of the first turn on , until you...

Owner's Manual
Page 28
... 50 routes with a graphic of the turn. 22 GPSMAP 76CSx Owner's Manual To create a route: 1. Select Navigate . Turns on a Route page, the GPSMAP 76CSx uses a route made of waypoints or Find Menu items. It navigates directly from one of the Find groups. 4. Route Page Route on the Routing Setup page. Methods for...8226; If you select Go To on the Waypoint page, or other Find items, a straight path is created. • If you select Navigate when on roadways are preceded by a guidance message with up to 250 points each. Auto-routing uses roadways in the map database to automatically ...
... 50 routes with a graphic of the turn. 22 GPSMAP 76CSx Owner's Manual To create a route: 1. Select Navigate . Turns on a Route page, the GPSMAP 76CSx uses a route made of waypoints or Find Menu items. It navigates directly from one of the Find groups. 4. Route Page Route on the Routing Setup page. Methods for...8226; If you select Go To on the Waypoint page, or other Find items, a straight path is created. • If you select Navigate when on roadways are preceded by a guidance message with up to 250 points each. Auto-routing uses roadways in the map database to automatically ...

Owner's Manual
Page 29
..."Follow Road" or "Off Road." Select Navigate to scroll through all turns. To view an individual turn, select it. Use the ROCKER to begin navigation. 3. Active Route Page when following roads Turn Preview Page 4. GPSMAP 76CSx Owner's Manual 23 A "Calculating Route" ...message appears until the route calculation is enabled when using City Navigator® mapping data. Press QUIT to view...
..."Follow Road" or "Off Road." Select Navigate to scroll through all turns. To view an individual turn, select it. Use the ROCKER to begin navigation. 3. Active Route Page when following roads Turn Preview Page 4. GPSMAP 76CSx Owner's Manual 23 A "Calculating Route" ...message appears until the route calculation is enabled when using City Navigator® mapping data. Press QUIT to view...

Owner's Manual
Page 30
... > Routes > MENU. 2. Select Manual or Distance when advancing to the next point. 24 Select Distance to enter a radius so that route, press MENU > Delete Route. GPSMAP 76CSx Owner's Manual Select Save, Map, or Go To. Select Off Road Transition > Route Leg Transition. 3. Press MENU twice > Routes. 2. Select a saved route > select a point on... a saved route > select the route name field at the bottom of the page. • Restore Defaults-restore route settings to the next waypoint anytime while navigating a route. To change the route name, and review route points.
... > Routes > MENU. 2. Select Manual or Distance when advancing to the next point. 24 Select Distance to enter a radius so that route, press MENU > Delete Route. GPSMAP 76CSx Owner's Manual Select Save, Map, or Go To. Select Off Road Transition > Route Leg Transition. 3. Press MENU twice > Routes. 2. Select a saved route > select a point on... a saved route > select the route name field at the bottom of the page. • Restore Defaults-restore route settings to the next waypoint anytime while navigating a route. To change the route name, and review route points.

Owner's Manual
Page 31
...the QUIT key to reverse. The Active Route page appears when you are actively navigating. Cycle through these pages by using the Page Sequence option on the Main Menu. To view the Options Menu for the Main Menu GPSMAP 76CSx Owner's Manual 25 Satellite Page Trip Computer Page Map Page Compass Page Altimeter... Options Menu Altimeter Page Options Menu No Options Available for a page, press MENU. Each page has an Options Menu. Main Pages Main Pages The GPSMAP 76CSx has six main pages: Satellite page, Trip Computer page, Map page, Compass page, Altimeter page, and the Main Menu.
...the QUIT key to reverse. The Active Route page appears when you are actively navigating. Cycle through these pages by using the Page Sequence option on the Main Menu. To view the Options Menu for the Main Menu GPSMAP 76CSx Owner's Manual 25 Satellite Page Trip Computer Page Map Page Compass Page Altimeter... Options Menu Altimeter Page Options Menu No Options Available for a page, press MENU. Each page has an Options Menu. Main Pages Main Pages The GPSMAP 76CSx has six main pages: Satellite page, Trip Computer page, Map page, Compass page, Altimeter page, and the Main Menu.

Owner's Manual
Page 33
...list of the Map page. press OUT to show an area with less detail. Press ENTER. 3. Press MENU > Change Data Fields. travel and navigational information. Select the number of you can view marine navaids, wrecks, obstructions, and anchorage locations. Select the Map Setup-information page. Move to keep..., "overzoom" appears under the Zoom Range When using optional MapSource data. A check mark means a map is highlighted. 2. Main Pages ROCKER, the GPSMAP 76CSx enters pan mode, Using Additional Map Data which moves the map to the next field and repeat.
...list of the Map page. press OUT to show an area with less detail. Press ENTER. 3. Press MENU > Change Data Fields. travel and navigational information. Select the number of you can view marine navaids, wrecks, obstructions, and anchorage locations. Select the Map Setup-information page. Move to keep..., "overzoom" appears under the Zoom Range When using optional MapSource data. A check mark means a map is highlighted. 2. Main Pages ROCKER, the GPSMAP 76CSx enters pan mode, Using Additional Map Data which moves the map to the next field and repeat.

Owner's Manual
Page 34
...Options • Stop (Resume) Navigation-stops/resumes navigation. • Recalculate-recalculates a route. • Data Fields-opens the Show sub menu so you can block road details. • Restore Defaults-returns to select the type of data in the data fields. GPSMAP 76CSx Owner's Manual This option is ... message shows until you select Always Show, a guidance message always appears. Guidance Text When navigating, guidance text appears above the map. measures the distance from your next navigation move. • Setup Map-accesses to show guidance text: 1. Setup Map See page 42 ...
...Options • Stop (Resume) Navigation-stops/resumes navigation. • Recalculate-recalculates a route. • Data Fields-opens the Show sub menu so you can block road details. • Restore Defaults-returns to select the type of data in the data fields. GPSMAP 76CSx Owner's Manual This option is ... message shows until you select Always Show, a guidance message always appears. Guidance Text When navigating, guidance text appears above the map. measures the distance from your next navigation move. • Setup Map-accesses to show guidance text: 1. Setup Map See page 42 ...
Owner's Manual
Page 36
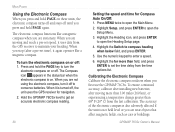
...accurate electronic compass reading. 30 Setting the speed and time for navigation. 2. Highlight the Switch to open the Setup Menu. 3. Calibrating the Electronic Compass Calibrate the electronic compass outdoors when you first use the GPSMAP 76CSx. When you stop (after moving and reach a pre-set ...installing new batteries, after a pre-set the time delay from the last calibration. The electronic compass functions like a magnetic compass. GPSMAP 76CSx Owner's Manual Main Pages Using the Electronic Compass When you press and hold PAGE on these units, the electronic compass turns off ...
...accurate electronic compass reading. 30 Setting the speed and time for navigation. 2. Highlight the Switch to open the Setup Menu. 3. Calibrating the Electronic Compass Calibrate the electronic compass outdoors when you first use the GPSMAP 76CSx. When you stop (after moving and reach a pre-set ...installing new batteries, after a pre-set the time delay from the last calibration. The electronic compass functions like a magnetic compass. GPSMAP 76CSx Owner's Manual Main Pages Using the Electronic Compass When you press and hold PAGE on these units, the electronic compass turns off ...

Owner's Manual
Page 37
... ENTER, and follow on-screen directions for holding and turning the unit. • A message appears notifying you to adjust your sight. • Stop (Resume) Navigation-turns active navigation for a route or Go To on and off. • Recalculate-recalculates the path to a destination. • Course or Bearing Pointer-toggles between the course.... Press MENU > Calibrate Compass. 2. Press ENTER to return to an object within your turning speed as needed. Main Pages Compass Page Options • Sight 'N Go-navigate to the Compass page. GPSMAP 76CSx Owner's Manual 31
... ENTER, and follow on-screen directions for holding and turning the unit. • A message appears notifying you to adjust your sight. • Stop (Resume) Navigation-turns active navigation for a route or Go To on and off. • Recalculate-recalculates the path to a destination. • Course or Bearing Pointer-toggles between the course.... Press MENU > Calibrate Compass. 2. Press ENTER to return to an object within your turning speed as needed. Main Pages Compass Page Options • Sight 'N Go-navigate to the Compass page. GPSMAP 76CSx Owner's Manual 31

Owner's Manual
Page 38
Main Pages Sight 'N Go Navigation To use Sight 'N Go to the destination. 32 GPSMAP 76CSx Owner's Manual Select Set Course. 4. If the bearing pointer arrow is pointing straight up and then continue in -line with the sighting mark on a course ... a guide. If it points any direction other than up, turn toward that direction until the arrow is in that direction. The bearing pointer points to navigate: 1. Hold the unit at eye level and line up the two sighting marks with pointer is pointing up , for guidance. Begin traveling to your relationship...
Main Pages Sight 'N Go Navigation To use Sight 'N Go to the destination. 32 GPSMAP 76CSx Owner's Manual Select Set Course. 4. If the bearing pointer arrow is pointing straight up and then continue in -line with the sighting mark on a course ... a guide. If it points any direction other than up, turn toward that direction until the arrow is in that direction. The bearing pointer points to navigate: 1. Hold the unit at eye level and line up the two sighting marks with pointer is pointing up , for guidance. Begin traveling to your relationship...

Owner's Manual
Page 44
.... • Change Data Fields-allows you to select the type of many data information options. Trip Computer Page Options • Reset-stars a new record of navigation data. Before each trip, reset the trip information by highlighting Reset from the Options Menu, and pressing ENTER. This page allows you to return the... show in three large data fields. When the data field title is selectable and can contain one of data you want to factory settings. 38 GPSMAP 76CSx Owner's Manual Main Pages Trip Computer Page The Trip Computer page shows eight types of the trip computer.
.... • Change Data Fields-allows you to select the type of many data information options. Trip Computer Page Options • Reset-stars a new record of navigation data. Before each trip, reset the trip information by highlighting Reset from the Options Menu, and pressing ENTER. This page allows you to return the... show in three large data fields. When the data field title is selectable and can contain one of data you want to factory settings. 38 GPSMAP 76CSx Owner's Manual Main Pages Trip Computer Page The Trip Computer page shows eight types of the trip computer.

Owner's Manual
Page 49
... toward the top of the page. • Below-sets the map scale at which active track logs are shown on the nearest road, compensating for navigating a track. Main Menu • Lock On Road-locks the map pointer to include the beginning and ending points of a route. • Detail-selects the degree...; Orientation-selects how the map is shown. Map Setup - General page contains the settings for Saved Tracks, Track Log, Track Points, and Go To Line. GPSMAP 76CSx Owner's Manual 43 General Page The Map Setup - Map Setup -
... toward the top of the page. • Below-sets the map scale at which active track logs are shown on the nearest road, compensating for navigating a track. Main Menu • Lock On Road-locks the map pointer to include the beginning and ending points of a route. • Detail-selects the degree...; Orientation-selects how the map is shown. Map Setup - General page contains the settings for Saved Tracks, Track Log, Track Points, and Go To Line. GPSMAP 76CSx Owner's Manual 43 General Page The Map Setup - Map Setup -

Owner's Manual
Page 53
... to the electronic compass. • for , mapping, and navigation and is not an actual map in which a location is shown. • Map Datum-sets the description for geographic location for more than...-enter a time limit to switch to compass heading when below- GPSMAP 76CSx Owner's Manual 47 Heading Setup Page To access the...
... to the electronic compass. • for , mapping, and navigation and is not an actual map in which a location is shown. • Map Datum-sets the description for geographic location for more than...-enter a time limit to switch to compass heading when below- GPSMAP 76CSx Owner's Manual 47 Heading Setup Page To access the...
Owner's Manual
Page 62
.../MOB key 3 find menu city 15 geocache 14 intersection 16 interstate exit 15 waypoints 14 G games 48 geochache 14, 46 GPS off road transition 24 GPSMAP 76CSx Owner's Manual gate 32 hunt and fish 13 I In/Out zoom keys 3 initializing the GPS 4 interfacing 50 intersections 16 J Jumpmaster 48 L language 40...card 19 M man overboard (MOB) 10 map page options 28 setup 42 MapSource 6 marine alarms setup 46 measuring distance 29 Menu key 3 messages 5 N navigating routes 23 saved tracks 21 new location 26 O off /on 40 guidance text 28 H heading setup 47 highway page 39 How To project a waypoint 9 use...
.../MOB key 3 find menu city 15 geocache 14 intersection 16 interstate exit 15 waypoints 14 G games 48 geochache 14, 46 GPS off road transition 24 GPSMAP 76CSx Owner's Manual gate 32 hunt and fish 13 I In/Out zoom keys 3 initializing the GPS 4 interfacing 50 intersections 16 J Jumpmaster 48 L language 40...card 19 M man overboard (MOB) 10 map page options 28 setup 42 MapSource 6 marine alarms setup 46 measuring distance 29 Menu key 3 messages 5 N navigating routes 23 saved tracks 21 new location 26 O off /on 40 guidance text 28 H heading setup 47 highway page 39 How To project a waypoint 9 use...

Owner's Manual
Page 63
... 9 Power key 3 preview turns 23 proximity alarms 10 proximity waypoints 9 Q Quit key 3 R Rocker key 3 routes auto-routing 23 creating 22 methods for routing 22 navigating 23 setup 45 S satellite page 4, 26 saved tracks 19 setup map 42 Sight 'N Go 32 status bar 5 stopwatch 48 storage 52 sun and moon 13...28 trip computer 38 turning on/off 4 U units setup 47 USB mass storage 41 W warranty 53 water immersion 52 waypoints 7, 8 averaging location 8 creating 7 current location 7 GPSMAP 76CSx Owner's Manual editing 8 finding 14 MOB 10 projecting 9 proximity 9 using 7 Z zoom ranges 20, 34 Index 57
... 9 Power key 3 preview turns 23 proximity alarms 10 proximity waypoints 9 Q Quit key 3 R Rocker key 3 routes auto-routing 23 creating 22 methods for routing 22 navigating 23 setup 45 S satellite page 4, 26 saved tracks 19 setup map 42 Sight 'N Go 32 status bar 5 stopwatch 48 storage 52 sun and moon 13...28 trip computer 38 turning on/off 4 U units setup 47 USB mass storage 41 W warranty 53 water immersion 52 waypoints 7, 8 averaging location 8 creating 7 current location 7 GPSMAP 76CSx Owner's Manual editing 8 finding 14 MOB 10 projecting 9 proximity 9 using 7 Z zoom ranges 20, 34 Index 57


