Technical Reference for Garmin NMEA 2000 Products
Page 12
... location. NMEA 2000 devices must be connected to power to consider: Cable Type: Garmin uses NMEA 2000 micro connectors for Garmin NMEA 2000 Products Existing NMEA 2000 Installation Considerations If your boat has an existing NMEA 2000 installation, and you would like to add Garmin NMEA 2000 equipment, there are a few things to function correctly (page 5). Power: Is the existing NMEA 2000 network connected to the NMEA 2000 backbone. Do not add more terminators to connect NMEA...
... location. NMEA 2000 devices must be connected to power to consider: Cable Type: Garmin uses NMEA 2000 micro connectors for Garmin NMEA 2000 Products Existing NMEA 2000 Installation Considerations If your boat has an existing NMEA 2000 installation, and you would like to add Garmin NMEA 2000 equipment, there are a few things to function correctly (page 5). Power: Is the existing NMEA 2000 network connected to the NMEA 2000 backbone. Do not add more terminators to connect NMEA...
Technical Reference for Garmin NMEA 2000 Products
Page 13
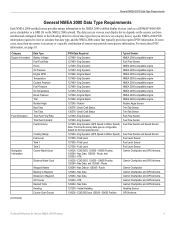
... Garmin Chartplotter and GPS Antenna Heading Sensor GPS Antenna Technical Reference for a list of sensors may provide more-precise information. For more than one sensor is configurable, based on the fuel speed source 127489 - Category Engine Information Fuel Information Data Type Battery Voltage Fuel Flow Rate Hours Oil Pressure Engine RPM Temperature Coolant Pressure Fuel Pressure Oil Temperature Boost Pressure Trim Rudder Angle Bow Tabs Trim Tabs Total Fuel Flow Rate Total Fuel Onboard Fuel Economy Navigation Information (Continued) Cruising Range Fuel Level Tank 1 Tank 2 Course...
... Garmin Chartplotter and GPS Antenna Heading Sensor GPS Antenna Technical Reference for a list of sensors may provide more-precise information. For more than one sensor is configurable, based on the fuel speed source 127489 - Category Engine Information Fuel Information Data Type Battery Voltage Fuel Flow Rate Hours Oil Pressure Engine RPM Temperature Coolant Pressure Fuel Pressure Oil Temperature Boost Pressure Trim Rudder Angle Bow Tabs Trim Tabs Total Fuel Flow Rate Total Fuel Onboard Fuel Economy Navigation Information (Continued) Cruising Range Fuel Level Tank 1 Tank 2 Course...
Important Safety and Product Information
Page 4
... products or services that are not eligible for shipping instructions and an RMA tracking number. Securely pack the device and a copy of the original sales receipt, which is required as a travel aid and must be used in the United States or Canada must not be returned to repair or replace (with a new or newly-overhauled replacement product) the device or software or...
... products or services that are not eligible for shipping instructions and an RMA tracking number. Securely pack the device and a copy of the original sales receipt, which is required as a travel aid and must be used in the United States or Canada must not be returned to repair or replace (with a new or newly-overhauled replacement product) the device or software or...
XM Supplement
Page 17
... location. XM Radio U.S. This product was developed using the DAFIF product. Title, ownership rights, and intellectual property rights in Garmin and/or its third-party providers. Hardware and required monthly subscription sold separately. XM WX weather data displays and individual product availability vary by the National Geospatial-Intelligence Agency, or the United States Department of XM Satellite Radio Inc. 700 Series...
... location. XM Radio U.S. This product was developed using the DAFIF product. Title, ownership rights, and intellectual property rights in Garmin and/or its third-party providers. Hardware and required monthly subscription sold separately. XM WX weather data displays and individual product availability vary by the National Geospatial-Intelligence Agency, or the United States Department of XM Satellite Radio Inc. 700 Series...
Installation Instructions
Page 2
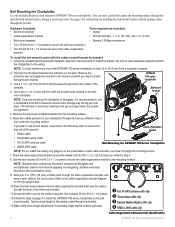
... mm M 3.5 × 1.3 screws to secure the cable-organization bracket to bail mount the GPSMAP 700 series chartplotter. GPSMAP 700 series chartplotter 3. Use a use all fit correctly: Cable-organization bracket • Radar cable • Power/data wiring cable • GA 30 GPS antenna cable • NMEA 2000 cable Bail-Mounting the GPSMAP 700 Series Chartplotter NOTE: Do not install the locking ring (page 4) on installing the bail-mount bracket without routing cables through the bracket. 13.Make cable slack-length adjustments if necessary. This will help to avoid...
... mm M 3.5 × 1.3 screws to secure the cable-organization bracket to bail mount the GPSMAP 700 series chartplotter. GPSMAP 700 series chartplotter 3. Use a use all fit correctly: Cable-organization bracket • Radar cable • Power/data wiring cable • GA 30 GPS antenna cable • NMEA 2000 cable Bail-Mounting the GPSMAP 700 Series Chartplotter NOTE: Do not install the locking ring (page 4) on installing the bail-mount bracket without routing cables through the bracket. 13.Make cable slack-length adjustments if necessary. This will help to avoid...

Installation Instructions
Page 5
... power/data cable to use the fuse block on the boat, route the positive connection through the fuse, as a DSC or AIS device. The alarm circuit switches to determine the polarity of the voltage source. 2. To 10-32 Vdc boat supply 23A 3. Battery Wire color 10-32 Vdc Wire function Fuse 3 A Red (power) Power Black (ground) Power ground NMEA Ground > Blue (out) NMEA Rx/A (+) > Brown (in ) wires for more information. Set the serial port (or ports) on the diagram.) 3 A fuse Boat ground + - Connecting the Power/Data Cable...
... power/data cable to use the fuse block on the boat, route the positive connection through the fuse, as a DSC or AIS device. The alarm circuit switches to determine the polarity of the voltage source. 2. To 10-32 Vdc boat supply 23A 3. Battery Wire color 10-32 Vdc Wire function Fuse 3 A Red (power) Power Black (ground) Power ground NMEA Ground > Blue (out) NMEA Rx/A (+) > Brown (in ) wires for more information. Set the serial port (or ports) on the diagram.) 3 A fuse Boat ground + - Connecting the Power/Data Cable...
Installation Instructions
Page 6
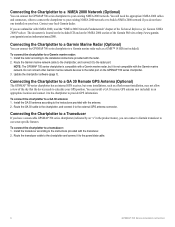
...GPS position. If you can connect the GPSMAP 700 series chartplotter to a Garmin marine radar such as a flush-mount-installation, may not allow a view of the sky that the device needs to calculate your existing NMEA 2000 network. Connecting the Chartplotter to a Garmin Marine Radar (Optional) You can connect a Garmin transducer to the chartplotter, and connect it is located on the included CD and on the GPSMAP 700 series chartplotter. 3. To connect the chartplotter to a transducer: 1. Route the Garmin marine network cable to use sonar-specific features. Do not connect other Garmin...
...GPS position. If you can connect the GPSMAP 700 series chartplotter to a Garmin marine radar such as a flush-mount-installation, may not allow a view of the sky that the device needs to calculate your existing NMEA 2000 network. Connecting the Chartplotter to a Garmin Marine Radar (Optional) You can connect a Garmin transducer to the chartplotter, and connect it is located on the included CD and on the GPSMAP 700 series chartplotter. 3. To connect the chartplotter to a transducer: 1. Route the Garmin marine network cable to use sonar-specific features. Do not connect other Garmin...

Installation Instructions
Page 7
... card. After the cable is seated, turn the locking ring clockwise until it is wired to the boat (and after any optional Garmin radar, NMEA 0183, NMEA 2000, or external GPS devices are installed) connect the cables to the GPSMAP 700 series chartplotter. If so, follow the instructions provided with the card. If a software update SD card is not included, visit www.garmin.com to -date. Carefully press the cable into the correct port on your chartplotter software...
... card. After the cable is seated, turn the locking ring clockwise until it is wired to the boat (and after any optional Garmin radar, NMEA 0183, NMEA 2000, or external GPS devices are installed) connect the cables to the GPSMAP 700 series chartplotter. If so, follow the instructions provided with the card. If a software update SD card is not included, visit www.garmin.com to -date. Carefully press the cable into the correct port on your chartplotter software...

Quick Reference Guide
Page 2
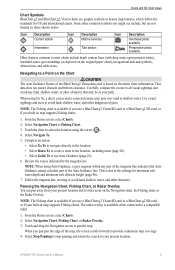
...Home screen, select Charts. 2. An international MOB symbol marks the active MOB point and the chartplotter sets a course back to name the waypoint, select the waypoint on electronic chart information. Adjust the backlight: • Select Auto to allow the chartplotter to a Marine Services Destination CAUTION The Auto Guidance feature of the Auto Guidance line. NOTE: Select Auto to avoid land, shallow water, and other obstacles. Complete an action: • Select Navigation Chart > Menu > Navigation Chart Setup > Chart Appearance > Heading Line. • Select Fishing Chart...
...Home screen, select Charts. 2. An international MOB symbol marks the active MOB point and the chartplotter sets a course back to name the waypoint, select the waypoint on electronic chart information. Adjust the backlight: • Select Auto to allow the chartplotter to a Marine Services Destination CAUTION The Auto Guidance feature of the Auto Guidance line. NOTE: Select Auto to avoid land, shallow water, and other obstacles. Complete an action: • Select Navigation Chart > Menu > Navigation Chart Setup > Chart Appearance > Heading Line. • Select Fishing Chart...

Owner's Manual
Page 4
... Navigation Questions 25 Navigation with a Chartplotter 25 Waypoints 26 Routes 28 Tracks 30 Navigating with a Garmin Autopilot 32 Where To 33 Marine Services Destinations 33 Almanac, On-boat, and Environmental Data 36 Almanac Data 36 On-boat Data 38 Environmental Data 41 Device Configuration 44 Basic Device Configuration Questions 44 Simulator Mode 44 Turning the Chartplotter On Automatically.......44 Display Configuration 45 Navigation Preferences 45 Information about Your Boat 50 Alarms 51 Chartplotter Data Management 52 Radar 54 Transmitting Radar Signals 54 Adjusting...
... Navigation Questions 25 Navigation with a Chartplotter 25 Waypoints 26 Routes 28 Tracks 30 Navigating with a Garmin Autopilot 32 Where To 33 Marine Services Destinations 33 Almanac, On-boat, and Environmental Data 36 Almanac Data 36 On-boat Data 38 Environmental Data 41 Device Configuration 44 Basic Device Configuration Questions 44 Simulator Mode 44 Turning the Chartplotter On Automatically.......44 Display Configuration 45 Navigation Preferences 45 Information about Your Boat 50 Alarms 51 Chartplotter Data Management 52 Radar 54 Transmitting Radar Signals 54 Adjusting...
Owner's Manual
Page 7
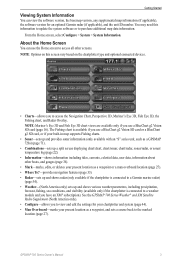
... chartplotter type and optional connected devices. • Charts-allows you use the Home screen to access all other boats, and gauges (page 36). • Mark-marks, edits, or deletes your present location as a waypoint, and sets a course back to the marked location (page 27). From the Home screen, select Configure > System > System Information. GPSMAP 700 Series Owner's Manual 3 Getting Started Viewing System Information You can use a BlueChart g2 Vision SD card (page 16). Note: Mariner's Eye 3D and Fish Eye 3D chart...
... chartplotter type and optional connected devices. • Charts-allows you use the Home screen to access all other boats, and gauges (page 36). • Mark-marks, edits, or deletes your present location as a waypoint, and sets a course back to the marked location (page 27). From the Home screen, select Configure > System > System Information. GPSMAP 700 Series Owner's Manual 3 Getting Started Viewing System Information You can use a BlueChart g2 Vision SD card (page 16). Note: Mariner's Eye 3D and Fish Eye 3D chart...
Owner's Manual
Page 9
... the Auto Guidance line. Select Navigate To. 5. Select Navigation Chart, Fishing Chart, or Radar Overlay. 3. GPSMAP 700 Series Owner's Manual 5 That data does not ensure obstacle and bottom clearance. Note: When using Go To, a direct course and a corrected course may be in white), intertidal zones, spot soundings (as depicted on electronic chart information. Touch and drag the Navigation screen to select the location using the cursor ( ). 4. Charts and 3D Chart Views Chart Symbols BlueChart g2 and BlueChart g2 Vision charts use...
... the Auto Guidance line. Select Navigate To. 5. Select Navigation Chart, Fishing Chart, or Radar Overlay. 3. GPSMAP 700 Series Owner's Manual 5 That data does not ensure obstacle and bottom clearance. Note: When using Go To, a direct course and a corrected course may be in white), intertidal zones, spot soundings (as depicted on electronic chart information. Touch and drag the Navigation screen to select the location using the cursor ( ). 4. Charts and 3D Chart Views Chart Symbols BlueChart g2 and BlueChart g2 Vision charts use...
Owner's Manual
Page 30
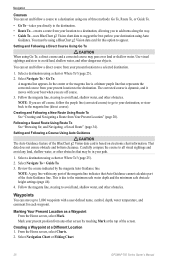
... magenta line, steering to the destination. Marking Your Present Location as a Waypoint From the Home screen, select Mark. Select Navigation Chart or Fishing Chart. 26 GPSMAP 700 Series Owner's Manual Setting and Following a Direct Course Using Go To CAUTION When using a chart or Where To? (page 25). 2. The corrected course is dynamic, and it moves with a user-defined name, symbol, depth, water temperature, and comment for each waypoint. Review the course indicated by touching Mark at a Different Location 1. Creating a Waypoint at...
... magenta line, steering to the destination. Marking Your Present Location as a Waypoint From the Home screen, select Mark. Select Navigation Chart or Fishing Chart. 26 GPSMAP 700 Series Owner's Manual Setting and Following a Direct Course Using Go To CAUTION When using a chart or Where To? (page 25). 2. The corrected course is dynamic, and it moves with a user-defined name, symbol, depth, water temperature, and comment for each waypoint. Review the course indicated by touching Mark at a Different Location 1. Creating a Waypoint at...

Owner's Manual
Page 49
... Time > Turn Transition Time, and enter the time. • Select Distance > Turn Transition Distance, and enter the distance. 3. Configuring Speed Data Sources You can specify the source of the autopilot when navigating a route or an Auto Guidance line with route turns on the GPS Speed, or whether the chartplotter selects a speed data source automatically. • Select Fuel Economy, and indicate whether the speed data that is used to have the chartplotter beep when the screen is available with a preprogrammed BlueChart g2 Vision data card. Setting...
... Time > Turn Transition Time, and enter the time. • Select Distance > Turn Transition Distance, and enter the distance. 3. Configuring Speed Data Sources You can specify the source of the autopilot when navigating a route or an Auto Guidance line with route turns on the GPS Speed, or whether the chartplotter selects a speed data source automatically. • Select Fuel Economy, and indicate whether the speed data that is used to have the chartplotter beep when the screen is available with a preprogrammed BlueChart g2 Vision data card. Setting...

Owner's Manual
Page 51
..., the chartplotter may not reposition the Auto Guidance line, unless the destination selected in calculating heading information. 1. Repeat steps 1-10 at least once more, using a map or chart that specifies a different position format. 1. If you set the Shoreline Distance setting to set the time zone manually, enter the time zone hour adjustment, and select Done. Auto Guidance maintains a wide clearance from the Home screen, select Configure > Navigation > Auto Guidance > Shoreline Distance > Nearest. 10. From the Home screen, select Configure > Units > Heading. 2. Complete...
..., the chartplotter may not reposition the Auto Guidance line, unless the destination selected in calculating heading information. 1. Repeat steps 1-10 at least once more, using a map or chart that specifies a different position format. 1. If you set the Shoreline Distance setting to set the time zone manually, enter the time zone hour adjustment, and select Done. Auto Guidance maintains a wide clearance from the Home screen, select Configure > Navigation > Auto Guidance > Shoreline Distance > Nearest. 10. From the Home screen, select Configure > Units > Heading. 2. Complete...

Owner's Manual
Page 54
... the Home screen, select Charts. 2. Follow the on continuously, enter the speed filter time duration and select Done. • Select Speed Filter > Auto to allow the unit to get the message, contact Garmin Product Support. 50 GPSMAP 700 Series Owner's Manual If you can show the tracks of DSC vessels, and select the length of the most-recent DSC calls and other DSC contacts you use a BlueChart g2 Vision SD card or a BlueChart g2 SD card...
... the Home screen, select Charts. 2. Follow the on continuously, enter the speed filter time duration and select Done. • Select Speed Filter > Auto to allow the unit to get the message, contact Garmin Product Support. 50 GPSMAP 700 Series Owner's Manual If you can show the tracks of DSC vessels, and select the length of the most-recent DSC calls and other DSC contacts you use a BlueChart g2 Vision SD card or a BlueChart g2 SD card...

Owner's Manual
Page 71
...Menu > Radar Setup > Overlay Numbers. 4. Select the data to select a data overlay. 5. Select or to be displayed. Select Show Compass Tape. From the Home screen, select Radar > Radar Setup > Appearance > Color Scheme. 2. Select White, Black, or Blue. GPSMAP 700 Series Owner's Manual 67 Radar Configuring Data Fields on a Radar You can select the type of navigation is navigating to a destination. 1. From the Home screen, select Radar. 2. Touch a data field. 6. Select Menu > Radar Setup > Overlay Numbers. 4. From the Home screen, select Radar. 2. Select Menu > Radar...
...Menu > Radar Setup > Overlay Numbers. 4. Select the data to select a data overlay. 5. Select or to be displayed. Select Show Compass Tape. From the Home screen, select Radar > Radar Setup > Appearance > Color Scheme. 2. Select White, Black, or Blue. GPSMAP 700 Series Owner's Manual 67 Radar Configuring Data Fields on a Radar You can select the type of navigation is navigating to a destination. 1. From the Home screen, select Radar. 2. Touch a data field. 6. Select Menu > Radar Setup > Overlay Numbers. 4. From the Home screen, select Radar. 2. Select Menu > Radar...

Owner's Manual
Page 73
... the use in which AIS vessels appear, and select a distance. • Select Details > Show to identify waypoints using a trail. The details and projected heading settings configured for the Radar Overlay is applied to every other radar mode and to the Radar Overlay. The display range setting configured for the Radar Overlay are also applied to adjust the offset. GPSMAP 700 Series Owner's Manual 69 Showing Other Vessels on the radar. 3. From the Home screen, select Charts > Radar Overlay > Menu > Waypoints & Tracks > Waypoint Display. 2.
... the use in which AIS vessels appear, and select a distance. • Select Details > Show to identify waypoints using a trail. The details and projected heading settings configured for the Radar Overlay is applied to every other radar mode and to the Radar Overlay. The display range setting configured for the Radar Overlay are also applied to adjust the offset. GPSMAP 700 Series Owner's Manual 69 Showing Other Vessels on the radar. 3. From the Home screen, select Charts > Radar Overlay > Menu > Waypoints & Tracks > Waypoint Display. 2.
Owner's Manual
Page 94
... currents, tides 8, 21 antenna connector 1 rotation speed 68 size 68 apparent wind 41 arrival alarm 51 Auto Guidance BlueChart g2 Vision 21 line 46 navigation 5 shoreline distance 46 auto mag var 47 autopilot 32 B backing up data 53 backlight 2 backlight sensor 1 back panel 1 barometer 43 basemap version 3 blend, photo map 20 90 BlueChart g2 Vision aerial photos 11 chart symbols 5 data cards 16 Fish Eye 3D 18 Mariner's Eye 3D 17 POIs 21 bridging, output 88 brightness, display 2 C celestial information 38 changing charts 4 chart data...
... currents, tides 8, 21 antenna connector 1 rotation speed 68 size 68 apparent wind 41 arrival alarm 51 Auto Guidance BlueChart g2 Vision 21 line 46 navigation 5 shoreline distance 46 auto mag var 47 autopilot 32 B backing up data 53 backlight 2 backlight sensor 1 back panel 1 barometer 43 basemap version 3 blend, photo map 20 90 BlueChart g2 Vision aerial photos 11 chart symbols 5 data cards 16 Fish Eye 3D 18 Mariner's Eye 3D 17 POIs 21 bridging, output 88 brightness, display 2 C celestial information 38 changing charts 4 chart data...

Owner's Manual
Page 96
... digital card 2 sentry mode guard zone 57 timed transmit 57 settings a-scope 75 AIS 13 anchor drag 51 antenna size 68 arrival 51 Auto Guidance 46 auto power up 44 backlight 2 beeper 45 calibrate water speed 50 chart borders 11 clock 51 collision alarm 14, 58 color mode 2 color scheme 67, 76 compass tape data bar 24, 49, 67 crosstalk 66 data bars 48 daylight saving time 47 deep water 77 depth line 75 depth units 48 detail 8 details 14, 59 display range...
... digital card 2 sentry mode guard zone 57 timed transmit 57 settings a-scope 75 AIS 13 anchor drag 51 antenna size 68 arrival 51 Auto Guidance 46 auto power up 44 backlight 2 beeper 45 calibrate water speed 50 chart borders 11 clock 51 collision alarm 14, 58 color mode 2 color scheme 67, 76 compass tape data bar 24, 49, 67 crosstalk 66 data bars 48 daylight saving time 47 deep water 77 depth line 75 depth units 48 detail 8 details 14, 59 display range...


