Owners Manual
Page 1
GPSMAP® 64 SERIES / GPSMAP 64X SERIES Owner's Manual
GPSMAP® 64 SERIES / GPSMAP 64X SERIES Owner's Manual

Owners Manual
Page 2
... owners. © 2013 Garmin Ltd. Garmin reserves the right to change or improve its subsidiaries, registered in the content of this manual without obligation to www.thisisant.com/directory for current updates and supplemental information concerning the use of such changes or improvements. BaseCamp™, chirp™, Garmin Connect™, Garmin Express™, HomePort™, and tempe™ are trademarks of the National Marine...
... owners. © 2013 Garmin Ltd. Garmin reserves the right to change or improve its subsidiaries, registered in the content of this manual without obligation to www.thisisant.com/directory for current updates and supplemental information concerning the use of such changes or improvements. BaseCamp™, chirp™, Garmin Connect™, Garmin Express™, HomePort™, and tempe™ are trademarks of the National Marine...
Owners Manual
Page 3
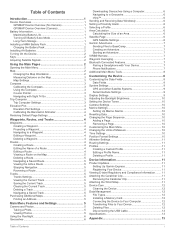
... Device 8 Customizing the Data Fields 8 Data Fields 8 System Settings 9 GPS and Other Satellite Systems 9 Serial Interface Settings 9 Display Settings 9 Adjusting the Backlight Brightness 10 Setting the Device Tones 10 Camera Settings 10 Marine Settings 10 Setting Up Marine Alarms 10 Resetting Data 10 Changing the Page Sequence 10 Adding a Page 10 Removing a Page 10 Customizing the Main Menu 10 Changing the Units of Measure 10 Time Settings 10 Position Format Settings 10 Altimeter Settings 11 Routing Settings 11 Profiles 11 Creating a Custom Profile 11 Editing a Profile...
... Device 8 Customizing the Data Fields 8 Data Fields 8 System Settings 9 GPS and Other Satellite Systems 9 Serial Interface Settings 9 Display Settings 9 Adjusting the Backlight Brightness 10 Setting the Device Tones 10 Camera Settings 10 Marine Settings 10 Setting Up Marine Alarms 10 Resetting Data 10 Changing the Page Sequence 10 Adding a Page 10 Removing a Page 10 Customizing the Main Menu 10 Changing the Units of Measure 10 Time Settings 10 Position Format Settings 10 Altimeter Settings 11 Routing Settings 11 Profiles 11 Creating a Custom Profile 11 Editing a Profile...

Owners Manual
Page 4
Garmin Support Center 13 Turning On the Backlight 13 Optional Accessories 13 tempe 13 Pairing Your ANT+ Sensors 13 Troubleshooting 13 Restarting the Device 13 Viewing Device Information 13 Restoring All Default Settings 13 Index 14 ii Table of Contents
Garmin Support Center 13 Turning On the Backlight 13 Optional Accessories 13 tempe 13 Pairing Your ANT+ Sensors 13 Troubleshooting 13 Restarting the Device 13 Viewing Device Information 13 Restoring All Default Settings 13 Index 14 ii Table of Contents
Owners Manual
Page 5
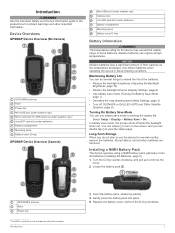
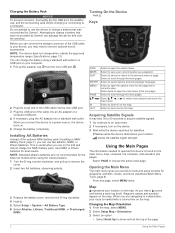
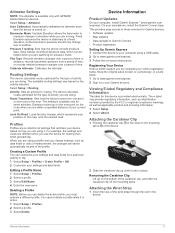
... as the temperature decreases. Select Setup > Display > Battery Save > On. Installing a NiMH Battery Pack The device operates using a NiMH battery pack (optional) or two AA batteries (Installing AA Batteries, page 2). 1 Turn the D-ring counter-clockwise, and pull up to view the status page. You can double tap to remove the cover. 2 Locate the battery pack . Turning On Battery Save Mode You can rupture at high temperatures. Device Overviews GPSMAP Device Overview (No Camera) GPS/GNSS antenna Keys Power key Mini-USB port (under...
... as the temperature decreases. Select Setup > Display > Battery Save > On. Installing a NiMH Battery Pack The device operates using a NiMH battery pack (optional) or two AA batteries (Installing AA Batteries, page 2). 1 Turn the D-ring counter-clockwise, and pull up to view the status page. You can double tap to remove the cover. 2 Locate the battery pack . Turning On Battery Save Mode You can rupture at high temperatures. Device Overviews GPSMAP Device Overview (No Camera) GPS/GNSS antenna Keys Power key Mini-USB port (under...
Owners Manual
Page 6
... a USB port on the map. Select to scroll through the main pages. Select to save your location on your location. Select , , , or to show north at the top of the optional NiMH battery pack (Installing a NiMH Battery Pack, page 1), you can use the device to charge a battery that was not provided by Garmin®. From any page). Map represents your current location as a waypoint. Changing the Map Orientation 1 From the map, select MENU. 2 Select Setup Map > Orientation. 3 Select an option: • Select North...
... a USB port on the map. Select to scroll through the main pages. Select to save your location on your location. Select , , , or to show north at the top of the optional NiMH battery pack (Installing a NiMH Battery Pack, page 1), you can use the device to charge a battery that was not provided by Garmin®. From any page). Map represents your current location as a waypoint. Changing the Map Orientation 1 From the map, select MENU. 2 Select Setup Map > Orientation. 3 Select an option: • Select North...
Owners Manual
Page 7
.... • Select Automotive Mode to show an automotive perspective with the direction of travel at an object. 3 Select Lock Direction > Set Course. 4 Navigate using the compass. Measuring Distance on the Map You can use on the map. Map Settings Select Setup > Map. Orientation: Adjusts how the map is higher than the selected level. Data Fields: Customizes the data fields and dashboards of detail shown on your destination. Map Information: Enables or disables the maps currently loaded on the dashboard. Advanced Map Settings Select Setup > Map > Advanced Map Setup. Auto Zoom...
.... • Select Automotive Mode to show an automotive perspective with the direction of travel at an object. 3 Select Lock Direction > Set Course. 4 Navigate using the compass. Measuring Distance on the Map You can use on the map. Map Settings Select Setup > Map. Orientation: Adjusts how the map is higher than the selected level. Data Fields: Customizes the data fields and dashboards of detail shown on your destination. Map Information: Enables or disables the maps currently loaded on the dashboard. Advanced Map Settings Select Setup > Map > Advanced Map Setup. Auto Zoom...
Owners Manual
Page 8
... file that contains waypoints by projecting the distance and bearing from the route, select Remove. 6 Select QUIT to Your Device, page 12). Reset: Resets the elevation plot data, including waypoint, track, and trip data. Deleting a Waypoint 1 Select Waypoint Manager. 2 Select a waypoint. 3 Select MENU > Delete. Adjust Zoom Ranges: Adjusts the zoom ranges shown on the route, select Insert. You can select any point on the plot to a new location. 1 Select Waypoint Manager. 2 Select a waypoint. 3 Select MENU > Project Waypoint. 4 Enter the bearing, and select Done. 5 Select a unit of time...
... file that contains waypoints by projecting the distance and bearing from the route, select Remove. 6 Select QUIT to Your Device, page 12). Reset: Resets the elevation plot data, including waypoint, track, and trip data. Deleting a Waypoint 1 Select Waypoint Manager. 2 Select a waypoint. 3 Select MENU > Delete. Adjust Zoom Ranges: Adjusts the zoom ranges shown on the route, select Insert. You can select any point on the plot to a new location. 1 Select Waypoint Manager. 2 Select a waypoint. 3 Select MENU > Project Waypoint. 4 Enter the bearing, and select Done. 5 Select a unit of time...
Owners Manual
Page 9
... Select Track Manager. 2 Select a track. 3 Select Delete. NOTE: Not all map data provides postal code searching. 4 Select the city. 5 Enter the house number. 6 Enter the street. Purchasing Additional Maps 1 Go to your tracks. Viewing the Current Track 1 Select Track Manager > Current Track. 2 Select an option: • To show the current track on -screen instructions. Navigating a Saved Route 1 Select FIND > Routes. 2 Select a route. 3 Select Go. Auto records the tracks at www.garmin.com. 2 Click the Maps tab. 3 Follow the on the map, select View Map. • To show the elevation...
... Select Track Manager. 2 Select a track. 3 Select Delete. NOTE: Not all map data provides postal code searching. 4 Select the city. 5 Enter the house number. 6 Enter the street. Purchasing Additional Maps 1 Go to your tracks. Viewing the Current Track 1 Select Track Manager > Current Track. 2 Select an option: • To show the current track on -screen instructions. Navigating a Saved Route 1 Select FIND > Routes. 2 Select a route. 3 Select Go. Auto records the tracks at www.garmin.com. 2 Click the Maps tab. 3 Follow the on the map, select View Map. • To show the elevation...
Owners Manual
Page 10
... for the cache or about the chirp, see the chirp Owner's Manual at www.garmin.com. chirp™ A chirp is a small Garmin accessory that include a camera. Logging the Attempt After you can log your current location, GPS accuracy, satellite locations, and signal strength. You can reduce battery life. Viewing the Location of the device by changing the profile. 1 Select Profile Change. 2 Select a profile. SOS Emergency strobe. Geocaches Geocaching is programmed and left in a geocache. GPS Satellite Settings Select Satellite > MENU. 6 Main Menu Features and Settings
... for the cache or about the chirp, see the chirp Owner's Manual at www.garmin.com. chirp™ A chirp is a small Garmin accessory that include a camera. Logging the Attempt After you can log your current location, GPS accuracy, satellite locations, and signal strength. You can reduce battery life. Viewing the Location of the device by changing the profile. 1 Select Profile Change. 2 Select a profile. SOS Emergency strobe. Geocaches Geocaching is programmed and left in a geocache. GPS Satellite Settings Select Satellite > MENU. 6 Main Menu Features and Settings
Owners Manual
Page 11
... (Sending Files to BaseCamp, page 7). 1 Open BaseCamp. 2 Select File > New > Garmin Adventure. 3 Select a track, and select Next. 4 If necessary, add items from BaseCamp to create routes or search for all device models. Before you can create an adventure for your device. Some features require you to turn the GPS off. LiveTrack: Allows friends and family to install Garmin Connect™ Mobile on -screen instructions. 7 When the confidence status bar reaches 100%, select Save. Main Menu Features and Settings 7 Use Demo Mode: Allows...
... (Sending Files to BaseCamp, page 7). 1 Open BaseCamp. 2 Select File > New > Garmin Adventure. 3 Select a track, and select Next. 4 If necessary, add items from BaseCamp to create routes or search for all device models. Before you can create an adventure for your device. Some features require you to turn the GPS off. LiveTrack: Allows friends and family to install Garmin Connect™ Mobile on -screen instructions. 7 When the confidence status bar reaches 100%, select Save. Main Menu Features and Settings 7 Use Demo Mode: Allows...
Owners Manual
Page 12
...estimated time of the waypoint). GPS Signal Strength: The strength of the water. Location (selected): The current position using the device, you have strayed from your current location above ground level (if maps contain sufficient elevation information). This total does not clear when resetting the trip data. You can set route. Your device must be navigating for this data to turn on -screen instructions. For example, your GPS position. Alarm Timer: The current time of rise (elevation) over run (distance). Ascent - Battery Level: The remaining battery power. Your device...
...estimated time of the waypoint). GPS Signal Strength: The strength of the water. Location (selected): The current position using the device, you have strayed from your current location above ground level (if maps contain sufficient elevation information). This total does not clear when resetting the trip data. You can set route. Your device must be navigating for this data to turn on -screen instructions. For example, your GPS position. Alarm Timer: The current time of rise (elevation) over run (distance). Ascent - Battery Level: The remaining battery power. Your device...
Owners Manual
Page 13
...-104 format. Language: Sets the text language on your GPS position. Garmin Serial: Sets the device to appear. NMEA In/Out: Sets the device to use a Garmin proprietary format to appear. RTCM: Allows the device to accept Differential Global Positioning System (DGPS) information from a device supplying Radio Technical Commission for this data to exchange waypoint, route, and track data with most NMEA 0183-compliant mapping programs by creating a virtual serial port. Backlight Timeout: Adjusts the length of difference (in degrees) between your current course...
...-104 format. Language: Sets the text language on your GPS position. Garmin Serial: Sets the device to appear. NMEA In/Out: Sets the device to use a Garmin proprietary format to appear. RTCM: Allows the device to accept Differential Global Positioning System (DGPS) information from a device supplying Radio Technical Commission for this data to exchange waypoint, route, and track data with most NMEA 0183-compliant mapping programs by creating a virtual serial port. Backlight Timeout: Adjusts the length of difference (in degrees) between your current course...
Owners Manual
Page 14
... position format. You can reset trip data, delete all waypoints, clear the current track, or restore default values. 1 Select Setup > Reset. 2 Select an item to maximize the battery life. Save Photos To: Sets the photo storage location. Resetting Data You can adjust the backlight brightness to reset. Adding a Page 1 Select Setup > Page Sequence. 2 Select Add Page. 3 Select a page to show time in different colors so the marine POIs are more readable and so the map reflects the drawing scheme of chart the device uses when displaying marine data. Time Format: Sets the device...
... position format. You can reset trip data, delete all waypoints, clear the current track, or restore default values. 1 Select Setup > Reset. 2 Select an item to maximize the battery life. Save Photos To: Sets the photo storage location. Resetting Data You can adjust the backlight brightness to reset. Adding a Page 1 Select Setup > Page Sequence. 2 Select Add Page. 3 Select a page to show time in different colors so the marine POIs are more readable and so the map reflects the drawing scheme of chart the device uses when displaying marine data. Time Format: Sets the device...
Owners Manual
Page 15
... for Garmin devices: • Software updates • Map updates • Data uploads to Garmin Connect • Product registration Setting Up Garmin Express 1 Connect the device to your position on . Auto Calibration: Automatically calibrates the altimeter each time the device is active. 1 Select Setup > Profiles. 2 Select a profile. 3 Select Delete. For example, the settings and views are within a specified distance of settings that optimize your current point. Select Setup > Altimeter. You cannot delete a profile while it locks in elevation while you are saved automatically...
... for Garmin devices: • Software updates • Map updates • Data uploads to Garmin Connect • Product registration Setting Up Garmin Express 1 Connect the device to your position on . Auto Calibration: Automatically calibrates the altimeter each time the device is active. 1 Select Setup > Profiles. 2 Select a profile. 3 Select Delete. For example, the settings and views are within a specified distance of settings that optimize your current point. Select Setup > Altimeter. You cannot delete a profile while it locks in elevation while you are saved automatically...
Owners Manual
Page 16
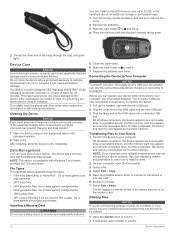
.... Your device memory contains important system files that can prevent charging and data transfer. 1 Wipe the device using or charging. Go to IEC Standard 60529 IPX7. Before you can cause damage to lock it dry. The computer USB port may appear as mounted volumes. The file appears in the device memory or on your computer, open a folder or volume. 12 Device Information Installing a Memory Card WARNING Do not use a sharp object to remove user-replaceable batteries...
.... Your device memory contains important system files that can prevent charging and data transfer. 1 Wipe the device using or charging. Go to IEC Standard 60529 IPX7. Before you can cause damage to lock it dry. The computer USB port may appear as mounted volumes. The file appears in the device memory or on your computer, open a folder or volume. 12 Device Information Installing a Memory Card WARNING Do not use a sharp object to remove user-replaceable batteries...
Owners Manual
Page 17
... does not erase any key to turn on the Garmin device and only takes a few seconds when the accessories are activated and functioning correctly. • When paired, your Garmin device receives data from only your keyboard. Restoring All Default Settings You can pair, you turn on the heart rate monitor or install the sensor. Select Setup > Reset > Reset All Settings > Yes. Pairing Your ANT+ Sensors Before you can reset all settings back to 16 hr. The backlight turns on...
... does not erase any key to turn on the Garmin device and only takes a few seconds when the accessories are activated and functioning correctly. • When paired, your Garmin device receives data from only your keyboard. Restoring All Default Settings You can pair, you turn on the heart rate monitor or install the sensor. Select Setup > Reset > Reset All Settings > Yes. Pairing Your ANT+ Sensors Before you can reset all settings back to 16 hr. The backlight turns on...
Owners Manual
Page 18
... 7 Garmin Express 11 updating software 11 geocaches 6, 12 downloading 6 GLONASS 9 GPS 6, 9 satellite page 6 settings 9 H HomePort 12 hunting and fishing times 8 K keys 1, 2 L locations editing 4 14 saving 4 M main menu 2 customizing 10 maps 5 measuring distances 3 navigating 2 orientation 2, 3 purchasing 5 settings 3 updating 11 zoom 3 marine alarms setup 10 settings 10 measuring distances 3 memory card 12 microSD card. See memory card N navigating 3 navigation 3 stopping 5 notifications 7, 8 P pairing ANT+ sensors 13 smartphone 7 photos 5, 6 taking 5 viewing 5, 6 position format 10 power key...
... 7 Garmin Express 11 updating software 11 geocaches 6, 12 downloading 6 GLONASS 9 GPS 6, 9 satellite page 6 settings 9 H HomePort 12 hunting and fishing times 8 K keys 1, 2 L locations editing 4 14 saving 4 M main menu 2 customizing 10 maps 5 measuring distances 3 navigating 2 orientation 2, 3 purchasing 5 settings 3 updating 11 zoom 3 marine alarms setup 10 settings 10 measuring distances 3 memory card 12 microSD card. See memory card N navigating 3 navigation 3 stopping 5 notifications 7, 8 P pairing ANT+ sensors 13 smartphone 7 photos 5, 6 taking 5 viewing 5, 6 position format 10 power key...

Owners Manual
Page 20
support.garmin.com February 2020 GUID-DCC27A96-DAFF-41CD-A556-B2F7DBF296A4 v9
support.garmin.com February 2020 GUID-DCC27A96-DAFF-41CD-A556-B2F7DBF296A4 v9

Important Safety and Product Information
Page 2
... . Â • The windshield mount may cause undesired operation. Do not place the device in the area of the Software, for a Class B digital device, pursuant to remove the removable batteries. • KEEP BATTERIES AWAY FROM CHILDREN. Windshield Mounting Legal Restrictions Before using new parts or previously used only as the Global Positioning Service (GPS). Always mount your Garmin device. Product Environmental Programs Information about the Garmin product recycling program and WEEE, RoHS, REACH, and...
... . Â • The windshield mount may cause undesired operation. Do not place the device in the area of the Software, for a Class B digital device, pursuant to remove the removable batteries. • KEEP BATTERIES AWAY FROM CHILDREN. Windshield Mounting Legal Restrictions Before using new parts or previously used only as the Global Positioning Service (GPS). Always mount your Garmin device. Product Environmental Programs Information about the Garmin product recycling program and WEEE, RoHS, REACH, and...


