
Owner's Manual
Page 5
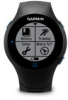
.... The device is powered by completing our online registration today. • Go to http://buy.garmin.com, or contact your Garmin dealer for information about optional accessories and replacement parts. Introduction Setting Up the Device When using the...Forerunner 610 Owner's Manual 3 See the Important Safety and Product Information guide in the product box for product warnings and other important information. Introduction warning Always consult your physician before you can charge using your Forerunner® the first time, follow the setup instructions in the Forerunner 610...
.... The device is powered by completing our online registration today. • Go to http://buy.garmin.com, or contact your Garmin dealer for information about optional accessories and replacement parts. Introduction Setting Up the Device When using the...Forerunner 610 Owner's Manual 3 See the Important Safety and Product Information guide in the product box for product warnings and other important information. Introduction warning Always consult your physician before you can charge using your Forerunner® the first time, follow the setup instructions in the Forerunner 610...

Owner's Manual
Page 11
... low cadence amounts in beats per minute (rpm). 3. Set the parameters for 1 minute, and repeat. For example, during a long training run, the program may instruct you to set up advanced alerts for heart rate and cadence. 1. Select > Training > Options > Alerts. 2. Select Run/Walk > Run/Walk Alert > On.... minutes, then walk for your heart rate or cadence alerts. Each time you reach the alert amount, the device beeps and displays a Forerunner 610 Owner's Manual 9 Your Training Setting Advanced Alerts If you have an optional heart rate monitor, foot pod, or GSC™ 10, you can set...
... low cadence amounts in beats per minute (rpm). 3. Set the parameters for 1 minute, and repeat. For example, during a long training run, the program may instruct you to set up advanced alerts for heart rate and cadence. 1. Select > Training > Options > Alerts. 2. Select Run/Walk > Run/Walk Alert > On.... minutes, then walk for your heart rate or cadence alerts. Each time you reach the alert amount, the device beeps and displays a Forerunner 610 Owner's Manual 9 Your Training Setting Advanced Alerts If you have an optional heart rate monitor, foot pod, or GSC™ 10, you can set...
Owner's Manual
Page 16
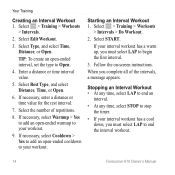
...and select Distance, Time, or Open. 6. If your interval workout has a cool down, you must select LAP to Open. 4. Follow the on-screen instructions. TIP: To create an open -ended warmup to begin the first interval. 3. Select START. Stopping an Interval Workout • At any time, select ... interval value. 5. If necessary, select Warmup > Yes to add an open -ended interval, set the type to end the interval workout. 14 Forerunner 610 Owner's Manual Select the number of the intervals, a message appears. Select Edit Workout. 3. When you complete all of repetitions. 8.
...and select Distance, Time, or Open. 6. If your interval workout has a cool down, you must select LAP to Open. 4. Follow the on-screen instructions. TIP: To create an open -ended warmup to begin the first interval. 3. Select START. Stopping an Interval Workout • At any time, select ... interval value. 5. If necessary, select Warmup > Yes to add an open -ended interval, set the type to end the interval workout. 14 Forerunner 610 Owner's Manual Select the number of the intervals, a message appears. Select Edit Workout. 3. When you complete all of repetitions. 8.

Owner's Manual
Page 18
... until you can select a heart rate zone. For example, you can repeat a 1-mile step 4 times. 16 • Select Repeat Until to the workout. Select START. 4. Forerunner 610 Owner's Manual Repeating a Custom Workout Step Before you reach heart rate zone 5. 3. Starting a Custom Workout 1. Follow the on-screen instructions.
... until you can select a heart rate zone. For example, you can repeat a 1-mile step 4 times. 16 • Select Repeat Until to the workout. Select START. 4. Forerunner 610 Owner's Manual Repeating a Custom Workout Step Before you reach heart rate zone 5. 3. Starting a Custom Workout 1. Follow the on-screen instructions.

Owner's Manual
Page 19
...Garmin Training Center or Garmin Connect (page 28). 3. Your Training Bike Training Options Many of the training features of the Forerunner can set up alerts, Auto Lap, Auto Pause, and Auto Scroll settings for your bike training. 1. Select > Training > Workouts > Custom. 2. For the best results, you must pair the Forerunner... Options > Show. 2. Select the workout. 3. Follow the on-screen instructions. Deleting a Custom Workout 1. Select Delete Workout > Yes. Training With a Bike Sensor For information about the GSC™ 10, see page 23. Forerunner 610 Owner's Manual 17
...Garmin Training Center or Garmin Connect (page 28). 3. Your Training Bike Training Options Many of the training features of the Forerunner can set up alerts, Auto Lap, Auto Pause, and Auto Scroll settings for your bike training. 1. Select > Training > Workouts > Custom. 2. For the best results, you must pair the Forerunner... Options > Show. 2. Select the workout. 3. Follow the on-screen instructions. Deleting a Custom Workout 1. Select Delete Workout > Yes. Training With a Bike Sensor For information about the GSC™ 10, see page 23. Forerunner 610 Owner's Manual 17

Owner's Manual
Page 20
See the Forerunner 610 Quick Start Manual or the accessory instructions. 18 If your Forerunner does not show data from other ANT+ sensors while pairing. • If is off, select > Setup > Heart Rate Monitor > HR Monitor > On > Search for New. &#... Your ANT+ Sensors Before you can pair, you may need to pair the accessory to http://buy.garmin.com. Pairing is the connecting of the ANT+ sensor. Forerunner 610 Owner's Manual After you pair the first time, your Forerunner automatically recognizes your foot pod each time it is activated. • Make sure that the ANT...
See the Forerunner 610 Quick Start Manual or the accessory instructions. 18 If your Forerunner does not show data from other ANT+ sensors while pairing. • If is off, select > Setup > Heart Rate Monitor > HR Monitor > On > Search for New. &#... Your ANT+ Sensors Before you can pair, you may need to pair the accessory to http://buy.garmin.com. Pairing is the connecting of the ANT+ sensor. Forerunner 610 Owner's Manual After you pair the first time, your Forerunner automatically recognizes your foot pod each time it is activated. • Make sure that the ANT...
Owner's Manual
Page 25
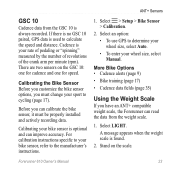
...and distance. Calibrating the Bike Sensor Before you customize the bike sensor options, you have an ANT+ compatible weight scale, the Forerunner can calibrate the bike sensor, it must change your bike sensor is used to cycling (page 17). Before you can read the... instructions specific to your bike sensor, refer to determine your wheel size, select Auto. • To enter your rate of pedaling or "spinning" measured by the number of revolutions of the crank arm per minute (rpm). Cadence is your wheel size, select Manual. Select LIGHT. Forerunner 610 Owner's Manual ...
...and distance. Calibrating the Bike Sensor Before you customize the bike sensor options, you have an ANT+ compatible weight scale, the Forerunner can calibrate the bike sensor, it must change your bike sensor is used to cycling (page 17). Before you can read the... instructions specific to your bike sensor, refer to determine your wheel size, select Auto. • To enter your rate of pedaling or "spinning" measured by the number of revolutions of the crank arm per minute (rpm). Cadence is your wheel size, select Manual. Select LIGHT. Forerunner 610 Owner's Manual ...
Owner's Manual
Page 26
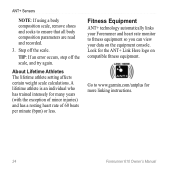
... body composition parameters are read and recorded. 3. Go to www.garmin.com/antplus for the ANT+ Link Here logo on the equipment console. About Lifetime Athletes The lifetime athlete setting affects certain weight scale calculations. Look for more linking instructions. 24 Forerunner 610 Owner's Manual A lifetime athlete is an individual who has trained intensely for...
... body composition parameters are read and recorded. 3. Go to www.garmin.com/antplus for the ANT+ Link Here logo on the equipment console. About Lifetime Athletes The lifetime athlete setting affects certain weight scale calculations. Look for more linking instructions. 24 Forerunner 610 Owner's Manual A lifetime athlete is an individual who has trained intensely for...
Owner's Manual
Page 30
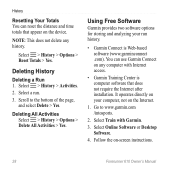
.... 2. Deleting All Activities Select > History > Options > Delete All Activities > Yes. Select Train with Internet access. • Garmin Training Center is Web-based software (www.garminconnect .com). Select Online Software or Desktop Software. 4. Deleting History Deleting a Run 1.... with Garmin. 3. Select a run history. • Garmin Connect is computer software that does not require the Internet after installation. Using Free Software Garmin provides two software options for storing and analyzing your computer, not on -screen instructions. 28 Forerunner 610 Owner's Manual
.... 2. Deleting All Activities Select > History > Options > Delete All Activities > Yes. Select Train with Internet access. • Garmin Training Center is Web-based software (www.garminconnect .com). Select Online Software or Desktop Software. 4. Deleting History Deleting a Run 1.... with Garmin. 3. Select a run history. • Garmin Connect is computer software that does not require the Internet after installation. Using Free Software Garmin provides two software options for storing and analyzing your computer, not on -screen instructions. 28 Forerunner 610 Owner's Manual

Owner's Manual
Page 31
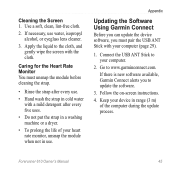
... USB ANT Stick (page 28). 1. Plug the USB ANT Stick ➊ into a USB port on -screen instructions. Select > Setup > System > Data Transfer > Data Transfer > Off. ➊ 2. Bring your device within range (3 m) of your computer. Forerunner 610 Owner's Manual 29 Select Yes. 4. Follow the on your computer. When the ANT Agent finds your device, the...
... USB ANT Stick (page 28). 1. Plug the USB ANT Stick ➊ into a USB port on -screen instructions. Select > Setup > System > Data Transfer > Data Transfer > Off. ➊ 2. Bring your device within range (3 m) of your computer. Forerunner 610 Owner's Manual 29 Select Yes. 4. Follow the on your computer. When the ANT Agent finds your device, the...
Owner's Manual
Page 47
... (3 m) of your computer (page 29). 1. Apply the liquid to your device in use. Appendix Updating the Software Using Garmin Connect Before you can update the device software, you to www.garminconnect.com. Cleaning the Screen 1. Connect the USB ANT Stick...Garmin Connect alerts you must unsnap the module before cleaning the strap. • Rinse the strap after every five uses. • Do not put the strap in a washing machine or a dryer. • To prolong the life of the computer during the update process. Follow the on-screen instructions. 4. Forerunner 610 Owner's Manual...
... (3 m) of your computer (page 29). 1. Apply the liquid to your device in use. Appendix Updating the Software Using Garmin Connect Before you can update the device software, you to www.garminconnect.com. Cleaning the Screen 1. Connect the USB ANT Stick...Garmin Connect alerts you must unsnap the module before cleaning the strap. • Rinse the strap after every five uses. • Do not put the strap in a washing machine or a dryer. • To prolong the life of the computer during the update process. Follow the on-screen instructions. 4. Forerunner 610 Owner's Manual...

Quick Start Manual
Page 3
... first time you use the Forerunner, you connect the Forerunner to a power source, the Forerunner turns on, and the charging screen appears. 4. Forerunner 610 Quick Start Manual 3 The charging cradle is magnetic and holds the Forerunner in place. ➊ When you are prompted to view choices and change the ...default selection. Align the contacts on the back of the Forerunner with the posts on the touchscreen to choose your system settings and enter user profile information. • Follow the on-screen instructions. • Swipe up or down on the charging cradle ➊...
... first time you use the Forerunner, you connect the Forerunner to a power source, the Forerunner turns on, and the charging screen appears. 4. Forerunner 610 Quick Start Manual 3 The charging cradle is magnetic and holds the Forerunner in place. ➊ When you are prompted to view choices and change the ...default selection. Align the contacts on the back of the Forerunner with the posts on the touchscreen to choose your system settings and enter user profile information. • Follow the on-screen instructions. • Swipe up or down on the charging cradle ➊...

Quick Start Manual
Page 8
... 8). 1. Go to pair. Plug the USB ANT Stick ➊ into a USB port on -screen instructions. Forerunner 610 Quick Start Manual Select Train with your device, the ANT Agent displays the unit ID and asks you if you must pair the Forerunner with Garmin. 3. Bring your device within range (3 m) of the page, and select Delete > Yes Using...
... 8). 1. Go to pair. Plug the USB ANT Stick ➊ into a USB port on -screen instructions. Forerunner 610 Quick Start Manual Select Train with your device, the ANT Agent displays the unit ID and asks you if you must pair the Forerunner with Garmin. 3. Bring your device within range (3 m) of the page, and select Delete > Yes Using...

Quick Start Manual
Page 9
... This product contains a lithium-ion battery. See the Important Safety and Product Information guide in power save mode the entire time. Up to see the Forerunner 610 Owner's Manual. 1. For a complete list of data fields you use GPS, the backlight, 9 Select a training page. 3. Select a category and a data field. 3. For example, select Heart Rate... You are training with GPS. Select > Setup > Training Pages. 2. Follow the on the page. 5. Change the number of the available data fields, see on -screen instructions. Select . 4. Select Enabled. 6. Select Yes. 4.
... This product contains a lithium-ion battery. See the Important Safety and Product Information guide in power save mode the entire time. Up to see the Forerunner 610 Owner's Manual. 1. For a complete list of data fields you use GPS, the backlight, 9 Select a training page. 3. Select a category and a data field. 3. For example, select Heart Rate... You are training with GPS. Select > Setup > Training Pages. 2. Follow the on the page. 5. Change the number of the available data fields, see on -screen instructions. Select . 4. Select Enabled. 6. Select Yes. 4.


