Owner's Manual
Page 3
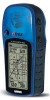
..., Accessories, Data Field Definitions, MapSource information, a Troubleshooting Guide and a Wiring Diagram followed by -Step instruction for choosing the GARMIN eTrex Legend. IInnttrroodduuccttiioonn About This Manual i This manual is organized into : (1) An overview that discusses the feature and how it functions and (2) A detailed Step-by the Index. The Appendices include information on items such as viewed on screen) provides details about using the feature. The Introduction...
..., Accessories, Data Field Definitions, MapSource information, a Troubleshooting Guide and a Wiring Diagram followed by -Step instruction for choosing the GARMIN eTrex Legend. IInnttrroodduuccttiioonn About This Manual i This manual is organized into : (1) An overview that discusses the feature and how it functions and (2) A detailed Step-by the Index. The Appendices include information on items such as viewed on screen) provides details about using the feature. The Introduction...
Owner's Manual
Page 9
... inside the battery compartment) in the System Setup Page. Serial Number: * * NOTE: Do not confuse this area to our website (www.garmin.com). GARMIN will not replace missing components from GARMIN. Look for warranty verification. To obtain warranty service, an original or copy of GARMIN MapSource Data to your eTrex Legend handy and connect to record the external serial number (8-digit number located inside of your unit. Phone...
... inside the battery compartment) in the System Setup Page. Serial Number: * * NOTE: Do not confuse this area to our website (www.garmin.com). GARMIN will not replace missing components from GARMIN. Look for warranty verification. To obtain warranty service, an original or copy of GARMIN MapSource Data to your eTrex Legend handy and connect to record the external serial number (8-digit number located inside of your unit. Phone...
Owner's Manual
Page 10
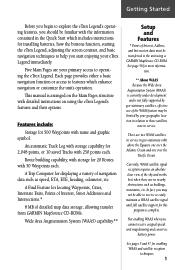
... Contents viii Getting Started Setup, and Features 1 Features and Button Function 2 Battery Installation 3 Backlighting and Contrast 3 The Main Pages Main Page Basics 4 Satellite The Main Page 5 Options 6-7 Navigating Navigating with eTrex Legend 8 Map The Main Page 9-10 Options 11-15 Using the Pan Map Option 12 Stop Navigation 13 Hide/Show Navigation Status 13 Hide/Show Data Fields 13 Setup 14-15 The Measure Distance option 15 Navigation The Main Page 16 Options 17-18 Trip Computer The...
... Contents viii Getting Started Setup, and Features 1 Features and Button Function 2 Battery Installation 3 Backlighting and Contrast 3 The Main Pages Main Page Basics 4 Satellite The Main Page 5 Options 6-7 Navigating Navigating with eTrex Legend 8 Map The Main Page 9-10 Options 11-15 Using the Pan Map Option 12 Stop Navigation 13 Hide/Show Navigation Status 13 Hide/Show Data Fields 13 Setup 14-15 The Measure Distance option 15 Navigation The Main Page 16 Options 17-18 Trip Computer The...
Owner's Manual
Page 11
... service. See pages 5 and 47 for 500 Waypoints with name and graphic symbol. Route building capability, with storage for 2,048 points, or 10 saved Tracks with 250 points each . In fact, you cannot receive a signal speeds unit map drawing and conserves battery power. Each page provides either a basic navigation function or access to features which includes instructions for displaying a variety of the WAAS feature may not be able to operating the eTrex Legend. Features...
... service. See pages 5 and 47 for 500 Waypoints with name and graphic symbol. Route building capability, with storage for 2,048 points, or 10 saved Tracks with 250 points each . In fact, you cannot receive a signal speeds unit map drawing and conserves battery power. Each page provides either a basic navigation function or access to features which includes instructions for displaying a variety of the WAAS feature may not be able to operating the eTrex Legend. Features...
Owner's Manual
Page 13
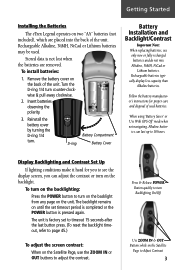
... Started Installing the Batteries The eTrex Legend operates on the Satellite Page, use only new or fully recharged batteries and do not mix Alkaline, NiMH, NiCad or Lithium batteries. Reinstall the battery cover by turning the D-ring 1/4 turn counter-clockwise & pull away clockwise. 2. Display Backlighting and Contrast Set Up If lighting conditions make it hard for proper care and disposal of the unit. The backlight remains on the backlight. Press & Release POWER Button quickly to Adjust...
... Started Installing the Batteries The eTrex Legend operates on the Satellite Page, use only new or fully recharged batteries and do not mix Alkaline, NiMH, NiCad or Lithium batteries. Reinstall the battery cover by turning the D-ring 1/4 turn counter-clockwise & pull away clockwise. 2. Display Backlighting and Contrast Set Up If lighting conditions make it hard for proper care and disposal of the unit. The backlight remains on the backlight. Press & Release POWER Button quickly to Adjust...
Owner's Manual
Page 16
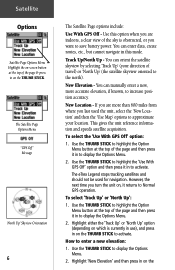
... eTrex Legend stops tracking satellites and should not be used the unit, select the 'New Location' and then the 'Use Map' options to approximate your direction of travel) or 'North Up' (the satellite skyview oriented to the north). Highlight 'New Elevation' and then press in on , it in to display the Options Menu. 2. You can manually enter a new, more than 600 miles from where you turn the unit on the If you want to save battery power. The Satellite...
... eTrex Legend stops tracking satellites and should not be used the unit, select the 'New Location' and then the 'Use Map' options to approximate your direction of travel) or 'North Up' (the satellite skyview oriented to the north). Highlight 'New Elevation' and then press in on , it in to display the Options Menu. 2. You can manually enter a new, more than 600 miles from where you turn the unit on the If you want to save battery power. The Satellite...
Owner's Manual
Page 18
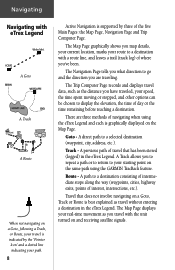
... reaching a destination. Navigating Navigating with the unit turned on and receiving satellite signals. The Map Page displays your real-time movement as the distance you map details, your current location, marks your starting point on the same path using the eTrex Legend and each is supported by the 'Pointer Icon' and a dotted line indicating your travel that does not involve navigating on a Goto, Track or Route is best explained as travel without entering a destination in the eTrex Legend. A path...
... reaching a destination. Navigating Navigating with the unit turned on and receiving satellite signals. The Map Page displays your real-time movement as the distance you map details, your current location, marks your starting point on the same path using the eTrex Legend and each is supported by the 'Pointer Icon' and a dotted line indicating your travel that does not involve navigating on a Goto, Track or Route is best explained as travel without entering a destination in the eTrex Legend. A path...
Owner's Manual
Page 31
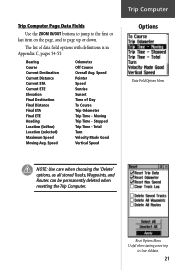
...) Location (selected) Maximum Speed Moving Avg. Speed Odometer Off Course Overall Avg. Stopped Trip Time - Reset Options Menu Useful when starting a new trip to page up or down. Speed Pointer Speed Sunrise Sunset Time of data field options with definitions is in Appendix C, pages 54-55. Total Turn Velocity Made Good Vertical Speed Trip Computer Options Data Field Options Menu NOTE: Use care when choosing the 'Delete' options, as all stored Tracks, Waypoints, and Routes can be permanently deleted...
...) Location (selected) Maximum Speed Moving Avg. Speed Odometer Off Course Overall Avg. Stopped Trip Time - Reset Options Menu Useful when starting a new trip to page up or down. Speed Pointer Speed Sunrise Sunset Time of data field options with definitions is in Appendix C, pages 54-55. Total Turn Velocity Made Good Vertical Speed Trip Computer Options Data Field Options Menu NOTE: Use care when choosing the 'Delete' options, as all stored Tracks, Waypoints, and Routes can be permanently deleted...
Owner's Manual
Page 36
... to display the waypoint. 2. Use the THUMB STICK to highlight the Waypoint symbol field and then press to display the keyboard. 4. Select a map item from numeral to numeral pressing the THUMB STICK to enter numbers. 4. Enter the distance and bearing to the projected waypoint in the symbol field. 3. It can change the coordinates or elevation. Use the THUMB STICK to highlight the Waypoint name, location coordinates or elevation fi...
... to display the waypoint. 2. Use the THUMB STICK to highlight the Waypoint symbol field and then press to display the keyboard. 4. Select a map item from numeral to numeral pressing the THUMB STICK to enter numbers. 4. Enter the distance and bearing to the projected waypoint in the symbol field. 3. It can change the coordinates or elevation. Use the THUMB STICK to highlight the Waypoint name, location coordinates or elevation fi...
Owner's Manual
Page 45
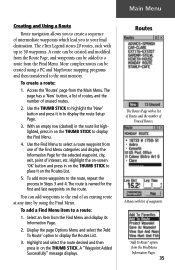
... Routes List. 5. A "Waypoint Added Successfully" message displays. A Route with up to a route from the Route Page, and waypoints can be created using the Find Menu. The page has a 'New' button, a list of routes, and the number of Unused Routes. To add more waypoints to display the Find Menu. 4. To add a Find Menu item to display the route Setup Page. 3. "Add To Route" option from the Main Menu. The eTrex Legend stores 20 routes, each with list of waypoints. Highlight the on-screen...
... Routes List. 5. A "Waypoint Added Successfully" message displays. A Route with up to a route from the Route Page, and waypoints can be created using the Find Menu. The page has a 'New' button, a list of routes, and the number of Unused Routes. To add more waypoints to display the Find Menu. 4. To add a Find Menu item to display the route Setup Page. 3. "Add To Route" option from the Main Menu. The eTrex Legend stores 20 routes, each with list of waypoints. Highlight the on-screen...
Owner's Manual
Page 51
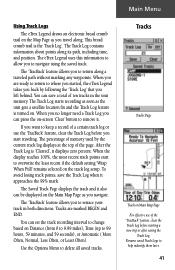
Tracks Tracks Page Track on Main Map Page For effective use of a certain track log or use the 'TracBack' feature, clear the Track Log before starting a new trip or after saving the Track Log. The Track Log contains information about points along a traveled path without marking any waypoints. If you want to return along its path, including time, and position. The Saved Track Page displays the track and it approaches the 99% mark. Use the Options Menu to help indentify...
Tracks Tracks Page Track on Main Map Page For effective use of a certain track log or use the 'TracBack' feature, clear the Track Log before starting a new trip or after saving the Track Log. The Track Log contains information about points along a traveled path without marking any waypoints. If you want to return along its path, including time, and position. The Saved Track Page displays the track and it approaches the 99% mark. Use the Options Menu to help indentify...
Owner's Manual
Page 56
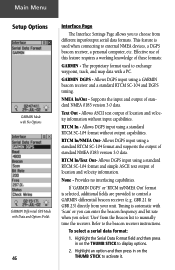
... the beacon receiver instructions. Refer to display options. 2. To select a serial data format: 1. Supports the input and output of these formats: GARMIN - Effective use of this feature requires a working knowledge of standard NMEA 0183 version 3.0 data. Allows DGPS input using a standard RTCM SC-104 format and simple ASCII text output of standard NMEA 0183 version 3.0 data. Tuning is automatic with Data and Options Fields 46 Interface Page The Interface Settings Page allows you select 'User' from the...
... the beacon receiver instructions. Refer to display options. 2. To select a serial data format: 1. Supports the input and output of these formats: GARMIN - Effective use of this feature requires a working knowledge of standard NMEA 0183 version 3.0 data. Allows DGPS input using a standard RTCM SC-104 format and simple ASCII text output of standard NMEA 0183 version 3.0 data. Tuning is automatic with Data and Options Fields 46 Interface Page The Interface Settings Page allows you select 'User' from the...
Owner's Manual
Page 57
... satellite signal reception altogether. Battery - The 'Memory Used' figure refers to significantly save battery power. Main Menu System Page The System Setup Page allows you restore defaults or display the current version of unit operating software and the Unit I.D. Choose one of 14 choices. The 'Battery Saver' mode reduces the rate of WAAS capabilities. The 'Demo Mode' simulates navigation. Language - Setup Options System Setup Page in to select. Change the type of Memory Used, Power Status, Time, Date, and Backlighting Status. Number. To adjust...
... satellite signal reception altogether. Battery - The 'Memory Used' figure refers to significantly save battery power. Main Menu System Page The System Setup Page allows you restore defaults or display the current version of unit operating software and the Unit I.D. Choose one of 14 choices. The 'Battery Saver' mode reduces the rate of WAAS capabilities. The 'Demo Mode' simulates navigation. Language - Setup Options System Setup Page in to select. Change the type of Memory Used, Power Status, Time, Date, and Backlighting Status. Number. To adjust...
Owner's Manual
Page 61
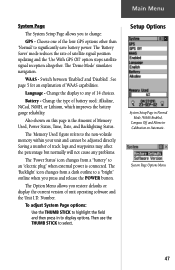
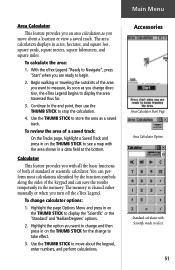
... about a location or view a saved track. With the eTrex Legend "Ready to Navigate", press 'Start' when you with Scientific mode to move about the keypad, enter numbers, and perform calculations. To change to stop the calculation. 4. Calculator This feature provides you are ready to display the 'Scientific' or the 'Standard' and 'Radian/Degrees' options. 2. As soon as you turn off the eTrex Legend. To review the area...
... about a location or view a saved track. With the eTrex Legend "Ready to Navigate", press 'Start' when you with Scientific mode to move about the keypad, enter numbers, and perform calculations. To change to stop the calculation. 4. Calculator This feature provides you are ready to display the 'Scientific' or the 'Standard' and 'Radian/Degrees' options. 2. As soon as you turn off the eTrex Legend. To review the area...
Owner's Manual
Page 67
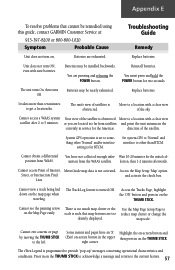
... WAAS satellite. Appendix E To resolve problems that map features are too densely displayed. Batteries may be remedied using this guide, contact GARMIN Customer Service at: 913-397-8200 or 800-800-1020 Symptom Probable Cause Troubleshooting Guide Remedy Unit does not turn ON, even with new batteries. You are exhausted. direction of the sky. The unit's view of Interest, MetroGuide map data is for the Americas. lection, then 1-2 minutes afterwards. The eTrex Legend is...
... WAAS satellite. Appendix E To resolve problems that map features are too densely displayed. Batteries may be remedied using this guide, contact GARMIN Customer Service at: 913-397-8200 or 800-800-1020 Symptom Probable Cause Troubleshooting Guide Remedy Unit does not turn ON, even with new batteries. You are exhausted. direction of the sky. The unit's view of Interest, MetroGuide map data is for the Americas. lection, then 1-2 minutes afterwards. The eTrex Legend is...

Owner's Manual
Page 71
... set the date and time 43, 48, 49, 50 set the location 48, 50 show Data Fields 13 show Nav Status 13 stop navigating 13, 34, 40 transfer data 56 use Setup Map options 15 use the Measure Distance option 15 use Track Log Setup options 42 view the next waypoint in the route 39 Hunt and Fish 50 I Installing Batteries 3 Lanyard 2 Interface Page 46 Internal Antenna 2 L Land Cover 15 Land or Water 14 Language 47 LCD Display 2 Leg Course...
... set the date and time 43, 48, 49, 50 set the location 48, 50 show Data Fields 13 show Nav Status 13 stop navigating 13, 34, 40 transfer data 56 use Setup Map options 15 use the Measure Distance option 15 use Track Log Setup options 42 view the next waypoint in the route 39 Hunt and Fish 50 I Installing Batteries 3 Lanyard 2 Interface Page 46 Internal Antenna 2 L Land Cover 15 Land or Water 14 Language 47 LCD Display 2 Leg Course...
Owner's Manual
Page 72
..., 54 Measure Distance 11, 15 Memory Used 47 Modes Demo 47 Normal 47 Moving Avg. Speed 13, 14, 18, 21, 54 Moving a Waypoint 25, 38 N National Imagery and Mapping Agency..... 44 Navigation About 4, 8, 17 Data Fields 18 Main Page 16, 54 Options 18 Route 8, 39 Nearest (Waypoints, Cities, etc 27-32 New Elevation 6 New Location 7 NMEA 46, 52, 58 NMEA Out 46 Normal Mode 47 North Reference 45 North Up 6, 14 O Odometer 14, 18...
..., 54 Measure Distance 11, 15 Memory Used 47 Modes Demo 47 Normal 47 Moving Avg. Speed 13, 14, 18, 21, 54 Moving a Waypoint 25, 38 N National Imagery and Mapping Agency..... 44 Navigation About 4, 8, 17 Data Fields 18 Main Page 16, 54 Options 18 Route 8, 39 Nearest (Waypoints, Cities, etc 27-32 New Elevation 6 New Location 7 NMEA 46, 52, 58 NMEA Out 46 Normal Mode 47 North Reference 45 North Up 6, 14 O Odometer 14, 18...
Owner's Manual
Page 73
... settings 36, 37 Route Page 23 Using 35 RTCM In 46 RTCM In/NMEA Out 46 RTCM In/Text Out 46 S Satellite Page 4-7 Saved Tracks 14 Saving the Track Log 41, 47 Selecting a Waypoint 28 Serial Number vii Setting the Correct Time Zone 22 Setup and Features 1 Setup Map 11, 14 Setup Map options 15 Setup Menu 43 Setup Page 22, 23 Setup the Navigation Page 18 Set course 16-20 Show Data Fields 11, 13 Navigation Status 13 Nav Status 11 Software...
... settings 36, 37 Route Page 23 Using 35 RTCM In 46 RTCM In/NMEA Out 46 RTCM In/Text Out 46 S Satellite Page 4-7 Saved Tracks 14 Saving the Track Log 41, 47 Selecting a Waypoint 28 Serial Number vii Setting the Correct Time Zone 22 Setup and Features 1 Setup Map 11, 14 Setup Map options 15 Setup Menu 43 Setup Page 22, 23 Setup the Navigation Page 18 Set course 16-20 Show Data Fields 11, 13 Navigation Status 13 Nav Status 11 Software...
Quick Reference Guide
Page 1
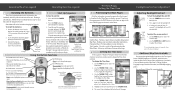
... a few more detailed view of the map. 2. The Navigation Page displays the 'Bearing Pointer' indicating the direction to display the Information Page. 5. To mark a waypoint: 1. Use the THUMB STICK to Get You Started (Turn this page and begin with Step 1) As you find your location as a waypoint and automatically assigned a three digit number. 2. To stop . C Printed in to go. Options Menu Button A Goto on the Navigation Page Map Page on back) LCD...
... a few more detailed view of the map. 2. The Navigation Page displays the 'Bearing Pointer' indicating the direction to display the Information Page. 5. To mark a waypoint: 1. Use the THUMB STICK to Get You Started (Turn this page and begin with Step 1) As you find your location as a waypoint and automatically assigned a three digit number. 2. To stop . C Printed in to go. Options Menu Button A Goto on the Navigation Page Map Page on back) LCD...
Quick Reference Guide
Page 2
.... Backlighting/Contrast Adjustment Adjusting Backlight/Contrast POWER Button To turn clockwise. Available choices include the MetroGuide, Points of satellites being tracked. See your current location as shown at the bottom of Interest List Map Showing Resturant Choice To install the batteries: 1. After that, it outside with the right hand, if preferred. The FIND button: LEGEND The PAGE button: • Press to cycle through lists, highlight fields, on-screen buttons, icons, enter data or move the map...
.... Backlighting/Contrast Adjustment Adjusting Backlight/Contrast POWER Button To turn clockwise. Available choices include the MetroGuide, Points of satellites being tracked. See your current location as shown at the bottom of Interest List Map Showing Resturant Choice To install the batteries: 1. After that, it outside with the right hand, if preferred. The FIND button: LEGEND The PAGE button: • Press to cycle through lists, highlight fields, on-screen buttons, icons, enter data or move the map...


