Getting Started Guide
Page 10
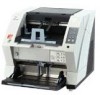
... panel consists of the scanner. Name 2 Pick rollers 3 Separator rollers 4 Brake roller 5 Pad Description Rollers that pick the paper from the default setting) Use this button to start linked applications (*About the settings, refer to help separate the paper as the feeding begins. Roller used to "Indications on... to Scan No. Separation Pad used to the "fi-5900C Operator's Guide" on the document thickness) Upper: 100 sheets Middle: 300 sheets Lower: 500 sheets Use these buttons to adjust the height of the scanner. This is a consumable item. 2 Name Function Hopper...
... panel consists of the scanner. Name 2 Pick rollers 3 Separator rollers 4 Brake roller 5 Pad Description Rollers that pick the paper from the default setting) Use this button to start linked applications (*About the settings, refer to help separate the paper as the feeding begins. Roller used to "Indications on... to Scan No. Separation Pad used to the "fi-5900C Operator's Guide" on the document thickness) Upper: 100 sheets Middle: 300 sheets Lower: 500 sheets Use these buttons to adjust the height of the scanner. This is a consumable item. 2 Name Function Hopper...

Getting Started Guide
Page 25
...] button. The Daily Care". Have you set the document thickness on fi-5900C and select Properties. Clean the Separator roller or the Pick rollers. Replace the Separator roller or the Pick rollers. Right-click on the Operator panel? fi-5900C Image Scanner Getting Started AP-2 Check this item Remedy Do the documents satisfy the "Document Quality" and the "Multifeed Detection Conditions" in the control...
...] button. The Daily Care". Have you set the document thickness on fi-5900C and select Properties. Clean the Separator roller or the Pick rollers. Replace the Separator roller or the Pick rollers. Right-click on the Operator panel? fi-5900C Image Scanner Getting Started AP-2 Check this item Remedy Do the documents satisfy the "Document Quality" and the "Multifeed Detection Conditions" in the control...

Getting Started Guide
Page 26
For details, refer to fi-5900C Operator's Guide "4.5 Cleaning the Transport path and the sensors". 2. When you purchased the scanner or an authorized FUJITSU scanner service provider. AP-3 The stacker is opened. Clean the document sensors For details refer to the "fi-590PRF/ fi-590PRB Operator's Guide, "5...error (back) The motor fuse has blown out. Confirm that the Pick roller is below stacker's capacity, and that the documents meet the paper specifications for releasing of each of the scanner. The following error occurred: 1. ■ Temporary error Indication U1...
For details, refer to fi-5900C Operator's Guide "4.5 Cleaning the Transport path and the sensors". 2. When you purchased the scanner or an authorized FUJITSU scanner service provider. AP-3 The stacker is opened. Clean the document sensors For details refer to the "fi-590PRF/ fi-590PRB Operator's Guide, "5...error (back) The motor fuse has blown out. Confirm that the Pick roller is below stacker's capacity, and that the documents meet the paper specifications for releasing of each of the scanner. The following error occurred: 1. ■ Temporary error Indication U1...

Getting Started Guide
Page 27
...fi-5900C Operator"s Guide. The Feed roller must be cleaned with a lint-free cloth moistened with pencil For details on the cleaning the ADF, refer to clean Pad Pick rollers Brake roller Separator rollers Feed rollers Pinch rollers Transport path Glass Skew-detection sensor Document sensor Standard Cleaning Cycle Clean these parts after every 10,000 scans. ATTENTION The scanner...dry cloth For details about the cleaning materials, contact the FUJITSU scanner dealer where you clean the Feed rollers or Eject rollers. ■ Cleaning Materials Cleaning Materials Parts No. Remarks ...
...fi-5900C Operator"s Guide. The Feed roller must be cleaned with a lint-free cloth moistened with pencil For details on the cleaning the ADF, refer to clean Pad Pick rollers Brake roller Separator rollers Feed rollers Pinch rollers Transport path Glass Skew-detection sensor Document sensor Standard Cleaning Cycle Clean these parts after every 10,000 scans. ATTENTION The scanner...dry cloth For details about the cleaning materials, contact the FUJITSU scanner dealer where you clean the Feed rollers or Eject rollers. ■ Cleaning Materials Cleaning Materials Parts No. Remarks ...

Getting Started Guide
Page 28
... PA03450- Pick roller Separator roller ■ Consumables and Replacement Cycle The followings are rough guidelines when scanning A4/Letter sized, 20lb paper. This cleaning cycle varies according to "Chapter 5 Replacing Consumables" fi-5900C Operator's Guide on the Setup CD-ROM. The replacement cycles above are the specifications of papers scanned and how frequently the scanner is...
... PA03450- Pick roller Separator roller ■ Consumables and Replacement Cycle The followings are rough guidelines when scanning A4/Letter sized, 20lb paper. This cleaning cycle varies according to "Chapter 5 Replacing Consumables" fi-5900C Operator's Guide on the Setup CD-ROM. The replacement cycles above are the specifications of papers scanned and how frequently the scanner is...
Operator's Guide
Page 18
... the Pad 121 5.4 Replacing the Pick Roller 122 5.5 Replacing the Separator Rollers 124 5.6 Replacing the Brake roller 127 6 SOLVING COMMON PROBLEMS .......... 129 6.1 Clearing Document Jams 130 6.2 Error messages of the Operator panel 132 6.3 Troubleshooting 135 6.4 Before Contacting a Service Provider 148 6.5 Labels on the Scanner 150 7 DOCUMENT SPECIFICATIONS 151 7.1 Document Size 152 7.2 Document Quality 153 7.3 Maximum Document Loading Capacity 156 7.4 Hole...
... the Pad 121 5.4 Replacing the Pick Roller 122 5.5 Replacing the Separator Rollers 124 5.6 Replacing the Brake roller 127 6 SOLVING COMMON PROBLEMS .......... 129 6.1 Clearing Document Jams 130 6.2 Error messages of the Operator panel 132 6.3 Troubleshooting 135 6.4 Before Contacting a Service Provider 148 6.5 Labels on the Scanner 150 7 DOCUMENT SPECIFICATIONS 151 7.1 Document Size 152 7.2 Document Quality 153 7.3 Maximum Document Loading Capacity 156 7.4 Hole...

Operator's Guide
Page 24
... Hopper Heihgt Thin Power Thickness Thick Send to help separate the paper as the feeding begins. This is a consumable item. This is a consumable item. Name 1 Document smoother 2 Pick Rollers 3 Separator rollers 4 Brake rollers 5 Pad Description Attached when the stacker position is set to help separate the paper as the feeding begins.
... Hopper Heihgt Thin Power Thickness Thick Send to help separate the paper as the feeding begins. This is a consumable item. This is a consumable item. Name 1 Document smoother 2 Pick Rollers 3 Separator rollers 4 Brake rollers 5 Pad Description Attached when the stacker position is set to help separate the paper as the feeding begins.

Operator's Guide
Page 41
Start the scanner application and scan the document. Lock Lever • Release the lever. ⇒Now the two sides will not be picked.). 2 Pick roller BASIC SCANNER OPERATIONS 5. For the details on how to scan using ScandAll 21, refer to unlock side guides, follow the steps below: HINT • Release the ... Switch • Move both side guides toward the center while pressing the lock lever. ATTENTION Make sure that all the pages fall under the pick roller. (Otherwise they will move symmetrically as before. 2.6 Loading Documents on page 30 If you want to "2.10 Scanning...
Start the scanner application and scan the document. Lock Lever • Release the lever. ⇒Now the two sides will not be picked.). 2 Pick roller BASIC SCANNER OPERATIONS 5. For the details on how to scan using ScandAll 21, refer to unlock side guides, follow the steps below: HINT • Release the ... Switch • Move both side guides toward the center while pressing the lock lever. ATTENTION Make sure that all the pages fall under the pick roller. (Otherwise they will move symmetrically as before. 2.6 Loading Documents on page 30 If you want to "2.10 Scanning...

Operator's Guide
Page 55
Pick Roller Unit 2 Hopper Guide Plate BASIC SCANNER OPERATIONS ⇒The Pick roller unit will click into place. ⇒The hopper will move up at the center of the hopper, instead set them a bit apart. 2.12 Feeding Documents Manually 35 Place documents face-up to get your fingers or anything caught in... feed position. Lift up . 2. ATTENTION • If there is any document loaded on the left side using your finger. At this moment, do not stick the top edge of the document against the inner side of the hopper table. ■ Single Feed 1. Lift up the Pick roller unit.
Pick Roller Unit 2 Hopper Guide Plate BASIC SCANNER OPERATIONS ⇒The Pick roller unit will click into place. ⇒The hopper will move up at the center of the hopper, instead set them a bit apart. 2.12 Feeding Documents Manually 35 Place documents face-up to get your fingers or anything caught in... feed position. Lift up . 2. ATTENTION • If there is any document loaded on the left side using your finger. At this moment, do not stick the top edge of the document against the inner side of the hopper table. ■ Single Feed 1. Lift up the Pick roller unit.
Operator's Guide
Page 57
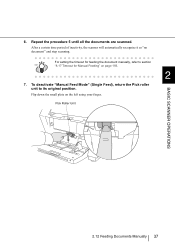
To deactivate "Manual Feed Mode" (Single Feed), return the Pick roller unit to section HINT "8.17 Timeout for feeding the document manually, refer to its original position. Pick Roller Unit BASIC SCANNER OPERATIONS 2.12 Feeding Documents Manually 37 For setting the timeout for Manual Feeding" on the left using your finger. Repeat the procedure 5 until all the documents are scanned. After a certain time period of inactivity, the scanner will automatically recognize it as "no document" and stop scanning. Flip down the small plate on page 193. 2 7. 6.
To deactivate "Manual Feed Mode" (Single Feed), return the Pick roller unit to section HINT "8.17 Timeout for feeding the document manually, refer to its original position. Pick Roller Unit BASIC SCANNER OPERATIONS 2.12 Feeding Documents Manually 37 For setting the timeout for Manual Feeding" on the left using your finger. Repeat the procedure 5 until all the documents are scanned. After a certain time period of inactivity, the scanner will automatically recognize it as "no document" and stop scanning. Flip down the small plate on page 193. 2 7. 6.
Operator's Guide
Page 93
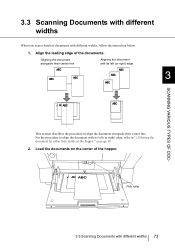
..., refer to align the document alongside their center line Aligning the document with its left (or right) edge 3 SCANNING VARIOUS TYPES OF DOC- Load the documents on page 19. 2. Aligning the document alongside their center line. Align the leading edge of the documents. on the center of the hopper. Pick roller 3.3 Scanning Documents with different widths, follow the...
..., refer to align the document alongside their center line Aligning the document with its left (or right) edge 3 SCANNING VARIOUS TYPES OF DOC- Load the documents on page 19. 2. Aligning the document alongside their center line. Align the leading edge of the documents. on the center of the hopper. Pick roller 3.3 Scanning Documents with different widths, follow the...

Operator's Guide
Page 94
Align the stacker's position. Align the side guides to "2.7 Setting up the Stacker" on page 22 for details. 74 3.3 Scanning Documents with different widths Refer to the width of the widest document. 原稿 幅 異 場合 4. ATTENTION Load the documents so that each sheet can be reached by the pick roller. (If the documents are not placed below the Pick roller, the document feeding will not be possible.) Pick roller 3.
Align the stacker's position. Align the side guides to "2.7 Setting up the Stacker" on page 22 for details. 74 3.3 Scanning Documents with different widths Refer to the width of the widest document. 原稿 幅 異 場合 4. ATTENTION Load the documents so that each sheet can be reached by the pick roller. (If the documents are not placed below the Pick roller, the document feeding will not be possible.) Pick roller 3.

Operator's Guide
Page 121
... or fi-590PRB imprinters. cleaning method cleaning sheet cleaning cycle Pad Pick rollers Brake roller Separator rollers Feed roller Pinch roller Transport path Glass Skew-detection sensor Document sensors every 10,000 scanned pages 3 3 3 3 3 3 cloth moistened with cleaner F1 every 10,000 scanned pages 3 3 3 3 3 3 3 3 3 3 cloth moistened with cleaner F2 clean when dirty 3 DAILY CARE 4 ATTENTION • The scanner must...
... or fi-590PRB imprinters. cleaning method cleaning sheet cleaning cycle Pad Pick rollers Brake roller Separator rollers Feed roller Pinch roller Transport path Glass Skew-detection sensor Document sensors every 10,000 scanned pages 3 3 3 3 3 3 cloth moistened with cleaner F1 every 10,000 scanned pages 3 3 3 3 3 3 3 3 3 3 cloth moistened with cleaner F2 clean when dirty 3 DAILY CARE 4 ATTENTION • The scanner must...

Operator's Guide
Page 127
Open the Pad cover. Pad cover 4.4 Cleaning the Rollers (with a lint-free cloth) 107 Close the roller cover after the cleaning is finished. 6. 4. Pick roller 4 DAILY CARE Separator roller Roller cover 5. Clean the Pick roller and the rubber surface of the cover, press to the inside and pull down (towards you), as shown in the illustration below. Grab both sides of the Separator rollers using the cleaner F1 or isopropyl alcohol.
Open the Pad cover. Pad cover 4.4 Cleaning the Rollers (with a lint-free cloth) 107 Close the roller cover after the cleaning is finished. 6. 4. Pick roller 4 DAILY CARE Separator roller Roller cover 5. Clean the Pick roller and the rubber surface of the cover, press to the inside and pull down (towards you), as shown in the illustration below. Grab both sides of the Separator rollers using the cleaner F1 or isopropyl alcohol.

Operator's Guide
Page 135
5 REPLACEMENT OF CONSUMABLES This chapter describes how to replace consumables. 5.1 Consumables and Replacement Cycle 116 5.2 How to check and reset the Consumables Counter........ 117 5.3 Replacing the Pad 121 5.4 Replacing the Pick Roller 122 5.5 Replacing the Separator Rollers 124 5.6 Replacing the Brake roller 127 115
5 REPLACEMENT OF CONSUMABLES This chapter describes how to replace consumables. 5.1 Consumables and Replacement Cycle 116 5.2 How to check and reset the Consumables Counter........ 117 5.3 Replacing the Pad 121 5.4 Replacing the Pick Roller 122 5.5 Replacing the Separator Rollers 124 5.6 Replacing the Brake roller 127 115

Operator's Guide
Page 136
... on page 117 Part Name Pad Part No. For the purchase of the consumables, contact the FUJITSU scanner dealer where you stock extra consumables before the ones in the scanner reach the end of Their service life. It can check the number of the consumables. 5.1 ...purchased your scanner. You can be replaced periodically. The replacement cycle may differ due to check and reset the Consumables Counter" on Letter/A4 woodfree paper or wood containing paper documents (64 g/m2). PA03450-K014 Standard replacement cycle 600,000 sheets or 1 year Pick Rollers Brake Roller PA03450-...
... on page 117 Part Name Pad Part No. For the purchase of the consumables, contact the FUJITSU scanner dealer where you stock extra consumables before the ones in the scanner reach the end of Their service life. It can check the number of the consumables. 5.1 ...purchased your scanner. You can be replaced periodically. The replacement cycle may differ due to check and reset the Consumables Counter" on Letter/A4 woodfree paper or wood containing paper documents (64 g/m2). PA03450-K014 Standard replacement cycle 600,000 sheets or 1 year Pick Rollers Brake Roller PA03450-...
Operator's Guide
Page 138
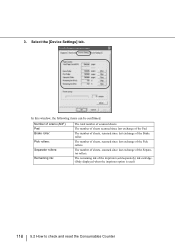
... items can be confirmed. The number of sheets, scanned since last exchange of the Pick rollers. Select the [Device Settings] tab. The number of sheets, scanned since last exchange of the Brake roller. Number of scans (ADF): Pad: Brake roller: Pick rollers: Separator rollers: Remaining ink: The total number of the imprinter (sold separately) ink cartridge. (Only...
... items can be confirmed. The number of sheets, scanned since last exchange of the Pick rollers. Select the [Device Settings] tab. The number of sheets, scanned since last exchange of the Brake roller. Number of scans (ADF): Pad: Brake roller: Pick rollers: Separator rollers: Remaining ink: The total number of the imprinter (sold separately) ink cartridge. (Only...

Operator's Guide
Page 140
...will disappear and scanning will continue. Pad: Pick rollers: Separator rollers: Brake roller: "5.3 Replacing the Pad" on page 121 "5.4 Replacing the Pick Roller" on page 122 "5.5 Replacing the Separator Rollers" on page 124 "5.6 Replacing the Brake roller" on page 127 120 5.2 How to... display, click the [this message not display again]. ■ Consumables replacement message The following sections. If you do not wish this message is displayed. For the replacement of consumables, refer to the following message may appear while using the scanner...
...will disappear and scanning will continue. Pad: Pick rollers: Separator rollers: Brake roller: "5.3 Replacing the Pad" on page 121 "5.4 Replacing the Pick Roller" on page 122 "5.5 Replacing the Separator Rollers" on page 124 "5.6 Replacing the Brake roller" on page 127 120 5.2 How to... display, click the [this message not display again]. ■ Consumables replacement message The following sections. If you do not wish this message is displayed. For the replacement of consumables, refer to the following message may appear while using the scanner...

Operator's Guide
Page 142
Open the roller cover. Roller cover 2. Depression Roller cover 122 5.4 Replacing the Pick Roller 5.4 Replacing the Pick Roller 1. Put your fingers in the depression on the left and right side and pull the cover towards you to "2.3 Opening and Closing ADF" on page 12. Open the ADF cover. Refer to open it.
Open the roller cover. Roller cover 2. Depression Roller cover 122 5.4 Replacing the Pick Roller 5.4 Replacing the Pick Roller 1. Put your fingers in the depression on the left and right side and pull the cover towards you to "2.3 Opening and Closing ADF" on page 12. Open the ADF cover. Refer to open it.

Operator's Guide
Page 143
... page 12 7. While pulling up the tab away from the shaft for removal. Pick Roller r 5 4. Close the ADF cover. Install the new Pick rollers (2 rollers, left and right) from the shaft, slide the Pick rollers (2 rollers, left and right) in place. 5. REPLACEMENT OF CONSUMABLES 3. Reset the Pick roller counter Refer to "5.2 How to "2.3 Opening and Closing ADF" on page 117...
... page 12 7. While pulling up the tab away from the shaft for removal. Pick Roller r 5 4. Close the ADF cover. Install the new Pick rollers (2 rollers, left and right) from the shaft, slide the Pick rollers (2 rollers, left and right) in place. 5. REPLACEMENT OF CONSUMABLES 3. Reset the Pick roller counter Refer to "5.2 How to "2.3 Opening and Closing ADF" on page 117...


