Operating Guide
Page 27
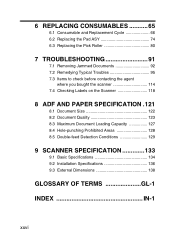
... the Pad ASY 74 6.3 Replacing the Pick Roller 80 7 TROUBLESHOOTING 91 7.1 Removing Jammed Documents 92 7.2 Remedying Typical Troubles 95 7.3 Items to check before contacting the agent where you bought the scanner 114 7.4 Checking Labels on the Scanner 118 8 ADF AND PAPER SPECIFICATION .121 8.1 Document Size 122 8.2 Document Quality 123 8.3 Maximum Document Loading Capacity 127 8.4 Hole-punching Prohibited...
... the Pad ASY 74 6.3 Replacing the Pick Roller 80 7 TROUBLESHOOTING 91 7.1 Removing Jammed Documents 92 7.2 Remedying Typical Troubles 95 7.3 Items to check before contacting the agent where you bought the scanner 114 7.4 Checking Labels on the Scanner 118 8 ADF AND PAPER SPECIFICATION .121 8.1 Document Size 122 8.2 Document Quality 123 8.3 Maximum Document Loading Capacity 127 8.4 Hole-punching Prohibited...
Operating Guide
Page 35
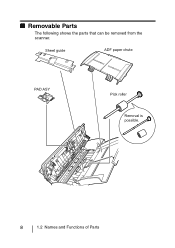
Sheet guide ADF paper chute PAD ASY Pick roller Removal is possible. 8 1.2 Names and Functions of Parts I Removable Parts The following shows the parts that can be removed from the scanner.
Sheet guide ADF paper chute PAD ASY Pick roller Removal is possible. 8 1.2 Names and Functions of Parts I Removable Parts The following shows the parts that can be removed from the scanner.

Operating Guide
Page 84
...;Chemically treated documents such as carbonless paper •Documents containing a large amount of calcium carbonate •Documents with lots of pencil-written areas 5.1 Cleaning Materials and Locations and Cleaning Cycle 57 Location Pad ASY Pick roller Feed roller Plastic roller Sheet guide Glass Standard Cleaning Cycle Clean every 1000 scanned sheets. ATTENTION The scanner must be cleaned...
...;Chemically treated documents such as carbonless paper •Documents containing a large amount of calcium carbonate •Documents with lots of pencil-written areas 5.1 Cleaning Materials and Locations and Cleaning Cycle 57 Location Pad ASY Pick roller Feed roller Plastic roller Sheet guide Glass Standard Cleaning Cycle Clean every 1000 scanned sheets. ATTENTION The scanner must be cleaned...
Operating Guide
Page 85
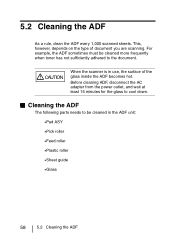
For example, the ADF sometimes must be cleaned in use, the surface of document you are scanning. CAUTION When the scanner is in the ADF unit: •Pad ASY •Pick roller •Feed roller •Plastic roller •Sheet guide • Glass 58 5.2 Cleaning the ADF I Cleaning the ADF The following parts needs to be... ADF becomes hot. Before cleaning ADF, disconnect the AC adapter from the power outlet, and wait at least 15 minutes for the glass to the document.
For example, the ADF sometimes must be cleaned in use, the surface of document you are scanning. CAUTION When the scanner is in the ADF unit: •Pad ASY •Pick roller •Feed roller •Plastic roller •Sheet guide • Glass 58 5.2 Cleaning the ADF I Cleaning the ADF The following parts needs to be... ADF becomes hot. Before cleaning ADF, disconnect the AC adapter from the power outlet, and wait at least 15 minutes for the glass to the document.
Operating Guide
Page 87
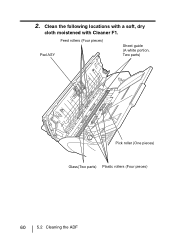
2. Feed rollers (Four pieces) Pad ASY Sheet guide (A white portion, Two parts) Pick roller (One pieces) Glass(Two parts) Plastic rollers (Four pieces) 60 5.2 Cleaning the ADF Clean the following locations with a soft, dry cloth moistened with Cleaner F1.
2. Feed rollers (Four pieces) Pad ASY Sheet guide (A white portion, Two parts) Pick roller (One pieces) Glass(Two parts) Plastic rollers (Four pieces) 60 5.2 Cleaning the ADF Clean the following locations with a soft, dry cloth moistened with Cleaner F1.
Operating Guide
Page 88
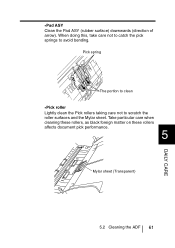
Pick spring The portion to clean •Pick roller Lightly clean the Pick rollers taking care not to avoid bending. Take particular care when cleaning these rollers, as black foreign matter on these rollers affects document pick performance. 5 Mylar sheet (Transparent) 5.2 Cleaning the ADF 61 DAILY CARE When doing this, take care not to catch the pick springs to scratch the roller surfaces and the Mylar sheet. •Pad ASY Clean the Pad ASY (rubber surface) downwards (direction of arrow).
Pick spring The portion to clean •Pick roller Lightly clean the Pick rollers taking care not to avoid bending. Take particular care when cleaning these rollers, as black foreign matter on these rollers affects document pick performance. 5 Mylar sheet (Transparent) 5.2 Cleaning the ADF 61 DAILY CARE When doing this, take care not to catch the pick springs to scratch the roller surfaces and the Mylar sheet. •Pad ASY Clean the Pad ASY (rubber surface) downwards (direction of arrow).
Operating Guide
Page 89
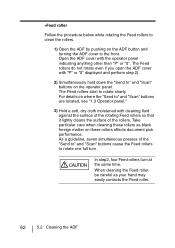
... ADF by pushing on the operator panel. Take particular care when cleaning these rollers affects document pick performance. As a guideline, seven simultaneous presses of the rollers. Open the ADF cover with cleaning fluid against the surface of the rotating Feed rollers so that it lightly cleans the surface of the "Send to" and "Scan...
... ADF by pushing on the operator panel. Take particular care when cleaning these rollers affects document pick performance. As a guideline, seven simultaneous presses of the rollers. Open the ADF cover with cleaning fluid against the surface of the rotating Feed rollers so that it lightly cleans the surface of the "Send to" and "Scan...
Operating Guide
Page 92
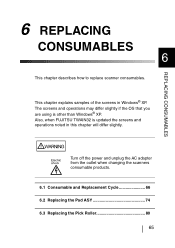
Also, when FUJITSU TWAIN32 is other than Windows® XP. WARNING Turn off the power and unplug the AC adapter from the outlet when changing the scanners consumable products. 6.1 Consumable and Replacement Cycle 66 6.2 Replacing the Pad ASY 74 6.3 Replacing the Pick Roller 80 65 This... chapter explains samples of the screens in this chapter will differ slightly. REPLACING CONSUMABLES 6 REPLACING CONSUMABLES 6 This chapter describes how to replace scanner consumables. The screens and operations may differ slightly if ...
Also, when FUJITSU TWAIN32 is other than Windows® XP. WARNING Turn off the power and unplug the AC adapter from the outlet when changing the scanners consumable products. 6.1 Consumable and Replacement Cycle 66 6.2 Replacing the Pad ASY 74 6.3 Replacing the Pick Roller 80 65 This... chapter explains samples of the screens in this chapter will differ slightly. REPLACING CONSUMABLES 6 REPLACING CONSUMABLES 6 This chapter describes how to replace scanner consumables. The screens and operations may differ slightly if ...
Operating Guide
Page 93
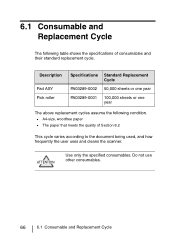
... roller Specifications Standard Replacement Cycle PA03289-0002 50,000 sheets or one year PA03289-0001 100,000 sheets or one year The above replacement cycles assume the following table shows the specifications of Section 8.2 This cycle varies according to the document being used, and how frequently the user uses and cleans the scanner...
... roller Specifications Standard Replacement Cycle PA03289-0002 50,000 sheets or one year PA03289-0001 100,000 sheets or one year The above replacement cycles assume the following table shows the specifications of Section 8.2 This cycle varies according to the document being used, and how frequently the user uses and cleans the scanner...
Operating Guide
Page 98
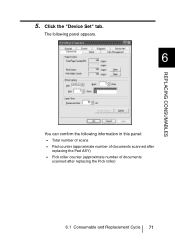
Click the "Device Set" tab. The following panel appears. 6 You can confirm the following information in this panel: • Total number of scans • Pad counter (approximate number of documents scanned after replacing the Pad ASY) • Pick roller counter (approximate number of documents scanned after replacing the Pick roller) 6.1 Consumable and Replacement Cycle 71 REPLACING CONSUMABLES 5.
Click the "Device Set" tab. The following panel appears. 6 You can confirm the following information in this panel: • Total number of scans • Pad counter (approximate number of documents scanned after replacing the Pad ASY) • Pick roller counter (approximate number of documents scanned after replacing the Pick roller) 6.1 Consumable and Replacement Cycle 71 REPLACING CONSUMABLES 5.
Operating Guide
Page 99
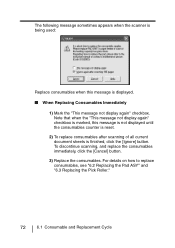
For details on how to replace consumables, see "6.2 Replacing the Pad ASY" and "6.3 Replacing the Pick Roller." 72 6.1 Consumable and Replacement Cycle Note that when the "This message not display again" checkbox is marked, this message is finished, click... To discontinue scanning, and replace the consumables immediately, click the [Cancel] button. 3) Replace the consumables. The following message sometimes appears when the scanner is being used: Replace consumables when this message is not displayed until the consumables counter is reset. 2) To replace consumables after scanning of all ...
For details on how to replace consumables, see "6.2 Replacing the Pad ASY" and "6.3 Replacing the Pick Roller." 72 6.1 Consumable and Replacement Cycle Note that when the "This message not display again" checkbox is marked, this message is finished, click... To discontinue scanning, and replace the consumables immediately, click the [Cancel] button. 3) Replace the consumables. The following message sometimes appears when the scanner is being used: Replace consumables when this message is not displayed until the consumables counter is reset. 2) To replace consumables after scanning of all ...

Operating Guide
Page 100
..." checkbox. REPLACING CONSUMABLES I When Consumables Cannot Be Replaced Immediately 1) To disable display of the current document, click the [Ignore] button. For details on how to replace consumables, see "6.2 Replacing the Pad ASY" and "6.3 Replacing the Pick Roller." 6.1 Consumable and Replacement Cycle 73 To discontinue scanning, click the [Cancel] button. 3) Replace the consumable...
..." checkbox. REPLACING CONSUMABLES I When Consumables Cannot Be Replaced Immediately 1) To disable display of the current document, click the [Ignore] button. For details on how to replace consumables, see "6.2 Replacing the Pad ASY" and "6.3 Replacing the Pick Roller." 6.1 Consumable and Replacement Cycle 73 To discontinue scanning, click the [Cancel] button. 3) Replace the consumable...

Operating Guide
Page 107
Remove the ADF paper chute. ADF paper chute 80 6.3 Replacing the Pick Roller 6.3 Replacing the Pick Roller The following shows the procedure for replacing the Pick roller. 1. Remove any documents on the ADF paper chute. 2.
Remove the ADF paper chute. ADF paper chute 80 6.3 Replacing the Pick Roller 6.3 Replacing the Pick Roller The following shows the procedure for replacing the Pick roller. 1. Remove any documents on the ADF paper chute. 2.
Operating Guide
Page 108
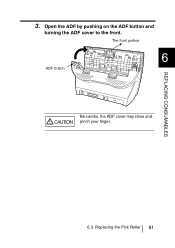
The front portion 6 ADF button Be careful, the ADF cover may close and CAUTION pinch your finger. 6.3 Replacing the Pick Roller 81 Open the ADF by pushing on the ADF button and turning the ADF cover to the front. REPLACING CONSUMABLES 3.
The front portion 6 ADF button Be careful, the ADF cover may close and CAUTION pinch your finger. 6.3 Replacing the Pick Roller 81 Open the ADF by pushing on the ADF button and turning the ADF cover to the front. REPLACING CONSUMABLES 3.

Operating Guide
Page 109
4. Pick roller bushing 82 6.3 Replacing the Pick Roller Remove the Pick roller from a scanner. 1) Grip the knobs on the sheet guide between you fingers, and lift up to remove. 2) Rotate the Pick roller bushing in the direction of the arrow.
4. Pick roller bushing 82 6.3 Replacing the Pick Roller Remove the Pick roller from a scanner. 1) Grip the knobs on the sheet guide between you fingers, and lift up to remove. 2) Rotate the Pick roller bushing in the direction of the arrow.

Operating Guide
Page 110
3) Remove the Pick roller while lifting it up the tab on the Pick roller. Do not turn this bearing with your fingernails. 4) Remove the Pick roller from the shaft while lifting up in the direction of the arrow. 6 REPLACING CONSUMABLES CAUTION The Pick roller Bushing is hard. tab Shaft Lift up. Pull shaft to remove. 6.3 Replacing the Pick Roller 83
3) Remove the Pick roller while lifting it up the tab on the Pick roller. Do not turn this bearing with your fingernails. 4) Remove the Pick roller from the shaft while lifting up in the direction of the arrow. 6 REPLACING CONSUMABLES CAUTION The Pick roller Bushing is hard. tab Shaft Lift up. Pull shaft to remove. 6.3 Replacing the Pick Roller 83
Operating Guide
Page 111
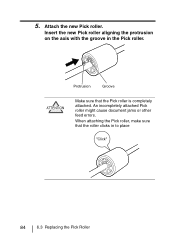
When attaching the Pick roller, make sure that the Pick roller is completely attached. Insert the new Pick roller aligning the protrusion on the axis with the groove in to place "Click" 84 6.3 Replacing the Pick Roller Protrusion Groove ATTENTION Make sure that the roller clicks in the Pick roller. An incompletely attached Pick roller might cause document jams or other feed errors. 5. Attach the new Pick roller.
When attaching the Pick roller, make sure that the Pick roller is completely attached. Insert the new Pick roller aligning the protrusion on the axis with the groove in to place "Click" 84 6.3 Replacing the Pick Roller Protrusion Groove ATTENTION Make sure that the roller clicks in the Pick roller. An incompletely attached Pick roller might cause document jams or other feed errors. 5. Attach the new Pick roller.

Operating Guide
Page 112
After attaching the Pick roller to the scanner, perform the following procedure to fix the sheet guide. 6.3 Replacing the Pick Roller 85 Pick roller bushing REPLACING CONSUMABLES 2) Move the sheet guide claws in the direction indicated by the arrow to fix it in place. 6 1) Turn the Pick roller bushing in the direction indicated by the arrow. The procedure to attach the Pick roller to the scanner. 6. Attach the Pick roller to the scanner is the inverted procedure of removing the Pick roller from the scanner.
After attaching the Pick roller to the scanner, perform the following procedure to fix the sheet guide. 6.3 Replacing the Pick Roller 85 Pick roller bushing REPLACING CONSUMABLES 2) Move the sheet guide claws in the direction indicated by the arrow to fix it in place. 6 1) Turn the Pick roller bushing in the direction indicated by the arrow. The procedure to attach the Pick roller to the scanner. 6. Attach the Pick roller to the scanner is the inverted procedure of removing the Pick roller from the scanner.

Operating Guide
Page 113
Press center of the ADF to return it to its original position and lock the ADF button. Attach the ADF paper chute. ADF paper chute 86 6.3 Replacing the Pick Roller Press down on the center of ADF. 8. 7.
Press center of the ADF to return it to its original position and lock the ADF button. Attach the ADF paper chute. ADF paper chute 86 6.3 Replacing the Pick Roller Press down on the center of ADF. 8. 7.

Operating Guide
Page 114
...Windows® 98 / Windows® Me / Windows® 2000 / Windows® XP 1) When turning on the power, check that the scanner and 6 the personal computer are connected. 2) Double click the "Printers and Other Hardware" icon on the operator panel of the host computer. ...The [Printers and Other Hardware] screen is displayed. The [Scanners and Cameras] screen is displayed. 3) In the [Printers and Other Hardware] screen, double click the "Scanners and Cameras" icon. 9. REPLACING CONSUMABLES 6.3 Replacing the Pick Roller 87 Reset the pick counter.
...Windows® 98 / Windows® Me / Windows® 2000 / Windows® XP 1) When turning on the power, check that the scanner and 6 the personal computer are connected. 2) Double click the "Printers and Other Hardware" icon on the operator panel of the host computer. ...The [Printers and Other Hardware] screen is displayed. The [Scanners and Cameras] screen is displayed. 3) In the [Printers and Other Hardware] screen, double click the "Scanners and Cameras" icon. 9. REPLACING CONSUMABLES 6.3 Replacing the Pick Roller 87 Reset the pick counter.


