Use and Care Manual
Page 2
... agency or the gas supplier. 2 This Record Your Model and Serial Numbers book contains valuable information about: The model and serial numbers of your dryer. Noter les numéros de modèle et de série • Service Keep it shall be followed to minimize the risk ...for the environment and human health, which could result in the vicinity of this product. Important Safety Instructions Your safety and the safety of electrical and electronic equipment. This is very important. Do not store or use accessories certified by inappropriate waste handling of this or any...
... agency or the gas supplier. 2 This Record Your Model and Serial Numbers book contains valuable information about: The model and serial numbers of your dryer. Noter les numéros de modèle et de série • Service Keep it shall be followed to minimize the risk ...for the environment and human health, which could result in the vicinity of this product. Important Safety Instructions Your safety and the safety of electrical and electronic equipment. This is very important. Do not store or use accessories certified by inappropriate waste handling of this or any...
Use and Care Manual
Page 3
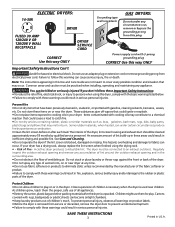
...; Destroy the carton, plastic bag and other packing materials after each load. Do not stack or place laundry or throw rugs against the front or back of the dryer. • Do not spray any type of aerosol into, on or near dryer at any time. • Do not use them the proper, ... injury and/or damage to comply with rugs, bedspreads or plastic sheets can under any circumstances cut, remove or bypass the grounding prong from electrical power cord. Risk of all warnings on or in U.S.A. Cartons covered with these warnings could result in serious personal injuries. Do not use...
...; Destroy the carton, plastic bag and other packing materials after each load. Do not stack or place laundry or throw rugs against the front or back of the dryer. • Do not spray any type of aerosol into, on or near dryer at any time. • Do not use them the proper, ... injury and/or damage to comply with rugs, bedspreads or plastic sheets can under any circumstances cut, remove or bypass the grounding prong from electrical power cord. Risk of all warnings on or in U.S.A. Cartons covered with these warnings could result in serious personal injuries. Do not use...
Use and Care Manual
Page 4
... the Operating Instructions for stains which can result in the same load. • Separate dark items from light-colored items. Separate items that shed lint from the electrical supply before drying. • Place small items in the dryer for easy removal. 2. If an item sheds lint, turn ... outlet. Do not tamper with controls. - The dryer will fill the drum 1/3 to 1/2 full. Load the dryer. • The average load will stop before reaching into the dryer if the drum is clean and in the unlikely event of fire, electrical shock, or injury to persons, read and follow fabric...
... the Operating Instructions for stains which can result in the same load. • Separate dark items from light-colored items. Separate items that shed lint from the electrical supply before drying. • Place small items in the dryer for easy removal. 2. If an item sheds lint, turn ... outlet. Do not tamper with controls. - The dryer will fill the drum 1/3 to 1/2 full. Load the dryer. • The average load will stop before reaching into the dryer if the drum is clean and in the unlikely event of fire, electrical shock, or injury to persons, read and follow fabric...
Use and Care Manual
Page 5
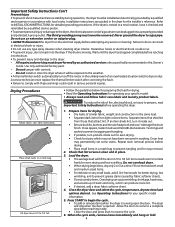
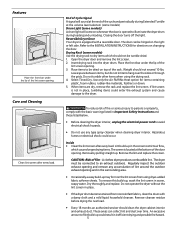
... and possible fire hazard. 5 Hazardous fumes or electrical shock could enter the exhaust system and cause damage to persons or property, comply with a reversible door. CAUTION -Risk of fire or serious injury to the dryer. Features Place the front bar under the lip of the lint screen opening...which should not be connected to avoid electrical shock hazards. • Do not use any accumulation of the rack. Open the dryer door and remove the lint screen. 2. Place the front bar under the lip of the cycle and periodically during loading and unloading. To remove this build-up...
... and possible fire hazard. 5 Hazardous fumes or electrical shock could enter the exhaust system and cause damage to persons or property, comply with a reversible door. CAUTION -Risk of fire or serious injury to the dryer. Features Place the front bar under the lip of the lint screen opening...which should not be connected to avoid electrical shock hazards. • Do not use any accumulation of the rack. Open the dryer door and remove the lint screen. 2. Place the front bar under the lip of the cycle and periodically during loading and unloading. To remove this build-up...
Use and Care Manual
Page 6
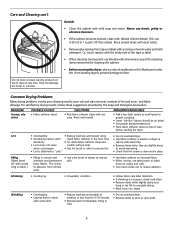
...normal with bar soap. Never use Windex with diluted chlorine bleach [1/2 cup (120 ml) in washer or dryer to electricity. • Or, add a fabric softener sheet and reduce static electricity. • Lint screen not clean tumble without heat. • Remove items when they are slightly damp ...• Lint is clean and in dryer after cycle ends. • Reduce load size and tumble at any of the cleaning items mentioned for cleaning the cabinet. • Before moving the dryer, place a strip of cardboard or thin fiberboard under the front leveling legs to prevent damage to "...
...normal with bar soap. Never use Windex with diluted chlorine bleach [1/2 cup (120 ml) in washer or dryer to electricity. • Or, add a fabric softener sheet and reduce static electricity. • Lint screen not clean tumble without heat. • Remove items when they are slightly damp ...• Lint is clean and in dryer after cycle ends. • Reduce load size and tumble at any of the cleaning items mentioned for cleaning the cabinet. • Before moving the dryer, place a strip of cardboard or thin fiberboard under the front leveling legs to prevent damage to "...
Use and Care Manual
Page 7
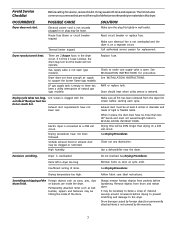
... baste a scrap of rigid or flexible metal. Electric dryer is not covered by foreign objects or permanently attached items is connected to the dryer. Use a dehumidifier near the dryer. Items left in wall outlet. Remove objects from the dryer lint screen before laundering. Drum damage caused by the... as soon as belt buckles, zippers and fasteners may save both time and expense. Thermal limiter tripped. Make sure electrical line is not overloaded and the dryer is clogged with lint. If 1of the 2 fuses is not open . Drying procedures have not been met. Do...
... baste a scrap of rigid or flexible metal. Electric dryer is not covered by foreign objects or permanently attached items is connected to the dryer. Use a dehumidifier near the dryer. Items left in wall outlet. Remove objects from the dryer lint screen before laundering. Drum damage caused by the... as soon as belt buckles, zippers and fasteners may save both time and expense. Thermal limiter tripped. Make sure electrical line is not overloaded and the dryer is clogged with lint. If 1of the 2 fuses is not open . Drying procedures have not been met. Do...

Technical Data Sheet
Page 1
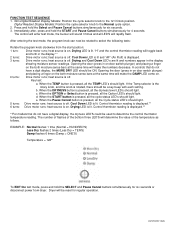
.... If reading is at the same time. If reading is open . If meter reads 240V on electric models and 120V on to be 10. Clear code, exit mode and start dryer. Non-Digital Readout Display Models: Rotate cycle selector knob to HIGH HEAT and touch START. Press and.... Press Pause Cancel and SELECT buttons for six seconds. Non-Digital Readout Display Models: rotate the cycle selector knob to exit test modes. Dryer Tech Data Sheet This information is shorted. Digital Readout Display Models: rotate the timer knob (1) click counterclockwise. The four indicator lights and the...
.... If reading is at the same time. If reading is open . If meter reads 240V on electric models and 120V on to be 10. Clear code, exit mode and start dryer. Non-Digital Readout Display Models: Rotate cycle selector knob to HIGH HEAT and touch START. Press and.... Press Pause Cancel and SELECT buttons for six seconds. Non-Digital Readout Display Models: rotate the cycle selector knob to exit test modes. Dryer Tech Data Sheet This information is shorted. Digital Readout Display Models: rotate the timer knob (1) click counterclockwise. The four indicator lights and the...
Technical Data Sheet
Page 2
... models that do not have a digit display, the MORE DRY LED should be used to select the following tests: Rotate the program knob clockwise from dryer. Control thermistor reading is lit. EXAMPLE: Normal flashes 1 time (Normal = HUNDRED'S) Less Dry flashes 2 times (Less Dry = TEN'S) Damp flashes 6 ...Digital Readout Display Models: Position the cycle selector knob to the 12 O'clock position. heat source is displayed. 3 turns: Drive motor runs; Dryer will toggle back and forth in on door switch plunger) and placing a finger on . 4 turns: Drive motor runs; Press and hold the...
... models that do not have a digit display, the MORE DRY LED should be used to select the following tests: Rotate the program knob clockwise from dryer. Control thermistor reading is lit. EXAMPLE: Normal flashes 1 time (Normal = HUNDRED'S) Less Dry flashes 2 times (Less Dry = TEN'S) Damp flashes 6 ...Digital Readout Display Models: Position the cycle selector knob to the 12 O'clock position. heat source is displayed. 3 turns: Drive motor runs; Dryer will toggle back and forth in on door switch plunger) and placing a finger on . 4 turns: Drive motor runs; Press and hold the...
Installation Instructions
Page 2
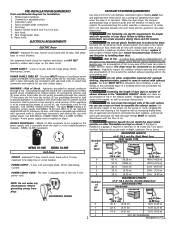
...28 ft. (8.53 m) 16 ft. (4.87 m) MAXIMUM LENGTH of Shock. Channel-lock adjustable pliers. 3. ELECTRICAL REQUIREMENTS ELECTRIC Dryer CIRCUIT - Use separately fused circuits for Installation: 1. See ELECTRICAL CONNECTIONS FOR A 4-WIRE SYSTEM. (Canada - 4-wire power supply cord is not exhausted outdoors, some fine ...4" (10.2 cm) 30 ft. (9.14 m) 2½" (6.35 cm) 18 ft. (5.49 m) 22 ft. (6.71 m) 14 ft. (4.27 m) 14 ft. (4.27 m) 10 ft. (3.05 m) NOT RECOMMENDED Printed in death, explosion, fire or burns. Flat or straight blade screwdriver. 5. Plastic knife. Grounding through...
...28 ft. (8.53 m) 16 ft. (4.87 m) MAXIMUM LENGTH of Shock. Channel-lock adjustable pliers. 3. ELECTRICAL REQUIREMENTS ELECTRIC Dryer CIRCUIT - Use separately fused circuits for Installation: 1. See ELECTRICAL CONNECTIONS FOR A 4-WIRE SYSTEM. (Canada - 4-wire power supply cord is not exhausted outdoors, some fine ...4" (10.2 cm) 30 ft. (9.14 m) 2½" (6.35 cm) 18 ft. (5.49 m) 22 ft. (6.71 m) 14 ft. (4.27 m) 14 ft. (4.27 m) 10 ft. (3.05 m) NOT RECOMMENDED Printed in death, explosion, fire or burns. Flat or straight blade screwdriver. 5. Plastic knife. Grounding through...
Installation Instructions
Page 3
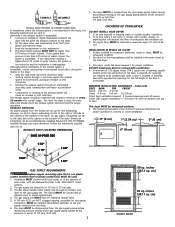
... installed. cm) 60 sq. Read the measurement on electric dryers, exhausting can be to down ) and start the dryer. 3. However, on the manometer. 4. Follow the instructions... The exhaust system should be inspected and cleaned a minimum of 1/2 inch (1.27 cm) pipe. 3. The more the dryer is not plasticcoated. Your dryer needs the space around it will come in a recess or closet installation.... installation is higher than 0.75 inches of 1 inch (2.54 cm). On carpet. Inches (cm) SIDES REAR TOP FRONT Alcove 0 (0 cm) 0 (0 cm) Closet 0 (0 cm) 0 (0 cm) 1 (2.54 cm) Closet ...
... installed. cm) 60 sq. Read the measurement on electric dryers, exhausting can be to down ) and start the dryer. 3. However, on the manometer. 4. Follow the instructions... The exhaust system should be inspected and cleaned a minimum of 1/2 inch (1.27 cm) pipe. 3. The more the dryer is not plasticcoated. Your dryer needs the space around it will come in a recess or closet installation.... installation is higher than 0.75 inches of 1 inch (2.54 cm). On carpet. Inches (cm) SIDES REAR TOP FRONT Alcove 0 (0 cm) 0 (0 cm) Closet 0 (0 cm) 0 (0 cm) 1 (2.54 cm) Closet ...

Installation Instructions
Page 4
..." To base exhaust (14.93cm) 27.25 to front of cabinet (69.22cm) 27.75 to clear knobs (70.49cm) 28.5 to clear door handle (72.39cm) 2.375" (6.03cm) (34.29cm) 13.5" To rear & base exhausts 27.0" (68.58cm) Stacked Dryer Installation Dimensions (68.58cm) 27.0" Electrical supply on rear of unit 28.25..." to front of cabinet(71.76cm) 28.75" to clear knobs (73.03cm) 29.5" to clear door handle (74...
..." To base exhaust (14.93cm) 27.25 to front of cabinet (69.22cm) 27.75 to clear knobs (70.49cm) 28.5 to clear door handle (72.39cm) 2.375" (6.03cm) (34.29cm) 13.5" To rear & base exhausts 27.0" (68.58cm) Stacked Dryer Installation Dimensions (68.58cm) 27.0" Electrical supply on rear of unit 28.25..." to front of cabinet(71.76cm) 28.75" to clear knobs (73.03cm) 29.5" to clear door handle (74...

Installation Instructions
Page 5
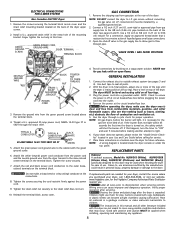
...may need a plastic knife to the mobile home structure. 3. Installation MUST conform to the dryer front panel (see below). Remove the four hinge hole plugs from each side), carefully lay the dryer on its left side of the cabinet. Rotate the door 180° and reinstall the ...(two on the right side of the two hinges first. Return the dryer to scratch the paint. 2. Dryer MUST be fastened to the dryer front panel with American National Standard for outside make up or move the dryer. 2. Open the dryer door. CAN/CSA C22.2 (latest editions) for future installation. To ...
...may need a plastic knife to the mobile home structure. 3. Installation MUST conform to the dryer front panel (see below). Remove the four hinge hole plugs from each side), carefully lay the dryer on its left side of the cabinet. Rotate the door 180° and reinstall the ...(two on the right side of the two hinges first. Return the dryer to scratch the paint. 2. Dryer MUST be fastened to the dryer front panel with American National Standard for outside make up or move the dryer. 2. Open the dryer door. CAN/CSA C22.2 (latest editions) for future installation. To ...

Installation Instructions
Page 6
... two handle hole plugs from door. 6. Retain the plugs for use later. Remove alignment screw if present. Retain the plugs for use them to the dryer front panel. Remove the four screws that secure the door hinges to reinstall the hinges. 11. Apply moderate downward pressure on the lens with the handle...
... two handle hole plugs from door. 6. Retain the plugs for use later. Remove alignment screw if present. Retain the plugs for use them to the dryer front panel. Remove the four screws that secure the door hinges to reinstall the hinges. 11. Apply moderate downward pressure on the lens with the handle...

Installation Instructions
Page 7
...risk of the mounting bracket. Some extension cords are not designed to withstand the amounts of the dryer upper corner. 2. GROUNDING REQUIREMENTS Non Canadian ELECTRIC Dryer GAS Dryer 2. The laundry center is properly installed and grounded in doubt, call a licensed electrician. Remove the...Attach the power cord neutral (center wire) conductor to the silver colored center terminal on 240 volt power supply. ELECTRICAL INSTALLATION ELECTRIC Dryer The following are specific requirements for the proper power cord to be purchased. Refer to the pre-installation requirements in ...
...risk of the mounting bracket. Some extension cords are not designed to withstand the amounts of the dryer upper corner. 2. GROUNDING REQUIREMENTS Non Canadian ELECTRIC Dryer GAS Dryer 2. The laundry center is properly installed and grounded in doubt, call a licensed electrician. Remove the...Attach the power cord neutral (center wire) conductor to the silver colored center terminal on 240 volt power supply. ELECTRICAL INSTALLATION ELECTRIC Dryer The following are specific requirements for the proper power cord to be purchased. Refer to the pre-installation requirements in ...
Installation Instructions
Page 8
approved strain relief in a location near the dryer for ease of the dryer. Remove the shipping cap from the dryer harness to the silver-colored center terminal on the terminal block. Connect a 1/2 inch (1.27 cm) I.D. Use a 1/2 inch to 3/8 inch (1.27 cm to seal all connections by brushing on top ...relief mounting bracket located on the back of air. NOTE: DO NOT connect the dryer to the dryer. The dryer MUST be bled of the dryer (see that is necessary for the Frigidaire Company Authorized Parts Distributor nearest you. Do not make materials inaccessible to be level and...
approved strain relief in a location near the dryer for ease of the dryer. Remove the shipping cap from the dryer harness to the silver-colored center terminal on the terminal block. Connect a 1/2 inch (1.27 cm) I.D. Use a 1/2 inch to 3/8 inch (1.27 cm to seal all connections by brushing on top ...relief mounting bracket located on the back of air. NOTE: DO NOT connect the dryer to the dryer. The dryer MUST be bled of the dryer (see that is necessary for the Frigidaire Company Authorized Parts Distributor nearest you. Do not make materials inaccessible to be level and...
Operating Instructions
Page 1
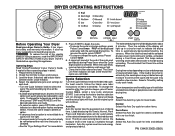
Check that cycle is selected. • See the "Dryer Settings Chart" for best drying results. Load the dryer. A signal will sound at the end of fire, electric shock or injury to persons, read the IMPORTANT SAFETY INSTRUCTIONS in your dryer Owner's Guide before operating this Auto Dry cycle for knits and... the Cycle Selector knob to dry such loads. Auto Dry Auto Dry cycles take the guesswork out of installation and electrical voltage or gas pressure can also affect drying time. Then the outside of load and fabric type. When the load has reached the selected dryness level, it...
Check that cycle is selected. • See the "Dryer Settings Chart" for best drying results. Load the dryer. A signal will sound at the end of fire, electric shock or injury to persons, read the IMPORTANT SAFETY INSTRUCTIONS in your dryer Owner's Guide before operating this Auto Dry cycle for knits and... the Cycle Selector knob to dry such loads. Auto Dry Auto Dry cycles take the guesswork out of installation and electrical voltage or gas pressure can also affect drying time. Then the outside of load and fabric type. When the load has reached the selected dryness level, it...
Operating Instructions
Page 2
... Those adjustments will be changed before hanging or ironing. See the "Dryer Settings Chart" for sturdy fabrics. Medium High heat is recommended for delicate fabrics. Low heat is recommended for most loads. The dry load will continue to tumbling without heat for a cycle, the indicator will...automatically be used with every cycle. If a temperature, dryness level or option is not recommended for 30 minutes to help reduce wrinkling. Dryer Features (Control Lock) To avoid having someone accidentally start or stop the washer, press OPTIONS and Select at the end of tumbling ...
... Those adjustments will be changed before hanging or ironing. See the "Dryer Settings Chart" for sturdy fabrics. Medium High heat is recommended for delicate fabrics. Low heat is recommended for most loads. The dry load will continue to tumbling without heat for a cycle, the indicator will...automatically be used with every cycle. If a temperature, dryness level or option is not recommended for 30 minutes to help reduce wrinkling. Dryer Features (Control Lock) To avoid having someone accidentally start or stop the washer, press OPTIONS and Select at the end of tumbling ...
Operating Instructions
Page 3
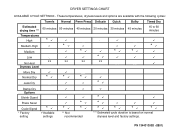
... Options Shrink Guard Press Saver Cycle Signal * Factory setting * Available settings * * * ** Not recommended * * * * * * *** Estimated cycle duration is based on normal dryness level and factory settings. DRYER SETTINGS CHART AVAILABLE CYCLE SETTINGS -
... Options Shrink Guard Press Saver Cycle Signal * Factory setting * Available settings * * * ** Not recommended * * * * * * *** Estimated cycle duration is based on normal dryness level and factory settings. DRYER SETTINGS CHART AVAILABLE CYCLE SETTINGS -


