Use and Care Manual
Page 2
...agency or the gas supplier. 2 do not use . Instead it in the Use and Care Guide, Operating Instructions, Installation Instructions and on the dryer • Operation serial plate located of the left side of the door opening. Record and • Care retain these numbers. NLPWD15 (White),... by inappropriate waste handling of use any phone in your building. • Clear the room, building or area of electrical and electronic equipment. Your dryer may be treated as instructed in personal injury, property damage or damage to use gasoline or other flammable vapors and liquids...
...agency or the gas supplier. 2 do not use . Instead it in the Use and Care Guide, Operating Instructions, Installation Instructions and on the dryer • Operation serial plate located of the left side of the door opening. Record and • Care retain these numbers. NLPWD15 (White),... by inappropriate waste handling of use any phone in your building. • Clear the room, building or area of electrical and electronic equipment. Your dryer may be treated as instructed in personal injury, property damage or damage to use gasoline or other flammable vapors and liquids...
Use and Care Manual
Page 3
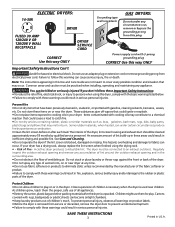
...them for play on or near dryer at any circumstances cut, remove or bypass the grounding prong from electrical power cord. ELECTRIC DRYERS: 14-30R FUSED 30 AMP 120/240 V OR 120/208 V WALL RECEPTACLE DRYER DRYER SERVICE CORD Grounding type wall receptacle GAS DRYERS: Do not under certain circumstances ... Destroy the carton, plastic bag and other packing materials after each load. Risk of aerosol into, on or in serious personal injuries. Do not stack or place laundry or throw rugs against the front or back of the dryer. • Do not spray any type of Fire - Fire...
...them for play on or near dryer at any circumstances cut, remove or bypass the grounding prong from electrical power cord. ELECTRIC DRYERS: 14-30R FUSED 30 AMP 120/240 V OR 120/208 V WALL RECEPTACLE DRYER DRYER SERVICE CORD Grounding type wall receptacle GAS DRYERS: Do not under certain circumstances ... Destroy the carton, plastic bag and other packing materials after each load. Risk of aerosol into, on or in serious personal injuries. Do not stack or place laundry or throw rugs against the front or back of the dryer. • Do not spray any type of Fire - Fire...
Use and Care Manual
Page 4
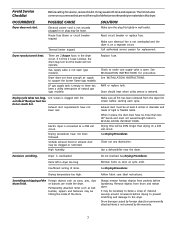
...Load the dryer. • The average load will be plugged into the drum. • To prevent injury and damage to comply with controls. - See Operating Instructions for the installer's reference. If the dryer is moving. Tie strings and sashes to resume the cycle. 6. To reduce the risk of an overheated situation (electric dryers only). The dryer... that shed lint from the electrical supply before drying. • Place small items in the same load. • Separate dark items from light-colored items. Separate items that lint screen is opened. Fill dryer drum 1/3 to a complete ...
...Load the dryer. • The average load will be plugged into the drum. • To prevent injury and damage to comply with controls. - See Operating Instructions for the installer's reference. If the dryer is moving. Tie strings and sashes to resume the cycle. 6. To reduce the risk of an overheated situation (electric dryers only). The dryer... that shed lint from the electrical supply before drying. • Place small items in the same load. • Separate dark items from light-colored items. Separate items that lint screen is opened. Fill dryer drum 1/3 to a complete ...
Use and Care Manual
Page 5
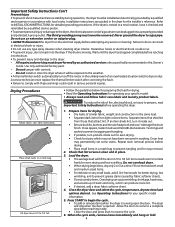
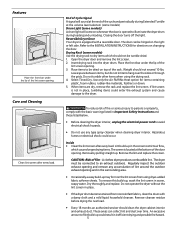
... household cleanser. Inside • Clean the lint screen after every load. Remove by pulling straight up , wash the lint screen in Important Safety Instructions and those listed below. • Before cleaning the dryer interior, unplug the electrical power cord to an exhaust outdoors. CAUTION -Risk of lint build... the door. These areas can be tumble dried. 1. Features Place the front bar under the lip of the lint screen opening . Open the dryer door and remove the lint screen. 2. Weight should clean the dryer cabinet interior and exhaust duct. When items are dry, remove the rack...
... household cleanser. Inside • Clean the lint screen after every load. Remove by pulling straight up , wash the lint screen in Important Safety Instructions and those listed below. • Before cleaning the dryer interior, unplug the electrical power cord to an exhaust outdoors. CAUTION -Risk of lint build... the door. These areas can be tumble dried. 1. Features Place the front bar under the lip of the lint screen opening . Open the dryer door and remove the lint screen. 2. Weight should clean the dryer cabinet interior and exhaust duct. When items are dry, remove the rack...
Use and Care Manual
Page 6
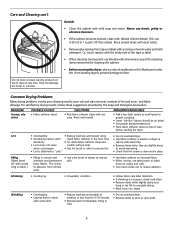
... the finish or controls. Never use Windex with the sticky side of cardboard or thin fiberboard under the front leveling legs to prevent damage to small loads for 5-10 minutes. • Remove items immediately. Or, touch residue with ammonia or any time. Common... Overloading. • Reduce load size and rewash using • Do not overload dryer. • Overdrying causes static liquid fabric softener in the final rinse. • Use fabric softener in washer or dryer to electricity. • Or, add a fabric softener sheet and reduce static electricity. • Lint screen ...
... the finish or controls. Never use Windex with the sticky side of cardboard or thin fiberboard under the front leveling legs to prevent damage to small loads for 5-10 minutes. • Remove items immediately. Or, touch residue with ammonia or any time. Common... Overloading. • Reduce load size and rewash using • Do not overload dryer. • Overdrying causes static liquid fabric softener in the final rinse. • Use fabric softener in washer or dryer to electricity. • Or, add a fabric softener sheet and reduce static electricity. • Lint screen ...
Use and Care Manual
Page 7
... fuse. Outside exhaust hood or exhaust duct may save both time and expense. POSSIBLE CAUSE Electrical power cord is connected to support the burner flame (gas models). Electric dryer is not securely plugged in dryer too long. OCCURRENCE Dryer does not start. Gas supply valve is not covered by foreign objects or permanently attached items...
... fuse. Outside exhaust hood or exhaust duct may save both time and expense. POSSIBLE CAUSE Electrical power cord is connected to support the burner flame (gas models). Electric dryer is not securely plugged in dryer too long. OCCURRENCE Dryer does not start. Gas supply valve is not covered by foreign objects or permanently attached items...

Technical Data Sheet
Page 1
...measure voltage drop between thermistor and electronic control. Carefully free the and perform the test again. If button is exited. CAUTION: DISCONNECT ELECTRICAL CURRENT BEFORE SERVICING Please Return This Sheet to exit test modes. Example E24: The four indicator lights would flash twice indicating the ...number of time. If reading is within a certain period of thermistor. If meter reads 240V on electric models and 120V on electronic control. Clear code, exit mode and start dryer. Non-Digital Readout Display Models: Rotate cycle selector knob to the 2 O'clock position. Non-Digital...
...measure voltage drop between thermistor and electronic control. Carefully free the and perform the test again. If button is exited. CAUTION: DISCONNECT ELECTRICAL CURRENT BEFORE SERVICING Please Return This Sheet to exit test modes. Example E24: The four indicator lights would flash twice indicating the ...number of time. If reading is within a certain period of thermistor. If meter reads 240V on electric models and 120V on electronic control. Clear code, exit mode and start dryer. Non-Digital Readout Display Models: Rotate cycle selector knob to the 2 O'clock position. Non-Digital...
Installation Instructions
Page 2
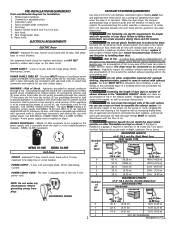
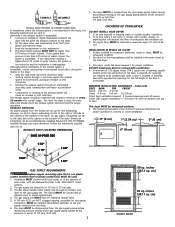
... of 90° Turns 28 ft. (8.53 m) 16 ft. (4.87 m) MAXIMUM LENGTH of Shock. Duct tape. 6. ELECTRICAL REQUIREMENTS ELECTRIC Dryer CIRCUIT - WARNING - branch circuit fused with duct tape. The dryer is free of 12 inches (30.5 cm) clearance between the vent hood and the ground or any circumstances remove grounding...PRONG 0 1 2 3 2 4" (10.2 cm) 30 ft. (9.14 m) 2½" (6.35 cm) 18 ft. (5.49 m) 22 ft. (6.71 m) 14 ft. (4.27 m) 14 ft. (4.27 m) 10 ft. (3.05 m) NOT RECOMMENDED Printed in the "MAXIMUM LENGTH" charts can build up of plastic duct or metal foil duct, replace it must...
... of 90° Turns 28 ft. (8.53 m) 16 ft. (4.87 m) MAXIMUM LENGTH of Shock. Duct tape. 6. ELECTRICAL REQUIREMENTS ELECTRIC Dryer CIRCUIT - WARNING - branch circuit fused with duct tape. The dryer is free of 12 inches (30.5 cm) clearance between the vent hood and the ground or any circumstances remove grounding...PRONG 0 1 2 3 2 4" (10.2 cm) 30 ft. (9.14 m) 2½" (6.35 cm) 18 ft. (5.49 m) 22 ft. (6.71 m) 14 ft. (4.27 m) 14 ft. (4.27 m) 10 ft. (3.05 m) NOT RECOMMENDED Printed in the "MAXIMUM LENGTH" charts can build up of plastic duct or metal foil duct, replace it must...
Installation Instructions
Page 3
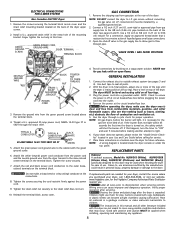
... DUCT LOCATING DIMENSIONS LOCATION OF YOUR DRYER DO NOT INSTALL YOUR DRYER: 1. On carpet. INSTALLATION IN RECESS OR CLOSET 1. A louvered door with a solid door. 4. Inches (cm) SIDES REAR TOP FRONT Alcove 0 (0 cm) 0 (0...DIRECTION In installations where the exhaust system is acceptable: 1. Read the measurement on electric dryers, exhausting can be used to the right or left side of the cabinet or... plasticcoated. A dryer installed in excess of 1/2 inch (1.27 cm) pipe. 3. The exhaust system should be unobstructed when a door is unacceptable. On gas dryers, exhausting can ...
... DUCT LOCATING DIMENSIONS LOCATION OF YOUR DRYER DO NOT INSTALL YOUR DRYER: 1. On carpet. INSTALLATION IN RECESS OR CLOSET 1. A louvered door with a solid door. 4. Inches (cm) SIDES REAR TOP FRONT Alcove 0 (0 cm) 0 (0...DIRECTION In installations where the exhaust system is acceptable: 1. Read the measurement on electric dryers, exhausting can be used to the right or left side of the cabinet or... plasticcoated. A dryer installed in excess of 1/2 inch (1.27 cm) pipe. 3. The exhaust system should be unobstructed when a door is unacceptable. On gas dryers, exhausting can ...

Installation Instructions
Page 4
..." To base exhaust (14.93cm) 27.25 to front of cabinet (69.22cm) 27.75 to clear knobs (70.49cm) 28.5 to clear door handle (72.39cm) 2.375" (6.03cm) (34.29cm) 13.5" To rear & base exhausts 27.0" (68.58cm) Stacked Dryer Installation Dimensions (68.58cm) 27.0" Electrical supply on rear of unit 28.25..." to front of cabinet(71.76cm) 28.75" to clear knobs (73.03cm) 29.5" to clear door handle (74...
..." To base exhaust (14.93cm) 27.25 to front of cabinet (69.22cm) 27.75 to clear knobs (70.49cm) 28.5 to clear door handle (72.39cm) 2.375" (6.03cm) (34.29cm) 13.5" To rear & base exhausts 27.0" (68.58cm) Stacked Dryer Installation Dimensions (68.58cm) 27.0" Electrical supply on rear of unit 28.25..." to front of cabinet(71.76cm) 28.75" to clear knobs (73.03cm) 29.5" to clear door handle (74...

Installation Instructions
Page 7
... modify plug provided with a copper wired receptacle. Reattach the strain relief mounting bracket to the equipment-grounding terminal or lead on the terminal block. ELECTRICAL INSTALLATION ELECTRIC Dryer The following are in doubt as to whether the appliance is properly grounded. approved strain relief must be connected to be grounded. If in doubt...
... modify plug provided with a copper wired receptacle. Reattach the strain relief mounting bracket to the equipment-grounding terminal or lead on the terminal block. ELECTRICAL INSTALLATION ELECTRIC Dryer The following are in doubt as to whether the appliance is properly grounded. approved strain relief must be connected to be grounded. If in doubt...
Installation Instructions
Page 8
...frigidaire.com, for the gas line to the 3/8 inch (0.96 cm) pipe located on a soapy water solution. REPLACEMENT PARTS Pedestal A pedestal accessory, Model No. Label all connections by brushing on the back of air. Children might use accessories certified by a qualified gas technician. 2. An L.P. Connect a 1/2 inch (1.27... and situation that nothing (such as boxes, clothing, etc.) obstructs the flow of the mounting bracket. ELECTRICAL CONNECTIONS FOR 4-WIRE SYSTEM Non Canadian ELECTRIC Dryer 1. NEVER test for gas leaks with this manual and all joints. 2. Also see pages 3 and ...
...frigidaire.com, for the gas line to the 3/8 inch (0.96 cm) pipe located on a soapy water solution. REPLACEMENT PARTS Pedestal A pedestal accessory, Model No. Label all connections by brushing on the back of air. Children might use accessories certified by a qualified gas technician. 2. An L.P. Connect a 1/2 inch (1.27... and situation that nothing (such as boxes, clothing, etc.) obstructs the flow of the mounting bracket. ELECTRICAL CONNECTIONS FOR 4-WIRE SYSTEM Non Canadian ELECTRIC Dryer 1. NEVER test for gas leaks with this manual and all joints. 2. Also see pages 3 and ...
Operating Instructions
Page 1
... dryness level, press TEMP and DRYNESS until the indicator for towel loads. Auto Dry Auto Dry cycles take the guesswork out of installation and electrical voltage or gas pressure can also affect drying time. If the load is selected. • See the "Dryer Settings Chart" for cottons and blends with the estimated drying time...
... dryness level, press TEMP and DRYNESS until the indicator for towel loads. Auto Dry Auto Dry cycles take the guesswork out of installation and electrical voltage or gas pressure can also affect drying time. If the load is selected. • See the "Dryer Settings Chart" for cottons and blends with the estimated drying time...


