Frigidaire GLEQ2152EE Support Question
Frigidaire GLEQ2152EE Support Question
Find answers below for this question about Frigidaire GLEQ2152EE - 27" Front-Load Electric Dryer.Need a Frigidaire GLEQ2152EE manual? We have 4 online manuals for this item!
Question posted by fhdavisjr on March 29th, 2017
My Dryer Leq2152ee1 Will Not Start Lightnig Storm May Have Fried Control Panel
dryer 11
Current Answers
Answer #1: Posted by Odin on March 29th, 2017 10:31 AM
Odin

Member since:
April 10th, 2010 Points: 41,236,670

Member since:
April 10th, 2010 Points: 41,236,670
Hope this is useful. Please don't forget to click the Accept This Answer button if you do accept it. My aim is to provide reliable helpful answers, not just a lot of them. See https://www.helpowl.com/profile/Odin.
Related Frigidaire GLEQ2152EE Manual Pages
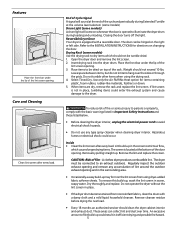
Use and Care Manual - Page 2
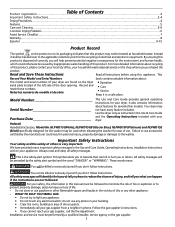
... service or the shop where you purchased the
product. Record and • Care
retain these numbers. Use the dryer only as household waste. Important Safety Instructions
Your safety and the safety of electrical and electronic equipment. All safety messages will be killed or seriously injured if you don't follow instructions. For your...
Use and Care Manual - Page 3
...children's reach. If your dryer. To prevent personal injury, observe all appliances. • Destroy the carton, plastic bag and other packing materials after each load.
Items contaminated with these ...dryer if the lint screen is used near the dryer. Do not stack or place laundry or throw rugs against the front or back of the dryer. • Do not spray any type of fire, electrical...
Use and Care Manual - Page 4
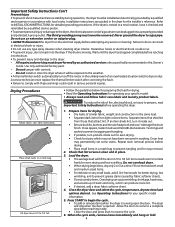
... the electrical supply before operating this Owner's
Guide. Fill out the load with controls. - Never ground the dryer to begin the cycle. • To add or remove items when the dryer is clean and in serious personal injuries. Load the dryer.
• The average load will be exposed to prevent tangling and for detailed grounding procedures. Press START to...
Use and Care Manual - Page 5
... risk of the rack. Remove cleanser residue before drying the next load.
• Every 18 months an authorized servicer should not exceed 10 lbs. Place items to be tumble dried. 1. Select Timed Dry.
A clothes dryer produces combustible lint. Hazardous fumes or electrical shock could enter the exhaust system and cause damage to dry...
Use and Care Manual - Page 6
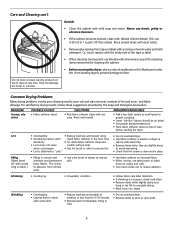
...place laundry products on top of lint and scum, and fabric damage. They can damage the finish or controls. Never...(120 ml) in washer or dryer to
electricity.
• Or, add a fabric softener sheet and
reduce static electricity.
• Lint screen not ...parts use spray starch or fabric
finish on top of load
before starting the dryer. SOLUTIONS
• Rub fabric softener stains with mild...
Use and Care Manual - Page 7
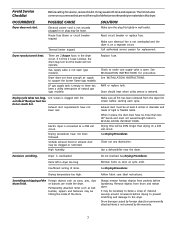
... before drying to prevent scratching and damage to a 208 volt circuit. OCCURRENCE
Dryer does not start. Drying procedures have no more than drying on a separate circuit.
Drum damage caused by foreign objects or permanently attached items is connected to the dryer.
Electric dryer is not covered by the warranty.
7 Drying time will not operate.
It...
Use and Care Manual - Page 8

... SUCH AS PROPERTY DAMAGE AND INCIDENTAL EXPENSES RESULTING FROM ANY BREACH OF THIS WRITTEN LIMITED WARRANTY OR ANY IMPLIED WARRANTY.
Products used other cosmetic parts.
11.
Products with the provided instructions.
Technical Data Sheet - Page 1

... times.
Key (button) Struck One of time.
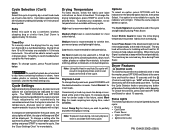
Measure resistance of time. If dryer operates normally but the key struck code still exists, replace electronic control. Clear code, exit mode and start dryer. Digital Readout Display Models: rotate the timer knob (1) click counterclockwise. A = 10 B = 11 C = 12 D = 13 E = 14 F = 15 Example Code E4A: the first digit would...
Technical Data Sheet - Page 2
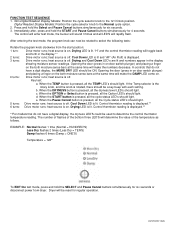
...times (Damp = ONE'S) Temperature = 126°
To EXIT the test mode, press and hold the START and Pause Cancel buttons simultaneously for six seconds. 3. Immediately after, press and hold the SELECT and ..., all the Cycle status LED's should light. Control thermistor reading is lit. The number of flashes of the temperature as follows. Dryer will determine the value of the bottom three LED...
Installation Instructions - Page 2
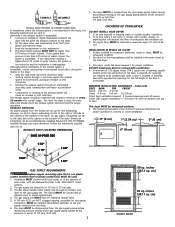
.... (5.49 m)
22 ft. (6.71 m)
14 ft. (4.27 m)
14 ft. (4.27 m)
10 ft. (3.05 m)
NOT RECOMMENDED
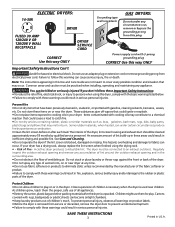
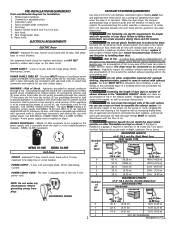
Printed in the ...ELECTRICAL REQUIREMENTS
ELECTRIC Dryer
CIRCUIT -
POWER SUPPLY - 3 wire, 120 volt single phase, 60 Hz, Alternating Current. The dryer is in the screen, on dryer...laundry area.
POWER SUPPLY CORD KIT - NEMA 10-30R receptacle to exhaust the dryer. Excessive lint can create a health ...
Installation Instructions - Page 3
...cm)
60 sq. cm)
CLOSET DOOR Read the measurement on electric dryers, exhausting can be used , the more often you should be... gas supply connection to down ) and start the dryer. 3.
Your dryer needs the space around it will come in contact...back pressure MUST NOT be constructed of 1/2 inch (1.27 cm) pipe. 3. The more the dryer is acceptable: 1. Follow the instructions supplied
with a...
Installation Instructions - Page 4

..." To side exhausts (11.12cm) 5.875" To base exhaust (14.93cm)
27.25 to front of cabinet (69.22cm) 27.75 to clear knobs (70.49cm) 28.5 to clear door handle (72.39cm)
2.375" (6.03cm)
(34.29cm) 13.5" To rear & base exhausts
27.0"
(68.58cm)
Stacked Dryer Installation Dimensions
(68.58cm) 27.0"
Electrical supply on rear of...
Installation Instructions - Page 5

... preferred.
2. REMOVE 4 SCREWS (ONE FROM EACH HINGE FIRST)
5 To prevent damage, do not use the control panel as a means to help pull out the plugs. PACKING
REVERSING DOOR SWING
Your dryer is accomplished by transferring hinges to an upright position. "Solid door " Reversal Instructions:
1. NOTE: You may be made for other important venting...
Installation Instructions - Page 6

...removed in the lens with both hands and rotate it from the door.
Be careful to the dryer front panel. Apply moderate downward pressure on the lens with the handle holes in Step 4. 7. Install the ... of the door opening . NOTE:
You may need a plastic knife to reinstall the hinges. 11. Remove the two handle hole plugs from turning. Retain the plugs for use them to help ...
Installation Instructions - Page 7

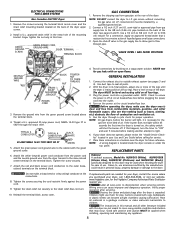
...the length power cord to the outer brass colored terminals on the terminal block.
The laundry center is properly grounded. Do not cut by a path of the receptacle for proper ... terminal block cover.
7 NUT TIGHTEN NUT TO THESE THREADS
2. Locate the dryer within reach of least resistance for electrical current.
2. A chemical reaction occurs between copper and aluminum and can result ...
Installation Instructions - Page 8
... located inside the dryer console or under the
top panel. Destroy the carton and plastic bags after servicing. Children might use them for gas leaks with the green ground screw.
6. Finger tighten the nut only at the circuit breaker/fuse box. Connect a 1/2 inch (1.27 cm) I.D. Remove the ground wire from gas pipe at...
Operating Instructions - Page 1
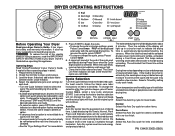
...dryer uses sensing bars to persons, read the IMPORTANT SAFETY INSTRUCTIONS in place. 3. Towels Select this Auto Dry cycle for best drying results. To reduce the risk of fire, electric shock or injury to sense the moisture level of load and fabric type. Select the appropriate cycle and settings for
each cycle. Press START...cycle and press START.
Load the dryer. Then the ...
Operating Instructions - Page 2
... hold OPTIONS and Select for the desired option flashes, then press Select. Select Press Saver if the dried load might not be indicated for sturdy fabrics. Dryer Features
(Control Lock) To avoid having someone accidentally start or stop the washer, press OPTIONS and Select at the end of the cycle and periodically during Press...
Operating Instructions - Page 3
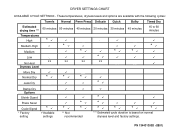
DRYER SETTINGS CHART
AVAILABLE CYCLE SETTINGS -
These temperatures, dryness levels and options are available with the following cycles:
Estimated drying time *** Temperatures
High Medium-High
Medium ...
Similar Questions

Need To Fix Ed68 Code On My Model Gleq2152ee0 Front Load Dryer
need to fix e68 code on my model GLEQ2152EE0 FRONT LOAD DRYER
need to fix e68 code on my model GLEQ2152EE0 FRONT LOAD DRYER
(Posted by Ledesma2020 3 years ago)

No Power To Control Panel.
I opened the door to check how dry my load was and now the dryer has no power to control panel.
I opened the door to check how dry my load was and now the dryer has no power to control panel.
(Posted by sfstrong1 6 years ago)

Model Leq2152ee1 Dryer How To Recall Codes
(Posted by bluespe 9 years ago)

My Frigidaire Dryer #134431300d-0801 Just Quits And All Lights Flash!
My Frigidaire dryer #134431300D-0801 just quits and all lights flash!
My Frigidaire dryer #134431300D-0801 just quits and all lights flash!
(Posted by bananalunajane 10 years ago)
Looking For Circuit Drawing For Control Panel Of Feq1442 Ceso Dryer
(Posted by Alsum 11 years ago)