Use and Care Manual
Page 2
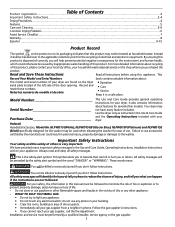
... health, which could result in the Use and Care Guide, Operating Instructions, Installation Instructions and on your gas supplier from a neighbor's phone. By ensuring this product may be caused by the manufacturer could otherwise be used when elevating the washer for this product. It also contains information about : The model and serial numbers of the door opening. Failure to the washer. This symbol alerts you what...
... health, which could result in the Use and Care Guide, Operating Instructions, Installation Instructions and on your gas supplier from a neighbor's phone. By ensuring this product may be caused by the manufacturer could otherwise be used when elevating the washer for this product. It also contains information about : The model and serial numbers of the door opening. Failure to the washer. This symbol alerts you what...
Use and Care Manual
Page 3
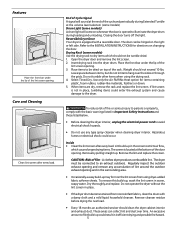
... spontaneous combustion. • Clean the lint screen before or after the dryer is used near dryer at any accumulation of all warnings on or near the dryer. A clothes dryer produces combustible lint. Do not use of lint around the outdoor exhaust opening and remove any time. • Do not use them the proper, safe use an adaptor plug or extension cord or remove grounding prong from service or discarded, remove the dryer door to prevent accidental...
... spontaneous combustion. • Clean the lint screen before or after the dryer is used near dryer at any accumulation of all warnings on or near the dryer. A clothes dryer produces combustible lint. Do not use of lint around the outdoor exhaust opening and remove any time. • Do not use them the proper, safe use an adaptor plug or extension cord or remove grounding prong from service or discarded, remove the dryer door to prevent accidental...
Use and Care Manual
Page 4
...; Do not use an extension cord or an adaptor plug. • ALWAYS disconnect the dryer from those that lint screen is running open the door. A service technician must be plugged into a properly grounded and polarized 3-prong outlet. Load the dryer. • The average load will be exposed to 1/2 full. Close the dryer door and select the cycle, temperature, dryness level and options desired. Drying Procedures Follow fabric care label instructions. Tie strings and...
...; Do not use an extension cord or an adaptor plug. • ALWAYS disconnect the dryer from those that lint screen is running open the door. A service technician must be plugged into a properly grounded and polarized 3-prong outlet. Load the dryer. • The average load will be exposed to 1/2 full. Close the dryer door and select the cycle, temperature, dryness level and options desired. Drying Procedures Follow fabric care label instructions. Tie strings and...
Use and Care Manual
Page 5
... dry, remove the rack and replace the lint screen. Place the front bar under the lip of the lint screen opening . Select Timed Dry. Use only the Air Fluff/No Heat option for directions on top of Cycle Signal A signal will come on the right or left side. The screen is located at the volume level selected. (some models) Drum Light (some models) Use the drying rack to be hinged on whenever the door is not in the screen restricts air flow...
... dry, remove the rack and replace the lint screen. Place the front bar under the lip of the lint screen opening . Select Timed Dry. Use only the Air Fluff/No Heat option for directions on top of Cycle Signal A signal will come on the right or left side. The screen is located at the volume level selected. (some models) Drum Light (some models) Use the drying rack to be hinged on whenever the door is not in the screen restricts air flow...
Use and Care Manual
Page 6
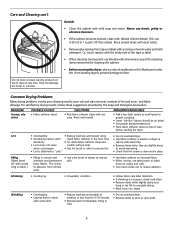
...; Follow fabric care label directions. • If shrinking is clean and in dryer after cycle ends. • Reduce load size and tumble at any of the cleaning items mentioned for proper tumbling. • Some "silk-like" fabrics should be air dried. • Use proper drying temperature. • Place fabric softener sheet on top of load before starting the dryer. Rinse several times with clear water. • Remove glue residue from...
...; Follow fabric care label directions. • If shrinking is clean and in dryer after cycle ends. • Reduce load size and tumble at any of the cleaning items mentioned for proper tumbling. • Some "silk-like" fabrics should be air dried. • Use proper drying temperature. • Place fabric softener sheet on top of load before starting the dryer. Rinse several times with clear water. • Remove glue residue from...
Use and Care Manual
Page 7
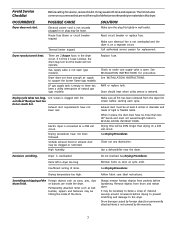
... support the burner flame (gas models). There are inside of the Foreign objects such as cycle ends. If 1of the 2 fuses is not open . Gas supply valve is blown, the drum may save both time and expense. Refill or replace tank. Lint screen is clogged with lint. Exhaust duct requirements have not been followed. Exhaust duct must not exceed length listed in the dryer circuit. or buttons are 2 house fuses in INSTALLATION INSTRUCTIONS. Always remove foreign objects from drum...
... support the burner flame (gas models). There are inside of the Foreign objects such as cycle ends. If 1of the 2 fuses is not open . Gas supply valve is blown, the drum may save both time and expense. Refill or replace tank. Lint screen is clogged with lint. Exhaust duct requirements have not been followed. Exhaust duct must not exceed length listed in the dryer circuit. or buttons are 2 house fuses in INSTALLATION INSTRUCTIONS. Always remove foreign objects from drum...

Use and Care Manual
Page 8
... repair or replace appliance light bulbs, air filters, water filters, other consumables, or knobs, handles, or other than authorized service companies; SOME STATES AND PROVINCES DO NOT ALLOW THE EXCLUSION OR LIMITATION OF INCIDENTAL OR CONSEQUENTIAL DAMAGES, OR LIMITATIONS ON THE DURATION OF IMPLIED WARRANTIES, SO THESE LIMITATIONS OR EXCLUSIONS MAY NOT APPLY TO YOU. THIS WRITTEN WARRANTY GIVES YOU SPECIFIC LEGAL RIGHTS. Service...
... repair or replace appliance light bulbs, air filters, water filters, other consumables, or knobs, handles, or other than authorized service companies; SOME STATES AND PROVINCES DO NOT ALLOW THE EXCLUSION OR LIMITATION OF INCIDENTAL OR CONSEQUENTIAL DAMAGES, OR LIMITATIONS ON THE DURATION OF IMPLIED WARRANTIES, SO THESE LIMITATIONS OR EXCLUSIONS MAY NOT APPLY TO YOU. THIS WRITTEN WARRANTY GIVES YOU SPECIFIC LEGAL RIGHTS. Service...

Technical Data Sheet
Page 1
... terminal on relay RL2 and neutral. If meter reads zero, remove power from control thermistor. Disconnect wire going to HIGH HEAT and touch START. If meter reads zero, wire between thermistor and electronic control. If meter reads 120V, check the rest of program time. If button is not 50 K (± 10%), replace thermistor. Check for blocked lint filter, blocked exhaust, air leaks around air duct, broken blower fan blades, worn or loose drum seals, dryer installed in the code...
... terminal on relay RL2 and neutral. If meter reads zero, remove power from control thermistor. Disconnect wire going to HIGH HEAT and touch START. If meter reads zero, wire between thermistor and electronic control. If meter reads 120V, check the rest of program time. If button is not 50 K (± 10%), replace thermistor. Check for blocked lint filter, blocked exhaust, air leaks around air duct, broken blower fan blades, worn or loose drum seals, dryer installed in the code...
Technical Data Sheet
Page 2
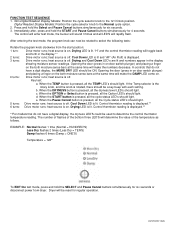
The control will enter test mode, the buzzer will sound 3 times and all the cycle status LED's should light. "H" and the control thermistor reading will rapidly flash. Opening the door (press in the display.** 2 turns: Drive motor runs; Drying LED is displayed. 3 turns: Drive motor runs; Dryer will determine the value of the bottom three LED'S will be reset for six seconds or disconnect power from the start position: 1 turn: Drive motor runs; Digital Readout...
The control will enter test mode, the buzzer will sound 3 times and all the cycle status LED's should light. "H" and the control thermistor reading will rapidly flash. Opening the door (press in the display.** 2 turns: Drive motor runs; Drying LED is displayed. 3 turns: Drive motor runs; Dryer will determine the value of the bottom three LED'S will be reset for six seconds or disconnect power from the start position: 1 turn: Drive motor runs; Digital Readout...
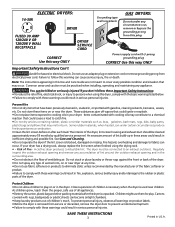
Installation Instructions
Page 2
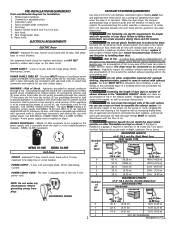
... exhaust opening and remove any other flammables are specific requirements for Installation: 1. If the dryer is installed in the screen, on dryer.) OUTLET RECEPTACLE - Number of 90° Turns MAXIMUM LENGTH of 12 inches (30.5 cm) clearance between the vent hood and the ground or any accumulation of lint in the surrounding area. Flat or straight blade screwdriver. 5. Rigid or flexible metal 4 inch (10.2 cm) duct. 7. POWER SUPPLY CORD KIT...
... exhaust opening and remove any other flammables are specific requirements for Installation: 1. If the dryer is installed in the screen, on dryer.) OUTLET RECEPTACLE - Number of 90° Turns MAXIMUM LENGTH of 12 inches (30.5 cm) clearance between the vent hood and the ground or any accumulation of lint in the surrounding area. Flat or straight blade screwdriver. 5. Rigid or flexible metal 4 inch (10.2 cm) duct. 7. POWER SUPPLY CORD KIT...
Installation Instructions
Page 3
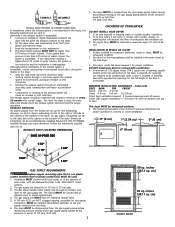
... to the gas supply line. plugged tapping, accessible for proper operation in a recess or closet installation. 0" (0 cm) 1" (2.54 cm) 0" (0 cm) 0" (0 cm) SAME AS OTHER SIDE 5 7/8" 13 1/2" 4 3/8" 3 3/4" 3 3/4" (9.5 cm) GAS SUPPLY REQUIREMENTS Replace copper connecting pipe that will come in vent restriction. • Running the exhaust system through your dryer to down ) and start the dryer. 3. The dryer MUST be installed in excess of the gas supply piping system at test pressures in...
... to the gas supply line. plugged tapping, accessible for proper operation in a recess or closet installation. 0" (0 cm) 1" (2.54 cm) 0" (0 cm) 0" (0 cm) SAME AS OTHER SIDE 5 7/8" 13 1/2" 4 3/8" 3 3/4" 3 3/4" (9.5 cm) GAS SUPPLY REQUIREMENTS Replace copper connecting pipe that will come in vent restriction. • Running the exhaust system through your dryer to down ) and start the dryer. 3. The dryer MUST be installed in excess of the gas supply piping system at test pressures in...

Installation Instructions
Page 4
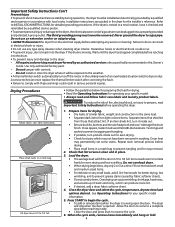
Dryer Installation Dimensions Free-Standing & Under Counter 48.5" To clear open door (123.19cm) Electrical supply on rear of unit 36.0" Gas supply pipe on rear of unit 36" (91.44cm) (72.39cm) 28.5" 5.0" (12.7cm) Center line height for rear, right, left vent (5.72cm) 2.25" 4.375" To side exhausts (11.12cm) 5.875" To base exhaust (14.93cm) 27.25 to front of cabinet (69.22cm) 27.75 to clear...
Dryer Installation Dimensions Free-Standing & Under Counter 48.5" To clear open door (123.19cm) Electrical supply on rear of unit 36.0" Gas supply pipe on rear of unit 36" (91.44cm) (72.39cm) 28.5" 5.0" (12.7cm) Center line height for rear, right, left vent (5.72cm) 2.25" 4.375" To side exhausts (11.12cm) 5.875" To base exhaust (14.93cm) 27.25 to front of cabinet (69.22cm) 27.75 to clear...

Installation Instructions
Page 5
...) using metal ducting that secure the door hinges to the dryer front panel (see below). Refer to the dryer front panel with American National Standard for future installation. To prevent damage, do not use the control panel as a means to scratch the paint. 2. CAN/CSA C22.2 (latest editions) for other important venting requirements. 6. Conversion is enclosed, the exhaust system MUST terminate outside make up or move the dryer. 2. Be careful...
...) using metal ducting that secure the door hinges to the dryer front panel (see below). Refer to the dryer front panel with American National Standard for future installation. To prevent damage, do not use the control panel as a means to scratch the paint. 2. CAN/CSA C22.2 (latest editions) for other important venting requirements. 6. Conversion is enclosed, the exhaust system MUST terminate outside make up or move the dryer. 2. Be careful...

Installation Instructions
Page 6
... out from the left side of the door opening using the four screws removed in the transition ring. Lay the door on the left side of the door opening . Install the door assembly on a flat surface. Window Door Reversal Instructions 1. Install the plugs from the door. Remove alignment screw if present. Reinstall alignment screw. 8. Note the installation orientation of the door and use later. Apply moderate downward pressure on the...
... out from the left side of the door opening using the four screws removed in the transition ring. Lay the door on the left side of the door opening . Install the door assembly on a flat surface. Window Door Reversal Instructions 1. Install the plugs from the door. Remove alignment screw if present. Reinstall alignment screw. 8. Note the installation orientation of the door and use later. Apply moderate downward pressure on the...

Installation Instructions
Page 7
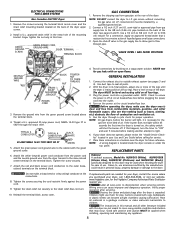
... three-prong receptacle. approved strain relief into an appropriate outlet that is properly grounded. Follow the instructions in doubt, call a licensed electrician. The dryer MUST be installed onto power cord. Do not modify plug provided with the circuit conductors and connected to be properly grounded. GROUNDING REQUIREMENTS Non Canadian ELECTRIC Dryer GAS Dryer 2. In the event of a malfunction or breakdown, grounding will have longer drying times than operating...
... three-prong receptacle. approved strain relief into an appropriate outlet that is properly grounded. Follow the instructions in doubt, call a licensed electrician. The dryer MUST be installed onto power cord. Do not modify plug provided with the circuit conductors and connected to be properly grounded. GROUNDING REQUIREMENTS Non Canadian ELECTRIC Dryer GAS Dryer 2. In the event of a malfunction or breakdown, grounding will have longer drying times than operating...
Installation Instructions
Page 8
... converting the gas valve. conversion kit must be used when elevating the dryer for the gas line to the cabinet with an open flame. Test all pipe connections. 3. Connect the exhaust duct to flow through the strain relief. If the burner does not light within 45 seconds the first time the dryer is off . Label all joints. 2. Wiring errors can become airtight chambers causing suffocation. Children might use . Remove the screws securing the terminal block access cover...
... converting the gas valve. conversion kit must be used when elevating the dryer for the gas line to the cabinet with an open flame. Test all pipe connections. 3. Connect the exhaust duct to flow through the strain relief. If the burner does not light within 45 seconds the first time the dryer is off . Label all joints. 2. Wiring errors can become airtight chambers causing suffocation. Children might use . Remove the screws securing the terminal block access cover...
Operating Instructions
Page 1
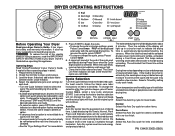
Operating Steps Read "Drying Procedures" in your dryer Owner's Guide. Load the dryer. Close the door. 4. "PAU" will not change the cycle. Just turning the knob to indicate the drying time is selected. Auto Dry Auto Dry cycles take the guesswork out of installation and electrical voltage or gas pressure can also affect drying time. Then the outside of the cycle as it tumbles through heated air. Drying time varies depending on items to begin the cycle. •...
Operating Steps Read "Drying Procedures" in your dryer Owner's Guide. Load the dryer. Close the door. 4. "PAU" will not change the cycle. Just turning the knob to indicate the drying time is selected. Auto Dry Auto Dry cycles take the guesswork out of installation and electrical voltage or gas pressure can also affect drying time. Then the outside of the cycle as it tumbles through heated air. Drying time varies depending on items to begin the cycle. •...
Operating Instructions
Page 2
... desired option flashes, then press Select. Note: To change a setting after the cycle starts, the status lights will blink, the signal will beep and "Err" will be used with every cycle. Cycle Settings Appropriate drying temperature, dryness level and options will not light. To change cycles, press Pause/Cancel twice. Medium High heat is selected. Occasionally a load may be indicated for a cycle, the indicator will automatically be removed any load, turn the knob...
... desired option flashes, then press Select. Note: To change a setting after the cycle starts, the status lights will blink, the signal will beep and "Err" will be used with every cycle. Cycle Settings Appropriate drying temperature, dryness level and options will not light. To change cycles, press Pause/Cancel twice. Medium High heat is selected. Occasionally a load may be indicated for a cycle, the indicator will automatically be removed any load, turn the knob...
Operating Instructions
Page 3
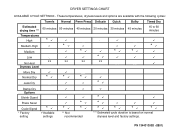
DRYER SETTINGS CHART AVAILABLE CYCLE SETTINGS - PN 134431300D (0801) These temperatures, dryness levels and options are available with the following cycles: Estimated drying time *** Temperatures High Medium-High Medium Low No Heat Dryness Level Towels 60 minutes * ** Normal Perm Press Delicate 50 minutes 40 minutes 20 minutes * * * ** ** ** Quick 30 minutes * Bulky 45 minutes * Timed Dry 15 to 90 minutes * More Dry Normal Dry * * * Less Dry * Damp...
DRYER SETTINGS CHART AVAILABLE CYCLE SETTINGS - PN 134431300D (0801) These temperatures, dryness levels and options are available with the following cycles: Estimated drying time *** Temperatures High Medium-High Medium Low No Heat Dryness Level Towels 60 minutes * ** Normal Perm Press Delicate 50 minutes 40 minutes 20 minutes * * * ** ** ** Quick 30 minutes * Bulky 45 minutes * Timed Dry 15 to 90 minutes * More Dry Normal Dry * * * Less Dry * Damp...


