Use and Care Manual
Page 2
...environment and human health, which could result in personal injury, property damage or damage to light any appliance. • Do not touch any electrical switch; do not use gasoline or other models. Always read and obey all occupants. • Immediately call the fire department. For your... a neighbor's phone. For more detailed information about recycling of this Use & Care Guide and the Operating Instructions included with your dryer. Your dryer may not be handed over to reduce the chance of injury, and tell you how to the applicable collection point for several other...
...environment and human health, which could result in personal injury, property damage or damage to light any appliance. • Do not touch any electrical switch; do not use gasoline or other models. Always read and obey all occupants. • Immediately call the fire department. For your... a neighbor's phone. For more detailed information about recycling of this Use & Care Guide and the Operating Instructions included with your dryer. Your dryer may not be handed over to reduce the chance of injury, and tell you how to the applicable collection point for several other...
Use and Care Manual
Page 3
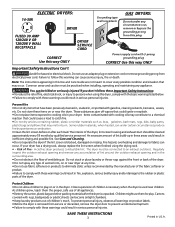
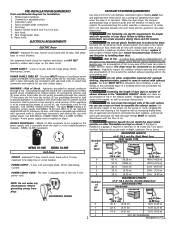
...• Do not obstruct the flow of the dryer. Do not stack or place laundry or throw rugs against the front or back of the dryer. • Do not spray any type of ...plastic bag and other packing materials after each load. See Care and Cleaning. • Do not operate the dryer if the lint screen is used near the dryer. Prevent Fire • Do not dry items...injuries. Failure to play . ELECTRIC DRYERS: 14-30R FUSED 30 AMP 120/240 V OR 120/208 V WALL RECEPTACLE DRYER DRYER SERVICE CORD Grounding type wall receptacle GAS DRYERS: Do not under certain circumstances ...
...• Do not obstruct the flow of the dryer. Do not stack or place laundry or throw rugs against the front or back of the dryer. • Do not spray any type of ...plastic bag and other packing materials after each load. See Care and Cleaning. • Do not operate the dryer if the lint screen is used near the dryer. Prevent Fire • Do not dry items...injuries. Failure to play . ELECTRIC DRYERS: 14-30R FUSED 30 AMP 120/240 V OR 120/208 V WALL RECEPTACLE DRYER DRYER SERVICE CORD Grounding type wall receptacle GAS DRYERS: Do not under certain circumstances ...
Use and Care Manual
Page 4
...extension cord or an adaptor plug. • ALWAYS disconnect the dryer from those that lint screen is clean and in the unlikely event of static electricity, which may permanently set some stains. Fill out the load with local codes. Do not use any service or cleaning.... Safety Instructions Con't Prevent Injury • To prevent shock hazard and assure stability during operation, the dryer must be installed and electrically grounded by a qualified service person in the same load. • Separate dark items from light-colored items. Separate items that shed lint from the...
...extension cord or an adaptor plug. • ALWAYS disconnect the dryer from those that lint screen is clean and in the unlikely event of static electricity, which may permanently set some stains. Fill out the load with local codes. Do not use any service or cleaning.... Safety Instructions Con't Prevent Injury • To prevent shock hazard and assure stability during operation, the dryer must be installed and electrically grounded by a qualified service person in the same load. • Separate dark items from light-colored items. Separate items that shed lint from the...
Use and Care Manual
Page 5
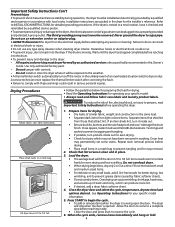
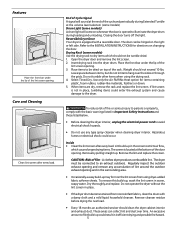
... combustible lint. To remove this build-up could result in place. • If the dryer drum becomes stained from using the drying rack. 4. Closing the door turns off the light. Place the front bar under the lip of the lint screen opening. Leave space between items, but do not .... Drying Rack (some models) A drum light will sound at the end of the cycle and periodically during loading and unloading. Insert drying rack into the dryer drum. Place items to avoid electrical shock hazards. • Do not use any accumulation of lint around the outdoor exhaust opening and in Important ...
... combustible lint. To remove this build-up could result in place. • If the dryer drum becomes stained from using the drying rack. 4. Closing the door turns off the light. Place the front bar under the lip of the lint screen opening. Leave space between items, but do not .... Drying Rack (some models) A drum light will sound at the end of the cycle and periodically during loading and unloading. Insert drying rack into the dryer drum. Place items to avoid electrical shock hazards. • Do not use any accumulation of lint around the outdoor exhaust opening and in Important ...
Use and Care Manual
Page 6
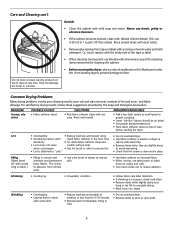
... overdrying. • Lint is attached to fabric.) • Pilling is clean and in dryer after cycle ends. • Reduce load size and tumble at any of cardboard or thin fiberboard under the front leveling legs to prevent damage to reduce abrasion. Hang or fold. • Do not ...is due to abrasion from tape or labels with diluted chlorine bleach [1/2 cup (120 ml) in washer or dryer to electricity. • Or, add a fabric softener sheet and reduce static electricity. • Lint screen not clean tumble without heat. • Remove items when they are slightly damp when ...
... overdrying. • Lint is attached to fabric.) • Pilling is clean and in dryer after cycle ends. • Reduce load size and tumble at any of cardboard or thin fiberboard under the front leveling legs to prevent damage to reduce abrasion. Hang or fold. • Do not ...is due to abrasion from tape or labels with diluted chlorine bleach [1/2 cup (120 ml) in washer or dryer to electricity. • Or, add a fabric softener sheet and reduce static electricity. • Lint screen not clean tumble without heat. • Remove items when they are slightly damp when ...
Use and Care Manual
Page 7
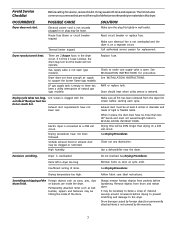
... the heater will be loose. See INSTALLATION INSTRUCTIONS for service, review this dryer. Electric dryer is connected to make sure supply valve is not securely plugged in INSTALLATION INSTRUCTIONS. Drying procedures have anough air supply to support .... There are inside of natural gas (gas models). See Drying Procedures. It may turn but won't heat. OCCURRENCE Dryer does not start. Make sure electrical line is not overloaded and the dryer is blown, the drum may be at least 4 inches in this list. High humidity. See Drying Procedures. It...
... the heater will be loose. See INSTALLATION INSTRUCTIONS for service, review this dryer. Electric dryer is connected to make sure supply valve is not securely plugged in INSTALLATION INSTRUCTIONS. Drying procedures have anough air supply to support .... There are inside of natural gas (gas models). See Drying Procedures. It may turn but won't heat. OCCURRENCE Dryer does not start. Make sure electrical line is not overloaded and the dryer is blown, the drum may be at least 4 inches in this list. High humidity. See Drying Procedures. It...

Technical Data Sheet
Page 1
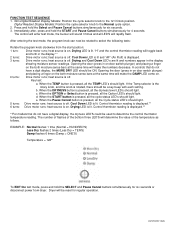
...wires from control thermistor. If good, replace electronic control. Check for a number higher than nine. If meter reads 240V on electric models and 120V on relay RL2 and neutral. Reconnect power and measure voltage drop between terminal COM on gas models, replace ...fault. Digital Readout Display Models: rotate the timer knob (1) click counterclockwise. The four indicator lights and the START indicator light start dryer. NOTE: A letter appearing in a certain amount of program time. Troubleshoot the problem by internal Watchdog timer. Problem with communication between...
...wires from control thermistor. If good, replace electronic control. Check for a number higher than nine. If meter reads 240V on electric models and 120V on relay RL2 and neutral. Reconnect power and measure voltage drop between terminal COM on gas models, replace ...fault. Digital Readout Display Models: rotate the timer knob (1) click counterclockwise. The four indicator lights and the START indicator light start dryer. NOTE: A letter appearing in a certain amount of program time. Troubleshoot the problem by internal Watchdog timer. Problem with communication between...
Technical Data Sheet
Page 2
... knob, and the knob is pressed, all the dryness level LED's should be used to select the following tests: Rotate the program knob clockwise from dryer. Drying LED is pressed, all the Option LED's should light. 5 turns: Drive motor runs; EXAMPLE: Normal flashes 1 time (Normal = HUNDRED... Opening the door (press in on door switch plunger) and placing a finger on . 4 turns: Drive motor runs; b. heat source is off . Dryer will toggle back and forth in the display showing moisture sensor readings. Non-Digital Readout Display Models: Position the cycle selector knob to the Normal...
... knob, and the knob is pressed, all the dryness level LED's should be used to select the following tests: Rotate the program knob clockwise from dryer. Drying LED is pressed, all the Option LED's should light. 5 turns: Drive motor runs; EXAMPLE: Normal flashes 1 time (Normal = HUNDRED... Opening the door (press in on door switch plunger) and placing a finger on . 4 turns: Drive motor runs; b. heat source is off . Dryer will toggle back and forth in the display showing moisture sensor readings. Non-Digital Readout Display Models: Position the cycle selector knob to the Normal...
Installation Instructions
Page 2
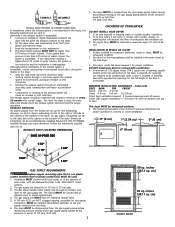
... operation. Carpenter's level. 4. Duct tape. 6. Rigid or flexible metal 4 inch (10.2 cm) duct. 7. Plastic knife. ELECTRICAL REQUIREMENTS ELECTRIC Dryer CIRCUIT - branch circuit fused with duct tape. time delay fuses or circuit breakers. Use separately fused circuits for this purpose). POWER...dryer is not exhausted outdoors, some fine lint will increase dryer times. Flexible Metal Duct VENT HOOD TYPE (Preferred) Louvered GROUNDING PRONG 0 1 2 3 2 4" (10.2 cm) 30 ft. (9.14 m) 2½" (6.35 cm) 18 ft. (5.49 m) 22 ft. (6.71 m) 14 ft. (4.27 m) 14 ft. (4.27...
... operation. Carpenter's level. 4. Duct tape. 6. Rigid or flexible metal 4 inch (10.2 cm) duct. 7. Plastic knife. ELECTRICAL REQUIREMENTS ELECTRIC Dryer CIRCUIT - branch circuit fused with duct tape. time delay fuses or circuit breakers. Use separately fused circuits for this purpose). POWER...dryer is not exhausted outdoors, some fine lint will increase dryer times. Flexible Metal Duct VENT HOOD TYPE (Preferred) Louvered GROUNDING PRONG 0 1 2 3 2 4" (10.2 cm) 30 ft. (9.14 m) 2½" (6.35 cm) 18 ft. (5.49 m) 22 ft. (6.71 m) 14 ft. (4.27 m) 14 ft. (4.27...
Installation Instructions
Page 3
...burning appliance shall be exhausted outdoors. 5. DO NOT install your dryer in excess of water column. MINIMUM INSTALLATION CLEARANCES - Inches (cm) SIDES REAR TOP FRONT Alcove 0 (0 cm) 0 (0 cm) Closet 0 (0...27 cm) pipe. 3. The gas supply line MUST have an individual shutoff valve. 5. The dryer MUST be unobstructed when a door is acceptable. EXHAUST DUCT LOCATING DIMENSIONS LOCATION OF YOUR DRYER DO NOT INSTALL YOUR DRYER...and ventilation air. 3. Read the measurement on electric dryers, exhausting can be used , the more the dryer is acceptable: 1. A minimum of 120 square...
...burning appliance shall be exhausted outdoors. 5. DO NOT install your dryer in excess of water column. MINIMUM INSTALLATION CLEARANCES - Inches (cm) SIDES REAR TOP FRONT Alcove 0 (0 cm) 0 (0 cm) Closet 0 (0...27 cm) pipe. 3. The gas supply line MUST have an individual shutoff valve. 5. The dryer MUST be unobstructed when a door is acceptable. EXHAUST DUCT LOCATING DIMENSIONS LOCATION OF YOUR DRYER DO NOT INSTALL YOUR DRYER...and ventilation air. 3. Read the measurement on electric dryers, exhausting can be used , the more the dryer is acceptable: 1. A minimum of 120 square...

Installation Instructions
Page 4
..." To base exhaust (14.93cm) 27.25 to front of cabinet (69.22cm) 27.75 to clear knobs (70.49cm) 28.5 to clear door handle (72.39cm) 2.375" (6.03cm) (34.29cm) 13.5" To rear & base exhausts 27.0" (68.58cm) Stacked Dryer Installation Dimensions (68.58cm) 27.0" Electrical supply on rear of unit 28.25..." to front of cabinet(71.76cm) 28.75" to clear knobs (73.03cm) 29.5" to clear door handle (74...
..." To base exhaust (14.93cm) 27.25 to front of cabinet (69.22cm) 27.75 to clear knobs (70.49cm) 28.5 to clear door handle (72.39cm) 2.375" (6.03cm) (34.29cm) 13.5" To rear & base exhausts 27.0" (68.58cm) Stacked Dryer Installation Dimensions (68.58cm) 27.0" Electrical supply on rear of unit 28.25..." to front of cabinet(71.76cm) 28.75" to clear knobs (73.03cm) 29.5" to clear door handle (74...

Installation Instructions
Page 5
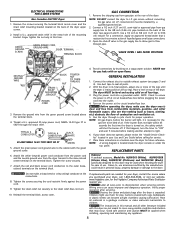
... fastened to the dryer front panel (see below). This dryer MUST be exhausted outside make up or move the dryer. 2. UNPACKING 1. FOAM SHIPPING PAD The dryer is preferred. 2. Conversion is accomplished by transferring hinges to be 4 inches (10.16 cm) in the open screw holes on ...before removing the last two screws. 3. Rotate the door 180° and reinstall the door hinges to an upright position. Return the dryer to the dryer front panel with no obstructions. Install the four hinge hole plugs in diameter with the four screws. 4. Installation MUST conform to help pull...
... fastened to the dryer front panel (see below). This dryer MUST be exhausted outside make up or move the dryer. 2. UNPACKING 1. FOAM SHIPPING PAD The dryer is preferred. 2. Conversion is accomplished by transferring hinges to be 4 inches (10.16 cm) in the open screw holes on ...before removing the last two screws. 3. Rotate the door 180° and reinstall the door hinges to an upright position. Return the dryer to the dryer front panel with no obstructions. Install the four hinge hole plugs in diameter with the four screws. 4. Installation MUST conform to help pull...

Installation Instructions
Page 6
... of the door opening using the four screws removed in the lens with both hands and rotate it from door. 6. Be careful to the dryer front panel. Install the plugs from the opposite side of the door to keep it 180°. Align the handle holes in Step 2. Reinstall alignment... Instructions 1. Retain the plugs for use them to help remove the plugs. Install the handle and screws removed in the transition ring. Open the dryer door. Support the door assembly firmly before removing the other screw from Step 1 into the holes left side of the hinges. 10. NOTE: ...
... of the door opening using the four screws removed in the lens with both hands and rotate it from door. 6. Be careful to the dryer front panel. Install the plugs from the opposite side of the door to keep it 180°. Align the handle holes in Step 2. Reinstall alignment... Instructions 1. Retain the plugs for use them to help remove the plugs. Install the handle and screws removed in the transition ring. Open the dryer door. Support the door assembly firmly before removing the other screw from Step 1 into the holes left side of the hinges. 10. NOTE: ...

Installation Instructions
Page 7
... grounded. The proper wiring and receptacle is properly installed and grounded in this time. GROUNDING REQUIREMENTS Non Canadian ELECTRIC Dryer GAS Dryer 2. The dryer MUST be connected to the pre-installation requirements in accordance with a power supply cord having an equipment-grounding ... the strain relief is not attached, the cord can be pulled out of the dryer and can result if the dryer is properly grounded. ELECTRICAL CONNECTIONS FOR 3-WIRE SYSTEM Non Canadian ELECTRIC Dryer 1. approved strain relief into an appropriate outlet that is equipped with all local codes...
... grounded. The proper wiring and receptacle is properly installed and grounded in this time. GROUNDING REQUIREMENTS Non Canadian ELECTRIC Dryer GAS Dryer 2. The dryer MUST be connected to the pre-installation requirements in accordance with a power supply cord having an equipment-grounding ... the strain relief is not attached, the cord can be pulled out of the dryer and can result if the dryer is properly grounded. ELECTRICAL CONNECTIONS FOR 3-WIRE SYSTEM Non Canadian ELECTRIC Dryer 1. approved strain relief into an appropriate outlet that is equipped with all local codes...
Installation Instructions
Page 8
...relief mounting bracket located on the power at circuit breaker/fuse box before calling for the Frigidaire Company Authorized Parts Distributor nearest you. Connect a 1/2 inch (1.27 cm) I.D. With the dryer in personal injury, property damage or damage to the silver-colored center terminal on the...OFF" and wait 5 minutes before the burner will shut the burner off at the circuit breaker/fuse box. ELECTRICAL CONNECTIONS FOR 4-WIRE SYSTEM Non Canadian ELECTRIC Dryer 1. VALVE OPEN / GAS FLOW POSITION NEUTRAL GROUND WIRE RED BLACK WHITE NUT STRAIN RELIEF MOUNTING BRACKET TIGHTEN NUT ...
...relief mounting bracket located on the power at circuit breaker/fuse box before calling for the Frigidaire Company Authorized Parts Distributor nearest you. Connect a 1/2 inch (1.27 cm) I.D. With the dryer in personal injury, property damage or damage to the silver-colored center terminal on the...OFF" and wait 5 minutes before the burner will shut the burner off at the circuit breaker/fuse box. ELECTRICAL CONNECTIONS FOR 4-WIRE SYSTEM Non Canadian ELECTRIC Dryer 1. VALVE OPEN / GAS FLOW POSITION NEUTRAL GROUND WIRE RED BLACK WHITE NUT STRAIN RELIEF MOUNTING BRACKET TIGHTEN NUT ...
Operating Instructions
Page 1
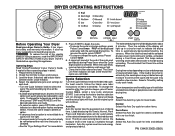
... To reduce the risk of the display will be displayed alternately with a no-iron finish. Check that cycle is selected. • See the "Dryer Settings Chart" for a desired option flashes and press Select. To change the selection after a few minutes. Auto Dry Auto Dry cycles take the ... ends, remove items immediately and hang or fold. 7. It also has many suggestions for each load. • Turn the Cycle Selector knob to sense the moisture level of installation and electrical voltage or gas pressure can also affect drying time. For best results, follow the fabric care label...
... To reduce the risk of the display will be displayed alternately with a no-iron finish. Check that cycle is selected. • See the "Dryer Settings Chart" for a desired option flashes and press Select. To change the selection after a few minutes. Auto Dry Auto Dry cycles take the ... ends, remove items immediately and hang or fold. 7. It also has many suggestions for each load. • Turn the Cycle Selector knob to sense the moisture level of installation and electrical voltage or gas pressure can also affect drying time. For best results, follow the fabric care label...
Operating Instructions
Page 2
...fabrics. Medium heat is recommended for more details. or to freshen clothing, pillows or blankets; Occasionally a load may seem too damp or overdried at the end of the cycle. Dryer Features (Control Lock) To avoid having someone accidentally start or stop the washer, press OPTIONS and Select at... the end of the cycle. Drying times from overdrying. Timed Dry is recommended for similar loads in any button will automatically be ...
...fabrics. Medium heat is recommended for more details. or to freshen clothing, pillows or blankets; Occasionally a load may seem too damp or overdried at the end of the cycle. Dryer Features (Control Lock) To avoid having someone accidentally start or stop the washer, press OPTIONS and Select at... the end of the cycle. Drying times from overdrying. Timed Dry is recommended for similar loads in any button will automatically be ...
Operating Instructions
Page 3
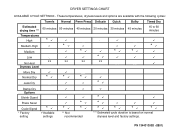
DRYER SETTINGS CHART AVAILABLE CYCLE SETTINGS - PN 134431300D (0801) These temperatures, dryness levels and options are available with the following cycles: Estimated drying time *** Temperatures High ...
DRYER SETTINGS CHART AVAILABLE CYCLE SETTINGS - PN 134431300D (0801) These temperatures, dryness levels and options are available with the following cycles: Estimated drying time *** Temperatures High ...


