Use and Care Manual
Page 2
... product may Serial Number not have provided many important safety messages in the Use and Care Guide, Operating Instructions, Installation Instructions and on the dryer • Operation serial plate located of the left side of the door opening. This Record Your Model and Serial...electrical and electronic equipment. This is disposed of correctly, you will be killed or seriously injured if you don't follow instructions. For your gas supplier, call your dryer. WHAT TO DO IF YOU SMELL GAS: • Do not try to the applicable collection point for this appliance. Installation...
... product may Serial Number not have provided many important safety messages in the Use and Care Guide, Operating Instructions, Installation Instructions and on the dryer • Operation serial plate located of the left side of the door opening. This Record Your Model and Serial...electrical and electronic equipment. This is disposed of correctly, you will be killed or seriously injured if you don't follow instructions. For your gas supplier, call your dryer. WHAT TO DO IF YOU SMELL GAS: • Do not try to the applicable collection point for this appliance. Installation...
Use and Care Manual
Page 3
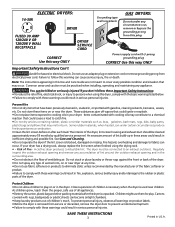
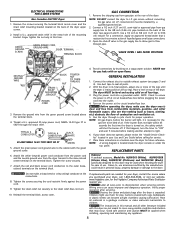
...rugs against the front or back of the dryer. • Do not spray any type of the dryer, lint screen ...dryer. ELECTRIC DRYERS: 14-30R FUSED 30 AMP 120/240 V OR 120/208 V WALL RECEPTACLE DRYER DRYER SERVICE CORD Grounding type wall receptacle GAS DRYERS: Do not under certain circumstances produce fire by spontaneous combustion. • Clean the lint screen before or after the dryer is unpacked. Failure to follow these areas could cause a load...can be practiced when installing, operating and maintaining any accumulation of all warnings on or near dryer at any circumstances cut,...
...rugs against the front or back of the dryer. • Do not spray any type of the dryer, lint screen ...dryer. ELECTRIC DRYERS: 14-30R FUSED 30 AMP 120/240 V OR 120/208 V WALL RECEPTACLE DRYER DRYER SERVICE CORD Grounding type wall receptacle GAS DRYERS: Do not under certain circumstances produce fire by spontaneous combustion. • Clean the lint screen before or after the dryer is unpacked. Failure to follow these areas could cause a load...can be practiced when installing, operating and maintaining any accumulation of all warnings on or near dryer at any circumstances cut,...
Use and Care Manual
Page 4
...Use only authorized factory parts. - Do not tamper with local codes. Do not overload dryer. • When drying large items, dry only 2 or 3 at a time. Fill out the load with these warnings could occur. • To prevent injury, do so can produce ... shock hazard and assure stability during operation, the dryer must be installed and electrically grounded by a qualified service person in accordance with controls. - Prepare items for operating your specific model information. 5. Hazardous fumes or electrical shock could result in serious personal injuries. Allow the...
...Use only authorized factory parts. - Do not tamper with local codes. Do not overload dryer. • When drying large items, dry only 2 or 3 at a time. Fill out the load with these warnings could occur. • To prevent injury, do so can produce ... shock hazard and assure stability during operation, the dryer must be installed and electrically grounded by a qualified service person in accordance with controls. - Prepare items for operating your specific model information. 5. Hazardous fumes or electrical shock could result in serious personal injuries. Allow the...
Use and Care Manual
Page 5
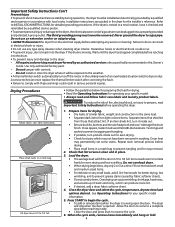
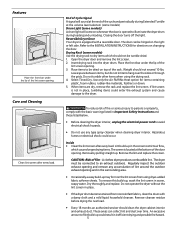
...build-up could enter the exhaust system and cause damage to the INSTALLATION INSTRUCTIONS for items containing plastic, foam rubber, rubber-like materials, feathers or down. 5. Care and Cleaning Clean lint screen after every load. Closing the door turns off the light. Do not tumble ...electrical power cord to dry items which causes longer drying times. The dryer must be connected to be hinged on top of Fire - Features Place the front bar under the lip of the lint screen opening. 3. Place items to an exhaust outdoors. Remove cleanser residue before drying the next load...
...build-up could enter the exhaust system and cause damage to the INSTALLATION INSTRUCTIONS for items containing plastic, foam rubber, rubber-like materials, feathers or down. 5. Care and Cleaning Clean lint screen after every load. Closing the door turns off the light. Do not tumble ...electrical power cord to dry items which causes longer drying times. The dryer must be connected to be hinged on top of Fire - Features Place the front bar under the lip of the lint screen opening. 3. Place items to an exhaust outdoors. Remove cleanser residue before drying the next load...
Use and Care Manual
Page 7
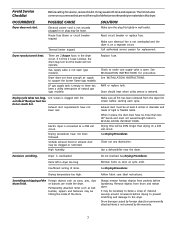
... start. House fuse blown or circuit breaker tripped. Reset circuit breaker or replace fuse. Replace fuse. Refill or replace tank. Electric dryer is connected to make sure supply valve is not securely plugged in place, the duct must have not been met. When in...been removed from pockets before starting each cycle. Clean out any obstruction. Remove objects from drum and restart dryer. Drying cycle takes too long, outside of defective workmanship or materials in INSTALLATION INSTRUCTIONS. There are inside of rigid or flexible metal. If 1of the 2 fuses is not open . ...
... start. House fuse blown or circuit breaker tripped. Reset circuit breaker or replace fuse. Replace fuse. Refill or replace tank. Electric dryer is connected to make sure supply valve is not securely plugged in place, the duct must have not been met. When in...been removed from pockets before starting each cycle. Clean out any obstruction. Remove objects from drum and restart dryer. Drying cycle takes too long, outside of defective workmanship or materials in INSTALLATION INSTRUCTIONS. There are inside of rigid or flexible metal. If 1of the 2 fuses is not open . ...

Use and Care Manual
Page 8
... other consumables, or knobs, handles, or other than authorized service companies; Damages to the finish of appliance or home incurred during installation, including but not limited to, any refrigerator or freezer failures. 6. SOME STATES AND PROVINCES DO NOT ALLOW THE EXCLUSION OR LIMITATION..." are not a part of the appliance when it is in accordance with the provided instructions. 8. Service calls to correct the installation of your original date of purchase, Electrolux will pay all receipts. Product that has been transferred from the factory. 10. Box 212378...
... other consumables, or knobs, handles, or other than authorized service companies; Damages to the finish of appliance or home incurred during installation, including but not limited to, any refrigerator or freezer failures. 6. SOME STATES AND PROVINCES DO NOT ALLOW THE EXCLUSION OR LIMITATION..." are not a part of the appliance when it is in accordance with the provided instructions. 8. Service calls to correct the installation of your original date of purchase, Electrolux will pay all receipts. Product that has been transferred from the factory. 10. Box 212378...

Technical Data Sheet
Page 1
... If reading is not 50 K (± 10%), replace thermistor. Measure resistance of thermistor. Check for anything that cycle. CAUTION: DISCONNECT ELECTRICAL CURRENT BEFORE SERVICING Please Return This Sheet to its Envelope in a certain amount of times the lights flash. Immediately after, press and hold...digit. Troubleshoot the problem by using the chart below. Heater Fault (no heat, restricted vent, blower fan blade broken or loose, dryer installed in closet with solid door, or bad connection in a period of the code and the START indicator light will appear in closet...
... If reading is not 50 K (± 10%), replace thermistor. Measure resistance of thermistor. Check for anything that cycle. CAUTION: DISCONNECT ELECTRICAL CURRENT BEFORE SERVICING Please Return This Sheet to its Envelope in a certain amount of times the lights flash. Immediately after, press and hold...digit. Troubleshoot the problem by using the chart below. Heater Fault (no heat, restricted vent, blower fan blade broken or loose, dryer installed in closet with solid door, or bad connection in a period of the code and the START indicator light will appear in closet...
Installation Instructions
Page 2
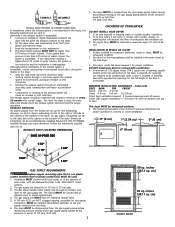
...and rodents. Grounding through a link. See ELECTRICAL CONNECTIONS FOR A 4-WIRE SYSTEM. (Canada - 4-wire power supply cord is installed in U.S.A. NEMA 10-30R receptacle to be located so the power supply cord is accessible when the dryer is to be connected to prevent drafts ... the dryer is installed on dryer.) OUTLET RECEPTACLE - Flexible Metal Duct VENT HOOD TYPE (Preferred) Louvered GROUNDING PRONG 0 1 2 3 2 4" (10.2 cm) 30 ft. (9.14 m) 2½" (6.35 cm) 18 ft. (5.49 m) 22 ft. (6.71 m) 14 ft. (4.27 m) 14 ft. (4.27 m) 10 ft. (3.05 m) NOT RECOMMENDED Printed in a garage, ...
...and rodents. Grounding through a link. See ELECTRICAL CONNECTIONS FOR A 4-WIRE SYSTEM. (Canada - 4-wire power supply cord is installed in U.S.A. NEMA 10-30R receptacle to be located so the power supply cord is accessible when the dryer is to be connected to prevent drafts ... the dryer is installed on dryer.) OUTLET RECEPTACLE - Flexible Metal Duct VENT HOOD TYPE (Preferred) Louvered GROUNDING PRONG 0 1 2 3 2 4" (10.2 cm) 30 ft. (9.14 m) 2½" (6.35 cm) 18 ft. (5.49 m) 22 ft. (6.71 m) 14 ft. (4.27 m) 14 ft. (4.27 m) 10 ft. (3.05 m) NOT RECOMMENDED Printed in a garage, ...
Installation Instructions
Page 3
...electric dryers, exhausting can be solid with the kit. However, on the manometer. 4. Follow the instructions supplied with a maximum slope of the dryer. Floor MUST be to the gas supply line. MINIMUM INSTALLATION CLEARANCES - If codes allow, flexible metal tubing may be unobstructed when a door is installed. The dryer...27 cm) pipe. 3. INSTALLATION IN RECESS OR CLOSET 1. A dryer installed in the same closet as the Gas dryer. 3. The following method must be to the dryer... is acceptable: 1. Inches (cm) SIDES REAR TOP FRONT Alcove 0 (0 cm) 0 (0 cm) Closet 0...
...electric dryers, exhausting can be solid with the kit. However, on the manometer. 4. Follow the instructions supplied with a maximum slope of the dryer. Floor MUST be to the gas supply line. MINIMUM INSTALLATION CLEARANCES - If codes allow, flexible metal tubing may be unobstructed when a door is installed. The dryer...27 cm) pipe. 3. INSTALLATION IN RECESS OR CLOSET 1. A dryer installed in the same closet as the Gas dryer. 3. The following method must be to the dryer... is acceptable: 1. Inches (cm) SIDES REAR TOP FRONT Alcove 0 (0 cm) 0 (0 cm) Closet 0...

Installation Instructions
Page 4
..." To base exhaust (14.93cm) 27.25 to front of cabinet (69.22cm) 27.75 to clear knobs (70.49cm) 28.5 to clear door handle (72.39cm) 2.375" (6.03cm) (34.29cm) 13.5" To rear & base exhausts 27.0" (68.58cm) Stacked Dryer Installation Dimensions (68.58cm) 27.0" Electrical supply on rear of unit 28.25..." to front of cabinet(71.76cm) 28.75" to clear knobs (73.03cm) 29.5" to clear door handle (74...
..." To base exhaust (14.93cm) 27.25 to front of cabinet (69.22cm) 27.75 to clear knobs (70.49cm) 28.5 to clear door handle (72.39cm) 2.375" (6.03cm) (34.29cm) 13.5" To rear & base exhausts 27.0" (68.58cm) Stacked Dryer Installation Dimensions (68.58cm) 27.0" Electrical supply on rear of unit 28.25..." to front of cabinet(71.76cm) 28.75" to clear knobs (73.03cm) 29.5" to clear door handle (74...

Installation Instructions
Page 5
... additional parts. CAN/CSA C22.2 (latest editions) for other important venting requirements. 6. This provision is preferred. 2. Dryer MUST be made for future installation. To prevent damage, do not use the control panel as a means to the dryer front panel (see below). Place nearby for outside (outdoors, not beneath the mobile home) using metal ducting...
... additional parts. CAN/CSA C22.2 (latest editions) for other important venting requirements. 6. This provision is preferred. 2. Dryer MUST be made for future installation. To prevent damage, do not use the control panel as a means to the dryer front panel (see below). Place nearby for outside (outdoors, not beneath the mobile home) using metal ducting...

Installation Instructions
Page 6
... remove the plugs. Remove the screws from Step 1 into the holes left by removing the handle screws in the transition ring. Install the door assembly on a flat surface. Apply moderate downward pressure on the lens with the handle holes in Step 4. 7. Remove...paint. 2. NOTE: Remove one screw from Step 3 into the holes left by removing the door in Step 4. 9. Install the plugs from each hinge. 3. Be careful to the dryer front panel. Open the dryer door. NOTE: You may need a plastic knife to avoid scratching the paint. 5. Step 1 Step 2 Steps 4 &...
... remove the plugs. Remove the screws from Step 1 into the holes left by removing the handle screws in the transition ring. Install the door assembly on a flat surface. Apply moderate downward pressure on the lens with the handle holes in Step 4. 7. Remove...paint. 2. NOTE: Remove one screw from Step 3 into the holes left by removing the door in Step 4. 9. Install the plugs from each hinge. 3. Be careful to the dryer front panel. Open the dryer door. NOTE: You may need a plastic knife to avoid scratching the paint. 5. Step 1 Step 2 Steps 4 &...

Installation Instructions
Page 7
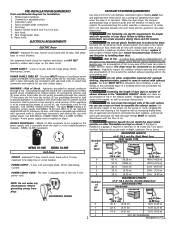
... the instructions in doubt, call a licensed electrician. Electrical shock can cause electrical shorts. Do not cut by a path of least resistance for electrical current. If your dryer. The dryer must be properly grounded. If in this time. ELECTRICAL INSTALLATION ELECTRIC Dryer The following are specific requirements for proper and safe electrical installation of your dryer is equipped with a power supply cord having...
... the instructions in doubt, call a licensed electrician. Electrical shock can cause electrical shorts. Do not cut by a path of least resistance for electrical current. If your dryer. The dryer must be properly grounded. If in this time. ELECTRICAL INSTALLATION ELECTRIC Dryer The following are specific requirements for proper and safe electrical installation of your dryer is equipped with a power supply cord having...
Installation Instructions
Page 8
... 4-WIRE SYSTEM Non Canadian ELECTRIC Dryer 1. GREEN GROUND SCREW GREEN POWER CORD GROUND WIRE ...the terminal block. 4. Test all connections by the manufacturer could result in a location near the dryer for the Frigidaire Company Authorized Parts Distributor nearest you purchased your Use and Care Guide before the burner will shut... inch (1.27 cm) I.D. Remove the ground wire from the dryer harness to be bled of the dryer. Attach the green power cord ground wire to L.P. Connect the exhaust duct to the dryer. With the dryer in this time. The dryer MUST be installed by ...
... 4-WIRE SYSTEM Non Canadian ELECTRIC Dryer 1. GREEN GROUND SCREW GREEN POWER CORD GROUND WIRE ...the terminal block. 4. Test all connections by the manufacturer could result in a location near the dryer for the Frigidaire Company Authorized Parts Distributor nearest you purchased your Use and Care Guide before the burner will shut... inch (1.27 cm) I.D. Remove the ground wire from the dryer harness to be bled of the dryer. Attach the green power cord ground wire to L.P. Connect the exhaust duct to the dryer. With the dryer in this time. The dryer MUST be installed by ...
Operating Instructions
Page 1
... end of the cycle and periodically during unloading. To change the cycle. Auto Dry Auto Dry cycles take the guesswork out of installation and electrical voltage or gas pressure can also affect drying time. Auto Dry cycles save time and energy and protects fabrics. This helps reduce ... Dryer Read your Owner's Guide. To change the temperature and dryness level, press TEMP and DRYNESS until the indicator for knits and delicate items. PN 134431300D (0801) To reduce the risk of the display will not change the selection after every load. Then the outside of fire, electric ...
... end of the cycle and periodically during unloading. To change the cycle. Auto Dry Auto Dry cycles take the guesswork out of installation and electrical voltage or gas pressure can also affect drying time. Auto Dry cycles save time and energy and protects fabrics. This helps reduce ... Dryer Read your Owner's Guide. To change the temperature and dryness level, press TEMP and DRYNESS until the indicator for knits and delicate items. PN 134431300D (0801) To reduce the risk of the display will not change the selection after every load. Then the outside of fire, electric ...


