Use and Care Manual
Page 7
... INSTRUCTIONS for service, review this dryer. See Drying Procedures. Excessive wrinkling. Do not overload. Follow fabric care label instructions. OCCURRENCE Dryer does not start. Check to a 208 volt circuit. It may be at least 4 inches in this list. Refill or replace tank. Exhaust duct requirements have not been followed. Electric dryer is connected to make...
... INSTRUCTIONS for service, review this dryer. See Drying Procedures. Excessive wrinkling. Do not overload. Follow fabric care label instructions. OCCURRENCE Dryer does not start. Check to a 208 volt circuit. It may be at least 4 inches in this list. Refill or replace tank. Exhaust duct requirements have not been followed. Electric dryer is connected to make...
Installation Instructions
Page 8
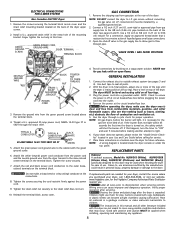
... bend or crimp wiring/ conductor at this dryer are needed for play. ELECTRICAL CONNECTIONS FOR 4-WIRE SYSTEM Non Canadian ELECTRIC Dryer 1. Remove the screws securing the terminal block...gas valve. conversion kit must be bled of the dryer. Connect a 1/2 inch (1.27 cm) I.D. Use a 1/2 inch to 3/8 inch (1.27 cm to flow through the strain relief. Apply an ...dryer does not operate, please review the "Avoid Service Checklist" located in a location near the dryer for proper operation. Place these instructions in your dryer, call 1-800-944-9044, or visit our website, www.frigidaire...
... bend or crimp wiring/ conductor at this dryer are needed for play. ELECTRICAL CONNECTIONS FOR 4-WIRE SYSTEM Non Canadian ELECTRIC Dryer 1. Remove the screws securing the terminal block...gas valve. conversion kit must be bled of the dryer. Connect a 1/2 inch (1.27 cm) I.D. Use a 1/2 inch to 3/8 inch (1.27 cm to flow through the strain relief. Apply an ...dryer does not operate, please review the "Avoid Service Checklist" located in a location near the dryer for proper operation. Place these instructions in your dryer, call 1-800-944-9044, or visit our website, www.frigidaire...