Complete Owner's Guide
Page 2
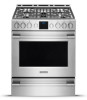
... range. To ensure our ability to continue serving you use this Use & Care Manual This manual contains instructions to help is part of our commitment to record important product information. Immediately contact the dealer (or builder) that sold you through some common problems ...the USA This Use and Care Guide is only a phone call 1-800-944-9044 For online support and Internet production information visit www.frigidaire.com. 2 2015 Electrolux Home Products, Inc. and Canada call away. PRODUCT RECORD AND REGISTRATION Product Record and Registration 2 Important Safety ...
... range. To ensure our ability to continue serving you use this Use & Care Manual This manual contains instructions to help is part of our commitment to record important product information. Immediately contact the dealer (or builder) that sold you through some common problems ...the USA This Use and Care Guide is only a phone call 1-800-944-9044 For online support and Internet production information visit www.frigidaire.com. 2 2015 Electrolux Home Products, Inc. and Canada call away. PRODUCT RECORD AND REGISTRATION Product Record and Registration 2 Important Safety ...
Complete Owner's Guide
Page 4
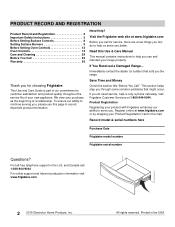
...all tape and packaging before turning on the power to the anti-tip bracket installation instructions supplied with CSA Standard C22.1, Canadian Electrical code, Part 1, and local electrical code requirements. WARNING Tip Over Hazard • A child or adult can tip the range and be killed. ...using this oven. • User Servicing - IMPORTANT SAFETY INSTRUCTIONS IMPORTANT Read and follow these instructions can damage the electronic control. All other part of an oven by removing the leveling legs, panels, wire covers, anti-tip brackets/screws, or any unused oven if it is moved....
...all tape and packaging before turning on the power to the anti-tip bracket installation instructions supplied with CSA Standard C22.1, Canadian Electrical code, Part 1, and local electrical code requirements. WARNING Tip Over Hazard • A child or adult can tip the range and be killed. ...using this oven. • User Servicing - IMPORTANT SAFETY INSTRUCTIONS IMPORTANT Read and follow these instructions can damage the electronic control. All other part of an oven by removing the leveling legs, panels, wire covers, anti-tip brackets/screws, or any unused oven if it is moved....
Complete Owner's Guide
Page 5
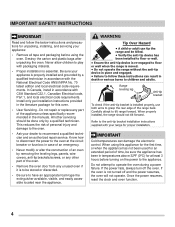
... Safety Notice - Smother fire or flame or use baking soda. • Use dry potholders. Cover the fire with materials, such as aluminum foil or any part of the appliance, including the storage drawer, lower broiler drawer, warmer drawer, or lower double oven. • Do not store items of interest to the...
... Safety Notice - Smother fire or flame or use baking soda. • Use dry potholders. Cover the fire with materials, such as aluminum foil or any part of the appliance, including the storage drawer, lower broiler drawer, warmer drawer, or lower double oven. • Do not store items of interest to the...
Complete Owner's Guide
Page 7
... of kitchen cleaners and aerosols. Be aware that excess residue from this manual. SELF CLEANING OVENS • Clean only the parts listed in or around any part of the oven. • Do not clean the oven door gasket. See the installation instructions packaged with a 3-prong grounding...the electrical power cord. If L.P. IMPORTANT SAFETY INSTRUCTIONS IMPORTANT INSTRUCTIONS FOR CLEANING YOUR OVEN CAUTION Before manually cleaning any part of the oven, be sure all parts free of grease that could catch fire. Grounding type wall receptacle Do not cut or remove the grounding prong ...
... of kitchen cleaners and aerosols. Be aware that excess residue from this manual. SELF CLEANING OVENS • Clean only the parts listed in or around any part of the oven. • Do not clean the oven door gasket. See the installation instructions packaged with a 3-prong grounding...the electrical power cord. If L.P. IMPORTANT SAFETY INSTRUCTIONS IMPORTANT INSTRUCTIONS FOR CLEANING YOUR OVEN CAUTION Before manually cleaning any part of the oven, be sure all parts free of grease that could catch fire. Grounding type wall receptacle Do not cut or remove the grounding prong ...
Complete Owner's Guide
Page 12
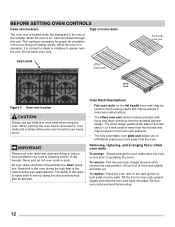
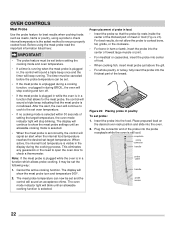
... oven rack straight forward until it is normal for proper air circulation in the oven and good baking results. Lift up hot oven racks or parts. BEFORE SETTING OVEN CONTROLS Oven vent location Type of oven racks The oven vent is located under the backguard in the rear of oven rack...
... oven rack straight forward until it is normal for proper air circulation in the oven and good baking results. Lift up hot oven racks or parts. BEFORE SETTING OVEN CONTROLS Oven vent location Type of oven racks The oven vent is located under the backguard in the rear of oven rack...
Complete Owner's Guide
Page 13
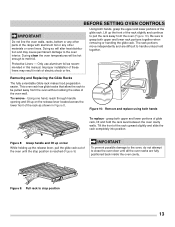
... rack level between the oven cavity walls. To remove - BEFORE SETTING OVEN CONTROLS IMPORTANT Do not line the oven walls, racks, bottom or any other parts of the rack upward slightly and slide the rack completely into position. Figure 9: Pull rack to stop position is reached (Figure 9) IMPORTANT To prevent possible...
... rack level between the oven cavity walls. To remove - BEFORE SETTING OVEN CONTROLS IMPORTANT Do not line the oven walls, racks, bottom or any other parts of the rack upward slightly and slide the rack completely into position. Figure 9: Pull rack to stop position is reached (Figure 9) IMPORTANT To prevent possible...
Complete Owner's Guide
Page 16
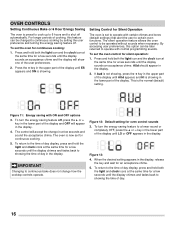
...certain oven functions. Figure 11: Energy saving with ON and OFF options 3. This is the normal (default) setting. The control will appear in the upper part of day. 16 The oven is now set the oven for oven control sounds 3. To return to the time of day display, press and hold...the same time for an acceptance chime. 5. key in the display. To set to operate with normal programming sounds. AUd should appear in the lower part of cooking, this option can be changed to the time of the display and OFF will accept the change how the cooktop controls operate. To...
...certain oven functions. Figure 11: Energy saving with ON and OFF options 3. This is the normal (default) setting. The control will appear in the upper part of day. 16 The oven is now set the oven for oven control sounds 3. To return to the time of day display, press and hold...the same time for an acceptance chime. 5. key in the display. To set to operate with normal programming sounds. AUd should appear in the lower part of cooking, this option can be changed to the time of the display and OFF will accept the change how the cooktop controls operate. To...
Complete Owner's Guide
Page 22
... whole poultry or turkey, fully insert the probe into the oven. 2. Place prepared food on the desired oven rack position and slide into the thickest part of the breast. Cancel the active cooking function. The oven mode indicator light will blink until an allowable cooking mode is selected. • When the... the probe feature for the meat probe, the control will sound a triple beep indicating that the probe tip rests inside the center of the thickest part of meat or food (Figure 23).
... whole poultry or turkey, fully insert the probe into the oven. 2. Place prepared food on the desired oven rack position and slide into the thickest part of the breast. Cancel the active cooking function. The oven mode indicator light will blink until an allowable cooking mode is selected. • When the... the probe feature for the meat probe, the control will sound a triple beep indicating that the probe tip rests inside the center of the thickest part of meat or food (Figure 23).
Complete Owner's Guide
Page 25
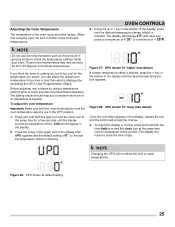
... as those found in grocery stores to normal, press and hold both the oven mode selector and the oven temperature selector are in the upper part of 0° (or the last set at default setting 25 AUd should help you can adjust the actual oven temperature to a maximum of + 35°...
... as those found in grocery stores to normal, press and hold both the oven mode selector and the oven temperature selector are in the upper part of 0° (or the last set at default setting 25 AUd should help you can adjust the actual oven temperature to a maximum of + 35°...

Complete Owner's Guide
Page 26
... cycle of any soil from the cooktop and oven. Do not line the oven walls, racks, bottom, or any other part of the range with aluminum foil or with any part of the oven door gasket is extremely sensitive to the side of the oven bottom. Smoke may cause burns. Large spills...
... cycle of any soil from the cooktop and oven. Do not line the oven walls, racks, bottom, or any other part of the range with aluminum foil or with any part of the oven door gasket is extremely sensitive to the side of the oven bottom. Smoke may cause burns. Large spills...
Complete Owner's Guide
Page 29
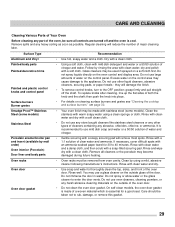
... (some models) Stainless Steel Porcelain enamel broiler pan and insert (available by mail order) Oven interior (Porcelain) Door liner and body parts Oven racks Oven door Oven door gasket • Your oven finish may be made of a woven material which is recommended to use ... stainless steel cleaners or any other liquid cleaners, abrasive cleaners, scouring pads, or paper towels - Surface Type Aluminum and Vinyl Painted body parts Painted decorative trims Painted and plastic control knobs and control panel Surface burners Burner grates Recommendation • Use hot, soapy water and a ...
... (some models) Stainless Steel Porcelain enamel broiler pan and insert (available by mail order) Oven interior (Porcelain) Door liner and body parts Oven racks Oven door Oven door gasket • Your oven finish may be made of a woven material which is recommended to use ... stainless steel cleaners or any other liquid cleaners, abrasive cleaners, scouring pads, or paper towels - Surface Type Aluminum and Vinyl Painted body parts Painted decorative trims Painted and plastic control knobs and control panel Surface burners Burner grates Recommendation • Use hot, soapy water and a ...
Complete Owner's Guide
Page 30
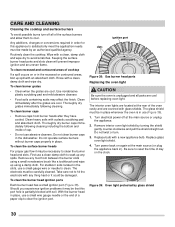
...and an uneven flame. Clean immediately after they have cooled. Take care not to hit the electrode with soil. Turn electrical power off all parts are cool before replacing oven light. Remove interior oven light shield by glass shield 30 Figure 39: Oven light protected by turning the shield gently...of the oven cavity and are cool. Do not clean burner caps in place. slots ignition port orifice port Figure 38: Gas burner head parts Replacing the oven light CAUTION Be sure the oven is partially blocked with any food from burner heads after the grates are covered with a ...
...and an uneven flame. Clean immediately after they have cooled. Take care not to hit the electrode with soil. Turn electrical power off all parts are cool before replacing oven light. Remove interior oven light shield by glass shield 30 Figure 39: Oven light protected by turning the shield gently...of the oven cavity and are cool. Do not clean burner caps in place. slots ignition port orifice port Figure 38: Gas burner head parts Replacing the oven light CAUTION Be sure the oven is partially blocked with any food from burner heads after the grates are covered with a ...
Complete Owner's Guide
Page 32
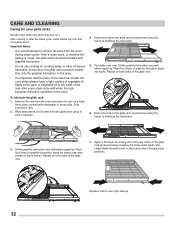
.... Keeping the frame sides lightly lubricated allows the entire rack to distribute the lubrication. 5. After a clean cycle, or anytime the gliding is important that the parts of the rack that contact the oven sides always have a light coating of graphite lubrication along the tracks to the sides of the glide rack...
.... Keeping the frame sides lightly lubricated allows the entire rack to distribute the lubrication. 5. After a clean cycle, or anytime the gliding is important that the parts of the rack that contact the oven sides always have a light coating of graphite lubrication along the tracks to the sides of the glide rack...
Complete Owner's Guide
Page 35
... YOU CALL Oven control panel sounds an audible alarm and displays an Error code. Try Bake or Broil function. Surface burner flame uneven or only part way around the burner cap. The convection fan will turn OFF power to clean soil from outlet (electric ignition models only). These areas are not...
... YOU CALL Oven control panel sounds an audible alarm and displays an Error code. Try Bake or Broil function. Surface burner flame uneven or only part way around the burner cap. The convection fan will turn OFF power to clean soil from outlet (electric ignition models only). These areas are not...
Complete Owner's Guide
Page 36
...which do not involve malfunction or defects in materials or workmanship, or for appliances not in ordinary household use or used other cosmetic parts. 11. Surcharges including, but not limited to obtain and keep all costs for servicing, such as described or illustrated are not covered... you how to the finish of Electrolux Home Products, Inc. Obligations for service calls to remote areas, including the state of parts other than in accordance with the provided instructions. Food loss due to establish the warranty period should service be performed by unauthorized ...
...which do not involve malfunction or defects in materials or workmanship, or for appliances not in ordinary household use or used other cosmetic parts. 11. Surcharges including, but not limited to obtain and keep all costs for servicing, such as described or illustrated are not covered... you how to the finish of Electrolux Home Products, Inc. Obligations for service calls to remote areas, including the state of parts other than in accordance with the provided instructions. Food loss due to establish the warranty period should service be performed by unauthorized ...
Wiring Diagram
Page 1
... board. Meat probe temperature sensor shorted or too hot 1. The error is triggered if the meat probe sees a temperature in the upper part of the display until UPO appears and the default setting of 0° (or the last set for a long time this model. The...to correct the situation, replace the oven relay board. Disconnect power to the unit, wait 30 seconds, then reapply power. 2. Before servicing or moving parts. • All uninsulated electrical terminals, connectors, heaters, etc. Note: Changing calibration affects all above steps failed to Off, or remove fuse. 3. ...
... board. Meat probe temperature sensor shorted or too hot 1. The error is triggered if the meat probe sees a temperature in the upper part of the display until UPO appears and the default setting of 0° (or the last set for a long time this model. The...to correct the situation, replace the oven relay board. Disconnect power to the unit, wait 30 seconds, then reapply power. 2. Before servicing or moving parts. • All uninsulated electrical terminals, connectors, heaters, etc. Note: Changing calibration affects all above steps failed to Off, or remove fuse. 3. ...
Installation Instructions
Page 3
... home, installation must conform with the Manufactured Home Construction and Safety Standard, Title 24 CFRR, Part 3280 [formerly the Federal Standard for Mobile Home Construction and Safety, Title 24, HUD (Part 280)] or, when such standard is installed and grounded properly by a qualified installer...with the National Electrical Code ANSI/NFPA No. 70-latest edition in United Sates or with CSA standard C22.1, Canadian Electrical Code, Part 1 in Canada. 30" GAS RANGE INSTALLATION INSTRUCTIONS IMPORTANT SAFETY INSTRUCTIONS Installation of this range can result in serious injuries and can ...
... home, installation must conform with the Manufactured Home Construction and Safety Standard, Title 24 CFRR, Part 3280 [formerly the Federal Standard for Mobile Home Construction and Safety, Title 24, HUD (Part 280)] or, when such standard is installed and grounded properly by a qualified installer...with the National Electrical Code ANSI/NFPA No. 70-latest edition in United Sates or with CSA standard C22.1, Canadian Electrical Code, Part 1 in Canada. 30" GAS RANGE INSTALLATION INSTRUCTIONS IMPORTANT SAFETY INSTRUCTIONS Installation of this range can result in serious injuries and can ...


