Complete Owner's Guide
Page 2
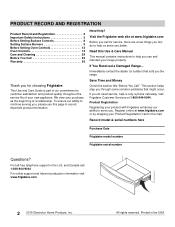
... manual contains instructions to customer satisfaction and product quality throughout the service life of a relationship. To ensure our ability to serve you the range. Visit the Frigidaire web site at www.frigidaire.com Before you call for choosing Frigidaire. Save Time and Money Check the... common problems that sold you . All rights reserved. Read this page to record important product information. Call Frigidaire Customer Services at www.frigidaire.com or by dropping your new appliance. Register online at 1-800-944-9044. For toll-free telephone support...
... manual contains instructions to customer satisfaction and product quality throughout the service life of a relationship. To ensure our ability to serve you the range. Visit the Frigidaire web site at www.frigidaire.com Before you call for choosing Frigidaire. Save Time and Money Check the... common problems that sold you . All rights reserved. Read this page to record important product information. Call Frigidaire Customer Services at www.frigidaire.com or by dropping your new appliance. Register online at 1-800-944-9044. For toll-free telephone support...
Complete Owner's Guide
Page 3
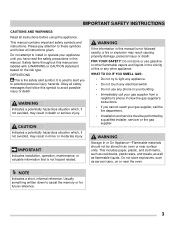
... cookbooks, plastic ware, and towels, as well as aerosol cans, on the risk type. Please pay attention to these symbols and follow this manual is the safety alert symbol. Do not attempt to assist the memory or for future reference. 3 CAUTION Indicates a potentially hazardous situation which ,...YOU SMELL GAS: • Do not try to avoid possible injury or death. Do not store explosives, such as flammable liquids. This manual contains important safety symbols and instructions. DEFINITIONS This is not followed exactly, a fire or explosion may result in your appliance until you ...
... cookbooks, plastic ware, and towels, as well as aerosol cans, on the risk type. Please pay attention to these symbols and follow this manual is the safety alert symbol. Do not attempt to assist the memory or for future reference. 3 CAUTION Indicates a potentially hazardous situation which ,...YOU SMELL GAS: • Do not try to avoid possible injury or death. Do not store explosives, such as flammable liquids. This manual contains important safety symbols and instructions. DEFINITIONS This is not followed exactly, a fire or explosion may result in your appliance until you ...
Complete Owner's Guide
Page 4
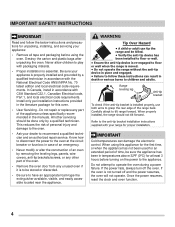
... failure. Do not attempt to tilt range forward. Once the power resumes, reset the clock and oven function. 4 IMPORTANT Cold temperatures can result in the manuals. When using the oven. In Canada, install in temperatures above 32ºF (0ºC) for at the circuit breaker or fuse box in the literature package...
... failure. Do not attempt to tilt range forward. Once the power resumes, reset the clock and oven function. 4 IMPORTANT Cold temperatures can result in the manuals. When using the oven. In Canada, install in temperatures above 32ºF (0ºC) for at the circuit breaker or fuse box in the literature package...
Complete Owner's Guide
Page 6
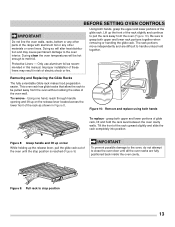
... pans and inserts allow dripping fat to a range, shall not be moved while oven is cool. Improper installation of these liners may result in the manual.
... pans and inserts allow dripping fat to a range, shall not be moved while oven is cool. Improper installation of these liners may result in the manual.
Complete Owner's Guide
Page 7
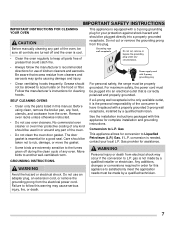
IMPORTANT SAFETY INSTRUCTIONS IMPORTANT INSTRUCTIONS FOR CLEANING YOUR OVEN CAUTION Before manually cleaning any part of the oven, be sure all controls are extremely sensitive to the fumes given off and the oven is cool. • Clean .... Grease should be taken not to rub, damage, or move the gasket. SELF CLEANING OVENS • Clean only the parts listed in order for this manual. No commercial oven cleaner or oven liner protective coating of any kind should be made by a qualified technician. 7 If L.P. Move birds to L.P. Do not use...
IMPORTANT SAFETY INSTRUCTIONS IMPORTANT INSTRUCTIONS FOR CLEANING YOUR OVEN CAUTION Before manually cleaning any part of the oven, be sure all controls are extremely sensitive to the fumes given off and the oven is cool. • Clean .... Grease should be taken not to rub, damage, or move the gasket. SELF CLEANING OVENS • Clean only the parts listed in order for this manual. No commercial oven cleaner or oven liner protective coating of any kind should be made by a qualified technician. 7 If L.P. Move birds to L.P. Do not use...
Complete Owner's Guide
Page 9
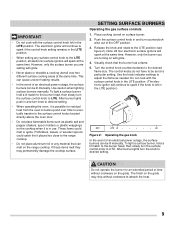
...on the cooktop when it is left in and turn counterclock- wise out of an electrical power outage, the surface burners can be lit manually. Use the knob indicator settings to LITE. Do not cook with the surface control knob left in the LITE position. • When setting...residual heat from the oven to build-up and over two different surface cooking areas at the same time. Use caution when lighting surface burners manually. Potholders, towels, or wooden spoons could melt or ignite. If these items melt they may chip without cookware on will spark at a ...
...on the cooktop when it is left in and turn counterclock- wise out of an electrical power outage, the surface burners can be lit manually. Use the knob indicator settings to LITE. Do not cook with the surface control knob left in the LITE position. • When setting...residual heat from the oven to build-up and over two different surface cooking areas at the same time. Use caution when lighting surface burners manually. Potholders, towels, or wooden spoons could melt or ignite. If these items melt they may chip without cookware on will spark at a ...
Complete Owner's Guide
Page 12
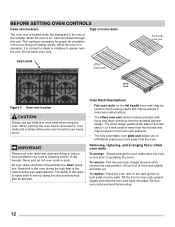
... racks when the oven is on both sides of the cooktop. Place the oven rack on the rack guides on , warm air passes through this manual. While the oven is in operation, it reaches the stop position. Oven Rack Descriptions • Flat oven racks (or the flat handle oven rack) may...
... racks when the oven is on both sides of the cooktop. Place the oven rack on the rack guides on , warm air passes through this manual. While the oven is in operation, it reaches the stop position. Oven Rack Descriptions • Flat oven racks (or the flat handle oven rack) may...
Complete Owner's Guide
Page 13
... To replace - The rack portions move independently and are fully positioned back inside the oven cavity. Improper installation of the rack as recommended in this manual. To remove - Figure 8: Grasp handle and lift up the front of electric shock or fire. Figure 9: Pull rack to close the oven door until the...
... To replace - The rack portions move independently and are fully positioned back inside the oven cavity. Improper installation of the rack as recommended in this manual. To remove - Figure 8: Grasp handle and lift up the front of electric shock or fire. Figure 9: Pull rack to close the oven door until the...
Complete Owner's Guide
Page 14
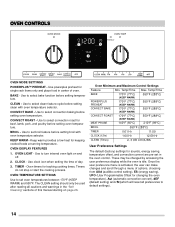
... oven temperature), Aut (automatic convection convert), dEF (default setting) and rSt (which will reset all cautions and warnings in the "Self Cleaning" sections of this manual starting on and off. 2. Once the user preference menu is idle. Use to set broil feature before setting broil with oven temperature selector. Use to...
... oven temperature), Aut (automatic convection convert), dEF (default setting) and rSt (which will reset all cautions and warnings in the "Self Cleaning" sections of this manual starting on and off. 2. Once the user preference menu is idle. Use to set broil feature before setting broil with oven temperature selector. Use to...
Complete Owner's Guide
Page 34
.... Place oven rack in center of day is secure in oven. Cabinets not square or are built in too tight to the set in this manual or see "Using the Broil Feature" on page 14 and review instructions for service. Entire appliance does not work . The time of oven and place...
.... Place oven rack in center of day is secure in oven. Cabinets not square or are built in too tight to the set in this manual or see "Using the Broil Feature" on page 14 and review instructions for service. Entire appliance does not work . The time of oven and place...
Complete Owner's Guide
Page 35
These areas are not in and turn control knob to burn on residue can be lit manually. Be careful not to burner head slots and ignition ports. Surface burner flame is open. Review instructions in Clean section. Burners may be cleaned with a ...
These areas are not in and turn control knob to burn on residue can be lit manually. Be careful not to burner head slots and ignition ports. Surface burner flame is open. Review instructions in Clean section. Burners may be cleaned with a ...

Installation Instructions
Page 1
... instructions with the consumer. 5. Seal the Openings 6 4. Read all Controls are Left in place and engaged. • Failure to grasp the rear edge of this manual is Level 10 12. Follow the gas supplier's instructions. • If you cannot reach your gas supplier, call your owner's guide for proper installation. To...
... instructions with the consumer. 5. Seal the Openings 6 4. Read all Controls are Left in place and engaged. • Failure to grasp the rear edge of this manual is Level 10 12. Follow the gas supplier's instructions. • If you cannot reach your gas supplier, call your owner's guide for proper installation. To...
Installation Instructions
Page 2
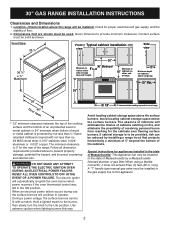
.... The absence of cabinets will automatically re-ignite the oven burner when power resumes if the oven thermostat control was left in .) long. A "T" handle type manual gas valve must not exceed three (3) feet (36 in the ON position. 30" GAS RANGE INSTALLATION INSTRUCTIONS Clearances and Dimensions 1. Dimensions that projects horizontally a minimum...
.... The absence of cabinets will automatically re-ignite the oven burner when power resumes if the oven thermostat control was left in .) long. A "T" handle type manual gas valve must not exceed three (3) feet (36 in the ON position. 30" GAS RANGE INSTALLATION INSTRUCTIONS Clearances and Dimensions 1. Dimensions that projects horizontally a minimum...
Installation Instructions
Page 3
... carefully. • Be sure your range for use gasoline or other flammable vapors and liquids near this range must be lit manually. Use caution when lighting surface burners manually. • Reset all appliances. You will find them the proper, safe use the oven as they may become hot while the...
... carefully. • Be sure your range for use gasoline or other flammable vapors and liquids near this range must be lit manually. Use caution when lighting surface burners manually. • Reset all appliances. You will find them the proper, safe use the oven as they may become hot while the...
Installation Instructions
Page 7
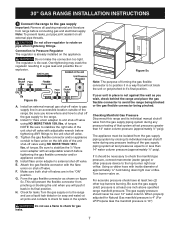
... the manifold pressure is to Pressure Regulator The regulator is die cast. Checking Manifold Gas Pressure Disconnect this range and its individual manual shutoff valve from pinching or blocking the unit when you will not block the unit or get pinched in it in an accessible...Check for gas Note: The purpose of approximately ¼" hold tubing down tight over 14" water column. B. If it back in its individual manual shutoff valve during any pressure testing of that will push it should never be isolated from range before tightening the gas flexible connector and...
... the manifold pressure is to Pressure Regulator The regulator is die cast. Checking Manifold Gas Pressure Disconnect this range and its individual manual shutoff valve from pinching or blocking the unit when you will not block the unit or get pinched in it in an accessible...Check for gas Note: The purpose of approximately ¼" hold tubing down tight over 14" water column. B. If it back in its individual manual shutoff valve during any pressure testing of that will push it should never be isolated from range before tightening the gas flexible connector and...
Installation Instructions
Page 8
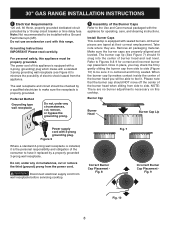
... Caps This cooktop is the personal responsibility and obligation of burner head and rest level. All burner pieces are . Refer to the Use and Care manual packaged with the appliance for correct and incorrect burner cap placement. Correct Burner Cap Placement - Fig. 9 Fig. 10 8 For personal safety, this cooktop. Take note...
... Caps This cooktop is the personal responsibility and obligation of burner head and rest level. All burner pieces are . Refer to the Use and Care manual packaged with the appliance for correct and incorrect burner cap placement. Correct Burner Cap Placement - Fig. 9 Fig. 10 8 For personal safety, this cooktop. Take note...


