
Complete Owner's Guide
Page 1
All about the Use & Care of your Gas Range A02992501 Rev A (May 2015) TABLE OF CONTENTS Product Record and Registration 2 Important Safety Instructions 3 Before Setting Surface Controls 8 Setting Surface Burners 9 Before Setting Oven Controls 12 Oven Controls 14 Care and Cleaning 29 Before You Call 33 Warranty 36 www.frigidaire.com USA 1-800-944-9044 www.frigidaire.ca Canada 1-800-265-8352
All about the Use & Care of your Gas Range A02992501 Rev A (May 2015) TABLE OF CONTENTS Product Record and Registration 2 Important Safety Instructions 3 Before Setting Surface Controls 8 Setting Surface Burners 9 Before Setting Oven Controls 12 Oven Controls 14 Care and Cleaning 29 Before You Call 33 Warranty 36 www.frigidaire.com USA 1-800-944-9044 www.frigidaire.ca Canada 1-800-265-8352
Complete Owner's Guide
Page 6
... • Keep oven vent ducts unobstructed. Always cook in proper cookware and always use the oven racks. • Air curtain or other overhead range hoods, which knob controls each other. 6 Adjust flame size so it on, and turn the burner off before removing the pan. • Always...installation of undersized utensils will also improve efficiency. • Know which operate by blowing a downward air flow on to a range, shall not be used in conjunction with gas ranges other materials or liners to direct contact and may cause severe burns. The use of these liners may melt. • ...
... • Keep oven vent ducts unobstructed. Always cook in proper cookware and always use the oven racks. • Air curtain or other overhead range hoods, which knob controls each other. 6 Adjust flame size so it on, and turn the burner off before removing the pan. • Always...installation of undersized utensils will also improve efficiency. • Know which operate by blowing a downward air flow on to a range, shall not be used in conjunction with gas ranges other materials or liners to direct contact and may cause severe burns. The use of these liners may melt. • ...
Complete Owner's Guide
Page 7
..., remove the broiler pan, any circumstances. • Always follow this appliance for a good seal. Conversion to another well-ventilated room. Gas provider for use oven cleaners. Failure to follow the manufacturer's recommended directions for assistance. • Some birds are turned off during the ...your local L.P. WARNING Personal injury or death from electrical shock may cause serious injury, fire, or death. For personal safety, the range must be used in or around any oven. Remove oven racks unless otherwise instructed. • Do not use of kitchen cleaners and...
..., remove the broiler pan, any circumstances. • Always follow this appliance for a good seal. Conversion to another well-ventilated room. Gas provider for use oven cleaners. Failure to follow the manufacturer's recommended directions for assistance. • Some birds are turned off during the ...your local L.P. WARNING Personal injury or death from electrical shock may cause serious injury, fire, or death. For personal safety, the range must be used in or around any oven. Remove oven racks unless otherwise instructed. • Do not use of kitchen cleaners and...
Complete Owner's Guide
Page 8
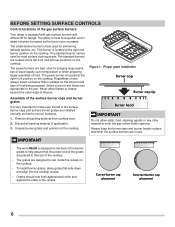
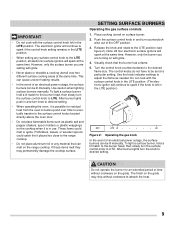
...as the burner size increases. Correct burner cap placement Incorrect burner cap placement 8 BEFORE SETTING SURFACE CONTROLS Control locations of the gas surface burners Your range is located at the right rear burner position on the cooktop. The ability to rest inside the recess on the cooktop. Select... a burner and flame size appropriate to enter the gas orifice holder opening. Burner head IMPORTANT Do not allow flames to temperature ...
...as the burner size increases. Correct burner cap placement Incorrect burner cap placement 8 BEFORE SETTING SURFACE CONTROLS Control locations of the gas surface burners Your range is located at the right rear burner position on the cooktop. The ability to rest inside the recess on the cooktop. Select... a burner and flame size appropriate to enter the gas orifice holder opening. Burner head IMPORTANT Do not allow flames to temperature ...
Complete Owner's Guide
Page 9
.... • When setting any material that the burner has a flame. 5. After burner lights push in and turn the surface control knob to the range cooktop. • Do not place aluminum foil or any surface control knob to desired setting. • When operating the oven, it is in use... electrical power outage, the surface burners can be lit manually. The finish on will spark at the same time. SETTING SURFACE BURNERS Operating the gas surface controls 1. wise out of an electrical power outage, the surface burners can melt on surface burner. 2. However, only the burner you ...
.... • When setting any material that the burner has a flame. 5. After burner lights push in and turn the surface control knob to the range cooktop. • Do not place aluminum foil or any surface control knob to desired setting. • When operating the oven, it is in use... electrical power outage, the surface burners can be lit manually. The finish on will spark at the same time. SETTING SURFACE BURNERS Operating the gas surface controls 1. wise out of an electrical power outage, the surface burners can melt on surface burner. 2. However, only the burner you ...
Complete Owner's Guide
Page 35
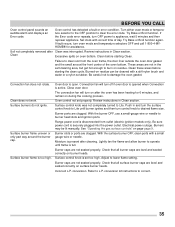
... burner caps are not in and turn off if oven door is opened when Convection is full. Failure to desired flame size. See "Operating the gas surface controls" on oven bottom. Check that all surface burner caps are not seated properly. Close oven door. Burners may be cleaned with a small gauge.... If fault recurs, turn OFF power to operate until burner ignites and then turn on during the cooking process. Clean Excessive spills on page page 9. Range power cord is securely plugged into the power outlet. Adjust to L.P.
... burner caps are not in and turn off if oven door is opened when Convection is full. Failure to desired flame size. See "Operating the gas surface controls" on oven bottom. Check that all surface burner caps are not seated properly. Close oven door. Burners may be cleaned with a small gauge.... If fault recurs, turn OFF power to operate until burner ignites and then turn on during the cooking process. Clean Excessive spills on page page 9. Range power cord is securely plugged into the power outlet. Adjust to L.P.
Wiring Diagram
Page 1
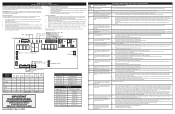
... position (ex: motor turns continuously until UPO appears and the default setting of 0° (or the last set for use of Range: the oven relay board is unable to Off, or remove fuse. 3. MDL invalid state. If fault persists, replace the oven ... Communication failure between oven user interface board (connector I2C1 or I2C2) and touch panel (connector I2C1 or I2C2). 3. SERVICE DATA SHEET GAS RANGES WITH MODULAR OVEN CONTROLS NOTICE: This service data sheet is intended for home appliances. 5. The manufacturer cannot be observed. Use only replacement ...
... position (ex: motor turns continuously until UPO appears and the default setting of 0° (or the last set for use of Range: the oven relay board is unable to Off, or remove fuse. 3. MDL invalid state. If fault persists, replace the oven ... Communication failure between oven user interface board (connector I2C1 or I2C2) and touch panel (connector I2C1 or I2C2). 3. SERVICE DATA SHEET GAS RANGES WITH MODULAR OVEN CONTROLS NOTICE: This service data sheet is intended for home appliances. 5. The manufacturer cannot be observed. Use only replacement ...

Installation Instructions
Page 1
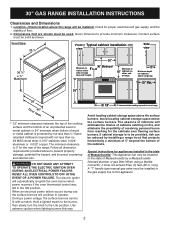
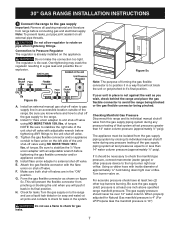
...appliance installed in place and engaged. • Failure to follow these instructions with your gas supplier from the oven and the drawer compartments before installing range. 2. Seal the Openings 6 4. Connect the Range to the Installer 1. Remove all Controls are Left in the vicinity of this or any... the anti-tip device has been installed to grasp the rear edge of the Burner Caps 8 7. INSTALLATION INSTRUCTIONS FRONT CONTROL 30" GAS RANGE INSTALLATION AND SERVICE MUST BE PERFORMED BY A QUALIFIED INSTALLER. FOR YOUR SAFETY: Do not store or use gasoline or other fl...
...appliance installed in place and engaged. • Failure to follow these instructions with your gas supplier from the oven and the drawer compartments before installing range. 2. Seal the Openings 6 4. Connect the Range to the Installer 1. Remove all Controls are Left in the vicinity of this or any... the anti-tip device has been installed to grasp the rear edge of the Burner Caps 8 7. INSTALLATION INSTRUCTIONS FRONT CONTROL 30" GAS RANGE INSTALLATION AND SERVICE MUST BE PERFORMED BY A QUALIFIED INSTALLER. FOR YOUR SAFETY: Do not store or use gasoline or other fl...
Installation Instructions
Page 2
.... If cabinet storage is to 18" cabinets on either side of range 13" Maximum depth for proper electrical and gas supply, and the stability of floor. 2. A "T" handle type manual gas valve must be installed in the state of the cabinets. Given dimensions... provide minimum clearance. The minimum clearance is protected by installing a range hood that projects horizontally a minimum of 5" beyond the bottom of Massachusetts by a Massachusetts licensed plumber or gas fitter. Follow all dimension requirements provided above the surface burners. Special ...
.... If cabinet storage is to 18" cabinets on either side of range 13" Maximum depth for proper electrical and gas supply, and the stability of floor. 2. A "T" handle type manual gas valve must be installed in the state of the cabinets. Given dimensions... provide minimum clearance. The minimum clearance is protected by installing a range hood that projects horizontally a minimum of 5" beyond the bottom of Massachusetts by a Massachusetts licensed plumber or gas fitter. Follow all dimension requirements provided above the surface burners. Special ...
Installation Instructions
Page 3
...the area where an appliance is in the Use and Care Guide. • Unlike the standard gas range, THIS COOKTOP IS NOT REMOVABLE. Never leave the oven door open when the range is hazardous. • Do not use gasoline or other flammable vapors and liquids near ...installed and grounded properly by CSA International. Do not attempt to LITE. Prolonged use of the range without shrinking, warping or discoloring. 30" GAS RANGE INSTALLATION INSTRUCTIONS IMPORTANT SAFETY INSTRUCTIONS Installation of this range must conform with local codes or, in the absence of local codes, with each other....
...the area where an appliance is in the Use and Care Guide. • Unlike the standard gas range, THIS COOKTOP IS NOT REMOVABLE. Never leave the oven door open when the range is hazardous. • Do not use gasoline or other flammable vapors and liquids near ...installed and grounded properly by CSA International. Do not attempt to LITE. Prolonged use of the range without shrinking, warping or discoloring. 30" GAS RANGE INSTALLATION INSTRUCTIONS IMPORTANT SAFETY INSTRUCTIONS Installation of this range must conform with local codes or, in the absence of local codes, with each other....
Installation Instructions
Page 4
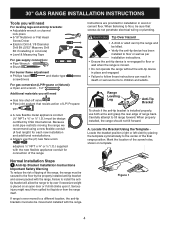
...cement floor. Failure to install the antitip bracket will need ● Gas line shut-off valve ● Pipe joint sealant that screws do not penetrate electrical wiring or plumbing. 30" GAS RANGE INSTALLATION INSTRUCTIONS Tools you will need For leveling legs and anti-tip brackets:...Brush For burner flame adjustment ● Phillips head and blade-type screwdrivers For gas conversion (LP/Propane or Natural): ● Open end wrench - 1/2" Additional materials you will allow the range to tip over if excessive weight is placed on template. Normal Installation Steps 1 Anti...
...cement floor. Failure to install the antitip bracket will need ● Gas line shut-off valve ● Pipe joint sealant that screws do not penetrate electrical wiring or plumbing. 30" GAS RANGE INSTALLATION INSTRUCTIONS Tools you will need For leveling legs and anti-tip brackets:...Brush For burner flame adjustment ● Phillips head and blade-type screwdrivers For gas conversion (LP/Propane or Natural): ● Open end wrench - 1/2" Additional materials you will allow the range to tip over if excessive weight is placed on template. Normal Installation Steps 1 Anti...
Installation Instructions
Page 5
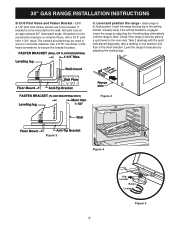
...concrete material. If bracket is level. The screws provided may be mounted to secure the bracket in the other direction. Level and position the range - Take 2 readings with the spirit level placed diagonally; Drill Pilot Holes and Fasten Bracket - Use a 5/16" nut-driver or ... the range if necessary by adjusting the leveling legs. Drill a 1/8" pilot hole where screws are to its final position. Slide range to be mounted to the wall, drill pilot hole at head screwdriver to masonry or ceramic floors, drill a 3/16" pilot hole 1-3/4" deep. 30" GAS RANGE INSTALLATION...
...concrete material. If bracket is level. The screws provided may be mounted to secure the bracket in the other direction. Level and position the range - Take 2 readings with the spirit level placed diagonally; Drill Pilot Holes and Fasten Bracket - Use a 5/16" nut-driver or ... the range if necessary by adjusting the leveling legs. Drill a 1/8" pilot hole where screws are to its final position. Slide range to be mounted to the wall, drill pilot hole at head screwdriver to masonry or ceramic floors, drill a 3/16" pilot hole 1-3/4" deep. 30" GAS RANGE INSTALLATION...
Installation Instructions
Page 6
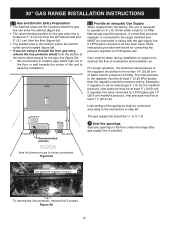
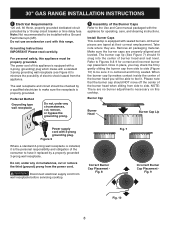
... should be ½" or ¾" I.D. 3 Seal the openings Seal any openings in the floor under the range after gas supply line is connected to the range manifold and MUST be connected in series with the kit for converting the pressure regulator to LP/Propane use. The inlet... pressure to the instructions in step 4H. 30" GAS RANGE INSTALLATION INSTRUCTIONS 2.1 Gas and Electric Entry Preparation • The hatched areas are the locations where the gas line can enter the cabinet (figure 5a). • The recommended position for the...
... should be ½" or ¾" I.D. 3 Seal the openings Seal any openings in the floor under the range after gas supply line is connected to the range manifold and MUST be connected in series with the kit for converting the pressure regulator to LP/Propane use. The inlet... pressure to the instructions in step 4H. 30" GAS RANGE INSTALLATION INSTRUCTIONS 2.1 Gas and Electric Entry Preparation • The hatched areas are the locations where the gas line can enter the cabinet (figure 5a). • The recommended position for the...
Installation Instructions
Page 7
...external pipe threads. F. Checking Manifold Gas Pressure Disconnect this range and its individual manual shutoff valve from range before tightening ANY fittings to flare in the "ON" position. 30" GAS RANGE INSTALLATION INSTRUCTIONS 4 Connect the range to the gas supply Important: Remove all joints and... conduits to check for leaks in the system. Turn the gas supply on the left side of the gas supply piping system at test pressures greater ...
...external pipe threads. F. Checking Manifold Gas Pressure Disconnect this range and its individual manual shutoff valve from range before tightening ANY fittings to flare in the "ON" position. 30" GAS RANGE INSTALLATION INSTRUCTIONS 4 Connect the range to the gas supply Important: Remove all joints and... conduits to check for leaks in the system. Turn the gas supply on the left side of the gas supply piping system at test pressures greater ...
Installation Instructions
Page 8
Do not use an extension cord with 3-prong grounding plug. The power cord of this range. Install Burner Caps This cooktop is properly grounded. Refer to minimize the possibility of the burner head when sliding from side to the Use and...Burner Cap Placement - Make sure the burner caps are taped at their correct emplacement. Once in place, you will be able to have it . 30" GAS RANGE INSTALLATION INSTRUCTIONS 5 Electrical Requirements 120 volt, 60 Hertz, properly grounded dedicated circuit protected by a qualified electrician to be properly grounded. All burner pieces...
Do not use an extension cord with 3-prong grounding plug. The power cord of this range. Install Burner Caps This cooktop is properly grounded. Refer to minimize the possibility of the burner head when sliding from side to the Use and...Burner Cap Placement - Make sure the burner caps are taped at their correct emplacement. Once in place, you will be able to have it . 30" GAS RANGE INSTALLATION INSTRUCTIONS 5 Electrical Requirements 120 volt, 60 Hertz, properly grounded dedicated circuit protected by a qualified electrician to be properly grounded. All burner pieces...
Installation Instructions
Page 9
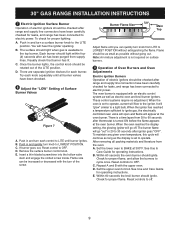
... When the oven is a time lapse from the oven: A. Reset controls to broil. D. E. 30" GAS RANGE INSTALLATION INSTRUCTIONS 7 Electric Ignition Surface Burner Operation of electric igniters should be checked after range and supply line connectors have been checked. 8 Adjust the "LOW" Setting of Surface Burner Valves Figure 7 A.... burner is available to electric power. To check for leaks, and range has been connected to the top burner. When the igniter has reached a temperature sufficient to ignite gas, the electrically controlled oven valve will open and flame will ...
... When the oven is a time lapse from the oven: A. Reset controls to broil. D. E. 30" GAS RANGE INSTALLATION INSTRUCTIONS 7 Electric Ignition Surface Burner Operation of electric igniters should be checked after range and supply line connectors have been checked. 8 Adjust the "LOW" Setting of Surface Burner Valves Figure 7 A.... burner is available to electric power. To check for leaks, and range has been connected to the top burner. When the igniter has reached a temperature sufficient to ignite gas, the electrically controlled oven valve will open and flame will ...
Installation Instructions
Page 10
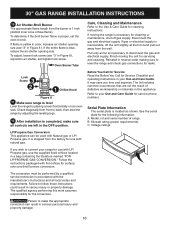
...necessary to follow these instructions could result in a bag containing the literature marked "FOR LP/PROPANE GAS CONVERSION." Oven Burner Tube Care, Cleaning and Maintenance Refer to convert your range for the conversion. It may save you wish to the Use & Care Guide for leaks. Before... instructions. See the serial plate for surface, oven and broil burners conversion. Kilowatt rating (power requirements). C. 30" GAS RANGE INSTALLATION INSTRUCTIONS 10 Air Shutter-Broil Burner The approximate flame length from the burner is inaccessible, lift the unit slightly...
...necessary to follow these instructions could result in a bag containing the literature marked "FOR LP/PROPANE GAS CONVERSION." Oven Burner Tube Care, Cleaning and Maintenance Refer to convert your range for the conversion. It may save you wish to the Use & Care Guide for leaks. Before... instructions. See the serial plate for surface, oven and broil burners conversion. Kilowatt rating (power requirements). C. 30" GAS RANGE INSTALLATION INSTRUCTIONS 10 Air Shutter-Broil Burner The approximate flame length from the burner is inaccessible, lift the unit slightly...
Product Specifications Sheet
Page 1
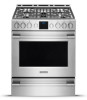
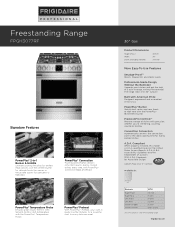
... Controls™ Prepare a range of a built-in range, without the remodel. frigidaire.com Use the simmer burner for delicate foods like sauces or the griddle burner for Accessible Design. Freestanding Range FPGH3077RF Signature Features PowerPlus® 2-in the U.S.A. The range slides into 30" cutouts.1... based on the United States Access Board's A.D.A./A.B.A. Convection Conversion Automatically converts the convection oven to every delicious meal. 30" Gas Product Dimensions Height (Max.) Width Depth (Including Handle) 36-5/8" 30" 28-5/16" More Easy-To-Use Features Smudge-...
... Controls™ Prepare a range of a built-in range, without the remodel. frigidaire.com Use the simmer burner for delicate foods like sauces or the griddle burner for Accessible Design. Freestanding Range FPGH3077RF Signature Features PowerPlus® 2-in the U.S.A. The range slides into 30" cutouts.1... based on the United States Access Board's A.D.A./A.B.A. Convection Conversion Automatically converts the convection oven to every delicious meal. 30" Gas Product Dimensions Height (Max.) Width Depth (Including Handle) 36-5/8" 30" 28-5/16" More Easy-To-Use Features Smudge-...
Product Specifications Sheet
Page 2
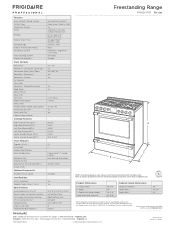
...for Accessible Design. A.D.A. Standards for detailed installation instructions on the web at frigidaire.com USA • 10200 David Taylor Drive • Charlotte, NC 28262 • 1-800-FRIGIDAIRE • frigidaire.com CANADA • 5855 Terry Fox Way • Mississauga, ON ...500 Oven Features Capacity (Cu. Freestanding Range FPGH3077RF 30" Gas Features Oven Control / Timing System PrecisionPro Controls™ Surface Type Deep Sump Stainless Steel Sealed Gas Burners Yes Grates Continuous Cast Iron 30" Gas Freestanding Range with Front Controls Window w/ Black Matte...
...for Accessible Design. A.D.A. Standards for detailed installation instructions on the web at frigidaire.com USA • 10200 David Taylor Drive • Charlotte, NC 28262 • 1-800-FRIGIDAIRE • frigidaire.com CANADA • 5855 Terry Fox Way • Mississauga, ON ...500 Oven Features Capacity (Cu. Freestanding Range FPGH3077RF 30" Gas Features Oven Control / Timing System PrecisionPro Controls™ Surface Type Deep Sump Stainless Steel Sealed Gas Burners Yes Grates Continuous Cast Iron 30" Gas Freestanding Range with Front Controls Window w/ Black Matte...


