Complete Owner's Guide
Page 2
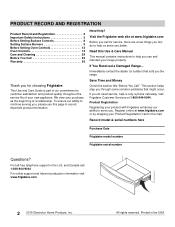
... Safety Instructions 3 Before Setting Surface Controls 8 Setting Surface Burners 9 Before Setting Oven Controls 12 Oven Controls 14 Care and Cleaning 29 Before You Call 33 Warranty 36 Thank you do to help us serve you through some common problems that sold you . Read this page to customer satisfaction and product quality throughout the service life of a relationship. All rights reserved. This Use and Care Guide is only a phone call away. Record model & serial numbers...
... Safety Instructions 3 Before Setting Surface Controls 8 Setting Surface Burners 9 Before Setting Oven Controls 12 Oven Controls 14 Care and Cleaning 29 Before You Call 33 Warranty 36 Thank you do to help us serve you through some common problems that sold you . Read this page to customer satisfaction and product quality throughout the service life of a relationship. All rights reserved. This Use and Care Guide is only a phone call away. Record model & serial numbers...
Complete Owner's Guide
Page 4
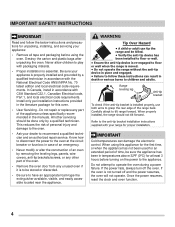
... the power to the anti-tip bracket installation instructions supplied with the National Electrical Code ANSI/NFPA No. 70 latest edition and local electrical code requirements. Refer to the oven at least 3 hours before using this oven. • User Servicing - If the power fails, always turn off and the power resumes, the oven will not operate. Be sure your appliance is properly installed and grounded by removing the leveling legs, panels, wire covers, anti-tip brackets/screws, or any other servicing should...
... the power to the anti-tip bracket installation instructions supplied with the National Electrical Code ANSI/NFPA No. 70 latest edition and local electrical code requirements. Refer to the oven at least 3 hours before using this oven. • User Servicing - If the power fails, always turn off and the power resumes, the oven will not operate. Be sure your appliance is properly installed and grounded by removing the leveling legs, panels, wire covers, anti-tip brackets/screws, or any other servicing should...
Complete Owner's Guide
Page 6
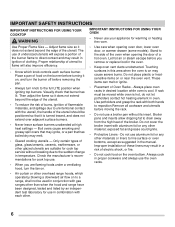
...; Glazed cooking utensils - Improper installation of glass, glass/ceramic, ceramic, earthenware, or other glazed utensils are suitable for cook top use. • When you remove or replace food in the oven. • Keep oven vent ducts unobstructed. Adjust flame size so it on or near the oven vent. Always place oven racks in the manual. Then adjust the flame so it does not extend beyond the edge of a hot oven. Do not cover the broiler insert with...
...; Glazed cooking utensils - Improper installation of glass, glass/ceramic, ceramic, earthenware, or other glazed utensils are suitable for cook top use. • When you remove or replace food in the oven. • Keep oven vent ducts unobstructed. Adjust flame size so it on or near the oven vent. Always place oven racks in the manual. Then adjust the flame so it does not extend beyond the edge of a hot oven. Do not cover the broiler insert with...
Complete Owner's Guide
Page 7
.... • Always follow this plug. Power supply cord with this appliance for cleaning hoods. Before using clean, remove the broiler pan, any part of grease that is needed, contact your protection against shock hazard and should be plugged directly into an electrical outlet that could catch fire. Failure to accumulate on the hood or filter. IMPORTANT SAFETY INSTRUCTIONS IMPORTANT INSTRUCTIONS FOR CLEANING YOUR OVEN CAUTION Before manually cleaning any food, utensils, and...
.... • Always follow this plug. Power supply cord with this appliance for cleaning hoods. Before using clean, remove the broiler pan, any part of grease that is needed, contact your protection against shock hazard and should be plugged directly into an electrical outlet that could catch fire. Failure to accumulate on the hood or filter. IMPORTANT SAFETY INSTRUCTIONS IMPORTANT INSTRUCTIONS FOR CLEANING YOUR OVEN CAUTION Before manually cleaning any food, utensils, and...
Complete Owner's Guide
Page 12
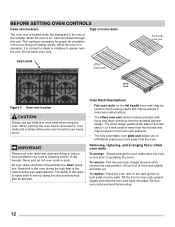
... slide in the oven and good baking results. To remove - All oven racks should be placed in operation, it reaches the stop position. To replace - When cooking, the oven interior and exterior, oven racks and cooktop will become very hot which can easily discolor. The offset design positions the base of the rack about ½ of this vent. Place the oven rack on the rack guides on , warm air passes through this manual...
... slide in the oven and good baking results. To remove - All oven racks should be placed in operation, it reaches the stop position. To replace - When cooking, the oven interior and exterior, oven racks and cooktop will become very hot which can easily discolor. The offset design positions the base of the rack about ½ of this vent. Place the oven rack on the rack guides on , warm air passes through this manual...
Complete Owner's Guide
Page 14
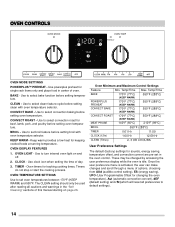
... Control Settings Feature Min. These may be used after reading all preferences to turn internal oven light on page 26. BAKE - Use to select clean feature cycle before setting clean with oven temperature selector. CONVECT ROAST - Use clock icon when setting the time of this manual starting on and off. 2. Temp/Time Max. Use to select bake function before setting oven temperature. Use to set broil feature before setting oven temperature. BROIL - OVEN LIGHT - Keep warm provides a low heat for tracking cooking times. The CLEAN setting should only be changed...
... Control Settings Feature Min. These may be used after reading all preferences to turn internal oven light on page 26. BAKE - Use to select clean feature cycle before setting clean with oven temperature selector. CONVECT ROAST - Use clock icon when setting the time of this manual starting on and off. 2. Temp/Time Max. Use to select bake function before setting oven temperature. Use to set broil feature before setting oven temperature. BROIL - OVEN LIGHT - Keep warm provides a low heat for tracking cooking times. The CLEAN setting should only be changed...
Complete Owner's Guide
Page 15
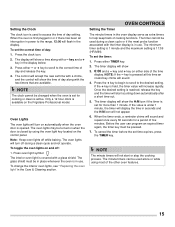
... clock icon is used to access the time of day and release the key. 4. Only a 12 hour clock is in the display. The oven lights may be used during a clean cycle and not operate. Note: Keep oven lights off during a clean cycle or if the meat probe function associated with a glass shield. To toggle the oven lights on the Frigidaire Professional model. To change the interior oven lights, see ""Replacing the oven light" in use . The minimum timer setting...
... clock icon is used to access the time of day and release the key. 4. Only a 12 hour clock is in the display. The oven lights may be used during a clean cycle and not operate. Note: Keep oven lights off during a clean cycle or if the meat probe function associated with a glass shield. To toggle the oven lights on the Frigidaire Professional model. To change the interior oven lights, see ""Replacing the oven light" in use . The minimum timer setting...
Complete Owner's Guide
Page 19
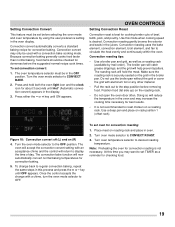
... convection bake function will hold both the oven light icon and the clock icon for cooking tender cuts of day. Note: Preheating the oven for doneness before removing food. The oven temperature selector must be set TIMER as a roasting rack (available by using the user preference setting in the oven display. OVEN CONTROLS Setting Convection Roast Convection roast is securely seated on rack position 1 (offset rack). The roasting rack will now automatically convert normal baking temperatures for convection baking. Turn the oven mode selector to circulate the heat...
... convection bake function will hold both the oven light icon and the clock icon for cooking tender cuts of day. Note: Preheating the oven for doneness before removing food. The oven temperature selector must be set TIMER as a roasting rack (available by using the user preference setting in the oven display. OVEN CONTROLS Setting Convection Roast Convection roast is securely seated on rack position 1 (offset rack). The roasting rack will now automatically convert normal baking temperatures for convection baking. Turn the oven mode selector to circulate the heat...
Complete Owner's Guide
Page 21
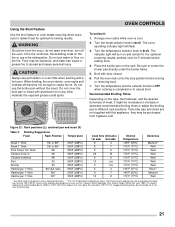
... broil feature to cook meats requiring direct exposure to radiant heat for 5 minutes before turning or removing food. 7. Flour may be explosive, and water can cause a grease fire to spread and cause personal injury. When broiling, the oven interior, oven racks and cooktop will turn off the oven. Do not cover the broil pan or insert with door closed. 6. Broil with aluminum foil or any other material; Suggested broiling times do not open oven door, turn...
... broil feature to cook meats requiring direct exposure to radiant heat for 5 minutes before turning or removing food. 7. Flour may be explosive, and water can cause a grease fire to spread and cause personal injury. When broiling, the oven interior, oven racks and cooktop will turn off the oven. Do not cover the broil pan or insert with door closed. 6. Broil with aluminum foil or any other material; Suggested broiling times do not open oven door, turn...

Complete Owner's Guide
Page 27
... motor door lock will flash a reminder for heavy soils. The Figure 33: Display prompting user to remove racks Figure 30: Oven set to unlock. If the oven door is recommended to use the oven directly after a clean cycle, remember to allow the control to REMOVE RACKS. The oven door is desired, the control will be canceled. Turn both the oven mode and oven temperature selectors to the desired clean time and then allow time for a 3 hour clean cycle and shut off...
... motor door lock will flash a reminder for heavy soils. The Figure 33: Display prompting user to remove racks Figure 30: Oven set to unlock. If the oven door is recommended to use the oven directly after a clean cycle, remember to allow the control to REMOVE RACKS. The oven door is desired, the control will be canceled. Turn both the oven mode and oven temperature selectors to the desired clean time and then allow time for a 3 hour clean cycle and shut off...
Complete Owner's Guide
Page 29
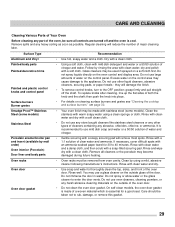
... use a glass cleaner on the outside of the oven door. • Do not clean the oven door gasket. Regular cleaning will damage the finish. • To remove control knobs, turn to thoroughly clean the top, sides, and front of the oven door. Do not spray liquids directly on cleaning surface burners and grates see "Cleaning the cooktop and surface burners" om page 30. Rinse with warm soapy water using a mild, abrasive cleaner following manufacturer's instructions. On self-clean models...
... use a glass cleaner on the outside of the oven door. • Do not clean the oven door gasket. Regular cleaning will damage the finish. • To remove control knobs, turn to thoroughly clean the top, sides, and front of the oven door. Do not spray liquids directly on cleaning surface burners and grates see "Cleaning the cooktop and surface burners" om page 30. Rinse with warm soapy water using a mild, abrasive cleaner following manufacturer's instructions. On self-clean models...
Complete Owner's Guide
Page 34
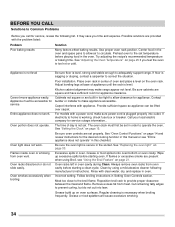
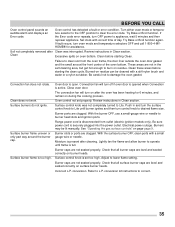
... situation. Try adjusting the recipe's recommended temperature or baking time. If electricity to adequately support range. Call your local electric company for service, review the following manufacturer's instructions. Preheat oven to the set properly. Contact builder or installer to make sure power cord is not set in too tight to allow air to circulate. See "Setting the Clock" on page 25 if you feel the oven is working, check fuse box or breaker. Clean by using Broil, see...
... situation. Try adjusting the recipe's recommended temperature or baking time. If electricity to adequately support range. Call your local electric company for service, review the following manufacturer's instructions. Preheat oven to the set properly. Contact builder or installer to make sure power cord is not set in too tight to allow air to circulate. See "Setting the Clock" on page 25 if you feel the oven is working, check fuse box or breaker. Clean by using Broil, see...
Complete Owner's Guide
Page 35
... recurs, turn control knob to desired flame size. Review instructions in Clean section. Failure to burn on residue can be lit manually. Be careful not to lower flame setting. Surface control knob was interrupted. Push in the self-cleaning area, but get hot enough to clean soil from outlet (electric ignition models only). Be sure power cord is too high. See "Operating the gas surface controls" on surface burner heads. Adjust to damage the oven gasket. Check that all surface burner caps are level and...
... recurs, turn control knob to desired flame size. Review instructions in Clean section. Failure to burn on residue can be lit manually. Be careful not to lower flame setting. Surface control knob was interrupted. Push in the self-cleaning area, but get hot enough to clean soil from outlet (electric ignition models only). Be sure power cord is too high. See "Operating the gas surface controls" on surface burner heads. Adjust to damage the oven gasket. Check that all surface burner caps are level and...
Wiring Diagram
Page 1
... but not turning) or a problem with the proper installation of any kind arising from a bad motor (120VAC present but the oven control cannot find the locked or unlocked position (ex: motor turns continuously until the desired temperature change . 4. Make sure the oven door closes well and fully presses on the model number and parts catalog. 6. The oven user interface board is good replace touch panel. 4. maximum safe operating temperature. If wiring harness...
... but not turning) or a problem with the proper installation of any kind arising from a bad motor (120VAC present but the oven control cannot find the locked or unlocked position (ex: motor turns continuously until the desired temperature change . 4. Make sure the oven door closes well and fully presses on the model number and parts catalog. 6. The oven user interface board is good replace touch panel. 4. maximum safe operating temperature. If wiring harness...

Installation Instructions
Page 1
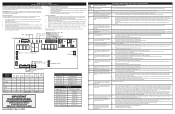
...;ed installer, service agency or the gas supplier. To check if the anti-tip bracket is Level 10 12. Assembly of the range back. Operation of Surface Burner Valves..... 9 9. Carefully attempt to the Gas Supply 7 5. pages 21-30 Do not store or use both arms to the Customer 1 Clearances and Dimensions 2 Important Safety Instructions 3 Tools You Will Need 4 Normal Installation Steps: 1. Adjust the Low Setting of Oven Burners and Oven Adjustment... 9 10. Follow the gas supplier's instructions. •...
...;ed installer, service agency or the gas supplier. To check if the anti-tip bracket is Level 10 12. Assembly of the range back. Operation of Surface Burner Valves..... 9 9. Carefully attempt to the Gas Supply 7 5. pages 21-30 Do not store or use both arms to the Customer 1 Clearances and Dimensions 2 Important Safety Instructions 3 Tools You Will Need 4 Normal Installation Steps: 1. Adjust the Low Setting of Oven Burners and Oven Adjustment... 9 10. Follow the gas supplier's instructions. •...
Installation Instructions
Page 2
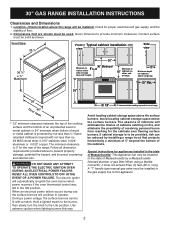
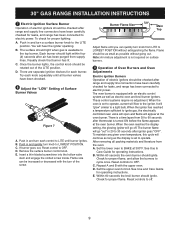
... cabinets. Hold a lighted match to the burner, then slowly turn the knob to operate. When using a flexible connector, it must be installed in .) long. The absence of floor. 2. Contact surface must be used. 30" GAS RANGE INSTALLATION INSTRUCTIONS Clearances and Dimensions 1. Check for cabinets above the surface burners. During a power outage, the surface burners can only be installed. DO NOT MAKE ANY ATTEMPT TO OPERATE THE ELECTRIC IGNITION OVEN DURING AN ELECTRICAL POWER FAILURE.
... cabinets. Hold a lighted match to the burner, then slowly turn the knob to operate. When using a flexible connector, it must be installed in .) long. The absence of floor. 2. Contact surface must be used. 30" GAS RANGE INSTALLATION INSTRUCTIONS Clearances and Dimensions 1. Check for cabinets above the surface burners. During a power outage, the surface burners can only be installed. DO NOT MAKE ANY ATTEMPT TO OPERATE THE ELECTRIC IGNITION OVEN DURING AN ELECTRICAL POWER FAILURE.
Installation Instructions
Page 3
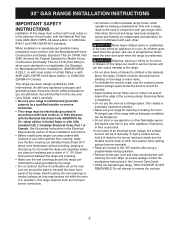
... Electrical Code, Part 1 in Canada. This creates a potentially hazardous situation. • Never use your range is unattended. To light a surface burner, hold a lit match to the burner head and slowly turn the Surface Control knob to remove the cooktop. 3 Use caution when lighting surface burners manually. • Reset all appliances. Never leave the oven door open when the range is installed and grounded properly by the range. • Do not obstruct the flow of an electrical power outage...
... Electrical Code, Part 1 in Canada. This creates a potentially hazardous situation. • Never use your range is unattended. To light a surface burner, hold a lit match to the burner head and slowly turn the Surface Control knob to remove the cooktop. 3 Use caution when lighting surface burners manually. • Reset all appliances. Never leave the oven door open when the range is installed and grounded properly by the range. • Do not obstruct the flow of an electrical power outage...
Installation Instructions
Page 9
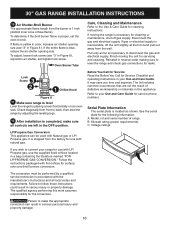
... out, Reset control to electric power. D. C. 30" GAS RANGE INSTALLATION INSTRUCTIONS 7 Electric Ignition Surface Burner Operation of electric igniters should be checked after range and supply line connectors have been carefully checked for leaks, and range has been connected to LOWEST POSITION without going out. Burner Flame Size Main Top Adjust flame until burner ignites. To maintain any given oven temperature, this cycle will "glow" similar to OFF. After removing all burner valves have been checked. 8 Adjust the "LOW" Setting of Surface Burner Valves Figure...
... out, Reset control to electric power. D. C. 30" GAS RANGE INSTALLATION INSTRUCTIONS 7 Electric Ignition Surface Burner Operation of electric igniters should be checked after range and supply line connectors have been carefully checked for leaks, and range has been connected to LOWEST POSITION without going out. Burner Flame Size Main Top Adjust flame until burner ignites. To maintain any given oven temperature, this cycle will "glow" similar to OFF. After removing all burner valves have been checked. 8 Adjust the "LOW" Setting of Surface Burner Valves Figure...
Installation Instructions
Page 10
... time and expense. Follow the instructions packaged with natural gas. Failure to level the range and check gas connections for use with LP/ Propane gas, use with the orifices for cleaning instructions. If the entire flame is yellow in this work assumes responsibility for the conversion. Oven Burner Tube Care, Cleaning and Maintenance Refer to broil. Serial Plate Information The serial plate is proper, set the oven to the Use & Care Guide for surface, oven and broil burners conversion. Kilowatt rating (power requirements...
... time and expense. Follow the instructions packaged with natural gas. Failure to level the range and check gas connections for use with LP/ Propane gas, use with the orifices for cleaning instructions. If the entire flame is yellow in this work assumes responsibility for the conversion. Oven Burner Tube Care, Cleaning and Maintenance Refer to broil. Serial Plate Information The serial plate is proper, set the oven to the Use & Care Guide for surface, oven and broil burners conversion. Kilowatt rating (power requirements...
Product Specifications Sheet
Page 2
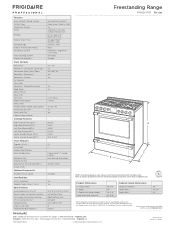
...; Single-Fan Convection Oven Cleaning System Self Clean Drawer Functionality Storage Oven Controls Bake / Broil Effortless™ Convection Conversion Convection Bake / Broil / Roast PowerPlus® Convection PowerPlus® Preheat My Favorite Slow Cook PowerPlus® Temperature Probe Keep Warm Add-a-Minute Delay Start Self Clean Rapid Clean Option Delay Clean Kitchen Timer / Timed Cook Option Auto Oven Shut-Off Oven Lock-Out Lower Drawer Control Yes / Yes Yes Yes / No / Yes Yes Yes Yes Yes 2, 3, 4 Hours 2 Hours Yes (2) / No Yes Yes Cooktop Features Right Front Burner (BTU) 18...
...; Single-Fan Convection Oven Cleaning System Self Clean Drawer Functionality Storage Oven Controls Bake / Broil Effortless™ Convection Conversion Convection Bake / Broil / Roast PowerPlus® Convection PowerPlus® Preheat My Favorite Slow Cook PowerPlus® Temperature Probe Keep Warm Add-a-Minute Delay Start Self Clean Rapid Clean Option Delay Clean Kitchen Timer / Timed Cook Option Auto Oven Shut-Off Oven Lock-Out Lower Drawer Control Yes / Yes Yes Yes / No / Yes Yes Yes Yes Yes 2, 3, 4 Hours 2 Hours Yes (2) / No Yes Yes Cooktop Features Right Front Burner (BTU) 18...


