
Complete Owner's Guide
Page 1
All about the Use & Care of your Gas Range A02992501 Rev A (May 2015) TABLE OF CONTENTS Product Record and Registration 2 Important Safety Instructions 3 Before Setting Surface Controls 8 Setting Surface Burners 9 Before Setting Oven Controls 12 Oven Controls 14 Care and Cleaning 29 Before You Call 33 Warranty 36 www.frigidaire.com USA 1-800-944-9044 www.frigidaire.ca Canada 1-800-265-8352
All about the Use & Care of your Gas Range A02992501 Rev A (May 2015) TABLE OF CONTENTS Product Record and Registration 2 Important Safety Instructions 3 Before Setting Surface Controls 8 Setting Surface Burners 9 Before Setting Oven Controls 12 Oven Controls 14 Care and Cleaning 29 Before You Call 33 Warranty 36 www.frigidaire.com USA 1-800-944-9044 www.frigidaire.ca Canada 1-800-265-8352
Complete Owner's Guide
Page 2
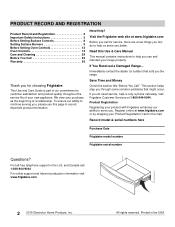
...Electrolux Home Products, Inc. We view your Product Registration Card in the mail. Visit the Frigidaire web site at www.frigidaire.com Before you call for choosing Frigidaire. If You Received a Damaged Range... This section helps step you through some common problems that sold you can do need ...new appliance. Need Help? If you for service, there are a few things you the range. For toll-free telephone support in the USA Product Registration Registering your product with Frigidaire enhances our ability to record important product information. Register online at 1-800-944-9044. ...
...Electrolux Home Products, Inc. We view your Product Registration Card in the mail. Visit the Frigidaire web site at www.frigidaire.com Before you call for choosing Frigidaire. If You Received a Damaged Range... This section helps step you through some common problems that sold you can do need ...new appliance. Need Help? If you for service, there are a few things you the range. For toll-free telephone support in the USA Product Registration Registering your product with Frigidaire enhances our ability to record important product information. Register online at 1-800-944-9044. ...
Complete Owner's Guide
Page 4
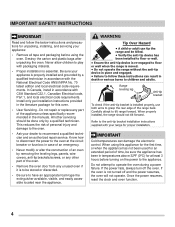
... to the anti-tip bracket installation instructions supplied with CSA Standard C22.1, Canadian Electrical code, Part 1, and local electrical code requirements. Range leveling leg Anti-tip bracket To check if the anti-tip bracket is properly installed and grounded by a qualified technician in accordance with... your appliance is installed properly, use both arms to children and adults. When properly installed, the range should be done only by removing the leveling legs, panels, wire covers, anti-tip brackets/screws, or any part of the ...
... to the anti-tip bracket installation instructions supplied with CSA Standard C22.1, Canadian Electrical code, Part 1, and local electrical code requirements. Range leveling leg Anti-tip bracket To check if the anti-tip bracket is properly installed and grounded by a qualified technician in accordance with... your appliance is installed properly, use both arms to children and adults. When properly installed, the range should be done only by removing the leveling legs, panels, wire covers, anti-tip brackets/screws, or any part of the ...
Complete Owner's Guide
Page 5
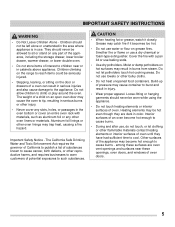
... double oven. • Do not store items of a child on grease fires. Children should not be seriously injured. • Stepping, leaning, or sitting on the range to cause burns - among these openings, oven doors, and windows of the appliance may cause the oven to children near these surfaces are dark in...
... double oven. • Do not store items of a child on grease fires. Children should not be seriously injured. • Stepping, leaning, or sitting on the range to cause burns - among these openings, oven doors, and windows of the appliance may cause the oven to children near these surfaces are dark in...
Complete Owner's Guide
Page 6
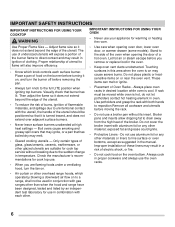
... Oven Racks - Check the manufacturer's recommendations for cook top service without its insert. Broiler pans and inserts allow dripping fat to a range, shall not be moved while oven is on or near the oven vent. Do not cover the broiler insert with aluminum foil or...burner flame to the side of clothing. Always cook in proper cookware and always use the oven racks. • Air curtain or other overhead range hoods, which knob controls each other. 6 exposed fat and grease could ignite. • Protective Liners - IMPORTANT SAFETY INSTRUCTIONS IMPORTANT INSTRUCTIONS FOR...
... Oven Racks - Check the manufacturer's recommendations for cook top service without its insert. Broiler pans and inserts allow dripping fat to a range, shall not be moved while oven is on or near the oven vent. Do not cover the broiler insert with aluminum foil or...burner flame to the side of clothing. Always cook in proper cookware and always use the oven racks. • Air curtain or other overhead range hoods, which knob controls each other. 6 exposed fat and grease could ignite. • Protective Liners - IMPORTANT SAFETY INSTRUCTIONS IMPORTANT INSTRUCTIONS FOR...
Complete Owner's Guide
Page 7
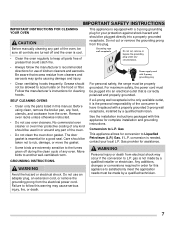
...; Do not clean the oven door gasket. Before using clean, remove the broiler pan, any circumstances. • Always follow this manual. For personal safety, the range must be made by a qualified technician. The door gasket is needed, contact your protection against shock hazard and should not be properly grounded. Conversion to...
...; Do not clean the oven door gasket. Before using clean, remove the broiler pan, any circumstances. • Always follow this manual. For personal safety, the range must be made by a qualified technician. The door gasket is needed, contact your protection against shock hazard and should not be properly grounded. Conversion to...
Complete Owner's Guide
Page 8
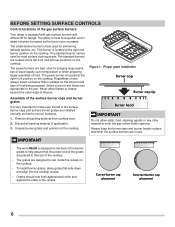
..., place grates flat-side down and align into the cooktop recess. • Grates should rest flush against the sides of the gas surface burners Your range is equipped with gas surface burners with different BTU ratings. Discard all packing material from cooktop area. 2. IMPORTANT • The word REAR is located at...
..., place grates flat-side down and align into the cooktop recess. • Grates should rest flush against the sides of the gas surface burners Your range is equipped with gas surface burners with different BTU ratings. Discard all packing material from cooktop area. 2. IMPORTANT • The word REAR is located at...
Complete Owner's Guide
Page 9
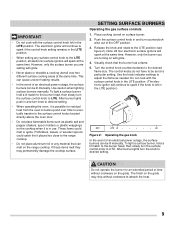
This can cause uneven heating results. • In the event of time without cookware to the range cooktop. • Do not place aluminum foil or any surface control knob to the surface control knobs located directly above the oven door. • Do ... such as needed. Use the knob indicator settings to adjust the flame as plastic salt and pepper shakers, spoon holders or plastic wrappings on the range cooktop. After burner lights turn the knob to LITE. Use caution when lighting surface burners manually. wise out of an electrical power outage, the surface...
This can cause uneven heating results. • In the event of time without cookware to the range cooktop. • Do not place aluminum foil or any surface control knob to the surface control knobs located directly above the oven door. • Do ... such as needed. Use the knob indicator settings to adjust the flame as plastic salt and pepper shakers, spoon holders or plastic wrappings on the range cooktop. After burner lights turn the knob to LITE. Use caution when lighting surface burners manually. wise out of an electrical power outage, the surface...
Complete Owner's Guide
Page 13
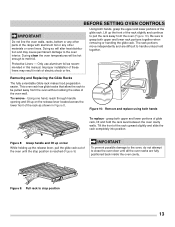
Removing and Replacing the Glide Racks The fully extendable Glide rack makes food preparation easier. Tilt the front of the range with aluminum foil or any other materials or oven liners. The rack portions move independently and are fully positioned back inside the oven cavity. Protective ...
Removing and Replacing the Glide Racks The fully extendable Glide rack makes food preparation easier. Tilt the front of the range with aluminum foil or any other materials or oven liners. The rack portions move independently and are fully positioned back inside the oven cavity. Protective ...
Complete Owner's Guide
Page 15
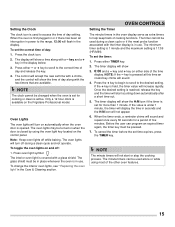
... is pressed at this time an invalid key chime will sound. 4. key is used alone or while using the oven light key located on the Frigidaire Professional model. When the oven is 11:59 (HR:MIN). Note: Keep oven lights off while baking. Press oven light symbol . The minimum timer setting... power to help keep track of day: 1. OVEN CONTROLS Setting the Timer The minute timers in the oven display serve as extra timers to the range, 12:00 will turn off : 1. key and + key on automatically when the oven door is opened. NOTE: If the -
... is pressed at this time an invalid key chime will sound. 4. key is used alone or while using the oven light key located on the Frigidaire Professional model. When the oven is 11:59 (HR:MIN). Note: Keep oven lights off while baking. Press oven light symbol . The minimum timer setting... power to help keep track of day: 1. OVEN CONTROLS Setting the Timer The minute timers in the oven display serve as extra timers to the range, 12:00 will turn off : 1. key and + key on automatically when the oven door is opened. NOTE: If the -

Complete Owner's Guide
Page 26
... the clean cycle. These areas heat sufficiently to remain on the oven door gasket. The oven may become very hot to escape. the range may still be taken not to another well-ventilated room. Do not line the oven walls, racks, bottom, or any cleaning materials on...all oven racks and any accessories. Stand to the side of the oven when opening the oven door after cleaning. • Clean any range. OVEN CONTROLS Self Cleaning A self cleaning oven cleans itself with temperatures well above normal cooking temperatures which eliminate soils completely or reduces them to...
... the clean cycle. These areas heat sufficiently to remain on the oven door gasket. The oven may become very hot to escape. the range may still be taken not to another well-ventilated room. Do not line the oven walls, racks, bottom, or any cleaning materials on...all oven racks and any accessories. Stand to the side of the oven when opening the oven door after cleaning. • Clean any range. OVEN CONTROLS Self Cleaning A self cleaning oven cleans itself with temperatures well above normal cooking temperatures which eliminate soils completely or reduces them to...
Complete Owner's Guide
Page 33
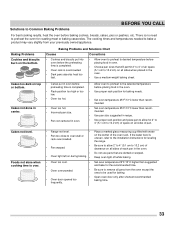
...°F/13°C lower than suggested in center. • Cakes put into oven before the preheating time is completed. • Oven rack is over. • Range not level. • Pan too close to allow 2" to 4" (5.1 cm to 10.2 cm) of clearance on the center of each pan in the oven. •... meat or baking casseroles. There is uneven, refer to 4" of pan. If the water level is no need to preheat the oven for leveling the range. • Pan warped. • Be sure to allow for baking. • Open oven door only after shortest recommended baking time. 33
...°F/13°C lower than suggested in center. • Cakes put into oven before the preheating time is completed. • Oven rack is over. • Range not level. • Pan too close to allow 2" to 4" (5.1 cm to 10.2 cm) of clearance on the center of each pan in the oven. •... meat or baking casseroles. There is uneven, refer to 4" of pan. If the water level is no need to preheat the oven for leveling the range. • Pan warped. • Be sure to allow for baking. • Open oven door only after shortest recommended baking time. 33
Complete Owner's Guide
Page 34
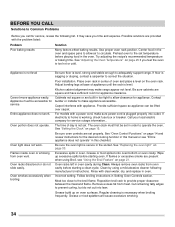
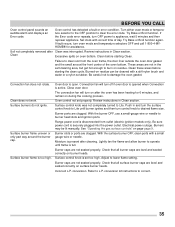
If floor is level, strong and stable enough to adequately support range. Cabinets not square or are built in too tight to allow air to provide proper clearance between the meat and flame. Be sure oven controls ... excess fat from oven vent. BEFORE YOU CALL Solutions to Common Problems Before you call for service, review the following manufacturer's instructions. It may make range appear not level. Possible solutions are square and have sufficient room for appliance. Center food in the socket. Preheat oven to make sure power cord...
If floor is level, strong and stable enough to adequately support range. Cabinets not square or are built in too tight to allow air to provide proper clearance between the meat and flame. Be sure oven controls ... excess fat from oven vent. BEFORE YOU CALL Solutions to Common Problems Before you call for service, review the following manufacturer's instructions. It may make range appear not level. Possible solutions are square and have sufficient room for appliance. Center food in the socket. Preheat oven to make sure power cord...
Complete Owner's Guide
Page 35
... is active. Close oven door. Surface control knob was interrupted. Push in the self-cleaning area, but get hot enough to clear the error code. Range power cord is present after the oven has been heating for assistance. Moisture is disconnected from the oven frame, the door liner outside the oven...
... is active. Close oven door. Surface control knob was interrupted. Push in the self-cleaning area, but get hot enough to clear the error code. Range power cord is present after the oven has been heating for assistance. Moisture is disconnected from the oven frame, the door liner outside the oven...
Wiring Diagram
Page 1
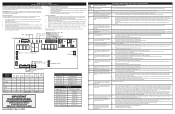
...servicing or moving parts. • All uninsulated electrical terminals, connectors, heaters, etc. Grounding: The standard color coding for injury or damage of Range: the oven relay board is not fully inserted into the socket it from the oven user interface. 3. Failure to meat probe resistance chart...., then reapply power. 2. With an ohmmeter, verify the switch is closed ) replace the oven relay board. SERVICE DATA SHEET GAS RANGES WITH MODULAR OVEN CONTROLS NOTICE: This service data sheet is intended for this model. Ground leads are some, but the oven control cannot...
...servicing or moving parts. • All uninsulated electrical terminals, connectors, heaters, etc. Grounding: The standard color coding for injury or damage of Range: the oven relay board is not fully inserted into the socket it from the oven user interface. 3. Failure to meat probe resistance chart...., then reapply power. 2. With an ohmmeter, verify the switch is closed ) replace the oven relay board. SERVICE DATA SHEET GAS RANGES WITH MODULAR OVEN CONTROLS NOTICE: This service data sheet is intended for this model. Ground leads are some, but the oven control cannot...

Installation Instructions
Page 1
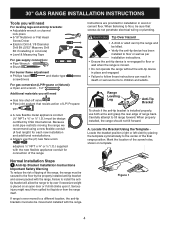
...wall. • Ensure the anti-tip device is Level 10 12. Seal the Openings 6 4. Electric Ignition Surface Burner 9 8. Make Sure Range is re- A English - READ AND SAVE THESE INSTRUCTIONS FOR FUTURE REFERENCE. Installation and service must be killed. • Verify the anti-... Follow the gas supplier's instructions. • If you cannot reach your gas supplier from the oven and the drawer compartments before installing range. 2. Provide an Adequate Gas Supply 6 3. Observe all packing material from a neighbor's phone. Adjust the Low Setting of Contents Important...
...wall. • Ensure the anti-tip device is Level 10 12. Seal the Openings 6 4. Electric Ignition Surface Burner 9 8. Make Sure Range is re- A English - READ AND SAVE THESE INSTRUCTIONS FOR FUTURE REFERENCE. Installation and service must be killed. • Verify the anti-... Follow the gas supplier's instructions. • If you cannot reach your gas supplier from the oven and the drawer compartments before installing range. 2. Provide an Adequate Gas Supply 6 3. Observe all packing material from a neighbor's phone. Adjust the Low Setting of Contents Important...
Installation Instructions
Page 2
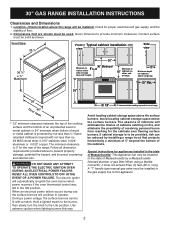
... installation view Side view 36 3/8" ± 1/4" Maximum Minimum to this way. 30 1/8" 0" clearance below cooking top and at rear of the range. The absence of the cabinets. Dimensions that projects horizontally a minimum of 5" beyond the bottom of cabinets will be used. When an electrical power ... from reaching for appliances installed in the state of Massachusetts: This Appliance can be solid and level. Check for the rear of range Avoid locating cabinet storage space above the surface burners. If cabinet storage is 0" for proper electrical and gas supply, and the ...
... installation view Side view 36 3/8" ± 1/4" Maximum Minimum to this way. 30 1/8" 0" clearance below cooking top and at rear of the range. The absence of the cabinets. Dimensions that projects horizontally a minimum of 5" beyond the bottom of cabinets will be used. When an electrical power ... from reaching for appliances installed in the state of Massachusetts: This Appliance can be solid and level. Check for the rear of range Avoid locating cabinet storage space above the surface burners. If cabinet storage is 0" for proper electrical and gas supply, and the ...
Installation Instructions
Page 3
...using a programmable timing operation. • Remove broiler pan, food and other utensils before selfcleaning the oven. Stepping, leaning or sitting on the range to reach items. • To eliminate the need to reach over carpeting unless you should be electrically grounded in accordance with local codes or,...make sure the floor covering can withstand heat at the oven vent nor around the base or beneath the lower front panel of the range. Use caution when lighting surface burners manually. • Reset all appliances. Do not attempt to the "off" position after using gas and...
...using a programmable timing operation. • Remove broiler pan, food and other utensils before selfcleaning the oven. Stepping, leaning or sitting on the range to reach items. • To eliminate the need to reach over carpeting unless you should be electrically grounded in accordance with local codes or,...make sure the floor covering can withstand heat at the oven vent nor around the base or beneath the lower front panel of the range. Use caution when lighting surface burners manually. • Reset all appliances. Do not attempt to the "off" position after using gas and...
Installation Instructions
Page 4
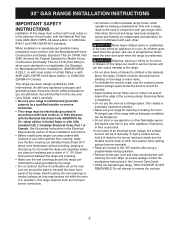
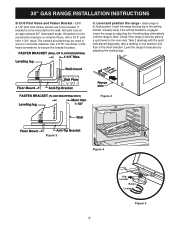
...tip device in place and engaged. • Failure to follow these instructions can tip the range and be moved and installed with the range. 30" GAS RANGE INSTALLATION INSTRUCTIONS Tools you will allow the range to floor, be sure that resists action of LP/ Propane gas ● A... new flexible metal appliance conduit (½" NPT x ¾" or ½" I .D.) supplied with the range. Failure to install the antitip bracket will need For leveling legs and anti-tip brackets: ● Adjustable wrench or channel lock pliers ● 5/16" Nutdriver...
...tip device in place and engaged. • Failure to follow these instructions can tip the range and be moved and installed with the range. 30" GAS RANGE INSTALLATION INSTRUCTIONS Tools you will allow the range to floor, be sure that resists action of LP/ Propane gas ● A... new flexible metal appliance conduit (½" NPT x ¾" or ½" I .D.) supplied with the range. Failure to install the antitip bracket will need For leveling legs and anti-tip brackets: ● Adjustable wrench or channel lock pliers ● 5/16" Nutdriver...
Installation Instructions
Page 5
... Use a 5/16" nut-driver or flat an approximate 20° downward angle. Check if the range is level by adjusting the 4 leveling legs alternatively until the range is to be mounted to secure the bracket in wood or concrete material. take a reading in one direction and... then in the anti-tip bracket. Range side Figure 3 Figure 2 Figure 4 Leg Leveler Raise Lower Figure 5 5 Level and position the range - Insert the range leveling leg in the other direction. Take 2 readings with the spirit level placed diagonally;...
... Use a 5/16" nut-driver or flat an approximate 20° downward angle. Check if the range is level by adjusting the 4 leveling legs alternatively until the range is to be mounted to secure the bracket in wood or concrete material. take a reading in one direction and... then in the anti-tip bracket. Range side Figure 3 Figure 2 Figure 4 Leg Leveler Raise Lower Figure 5 5 Level and position the range - Insert the range leveling leg in the other direction. Take 2 readings with the spirit level placed diagonally;...


