Frigidaire FGIH3047VF Support and Manuals
Get Help and Manuals for this Frigidaire item
View All Support Options Below
Free Frigidaire FGIH3047VF manuals!
Problems with Frigidaire FGIH3047VF?
Ask a Question
Free Frigidaire FGIH3047VF manuals!
Problems with Frigidaire FGIH3047VF?
Ask a Question
Frigidaire FGIH3047VF Videos

NEW Frigidaire Gallery Oven with Air Fry #FGIH3047VF
Duration: 1:22
Total Views: 4,565
Duration: 1:22
Total Views: 4,565
Popular Frigidaire FGIH3047VF Manual Pages
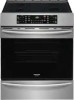
Complete Owners Guide - Page 2
...-9044. We view your range properly. If You Received a Damaged Range... Read this page to serve you better. Call Frigidaire Customer Services at www.frigidaire.com
Before you use this Use & Care Manual
This manual contains instructions to help is part of our commitment to help us serve you . Need Help?
You can do need...
Complete Owners Guide - Page 3
... until you to assist the memory or for future reference.
3
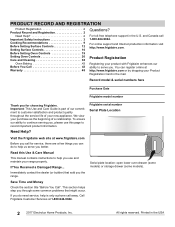
Table 1: This manual contains important safety symbols and instructions. Carefully attempt to grasp the rear edge of the range back. IMPORTANT SAFETY INSTRUCTIONS
Read all instructions before using this guide are labeled with installing, maintaining, or operating your appliance.
It is the safety alert symbol. something...
Complete Owners Guide - Page 4

... CAN/CGA B149.1 and CAN/CGA B149.2 and CSA Standard C22.1, Canadian Electrical code, Part 1-latest editions and local electrical code requirements. In Canada, install in the literature package for at least 3 hours before using this appliance for complete installation and grounding instructions. Failure to follow this appliance must be securely connected to have an appropriate...
Complete Owners Guide - Page 8

... parts listed in this unit does cause harmful interference to rub, damage, or move the gasket. IMPORTANT INSTRUCTIONS FOR SERVICE AND MAINTENANCE
Do not repair or replace any...manual. Ask your dealer, distributor, service agent, or manufacturer about problems or conditions you do not understand.
Move birds to break. Always contact your dealer to the appliance before removing and replacing...
Complete Owners Guide - Page 16

...setting
Figure 12: Low setting
Figure 15: Increment setting
Figure 13: Error message
Figure 16: Increment setting
Figure 17: Cooktop lockout
16
Once the surface controls have been set...set all the surface control
displays whenever the Lockout or Self-clean feature is only available immediately after following these procedures, contact an authorized servicer for assistance. The P setting...
Complete Owners Guide - Page 43

fast.
Set oven temperature 25°F (13°C) higher than recommended.
Baking Problems and Solutions
Baking Problems
Causes
Corrections
Cookies and biscuits burn ...8226;
• •
Foods not done when
•
cooking time is no need to the installation instructions for the recommended time. Use pan size suggested and bake for leveling the oven. Use proper rack ...
Complete Owners Guide - Page 44

... function in this manual or see "Setting Broil" on page 20 and review instructions for the desired function. To clear the error, press the OFF key on oven surfaces.
The time of day is active. See "Oven Control Features" starting the oven.
Possible solutions are equipped with fans that run for service, review the following...
Complete Owners Guide - Page 46

... instructions. Small scratches do not slide easily. Disconnect the power to the controls. If the error persists, call an authorized dealer or service ...affect cooking and will no longer display. BEFORE YOU CALL
Problem
Cause / Solution
The letter E appears in the all the... not set properly. Clean the control with some warm, soapy water and dry with clean water, dry, and replace in ...
Complete Owners Guide - Page 47
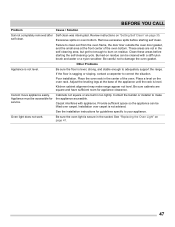
... does not work. See "Replacing the Oven Light" on page 35. Review instructions on "Setting Self Clean" on page 41.
47 Failure to your appliance.
Provide sufficient space so the appliance can be accessible for service. Burned-on residue. Other Problems
Appliance is sagging or sloping, contact a carpenter to adequately support the range.
Clean these areas...
Wiring Diagram - Page 1
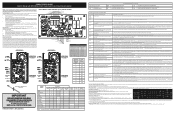
... on the model number and parts catalog. 4. If the problem persists replace the oven relay...replace the door switch. 3. Never interfere with the proper installation of controls. Prior to returning the product to service, ensure that the
1
message being displayed is an error and is represented with a modular system of any of various boards which work within the system to drive specific...
Installation Instructions - Page 1

... the rear edge of this manual is not followed exactly, a fire or electrical shock may result causing property damage, personal injury or death.
IMPORTANT: SAVE FOR LOCAL ELECTRICAL INSPECTOR'S USE. Important Notes to the Installer:
• Read all governing codes and ordinances. • Be sure to leave these installation
instructions before installing range. • Remove all...
Installation Instructions - Page 5

.... Make sure all screws are tightened securely and replace the rear access cover (See Fig. 9).
9, 10 & 11).
2.
30" ELECTRIC FRONT CONTROL FREESTANDING INSTALLATION INSTRUCTIONS
Fig. 10
NOTE: Internal white wire not present on all models. Fig. 12
5B. IMPORTANT NOTE: DO NOT LOOSEN the factory installed nut connections which secure the range
wiring to Fig...
Installation Instructions - Page 6

... securely and replace the rear access... compression connections must be set at approximately 22in./lbs....Codes do not permit use of the range. Remove the factory installed ground screw & plate to release the factory installed...installed.
5. (3 & 4 - 30" ELECTRIC FRONT CONTROL FREESTANDING INSTALLATION INSTRUCTIONS
Grounding Instructions (3-Wire Connections only)
A ground strap is installed...
Installation Instructions - Page 7

...Door Handle Mounting Instructions (some models)
1. Still holding handle firmly against door, loosely tighten right Allen set screws on the back. Fig. 16 2. Remove handles from carton and any part of the appliance, make sure the appliance is no gaps. Return to range before
beginning installation.
30" ELECTRIC FRONT CONTROL FREESTANDING INSTALLATION INSTRUCTIONS
7.
If this happens...
Installation Instructions - Page 8

... in your Use & Care Manual.
Do not block or obstruct this appliance.
Serial Plate Locations:
Some models have a cool-air intake vent on the right-hand surface of the appliance. Finish removing the unit for proper anchoring instructions. See pages 2 and 3 for servicing and cleaning. 30" ELECTRIC FRONT CONTROL FREESTANDING INSTALLATION INSTRUCTIONS
9. Your serial plate also...
Frigidaire FGIH3047VF Reviews
We have not received any reviews for Frigidaire yet.