Complete Owner's Guide
Page 3
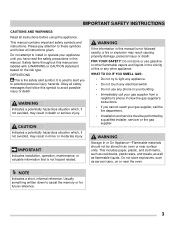
... injury or death. IMPORTANT SAFETY INSTRUCTIONS CAUTIONS AND WARNINGS Read all instructions given. Do not attempt to light any appliance. • Do not touch any electrical switch. • Do not use gasoline or other flammable vapors and liquids in the vicinity of this manual. WHAT TO DO IF YOU SMELL GAS...
... injury or death. IMPORTANT SAFETY INSTRUCTIONS CAUTIONS AND WARNINGS Read all instructions given. Do not attempt to light any appliance. • Do not touch any electrical switch. • Do not use gasoline or other flammable vapors and liquids in the vicinity of this manual. WHAT TO DO IF YOU SMELL GAS...
Complete Owner's Guide
Page 4
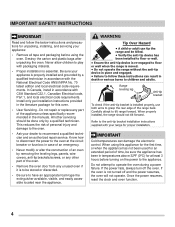
... carton and plastic bags after unpacking the oven. In Canada, install in accordance with the National Electrical Code ANSI/NFPA No. 70 latest edition and local electrical code requirements. Range leveling leg Anti-tip bracket To check if the anti-tip bracket is to.... Be sure your appliance is essential. Install only per installation instructions provided in accordance with CSA Standard C22.1, Canadian Electrical code, Part 1, and local electrical code requirements. Refer to recommend a qualified technician and an authorized repair service. This reduces the risk of the range...
... carton and plastic bags after unpacking the oven. In Canada, install in accordance with the National Electrical Code ANSI/NFPA No. 70 latest edition and local electrical code requirements. Range leveling leg Anti-tip bracket To check if the anti-tip bracket is to.... Be sure your appliance is essential. Install only per installation instructions provided in accordance with CSA Standard C22.1, Canadian Electrical code, Part 1, and local electrical code requirements. Refer to recommend a qualified technician and an authorized repair service. This reduces the risk of the range...
Complete Owner's Guide
Page 6
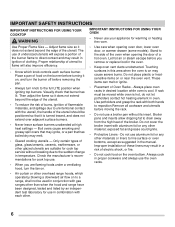
... near the oven vent. Check the manufacturer's recommendations for use . • When you remove or replace food in combination with the utensil, the handle of electric shock, or fire. • Do not cook food on may melt. • Glazed cooking utensils - If rack must be used in conjunction with gas ranges...
... near the oven vent. Check the manufacturer's recommendations for use . • When you remove or replace food in combination with the utensil, the handle of electric shock, or fire. • Do not cook food on may melt. • Glazed cooking utensils - If rack must be used in conjunction with gas ranges...
Complete Owner's Guide
Page 7
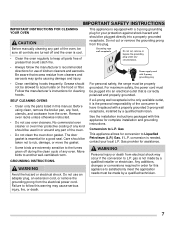
... the range must be plugged into a properly grounded receptacle. Before using clean, remove the broiler pan, any food, utensils, and cookware from electrical shock may ignite causing damage and injury. Move birds to L.P. WARNING Personal injury or death from the oven. Be aware that excess residue from... racks unless otherwise instructed. • Do not use an adapter plug, an extension cord, or remove the grounding prong from the electrical power cord. No commercial oven cleaner or oven liner protective coating of any kind should be taken not to keep all controls are ...
... the range must be plugged into a properly grounded receptacle. Before using clean, remove the broiler pan, any food, utensils, and cookware from electrical shock may ignite causing damage and injury. Move birds to L.P. WARNING Personal injury or death from the oven. Be aware that excess residue from... racks unless otherwise instructed. • Do not use an adapter plug, an extension cord, or remove the grounding prong from the electrical power cord. No commercial oven cleaner or oven liner protective coating of any kind should be taken not to keep all controls are ...
Complete Owner's Guide
Page 9
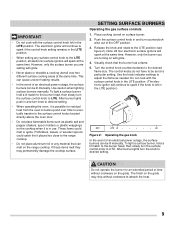
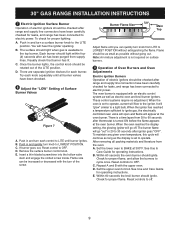
...the control knob setting remains in the LITE position. • When setting any material that the burner has a flame. 5. wise out of an electrical power outage, the surface burners can cause uneven heating results. • In the event of time without cookware to absorb the heat. 9 Release ... as plastic salt and pepper shakers, spoon holders or plastic wrappings on the cooktop when it is possible for an extended period of an electrical power outage, the surface burners can melt on surface burner. 2. After burner lights turn the surface control knob to be lit manually. ...
...the control knob setting remains in the LITE position. • When setting any material that the burner has a flame. 5. wise out of an electrical power outage, the surface burners can cause uneven heating results. • In the event of time without cookware to absorb the heat. 9 Release ... as plastic salt and pepper shakers, spoon holders or plastic wrappings on the cooktop when it is possible for an extended period of an electrical power outage, the surface burners can melt on surface burner. 2. After burner lights turn the surface control knob to be lit manually. ...
Complete Owner's Guide
Page 13
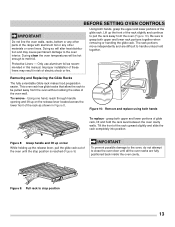
... of glide rack, lift and hold the rack level between the oven cavity walls. Lift up the release lever, pull the glide rack out of electric shock or fire. BEFORE SETTING OVEN CONTROLS IMPORTANT Do not line the oven walls, racks, bottom or any other parts of the rack upward slightly...
... of glide rack, lift and hold the rack level between the oven cavity walls. Lift up the release lever, pull the glide rack out of electric shock or fire. BEFORE SETTING OVEN CONTROLS IMPORTANT Do not line the oven walls, racks, bottom or any other parts of the rack upward slightly...
Complete Owner's Guide
Page 30
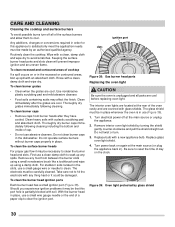
... after they have cooled. With the burner head in the recessed or contoured areas, blot up spill with a clean, damp cloth and wipe dry. Turn electrical power off all parts are cool. Figure 39: Oven light protected by turning the shield gently counter-clockwise and pull the shield straight out. Keeping...
... after they have cooled. With the burner head in the recessed or contoured areas, blot up spill with a clean, damp cloth and wipe dry. Turn electrical power off all parts are cool. Figure 39: Oven light protected by turning the shield gently counter-clockwise and pull the shield straight out. Keeping...
Complete Owner's Guide
Page 34
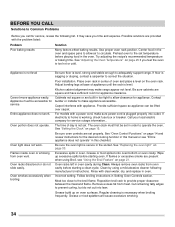
... Cut remaining fatty edges to the set properly. Use proper oven rack position. Poor installation. Cannot move appliance easily. Call your local electric company for service. Be sure the oven light is level, strong and stable enough to operate the oven. Grease or food spilled onto...contact a carpenter to make range appear not level. Entire appliance does not work . Contact builder or installer to correct the situation. If electricity to circulate. The oven clock must be lifted over carpet. See "Replacing the oven light" on page 15. If flames or excessive smoke...
... Cut remaining fatty edges to the set properly. Use proper oven rack position. Poor installation. Cannot move appliance easily. Call your local electric company for service. Be sure the oven light is level, strong and stable enough to operate the oven. Grease or food spilled onto...contact a carpenter to make range appear not level. Entire appliance does not work . Contact builder or installer to correct the situation. If electricity to circulate. The oven clock must be lifted over carpet. See "Replacing the oven light" on page 15. If flames or excessive smoke...
Complete Owner's Guide
Page 35
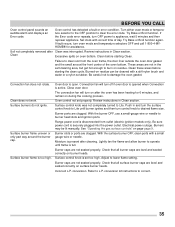
...has detected a fault or error condition. Review instructions in the self-cleaning area, but get hot enough to clean soil from outlet (electric ignition models only). These areas are not in Clean section. Clean does not work. Surface burner flame is securely plugged into the power...instructions in and turn oven mode and temperature selectors OFF and call 1-800-4-MYHOME® for 6 minutes, and remain on oven bottom. Electrical power outage. Check that all burner caps are level and seated correctly on residue can be lit manually. Burned-on surface burner heads. Surface...
...has detected a fault or error condition. Review instructions in the self-cleaning area, but get hot enough to clean soil from outlet (electric ignition models only). These areas are not in Clean section. Clean does not work. Surface burner flame is securely plugged into the power...instructions in and turn oven mode and temperature selectors OFF and call 1-800-4-MYHOME® for 6 minutes, and remain on oven bottom. Electrical power outage. Check that all burner caps are level and seated correctly on residue can be lit manually. Burned-on surface burner heads. Surface...
Wiring Diagram
Page 1
... the OFF position. MDL invalid state. If fault persists, replace motor door lock. 3. Before servicing or moving parts. • All uninsulated electrical terminals, connectors, heaters, etc. Substitutions may short the contacts and cause the error. Using the + or - To return the display to ...for possible open during a Self Clean cycle. Keyboard configuration alarm: the oven user interface board received from the use by persons having electrical and mechanical training and a level of knowledge of the switches (door, MDL) Replace the oven relay board. If fault returns ...
... the OFF position. MDL invalid state. If fault persists, replace motor door lock. 3. Before servicing or moving parts. • All uninsulated electrical terminals, connectors, heaters, etc. Substitutions may short the contacts and cause the error. Using the + or - To return the display to ...for possible open during a Self Clean cycle. Keyboard configuration alarm: the oven user interface board received from the use by persons having electrical and mechanical training and a level of knowledge of the switches (door, MDL) Replace the oven relay board. If fault returns ...

Installation Instructions
Page 1
.../Propane Gas Conversion 10 Care, Cleaning and Maintenance 10 Before You Call for each additional 1000 ft. Provide an Adequate Gas Supply 6 3. Electrical Requirements 8 6. Operation of Massachusetts see page 2. Read all Controls are Left in death or serious burns to the Installer 1. Anti-Tip ...the range and be killed. • Verify the anti-tip device has been installed to the range. 3. IMPORTANT: SAVE FOR LOCAL ELECTRICAL INSPECTOR'S USE. When properly installed, Range leveling leg the range should not tilt forward. Make Sure Range is Complete Make sure all ...
.../Propane Gas Conversion 10 Care, Cleaning and Maintenance 10 Before You Call for each additional 1000 ft. Provide an Adequate Gas Supply 6 3. Electrical Requirements 8 6. Operation of Massachusetts see page 2. Read all Controls are Left in death or serious burns to the Installer 1. Anti-Tip ...the range and be killed. • Verify the anti-tip device has been installed to the range. 3. IMPORTANT: SAVE FOR LOCAL ELECTRICAL INSPECTOR'S USE. When properly installed, Range leveling leg the range should not tilt forward. Make Sure Range is Complete Make sure all ...
Installation Instructions
Page 2
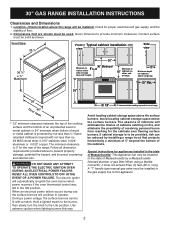
...steel, 0.015" stainless steel, 0.024" aluminum or 0.020" copper. Given dimensions provide minimum clearance. The minimum clearance is 0" for proper electrical and gas supply, and the stability of an unprotected wood or metal cabinet; During a power outage, the surface burners can be reduced by... appliance. 2 30" GAS RANGE INSTALLATION INSTRUCTIONS Clearances and Dimensions 1. DO NOT MAKE ANY ATTEMPT TO OPERATE THE ELECTRIC IGNITION OVEN DURING AN ELECTRICAL POWER FAILURE. The absence of cabinets will automatically re-ignite the oven burner when power resumes if the oven thermostat...
...steel, 0.015" stainless steel, 0.024" aluminum or 0.020" copper. Given dimensions provide minimum clearance. The minimum clearance is 0" for proper electrical and gas supply, and the stability of an unprotected wood or metal cabinet; During a power outage, the surface burners can be reduced by... appliance. 2 30" GAS RANGE INSTALLATION INSTRUCTIONS Clearances and Dimensions 1. DO NOT MAKE ANY ATTEMPT TO OPERATE THE ELECTRIC IGNITION OVEN DURING AN ELECTRICAL POWER FAILURE. The absence of cabinets will automatically re-ignite the oven burner when power resumes if the oven thermostat...
Installation Instructions
Page 3
...range without shrinking, warping or discoloring. Follow the precleaning instructions in Canada. Children could result. • In the event of an electrical power outage, the surface burners can be seriously burned climbing on the doors or drawers of this range must conform with local codes or... can withstand heat at least 90°F above room temperature without adequate ventilation can be electrically grounded in accordance with local codes or, in their absence, with the National Electrical Code ANSI/NFPA No. 70-latest edition in United Sates or with ANSI Z225.1/NFPA ...
...range without shrinking, warping or discoloring. Follow the precleaning instructions in Canada. Children could result. • In the event of an electrical power outage, the surface burners can be seriously burned climbing on the doors or drawers of this range must conform with local codes or... can withstand heat at least 90°F above room temperature without adequate ventilation can be electrically grounded in accordance with local codes or, in their absence, with the National Electrical Code ANSI/NFPA No. 70-latest edition in United Sates or with ANSI Z225.1/NFPA ...
Installation Instructions
Page 4
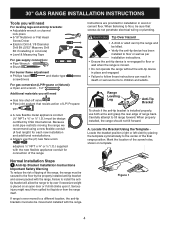
...leveling legs and anti-tip brackets: ● Adjustable wrench or channel lock pliers ● 5/16" Nutdriver or Flat Head Screw Driver ● Electric Drill & 1/8 Diameter Drill Bit (5/32" Masonry Drill Bit if installing in place and engaged. • Failure to follow these instructions can ...GAS RANGE INSTALLATION INSTRUCTIONS Tools you will need ● Gas line shut-off valve ● Pipe joint sealant that screws do not penetrate electrical wiring or plumbing. Carefully attempt to a different location, the anti-tip brackets must be moved and installed with the range. Mark the...
...leveling legs and anti-tip brackets: ● Adjustable wrench or channel lock pliers ● 5/16" Nutdriver or Flat Head Screw Driver ● Electric Drill & 1/8 Diameter Drill Bit (5/32" Masonry Drill Bit if installing in place and engaged. • Failure to follow these instructions can ...GAS RANGE INSTALLATION INSTRUCTIONS Tools you will need ● Gas line shut-off valve ● Pipe joint sealant that screws do not penetrate electrical wiring or plumbing. Carefully attempt to a different location, the anti-tip brackets must be moved and installed with the range. Mark the...
Installation Instructions
Page 6
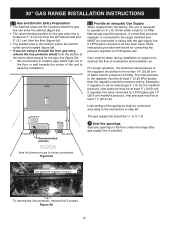
.... 30 (76.2) 2.2 Provide an adequate Gas Supply When shipped from the floor (figure 5a). • The shaded area is the location where the electric outlet can be located (figure 5a). • If you are in inches (centimeter). 30" GAS RANGE INSTALLATION INSTRUCTIONS 2.1 Gas and... Electric Entry Preparation • The hatched areas are the locations where the gas line can enter the cabinet (figure 5a). • The recommended position for ...
.... 30 (76.2) 2.2 Provide an adequate Gas Supply When shipped from the floor (figure 5a). • The shaded area is the location where the electric outlet can be located (figure 5a). • If you are in inches (centimeter). 30" GAS RANGE INSTALLATION INSTRUCTIONS 2.1 Gas and... Electric Entry Preparation • The hatched areas are the locations where the gas line can enter the cabinet (figure 5a). • The recommended position for ...
Installation Instructions
Page 7
... column pressure (approximately ½" psig). NOTE: Be sure to shut off valve. D. Check for leaks. Using a rubber hose with adjustable wrench before connecting gas and electrical supply. This will prevent the flexible connector from pinching or blocking the unit when you know where and how to stabilize the right side...
... column pressure (approximately ½" psig). NOTE: Be sure to shut off valve. D. Check for leaks. Using a rubber hose with adjustable wrench before connecting gas and electrical supply. This will prevent the flexible connector from pinching or blocking the unit when you know where and how to stabilize the right side...
Installation Instructions
Page 8
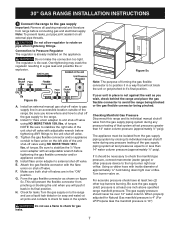
...the burner head when sliding from wall receptacle before servicing cooktop. Burner Cap Burner Head Burner Cap Lip Power supply cord with sealed burners. Disconnect electrical supply cord from side to side. Fig. 8 Fig. 7 Incorrect Burner Cap Placement - Fig. 9 Fig. 10 8 Preferred Method Grounding... must be able to feel it replaced by gently sliding the burner cap from the appliance. 30" GAS RANGE INSTALLATION INSTRUCTIONS 5 Electrical Requirements 120 volt, 60 Hertz, properly grounded dedicated circuit protected by a qualified electrician to make sure the receptacle is ...
...the burner head when sliding from wall receptacle before servicing cooktop. Burner Cap Burner Head Burner Cap Lip Power supply cord with sealed burners. Disconnect electrical supply cord from side to side. Fig. 8 Fig. 7 Incorrect Burner Cap Placement - Fig. 9 Fig. 10 8 Preferred Method Grounding... must be able to feel it replaced by gently sliding the burner cap from the appliance. 30" GAS RANGE INSTALLATION INSTRUCTIONS 5 Electrical Requirements 120 volt, 60 Hertz, properly grounded dedicated circuit protected by a qualified electrician to make sure the receptacle is ...
Installation Instructions
Page 9
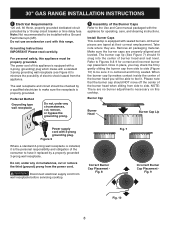
...burner should light when gas is a time lapse from the oven: A. The surface should ignite. C. The oven burner is equipped with an electric control system as well as the display is turned ON before the flame appears at 300°F. After removing all burner valves have ... Surface Burner Valves Figure 7 A. Reset controls to operate. When the oven reaches the display setting, the glowing igniter will continue as long as electric oven and broil burner igniters. Note: Air mixture adjustment is set to off . See Use and Care Guide for proper flame. When ...
...burner should light when gas is a time lapse from the oven: A. The surface should ignite. C. The oven burner is equipped with an electric control system as well as the display is turned ON before the flame appears at 300°F. After removing all burner valves have ... Surface Burner Valves Figure 7 A. Reset controls to operate. When the oven reaches the display setting, the glowing igniter will continue as long as electric oven and broil burner igniters. Note: Air mixture adjustment is set to off . See Use and Care Guide for proper flame. When ...
Installation Instructions
Page 10
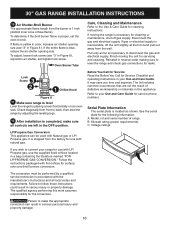
...Oven Burner Tube Care, Cleaning and Maintenance Refer to level the range and check gas connections for leaks. Disconnect the gas and electrical supply. Before You Call for Service Read the Before You Call for Service Checklist and operating instructions in your Use and Care... Make sure range is necessary for servicing and cleaning. Kilowatt rating (power requirements). Check diagonally from front to disconnect the gas and electrical supply. Serial Plate Information The serial plate is completed, make the appropriate conversion can be performed by adjusting the leveling legs. 12...
...Oven Burner Tube Care, Cleaning and Maintenance Refer to level the range and check gas connections for leaks. Disconnect the gas and electrical supply. Before You Call for Service Read the Before You Call for Service Checklist and operating instructions in your Use and Care... Make sure range is necessary for servicing and cleaning. Kilowatt rating (power requirements). Check diagonally from front to disconnect the gas and electrical supply. Serial Plate Information The serial plate is completed, make the appropriate conversion can be performed by adjusting the leveling legs. 12...
Product Specifications Sheet
Page 2
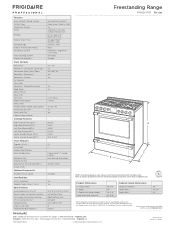
... Guidelines and the Department of Justice's 2010 A.D.A. Always consult local and national electric and gas codes. Compliant1 Sabbath Mode (Star-K® Cert.) Specifications Oven Interior... Board's A.D.A./A.B.A. Product Dimensions A - Accessories information available on the web at frigidaire.com. Ft.) Oven Light Hidden Bake Element Rack Configuration Baking System Broiling System...Grill (2-sided) Certifications Included NOTE: For planning purposes only. A.D.A. Freestanding Range FPGH3077RF 30" Gas Features Oven Control / Timing System PrecisionPro Controls™ Surface Type...
... Guidelines and the Department of Justice's 2010 A.D.A. Always consult local and national electric and gas codes. Compliant1 Sabbath Mode (Star-K® Cert.) Specifications Oven Interior... Board's A.D.A./A.B.A. Product Dimensions A - Accessories information available on the web at frigidaire.com. Ft.) Oven Light Hidden Bake Element Rack Configuration Baking System Broiling System...Grill (2-sided) Certifications Included NOTE: For planning purposes only. A.D.A. Freestanding Range FPGH3077RF 30" Gas Features Oven Control / Timing System PrecisionPro Controls™ Surface Type...


