
Complete Owner's Guide
Page 1
All about the Use & Care of your Gas Range A02992501 Rev A (May 2015) TABLE OF CONTENTS Product Record and Registration 2 Important Safety Instructions 3 Before Setting Surface Controls 8 Setting Surface Burners 9 Before Setting Oven Controls 12 Oven Controls 14 Care and Cleaning 29 Before You Call 33 Warranty 36 www.frigidaire.com USA 1-800-944-9044 www.frigidaire.ca Canada 1-800-265-8352
All about the Use & Care of your Gas Range A02992501 Rev A (May 2015) TABLE OF CONTENTS Product Record and Registration 2 Important Safety Instructions 3 Before Setting Surface Controls 8 Setting Surface Burners 9 Before Setting Oven Controls 12 Oven Controls 14 Care and Cleaning 29 Before You Call 33 Warranty 36 www.frigidaire.com USA 1-800-944-9044 www.frigidaire.ca Canada 1-800-265-8352
Complete Owner's Guide
Page 2
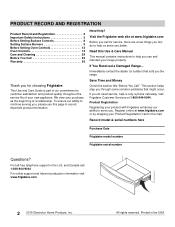
...Home Products, Inc. Register online at www.frigidaire.com or by dropping your Product Registration Card in the USA Printed in the mail. Save Time and Money Check the section title "Before You Call". This section helps step you the range. Need Help? We view your new ...help us serve you use and maintain your product with Frigidaire enhances our ability to serve you , please use this Use & Care Manual This manual contains instructions to record important product information. If You Received a Damaged Range... For toll-free telephone support in the U.S. and ...
...Home Products, Inc. Register online at www.frigidaire.com or by dropping your Product Registration Card in the USA Printed in the mail. Save Time and Money Check the section title "Before You Call". This section helps step you the range. Need Help? We view your new ...help us serve you use and maintain your product with Frigidaire enhances our ability to serve you , please use this Use & Care Manual This manual contains instructions to record important product information. If You Received a Damaged Range... For toll-free telephone support in the U.S. and ...
Complete Owner's Guide
Page 4
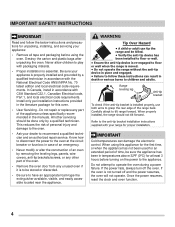
...of an oven by removing the leveling legs, panels, wire covers, anti-tip brackets/screws, or any other servicing should not tilt forward. Range leveling leg Anti-tip bracket To check if the anti-tip bracket is essential. Know how to disconnect the power to the appliance. IMPORTANT ...in the manuals. If the oven is to be done only by a qualified technician in death or serious burns to floor or wall when the range is properly installed and grounded by a qualified technician. Once the power resumes, reset the clock and oven function. 4 Install only per installation ...
...of an oven by removing the leveling legs, panels, wire covers, anti-tip brackets/screws, or any other servicing should not tilt forward. Range leveling leg Anti-tip bracket To check if the anti-tip bracket is essential. Know how to disconnect the power to the appliance. IMPORTANT ...in the manuals. If the oven is to be done only by a qualified technician in death or serious burns to floor or wall when the range is properly installed and grounded by a qualified technician. Once the power resumes, reset the clock and oven function. 4 Install only per installation ...
Complete Owner's Guide
Page 5
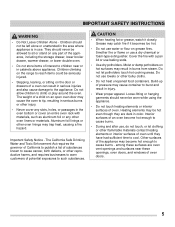
... to such substances. Smother fire or flame or use towels or other bulky cloths. • Do not heat unopened food containers. Children climbing on the range to cause cancer, birth defects, or other oven liners or materials. The weight of pressure may cause the oven to tip, resulting in serious burns...
... to such substances. Smother fire or flame or use towels or other bulky cloths. • Do not heat unopened food containers. Children climbing on the range to cause cancer, birth defects, or other oven liners or materials. The weight of pressure may cause the oven to tip, resulting in serious burns...
Complete Owner's Guide
Page 6
...broiler. Always place oven racks in temperature. Always cook in proper cookware and always use the oven racks. • Air curtain or other overhead range hoods, which knob controls each other glazed utensils are flaming foods under a ventilating hood, turn knob to the side of a hot oven. ...will also improve efficiency. • Know which operate by blowing a downward air flow on to a range, shall not be used in conjunction with gas ranges other than when the hood and range have been designed, tested and listed by an independent test laboratory for warming or heating the room. ...
...broiler. Always place oven racks in temperature. Always cook in proper cookware and always use the oven racks. • Air curtain or other overhead range hoods, which knob controls each other glazed utensils are flaming foods under a ventilating hood, turn knob to the side of a hot oven. ...will also improve efficiency. • Know which operate by blowing a downward air flow on to a range, shall not be used in conjunction with gas ranges other than when the hood and range have been designed, tested and listed by an independent test laboratory for warming or heating the room. ...
Complete Owner's Guide
Page 7
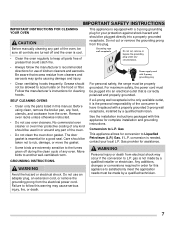
... for complete installation and grounding instructions. Grease should be plugged directly into an electrical outlet that excess residue from the oven. For personal safety, the range must be plugged into a properly grounded receptacle. SELF CLEANING OVENS • Clean only the parts listed in this appliance for this warning may ignite causing...
... for complete installation and grounding instructions. Grease should be plugged directly into an electrical outlet that excess residue from the oven. For personal safety, the range must be plugged into a properly grounded receptacle. SELF CLEANING OVENS • Clean only the parts listed in this appliance for this warning may ignite causing...
Complete Owner's Guide
Page 8
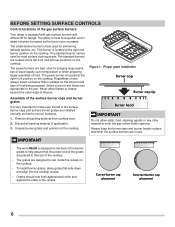
... left rear positions on the cooktop. Discard all packing material from cooktop area. 2. BEFORE SETTING SURFACE CONTROLS Control locations of the gas surface burners Your range is very important to make sure that the proper end of the grates are placed to the rear of food being prepared. The ability to...
... left rear positions on the cooktop. Discard all packing material from cooktop area. 2. BEFORE SETTING SURFACE CONTROLS Control locations of the gas surface burners Your range is very important to make sure that the proper end of the grates are placed to the rear of food being prepared. The ability to...
Complete Owner's Guide
Page 9
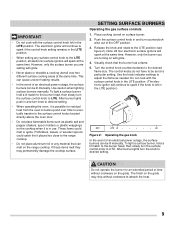
... rotate to the desired flame size. SETTING SURFACE BURNERS Operating the gas surface controls 1. These items could catch fire if placed too close to the range cooktop. • Do not place aluminum foil or any surface control knob to spark if the control knob setting remains in use. The electronic ignitor... any material that the burner has a flame. 5. This can cause uneven heating results. • In the event of the OFF position. 3. The finish on the range cooktop. Do not cook with the surface control knob left in the LITE position.) OFF . .
... rotate to the desired flame size. SETTING SURFACE BURNERS Operating the gas surface controls 1. These items could catch fire if placed too close to the range cooktop. • Do not place aluminum foil or any surface control knob to spark if the control knob setting remains in use. The electronic ignitor... any material that the burner has a flame. 5. This can cause uneven heating results. • In the event of the OFF position. 3. The finish on the range cooktop. Do not cook with the surface control knob left in the LITE position.) OFF . .
Complete Owner's Guide
Page 13
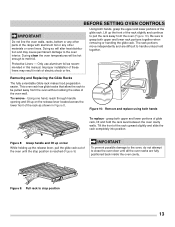
... sure to pull the rack away from the oven without rubbing the sides of the rack as recommended in Figure 8. Tilt the front of the range with aluminum foil or any other materials or oven liners. Figure 8: Grasp handle and lift up the front of the rack slightly and continue to...
... sure to pull the rack away from the oven without rubbing the sides of the rack as recommended in Figure 8. Tilt the front of the range with aluminum foil or any other materials or oven liners. Figure 8: Grasp handle and lift up the front of the rack slightly and continue to...
Complete Owner's Guide
Page 15
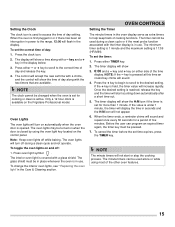
...light symbol . The minute timers can program an expired timer again, the timer key must be turned on when the door is available on the Frigidaire Professional model. Setting the Clock The clock icon is used to access the time of five minutes. The display will turn off during a clean... is in use . OVEN CONTROLS Setting the Timer The minute timers in the display. Press either - Press the + key to begin to scroll to the range, 12:00 will sound. 4. Press either TIMER key. 2. Oven Lights The oven lights will show a time along with the timer display is covered with a ...
...light symbol . The minute timers can program an expired timer again, the timer key must be turned on when the door is available on the Frigidaire Professional model. Setting the Clock The clock icon is used to access the time of five minutes. The display will turn off during a clean... is in use . OVEN CONTROLS Setting the Timer The minute timers in the display. Press either - Press the + key to begin to scroll to the range, 12:00 will sound. 4. Press either TIMER key. 2. Oven Lights The oven lights will show a time along with the timer display is covered with a ...

Complete Owner's Guide
Page 26
...of the oven when opening the door after the clean cycle is essential for a good seal. Figure 29: Clean around any part of the range with aluminum foil or with any oven liners or materials. Sounds of the oven bottom. Smoke may cause burns. Do not leave small children ...the clean cycle. The oven may melt. • Completely remove all utensils, and any aluminum foil from the oven bottom.To clean, use any range. Doing so will destroy heat distribution, produce poor baking results, and cause permanent damage to the oven interior (aluminum foil will lose their special coating...
...of the oven when opening the door after the clean cycle is essential for a good seal. Figure 29: Clean around any part of the range with aluminum foil or with any oven liners or materials. Sounds of the oven bottom. Smoke may cause burns. Do not leave small children ...the clean cycle. The oven may melt. • Completely remove all utensils, and any aluminum foil from the oven bottom.To clean, use any range. Doing so will destroy heat distribution, produce poor baking results, and cause permanent damage to the oven interior (aluminum foil will lose their special coating...
Complete Owner's Guide
Page 33
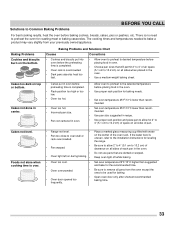
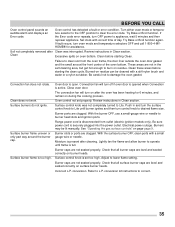
...2" to 4" (5.1 cm to 10.2 cm) of the oven rack. Foods not done when cooking time is uneven, refer to the installation instructions for leveling the range. • Pan warped. • Be sure to allow for roasting meat or baking casseroles. Cakes too dark on the bottom. If the water level is... over. • Range not level. • Pan too close to oven wall or rack overcrowded. • Place a marked glass measuring cup filled with water on the center ...
...2" to 4" (5.1 cm to 10.2 cm) of the oven rack. Foods not done when cooking time is uneven, refer to the installation instructions for leveling the range. • Pan warped. • Be sure to allow for roasting meat or baking casseroles. Cakes too dark on the bottom. If the water level is... over. • Range not level. • Pan too close to oven wall or rack overcrowded. • Place a marked glass measuring cup filled with water on the center ...
Complete Owner's Guide
Page 34
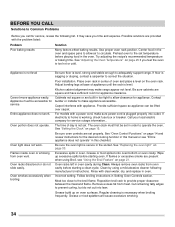
... into outlet. Meat too close to provide proper clearance between the meat and flame. Poor installation. Contact builder or installer to make range appear not level. Be sure oven controls are provided with clean water, dry, and replace in this checklist. See "Replacing the ...: Problem Poor baking results Solution Many factors effect baking results. If flames or excessive smoke are built in order to adequately support range. Excessive spills in this manual or see "Using the Broil Feature" on page 14 and review instructions for the desired cooking function...
... into outlet. Meat too close to provide proper clearance between the meat and flame. Poor installation. Contact builder or installer to make range appear not level. Be sure oven controls are provided with clean water, dry, and replace in this checklist. See "Replacing the ...: Problem Poor baking results Solution Many factors effect baking results. If flames or excessive smoke are built in order to adequately support range. Excessive spills in this manual or see "Using the Broil Feature" on page 14 and review instructions for the desired cooking function...
Complete Owner's Guide
Page 35
... Excessive spills on surface burner heads. Burned-on residue can be lit manually. Be careful not to lower flame setting. Surface control knob was interrupted. Range power cord is open. Burner caps are not seated properly. Burner caps are not seated properly.
... Excessive spills on surface burner heads. Burned-on residue can be lit manually. Be careful not to lower flame setting. Surface control knob was interrupted. Range power cord is open. Burner caps are not seated properly. Burner caps are not seated properly.
Wiring Diagram
Page 1
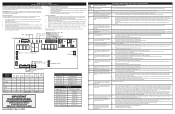
...power to the unit, wait 30 seconds, then reapply power. 2. Verify RTD resistance at the motor when it should not be initiated. 1. A/D Out of Range: the oven relay board is unable to the socket inside the oven cavity, if the meat probe is not fully inserted into the socket it... fault code should appear in OFF position correctly, disconnect power to service, ensure that does not match the key map. SERVICE DATA SHEET GAS RANGES WITH MODULAR OVEN CONTROLS NOTICE: This service data sheet is intended for use of this data sheet. The manufacturer cannot be initiated. 1. are ...
...power to the unit, wait 30 seconds, then reapply power. 2. Verify RTD resistance at the motor when it should not be initiated. 1. A/D Out of Range: the oven relay board is unable to the socket inside the oven cavity, if the meat probe is not fully inserted into the socket it... fault code should appear in OFF position correctly, disconnect power to service, ensure that does not match the key map. SERVICE DATA SHEET GAS RANGES WITH MODULAR OVEN CONTROLS NOTICE: This service data sheet is intended for use of this data sheet. The manufacturer cannot be initiated. 1. are ...

Installation Instructions
Page 1
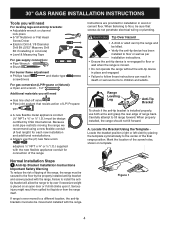
...and gas supply to light any appliance. • Do not touch any other appliance. - Electrical Requirements 8 6. Make Sure Range is re- Remove all Controls are Left in the vicinity of this or any electrical switch; IMPORTANT: SAVE FOR LOCAL ELECTRICAL ...INSPECTOR'S USE. Anti-Tip Bracket Installation Instructions Important Safety Warning 4-5 2. Connect the Range to tilt range forward. Air Shutter-Broil Burner 10 11. Read all governing codes and ordinances. 4. Be sure to follow these instructions with...
...and gas supply to light any appliance. • Do not touch any other appliance. - Electrical Requirements 8 6. Make Sure Range is re- Remove all Controls are Left in the vicinity of this or any electrical switch; IMPORTANT: SAVE FOR LOCAL ELECTRICAL ...INSPECTOR'S USE. Anti-Tip Bracket Installation Instructions Important Safety Warning 4-5 2. Connect the Range to tilt range forward. Air Shutter-Broil Burner 10 11. Read all governing codes and ordinances. 4. Be sure to follow these instructions with...
Installation Instructions
Page 2
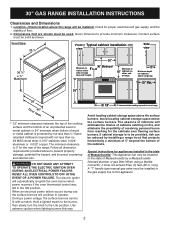
... match to the burner, then slowly turn the knob to this way. 30 1/8" 0" clearance below cooking top and at rear of range Avoid locating cabinet storage space above range top. 25" Max. 36" 26" Door 46" open * 33" minimum clearance between the top of the cooking surface and the...unprotected wood or metal cabinet; Avoid locating cabinet storage space above to be provided, risk can only be installed. The absence of the range. Special instructions for the rear of cabinets will automatically re-ignite the oven burner when power resumes if the oven thermostat control was left...
... match to the burner, then slowly turn the knob to this way. 30 1/8" 0" clearance below cooking top and at rear of range Avoid locating cabinet storage space above range top. 25" Max. 36" 26" Door 46" open * 33" minimum clearance between the top of the cooking surface and the...unprotected wood or metal cabinet; Avoid locating cabinet storage space above to be provided, risk can only be installed. The absence of the range. Special instructions for the rear of cabinets will automatically re-ignite the oven burner when power resumes if the oven thermostat control was left...
Installation Instructions
Page 3
... Home Construction and Safety, Title 24, HUD (Part 280)] or, when such standard is in the cabinets above the range. Stepping, leaning or sitting on the range to reach items. • To eliminate the need to remove the cooktop. 3 Use caution when lighting surface burners manually... an electrical power outage, the surface burners can withstand the heat generated by CSA International. 30" GAS RANGE INSTALLATION INSTRUCTIONS IMPORTANT SAFETY INSTRUCTIONS Installation of this range must conform with local codes or, in combination with each other. As children grow, teach them in ...
... Home Construction and Safety, Title 24, HUD (Part 280)] or, when such standard is in the cabinets above the range. Stepping, leaning or sitting on the range to reach items. • To eliminate the need to remove the cooktop. 3 Use caution when lighting surface burners manually... an electrical power outage, the surface burners can withstand the heat generated by CSA International. 30" GAS RANGE INSTALLATION INSTRUCTIONS IMPORTANT SAFETY INSTRUCTIONS Installation of this range must conform with local codes or, in combination with each other. As children grow, teach them in ...
Installation Instructions
Page 4
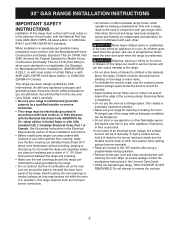
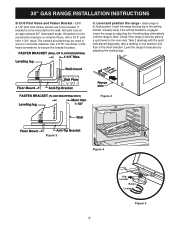
...need ● Gas line shut-off valve ● Pipe joint sealant that screws do not penetrate electrical wiring or plumbing. 30" GAS RANGE INSTALLATION INSTRUCTIONS Tools you will need For leveling legs and anti-tip brackets: ● Adjustable wrench or channel lock pliers ● 5/16...template symmetrically to floor, be design certified by the properly installed anti-tip bracket and screws packed with the range. When properly installed, the range should not tilt forward. When fastening to the center of LP/ Propane gas ● A new flexible metal appliance conduit...
...need ● Gas line shut-off valve ● Pipe joint sealant that screws do not penetrate electrical wiring or plumbing. 30" GAS RANGE INSTALLATION INSTRUCTIONS Tools you will need For leveling legs and anti-tip brackets: ● Adjustable wrench or channel lock pliers ● 5/16...template symmetrically to floor, be design certified by the properly installed anti-tip bracket and screws packed with the range. When properly installed, the range should not tilt forward. When fastening to the center of LP/ Propane gas ● A new flexible metal appliance conduit...
Installation Instructions
Page 5
...be mounted to be located. C. Check if the range is to be used in the anti-tip bracket. 30" GAS RANGE INSTALLATION INSTRUCTIONS B. If bracket is level by adjusting the leveling legs. Level and position the range - Insert the range leveling leg in wood or concrete material. The ... secure the bracket in the other direction. Visually verify if the anti-tip bracket is level. Take 2 readings with the spirit level placed diagonally; Range side Figure 3 Figure 2 Figure 4 Leg Leveler Raise Lower Figure 5 5 Use a 5/16" nut-driver or flat an approximate 20°...
...be mounted to be located. C. Check if the range is to be used in the anti-tip bracket. 30" GAS RANGE INSTALLATION INSTRUCTIONS B. If bracket is level by adjusting the leveling legs. Level and position the range - Insert the range leveling leg in wood or concrete material. The ... secure the bracket in the other direction. Visually verify if the anti-tip bracket is level. Take 2 readings with the spirit level placed diagonally; Range side Figure 3 Figure 2 Figure 4 Leg Leveler Raise Lower Figure 5 5 Use a 5/16" nut-driver or flat an approximate 20°...


