
User Manual
Page 18
Inside Product Parts - Top 1 Rear paper feed slot cover 2 Paper support 3 Rear paper feed slot 4 Edge guide 5 CD/DVD tray (shown removed and in storage position) 6 Document cover Parent topic: Product Parts Locations 18 Top Product Parts - Front Product Parts - Back Parent topic: Product Basics Product Parts - Product Parts -
Inside Product Parts - Top 1 Rear paper feed slot cover 2 Paper support 3 Rear paper feed slot 4 Edge guide 5 CD/DVD tray (shown removed and in storage position) 6 Document cover Parent topic: Product Parts Locations 18 Top Product Parts - Front Product Parts - Back Parent topic: Product Basics Product Parts - Product Parts -

User Manual
Page 45
... Cassette 1 (Upper Cassette) Loading Paper in Cassette 2 (Lower Cassette) Loading Paper in the Rear Paper Feed Slot Loading Envelopes Paper Loading Capacity Available Epson Papers Borderless Paper Type Compatibility Paper or Media Type Settings Loading Paper in Cassette 1 (Upper Cassette) You can load photo paper and other media in these sizes in the output tray, there may be slight resistance and...
... Cassette 1 (Upper Cassette) Loading Paper in Cassette 2 (Lower Cassette) Loading Paper in the Rear Paper Feed Slot Loading Envelopes Paper Loading Capacity Available Epson Papers Borderless Paper Type Compatibility Paper or Media Type Settings Loading Paper in Cassette 1 (Upper Cassette) You can load photo paper and other media in these sizes in the output tray, there may be slight resistance and...

User Manual
Page 47
Note: Make sure the paper is under the tabs on the tray. 6. Insert paper with the glossy or printable side facedown. Set the front edge guide to the position for the paper size you are marked on the edge guides. 47 Note: Various paper sizes are using. Note: Make sure the paper is loaded against the paper, but not too tightly. 5. Slide the side edge guides against the front edge guide. 7.
Note: Make sure the paper is under the tabs on the tray. 6. Insert paper with the glossy or printable side facedown. Set the front edge guide to the position for the paper size you are marked on the edge guides. 47 Note: Various paper sizes are using. Note: Make sure the paper is loaded against the paper, but not too tightly. 5. Slide the side edge guides against the front edge guide. 7.

User Manual
Page 48
... edge first and printable side facedown. • Make sure the paper is operating. Do not remove or insert the paper cassette while the product is under the tabs on the tray and product line up to be fully ejected. Always follow these paper loading guidelines: • Load only the recommended number of the product...
... edge first and printable side facedown. • Make sure the paper is operating. Do not remove or insert the paper cassette while the product is under the tabs on the tray and product line up to be fully ejected. Always follow these paper loading guidelines: • Load only the recommended number of the product...

User Manual
Page 49
Pull on the front cover to pull out the lower paper cassette. 49 Open the front cover. 3. This is normal. 2. Close the output tray, if necessary. Note: Do not remove or insert the paper cassette during printing. 1. Note: As you slide in the output tray, there may be slight resistance and noise.
Pull on the front cover to pull out the lower paper cassette. 49 Open the front cover. 3. This is normal. 2. Close the output tray, if necessary. Note: Do not remove or insert the paper cassette during printing. 1. Note: As you slide in the output tray, there may be slight resistance and noise.

User Manual
Page 50
Set the front edge guide to the paper size you are using . Note: If you are marked on the cassette and then extend it as shown. 5. Slide the edge guides outward. Note: Various paper sizes are using legal-size paper, remove the CD/DVD tray from the product. Press the button on the tray. 50 4.
Set the front edge guide to the paper size you are using . Note: If you are marked on the cassette and then extend it as shown. 5. Slide the edge guides outward. Note: Various paper sizes are using legal-size paper, remove the CD/DVD tray from the product. Press the button on the tray. 50 4.

User Manual
Page 52
... recommended number of sheets. • Load paper short edge first and printable side facedown. • Make sure the paper is under the tabs on the edge guides and not sticking out from the end of the product for any additional loading instructions. Note: The output tray opens automatically when you insert it is...
... recommended number of sheets. • Load paper short edge first and printable side facedown. • Make sure the paper is under the tabs on the edge guides and not sticking out from the end of the product for any additional loading instructions. Note: The output tray opens automatically when you insert it is...

User Manual
Page 57
... during printing. 1. You can also load a single envelope in the rear paper feed slot, as described here. Close the output tray, if necessary. This is normal. 2. You can print on plain paper envelopes in the output tray, there may be slight resistance and noise. Note: As you slide in this size: No. 10 (4.1 ×...
... during printing. 1. You can also load a single envelope in the rear paper feed slot, as described here. Close the output tray, if necessary. This is normal. 2. You can print on plain paper envelopes in the output tray, there may be slight resistance and noise. Note: As you slide in this size: No. 10 (4.1 ×...

User Manual
Page 59
...tray opens automatically when you insert it or load one envelope at a time. • Do not load envelopes that are under the tabs on the edge guides. 7. Note: Make sure the envelopes are curled, folded, or too thin. Parent topic: Loading Paper Related references Paper Loading Capacity Related tasks Loading Paper... in Cassette 1 (Upper Cassette) Loading Paper in Cassette 2 (Lower Cassette) Loading Paper in the Rear Paper Feed Slot 59 Always follow these envelope loading...
...tray opens automatically when you insert it or load one envelope at a time. • Do not load envelopes that are under the tabs on the edge guides. 7. Note: Make sure the envelopes are curled, folded, or too thin. Parent topic: Loading Paper Related references Paper Loading Capacity Related tasks Loading Paper... in Cassette 1 (Upper Cassette) Loading Paper in Cassette 2 (Lower Cassette) Loading Paper in the Rear Paper Feed Slot 59 Always follow these envelope loading...

User Manual
Page 226
1. Make sure there are no errors on the LCD screen and the CD/DVD tray is not inserted for printing. 2. Select Setup. 5. Select Maintenance. 6. Select Nozzle Check. 7. Load a few sheets of plain paper in the product. 3. Press the home button, if necessary. 4. Press the start button. 226
1. Make sure there are no errors on the LCD screen and the CD/DVD tray is not inserted for printing. 2. Select Setup. 5. Select Maintenance. 6. Select Nozzle Check. 7. Load a few sheets of plain paper in the product. 3. Press the home button, if necessary. 4. Press the start button. 226

User Manual
Page 228
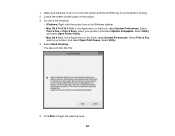
.... Load a few sheets of the following: • Windows: Right-click the product icon in the product. 3. Click Print. 228 Select Utility. 4. Do one of plain paper in the Windows taskbar. • Mac OS X 10.6/10.7/10.8: In the Apple menu or the Dock, select System Preferences. Make sure there are no... errors on the LCD screen and the CD/DVD tray is not inserted for printing. 2. Select Utility and select Open Printer Utility. • Mac OS X 10.5: In the Apple menu or the Dock, select System...
.... Load a few sheets of the following: • Windows: Right-click the product icon in the product. 3. Click Print. 228 Select Utility. 4. Do one of plain paper in the Windows taskbar. • Mac OS X 10.6/10.7/10.8: In the Apple menu or the Dock, select System Preferences. Make sure there are no... errors on the LCD screen and the CD/DVD tray is not inserted for printing. 2. Select Utility and select Open Printer Utility. • Mac OS X 10.5: In the Apple menu or the Dock, select System...

User Manual
Page 230
Select Setup. 5. Make sure there are no errors on your product. 1. Load a few sheets of plain paper in the product. 3. Press the home button, if necessary. 4. Cleaning the Print Head Using the Product Control Panel Cleaning the Print Head Using a Computer Utility Parent topic: Print Head Maintenance Related topics Replacing Ink Cartridges Cleaning the Print Head Using the Product Control Panel You can check the print head nozzles using the control panel on the LCD screen and the CD/DVD tray is not inserted for printing. 2. Select Maintenance. 230
Select Setup. 5. Make sure there are no errors on your product. 1. Load a few sheets of plain paper in the product. 3. Press the home button, if necessary. 4. Cleaning the Print Head Using the Product Control Panel Cleaning the Print Head Using a Computer Utility Parent topic: Print Head Maintenance Related topics Replacing Ink Cartridges Cleaning the Print Head Using the Product Control Panel You can check the print head nozzles using the control panel on the LCD screen and the CD/DVD tray is not inserted for printing. 2. Select Maintenance. 230
User Manual
Page 232
... Utility. 4. You see a window like this: 5. Make sure there are no errors on the LCD screen and the CD/DVD tray is not inserted for printing. 2. Do one of plain paper in the Windows taskbar. • Mac OS X 10.6/10.7/10.8: In the Apple menu or the Dock, select System Preferences. 1. Select...
... Utility. 4. You see a window like this: 5. Make sure there are no errors on the LCD screen and the CD/DVD tray is not inserted for printing. 2. Do one of plain paper in the Windows taskbar. • Mac OS X 10.6/10.7/10.8: In the Apple menu or the Dock, select System Preferences. 1. Select...

User Manual
Page 234
... Print Head Using the Product Control Panel You can align the print head using the control panel on the LCD screen and the CD/DVD tray is not inserted for printing. 2. Make sure there are no errors on your print head nozzles need to align the print head. Load a few sheets... the home button, if necessary. 4. Related topics Replacing Ink Cartridges Print Head Alignment If your printouts become grainy or blurry, you notice misalignment of plain paper in the product. 3.
... Print Head Using the Product Control Panel You can align the print head using the control panel on the LCD screen and the CD/DVD tray is not inserted for printing. 2. Make sure there are no errors on your print head nozzles need to align the print head. Load a few sheets... the home button, if necessary. 4. Related topics Replacing Ink Cartridges Print Head Alignment If your printouts become grainy or blurry, you notice misalignment of plain paper in the product. 3.

User Manual
Page 235
... following: • Windows: Right-click the product icon in the product. 3. Press the start button to print an alignment sheet. Do one of plain paper in the Windows taskbar. • Mac OS X 10.6/10.7/10.8: In the Apple menu or the Dock, select System Preferences. Check the printed pattern ...pattern for printing. 2. Select Print Head Alignment. 7. Select Print & Fax or Print & Scan, select your Windows computer or Mac. 1. Make sure the CD/DVD tray is not inserted for each set. 9. Select Utility and select Open Printer Utility. 235 6. Select Done when you are finished.
... following: • Windows: Right-click the product icon in the product. 3. Press the start button to print an alignment sheet. Do one of plain paper in the Windows taskbar. • Mac OS X 10.6/10.7/10.8: In the Apple menu or the Dock, select System Preferences. Check the printed pattern ...pattern for printing. 2. Select Print Head Alignment. 7. Select Print & Fax or Print & Scan, select your Windows computer or Mac. 1. Make sure the CD/DVD tray is not inserted for each set. 9. Select Utility and select Open Printer Utility. 235 6. Select Done when you are finished.

User Manual
Page 238
... as described here. Unplug the power cable. 3. Clean the outer case and control panel with a little glass cleaner. Close the output tray and front cover when you are not using the product to clean or transport your product. Cleaning Your Product Transporting Your Product Cleaning Your..., you may leak. 238 Caution: During transportation and storage, follow these sections if you need to protect it several times a year. Remove all the paper. 5. Caution: Do not use a hard brush, alcohol, or paint thinner to ship your product or transport it a long distance, prepare it . ...
... as described here. Unplug the power cable. 3. Clean the outer case and control panel with a little glass cleaner. Close the output tray and front cover when you are not using the product to clean or transport your product. Cleaning Your Product Transporting Your Product Cleaning Your..., you may leak. 238 Caution: During transportation and storage, follow these sections if you need to protect it several times a year. Remove all the paper. 5. Caution: Do not use a hard brush, alcohol, or paint thinner to ship your product or transport it a long distance, prepare it . ...

User Manual
Page 240
Then lower the control panel. 9. Be sure to remove the tape from the ink cartridge holder before turning on your product. If print quality has declined when you print again, clean and align the print head. Parent topic: Cleaning and Transporting Your Product Related concepts Print Head Cleaning Print Head Alignment 240 Keep the product level during transportation. Place the product in its original packing materials, if possible, or use equivalent materials with cushioning around the product. Close the rear paper feed slot cover and the output tray. 8.
Then lower the control panel. 9. Be sure to remove the tape from the ink cartridge holder before turning on your product. If print quality has declined when you print again, clean and align the print head. Parent topic: Cleaning and Transporting Your Product Related concepts Print Head Cleaning Print Head Alignment 240 Keep the product level during transportation. Place the product in its original packing materials, if possible, or use equivalent materials with cushioning around the product. Close the rear paper feed slot cover and the output tray. 8.

User Manual
Page 266
... a time. • Make sure your paper meets the specifications for your product. • Use Epson papers to ensure proper saturation and absorption of genuine Epson inks. • Make sure the paper type setting in your product software matches the type of paper you loaded. • Remove each sheet from the output tray as it is not damp...
... a time. • Make sure your paper meets the specifications for your product. • Use Epson papers to ensure proper saturation and absorption of genuine Epson inks. • Make sure the paper type setting in your product software matches the type of paper you loaded. • Remove each sheet from the output tray as it is not damp...

Quick Guide and Warranty
Page 3
...3. This is open, close it may be pushed into the printer. If the output tray is normal.) 2. Set the front edge guide to the next step. (As you are using. Upper cassette Lower cassette Loading Paper 3 Upper cassette Lower cassette Note: If you do not see the upper cassette, it ...before going to the position for the paper size you slide in the output tray, there may be slight resistance and noise. Pull out the paper cassette and slide the edge guides outward. Insert paper with the glossy or printable side facedown, then slide the side edge...
...3. This is open, close it may be pushed into the printer. If the output tray is normal.) 2. Set the front edge guide to the next step. (As you are using. Upper cassette Lower cassette Loading Paper 3 Upper cassette Lower cassette Note: If you do not see the upper cassette, it ...before going to the position for the paper size you slide in the output tray, there may be slight resistance and noise. Pull out the paper cassette and slide the edge guides outward. Insert paper with the glossy or printable side facedown, then slide the side edge...


