User Manual
Page 8
... Using the Product Control Panel 202 Checking the Nozzles Using a Computer Utility 205 Print Head Cleaning ...206 Cleaning the Print Head Using the Product Control Panel 207 Cleaning the Print Head Using a Computer Utility 209 Print Head Alignment ...212 Aligning the Print Head Using the Product Control Panel 212 Aligning the Print Head Using a Computer Utility 214 Cleaning the Paper Path ...216 Cleaning and Transporting...
... Using the Product Control Panel 202 Checking the Nozzles Using a Computer Utility 205 Print Head Cleaning ...206 Cleaning the Print Head Using the Product Control Panel 207 Cleaning the Print Head Using a Computer Utility 209 Print Head Alignment ...212 Aligning the Print Head Using the Product Control Panel 212 Aligning the Print Head Using a Computer Utility 214 Cleaning the Paper Path ...216 Cleaning and Transporting...
User Manual
Page 185
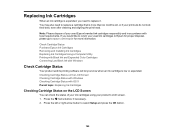
... proper disposal, please go to replace a cartridge that is low or expended. Check Cartridge Status Purchase Epson Ink Cartridges Removing and Installing Ink Cartridges Replacing Ink Cartridges Using a Computer Utility Printing with Black Ink and Expended Color Cartridges Conserving Low Black Ink with local requirements. Replacing Ink Cartridges When an ink cartridge... right arrow button to replace it. Note: Please dispose of your ink cartridges using your printouts do not look their best, even after cleaning and aligning the print head.
... proper disposal, please go to replace a cartridge that is low or expended. Check Cartridge Status Purchase Epson Ink Cartridges Removing and Installing Ink Cartridges Replacing Ink Cartridges Using a Computer Utility Printing with Black Ink and Expended Color Cartridges Conserving Low Black Ink with local requirements. Replacing Ink Cartridges When an ink cartridge... right arrow button to replace it. Note: Please dispose of your ink cartridges using your printouts do not look their best, even after cleaning and aligning the print head.
User Manual
Page 202
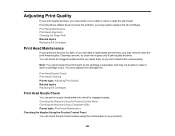
... may need to clean it when a cartridge is low. Print Head Maintenance Print Head Alignment Cleaning the Paper Path Related topics Replacing Ink Cartridges Print Head Maintenance If your print quality declines, you may not be able to clean the print head nozzles. You must replace the cartridge first. Adjusting Print Quality If your printouts become too light, or you see...
... may need to clean it when a cartridge is low. Print Head Maintenance Print Head Alignment Cleaning the Paper Path Related topics Replacing Ink Cartridges Print Head Maintenance If your print quality declines, you may not be able to clean the print head nozzles. You must replace the cartridge first. Adjusting Print Quality If your printouts become too light, or you see...

User Manual
Page 212
... Print Head Using the Product Control Panel Aligning the Print Head Using a Computer Utility Parent topic: Adjusting Print Quality Related concepts Print Head Cleaning Aligning the Print Head Using the Product Control Panel You can align the print head using the control panel on your print head nozzles need to align the print head. Press the left or right arrow button to select Maintenance and press the OK button. Print Head Alignment...
... Print Head Using the Product Control Panel Aligning the Print Head Using a Computer Utility Parent topic: Adjusting Print Quality Related concepts Print Head Cleaning Aligning the Print Head Using the Product Control Panel You can align the print head using the control panel on your print head nozzles need to align the print head. Press the left or right arrow button to select Maintenance and press the OK button. Print Head Alignment...

User Manual
Page 213
Note: Do not cancel printing while you are printing a head alignment pattern. Press the OK button after each set. 5. You see this screen: 6. Check the printed pattern and press the up or down arrow button to choose the number representing the best printed pattern for each selection. 213 Press the up or down arrow button to print an alignment sheet. You see this screen: 7. Press the start button to select Head Alignment and press the OK button.
Note: Do not cancel printing while you are printing a head alignment pattern. Press the OK button after each set. 5. You see this screen: 6. Check the printed pattern and press the up or down arrow button to choose the number representing the best printed pattern for each selection. 213 Press the up or down arrow button to print an alignment sheet. You see this screen: 7. Press the start button to select Head Alignment and press the OK button.

User Manual
Page 214
... Mac computer. 1. Select Print Head Alignment. 4. Note: Do not cancel printing while you are printing a head alignment pattern. 214 Load a few sheets of the following: • Windows: Access the Windows Desktop and right-click the product icon in the product. 2. Parent topic: Print Head Alignment Related topics Loading Paper Aligning the Print Head Using a Computer Utility You can align the print head using a utility on your...
... Mac computer. 1. Select Print Head Alignment. 4. Note: Do not cancel printing while you are printing a head alignment pattern. 214 Load a few sheets of the following: • Windows: Access the Windows Desktop and right-click the product icon in the product. 2. Parent topic: Print Head Alignment Related topics Loading Paper Aligning the Print Head Using a Computer Utility You can align the print head using a utility on your...

User Manual
Page 215
Then print another alignment sheet and check it. Parent topic: Print Head Alignment Related topics Loading Paper 215 You see a window like this: 5. Note: Click Skip (where available) if you are aligned in one or more of the sets, choose the closest one in each set and click Realignment. When you want to choose the number of the best printed pattern for each set. • After choosing a pattern number, click Next. • If no patterns are done, click Finish. Check the printed pattern and follow the instructions on the screen to skip a particular alignment sheet. 6.
Then print another alignment sheet and check it. Parent topic: Print Head Alignment Related topics Loading Paper 215 You see a window like this: 5. Note: Click Skip (where available) if you are aligned in one or more of the sets, choose the closest one in each set and click Realignment. When you want to choose the number of the best printed pattern for each set. • After choosing a pattern number, click Next. • If no patterns are done, click Finish. Check the printed pattern and follow the instructions on the screen to skip a particular alignment sheet. 6.
User Manual
Page 219
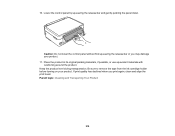
... has declined when you may damage your product. Caution: Do not lower the control panel without first squeezing the release bar or you print again, clean and align the print head. Be sure to remove the tape from the ink cartridge holder before turning on your product. 11. Lower the control panel by squeezing...
... has declined when you may damage your product. Caution: Do not lower the control panel without first squeezing the release bar or you print again, clean and align the print head. Be sure to remove the tape from the ink cartridge holder before turning on your product. 11. Lower the control panel by squeezing...
User Manual
Page 224
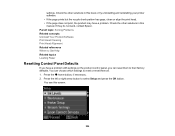
Parent topic: Solving Problems Related concepts Uninstall Your Product Software Print Head Cleaning Print Head Alignment Related references Where to Get Help Related topics Loading Paper Resetting Control Panel Defaults If you have a problem. If they do not work, contact Epson. settings. Press the home button, if necessary. 2. You see this book or try uninstalling and reinstalling...
Parent topic: Solving Problems Related concepts Uninstall Your Product Software Print Head Cleaning Print Head Alignment Related references Where to Get Help Related topics Loading Paper Resetting Control Panel Defaults If you have a problem. If they do not work, contact Epson. settings. Press the home button, if necessary. 2. You see this book or try uninstalling and reinstalling...

User Manual
Page 242
...your printer software. • Turn off any high speed settings in your paper is not printing while tilted or at an angle. Windows Selecting Additional Layout and Print Options - Parent topic: Solving Page Layout and Content Problems Related tasks Selecting Extended Settings -...Basic Print Settings - Windows Selecting Basic Print Settings - Windows Selecting Basic Print Settings - Windows Incorrect Image Size or Position If your printed image is the wrong size or in your printing program and printer software. • Make sure your product software. • Align the print head. &#...
...your printer software. • Turn off any high speed settings in your paper is not printing while tilted or at an angle. Windows Selecting Additional Layout and Print Options - Parent topic: Solving Page Layout and Content Problems Related tasks Selecting Extended Settings -...Basic Print Settings - Windows Selecting Basic Print Settings - Windows Selecting Basic Print Settings - Windows Incorrect Image Size or Position If your printed image is the wrong size or in your printing program and printer software. • Make sure your product software. • Align the print head. &#...
User Manual
Page 243
..., but your image looks fine on your product software. • Align the print head. • You may need to see if any high speed settings in this manual. Parent topic: Solving Print Quality Problems Related concepts Print Head Nozzle Check Print Head Cleaning Print Head Alignment Related references Paper or Media Type Settings - See the Apple website for your product. •...
..., but your image looks fine on your product software. • Align the print head. • You may need to see if any high speed settings in this manual. Parent topic: Solving Print Quality Problems Related concepts Print Head Nozzle Check Print Head Cleaning Print Head Alignment Related references Paper or Media Type Settings - See the Apple website for your product. •...
User Manual
Page 244
If one sheet at an angle. Then clean the print head, if necessary. • Align the print head. • Clean the paper path. Paper or Media Type Settings - Parent topic: Solving Print Quality Problems Related concepts Print Head Nozzle Check 244 OS X Related topics Replacing Ink Cartridges Blurry or Smeared ... of the print head nozzles are blurry or smeared, try these solutions: • Make sure your paper is printed. • Avoid handling printouts on a flat, stable surface that extends beyond the base of the paper correctly for your product. • Use Epson papers to...
If one sheet at an angle. Then clean the print head, if necessary. • Align the print head. • Clean the paper path. Paper or Media Type Settings - Parent topic: Solving Print Quality Problems Related concepts Print Head Nozzle Check 244 OS X Related topics Replacing Ink Cartridges Blurry or Smeared ... of the print head nozzles are blurry or smeared, try these solutions: • Make sure your paper is printed. • Avoid handling printouts on a flat, stable surface that extends beyond the base of the paper correctly for your product. • Use Epson papers to...
User Manual
Page 245
...the Paper Path Faint Printout or Printout Has Gaps If your product. • Align the print head. • Clean the paper path. Then clean the print head, if necessary. • The ink cartridges may be old or low on ink... type of the print head nozzles are clogged. OS X Selecting Basic Print Settings - Parent topic: Solving Print Quality Problems Related concepts Print Head Nozzle Check Print Head Cleaning Print Head Alignment Related tasks Selecting Basic Print Settings - Print Head Cleaning Print Head Alignment Related references Available Epson Papers Paper Specifications Related...
...the Paper Path Faint Printout or Printout Has Gaps If your product. • Align the print head. • Clean the paper path. Then clean the print head, if necessary. • The ink cartridges may be old or low on ink... type of the print head nozzles are clogged. OS X Selecting Basic Print Settings - Parent topic: Solving Print Quality Problems Related concepts Print Head Nozzle Check Print Head Cleaning Print Head Alignment Related tasks Selecting Basic Print Settings - Print Head Cleaning Print Head Alignment Related references Available Epson Papers Paper Specifications Related...
User Manual
Page 246
... the image size later, change the resolution setting to retain a high image quality. Windows 246 Then clean the print head, if necessary. • Align the print head. • You may be low resolution and not result in a high quality printout. • If you enlarged... select the lowest possible resolution that produces acceptable quality to increase the image resolution or print a smaller size; Windows Selecting Basic Print Settings - Parent topic: Solving Print Quality Problems Related concepts Print Head Nozzle Check Print Head Cleaning Print Head Alignment Related tasks Selecting Basic...
... the image size later, change the resolution setting to retain a high image quality. Windows 246 Then clean the print head, if necessary. • Align the print head. • You may be low resolution and not result in a high quality printout. • If you enlarged... select the lowest possible resolution that produces acceptable quality to increase the image resolution or print a smaller size; Windows Selecting Basic Print Settings - Parent topic: Solving Print Quality Problems Related concepts Print Head Nozzle Check Print Head Cleaning Print Head Alignment Related tasks Selecting Basic...


