User Manual
Page 3
... Changing the Power Off and Sleep Timer Settings - Mac OS X 21 Epson Connect Solutions for Smartphones, Tablets, and More 22 Using Epson Email Print ...23 Using the Epson iPrint Mobile App 23 Using Epson Remote Print ...23 Using Epson Scan to Cloud...24 Using Google Cloud Print ...24 Using AirPrint ...25...From the Control Panel 27 Wi-Fi Direct Mode Setup ...29 Enabling Wi-Fi Direct Mode ...30 Wi-Fi Protected Setup (WPS)...33 Using WPS to Connect to a Network 33 Printing a Network Status Sheet...35 3 Top...15 Product Parts - Contents XP-410 User's Guide...11 Product Basics ...12 Setting Up...
... Changing the Power Off and Sleep Timer Settings - Mac OS X 21 Epson Connect Solutions for Smartphones, Tablets, and More 22 Using Epson Email Print ...23 Using the Epson iPrint Mobile App 23 Using Epson Remote Print ...23 Using Epson Scan to Cloud...24 Using Google Cloud Print ...24 Using AirPrint ...25...From the Control Panel 27 Wi-Fi Direct Mode Setup ...29 Enabling Wi-Fi Direct Mode ...30 Wi-Fi Protected Setup (WPS)...33 Using WPS to Connect to a Network 33 Printing a Network Status Sheet...35 3 Top...15 Product Parts - Contents XP-410 User's Guide...11 Product Basics ...12 Setting Up...
User Manual
Page 5
...75 Selecting Basic Print Settings - Mac OS X 76 Print Quality Settings - Mac OS X 84 Printing Preferences - Mac OS X ...80 Selecting Page Setup Settings - Mac OS X 80 Selecting Print Layout Options - Mac OS X 83 Selecting Printing Preferences - Home Mode 101 Available Image Adjustments - Mac... Scan Using the Product Control Panel 88 Changing Default Scan Button Settings 90 Starting a Scan Using the Epson Scan Icon 90 Starting a Scan from a Scanning Program 92 Selecting Epson Scan Settings ...94 Scan Modes...94 Selecting the Scan Mode...95 Scanning in Home Mode ...98 Selecting...
...75 Selecting Basic Print Settings - Mac OS X 76 Print Quality Settings - Mac OS X 84 Printing Preferences - Mac OS X ...80 Selecting Page Setup Settings - Mac OS X 80 Selecting Print Layout Options - Mac OS X 83 Selecting Printing Preferences - Home Mode 101 Available Image Adjustments - Mac... Scan Using the Product Control Panel 88 Changing Default Scan Button Settings 90 Starting a Scan Using the Epson Scan Icon 90 Starting a Scan from a Scanning Program 92 Selecting Epson Scan Settings ...94 Scan Modes...94 Selecting the Scan Mode...95 Scanning in Home Mode ...98 Selecting...
User Manual
Page 8
... for Software Updates...189 Product Status Messages ...190 Running a Product Check ...191 Resetting Control Panel Defaults ...192 Solving Setup Problems ...194 Noise After Ink Installation ...194 Software Installation Problems ...194 Control Panel Setup Problems ...195 Solving Network Problems ...195 Product Cannot Connect to a Wireless Router or Access Point 195 Network Software Cannot...
... for Software Updates...189 Product Status Messages ...190 Running a Product Check ...191 Resetting Control Panel Defaults ...192 Solving Setup Problems ...194 Noise After Ink Installation ...194 Software Installation Problems ...194 Control Panel Setup Problems ...195 Solving Network Problems ...195 Product Cannot Connect to a Wireless Router or Access Point 195 Network Software Cannot...
User Manual
Page 13
... topic: Setting Up the Control Panel Changing LCD Screen Language You can adjust the position of the control panel to make it easier to select Setup and press the OK button. 13 Press the left or right arrow buttons to use. • To raise the control panel, lift it up from...
... topic: Setting Up the Control Panel Changing LCD Screen Language You can adjust the position of the control panel to make it easier to select Setup and press the OK button. 13 Press the left or right arrow buttons to use. • To raise the control panel, lift it up from...

User Manual
Page 14
... screen: 4. Press the left or right arrow buttons to exit. Press the up or down arrow buttons to select Printer Setup and press the OK button. Press the home button to select Setup and press the OK button. 3. Select Sound and press the OK button. 5. Press the up or down arrow buttons... to select Printer Setup and press the OK button. 4. Press the home button to select Language and press the OK button. 5. Select the Off setting and press the OK ...
... screen: 4. Press the left or right arrow buttons to exit. Press the up or down arrow buttons to select Printer Setup and press the OK button. Press the home button to select Setup and press the OK button. 3. Select Sound and press the OK button. 5. Press the up or down arrow buttons... to select Printer Setup and press the OK button. 4. Press the home button to select Language and press the OK button. 5. Select the Off setting and press the OK ...

User Manual
Page 19
You see this screen: 4. To change the Power Off Timer setting, press the up or down arrow buttons to select Printer Setup and press the OK button. Press the up or down arrow buttons to select the time period you want, then press the OK button. 19 Press the left or right arrow buttons to select Power Off Timer and press the OK button. You see this screen: 5. 2. Press the up or down arrow buttons to select Setup and press the OK button. 3.
You see this screen: 4. To change the Power Off Timer setting, press the up or down arrow buttons to select Printer Setup and press the OK button. Press the up or down arrow buttons to select the time period you want, then press the OK button. 19 Press the left or right arrow buttons to select Power Off Timer and press the OK button. You see this screen: 5. 2. Press the up or down arrow buttons to select Setup and press the OK button. 3.
User Manual
Page 23
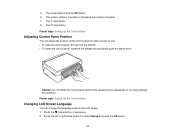
... to learn more about Email Print, check compatibility, and get detailed setup instructions. 3. Visit www.epson.com/connect to learn more about Epson iPrint and check the compatibility of your Epson product. Send an email with attachments to your mobile device. 3. Download Epson iPrint from your mobile device to your product's unique email address. If...
... to learn more about Email Print, check compatibility, and get detailed setup instructions. 3. Visit www.epson.com/connect to learn more about Epson iPrint and check the compatibility of your Epson product. Send an email with attachments to your mobile device. 3. Download Epson iPrint from your mobile device to your product's unique email address. If...
User Manual
Page 24
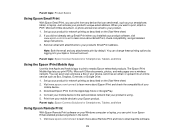
... the Remote Print driver for printing, and enter this address during Remote Print setup. 4. Select Destination List for Scan to use for your Epson product. Click Add, then follow these steps: 1. Parent topic: Epson Connect Solutions for Smartphones, Tablets, and More Using Google Cloud Print With a... printing as described on your destination list. 6. If your product is using. 2. Connect your Epson product for the Scan to the same network before starting the Google Cloud Print setup. Print a network status sheet. 24 If you are connected to Cloud service on the Start ...
... the Remote Print driver for printing, and enter this address during Remote Print setup. 4. Select Destination List for Scan to use for your Epson product. Click Add, then follow these steps: 1. Parent topic: Epson Connect Solutions for Smartphones, Tablets, and More Using Google Cloud Print With a... printing as described on your destination list. 6. If your product is using. 2. Connect your Epson product for the Scan to the same network before starting the Google Cloud Print setup. Print a network status sheet. 24 If you are connected to Cloud service on the Start ...
User Manual
Page 25
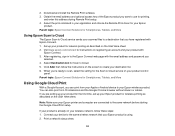
... on -screen instructions. 10. Parent topic: Product Basics 25 Select the check box to agree to complete setup and print a test page. Click Finish printer registration to the Usage Advisory and click Next. 8. Visit Epson Support for wireless printing as described on -screen instructions to the same wireless network that your product...
... on -screen instructions. 10. Parent topic: Product Basics 25 Select the check box to agree to complete setup and print a test page. Click Finish printer registration to the Usage Advisory and click Next. 8. Visit Epson Support for wireless printing as described on -screen instructions to the same wireless network that your product...

User Manual
Page 26
Wi-Fi Infrastructure Mode Setup Wi-Fi Direct Mode Setup Wi-Fi Protected Setup (WPS) Printing a Network Status Sheet Changing or Updating Network Connections Wi-Fi Infrastructure Mode Setup You can be connected to your computer over a wireless or wired network. 1 Epson product 2 Wireless router or access point 26 The wireless router or access point can set up your product to communicate with your product on a Wi-Fi network. Wi-Fi Networking See these sections to use your computer using a wireless router or access point.
Wi-Fi Infrastructure Mode Setup Wi-Fi Direct Mode Setup Wi-Fi Protected Setup (WPS) Printing a Network Status Sheet Changing or Updating Network Connections Wi-Fi Infrastructure Mode Setup You can be connected to your computer over a wireless or wired network. 1 Epson product 2 Wireless router or access point 26 The wireless router or access point can set up your product to communicate with your product on a Wi-Fi network. Wi-Fi Networking See these sections to use your computer using a wireless router or access point.
User Manual
Page 27
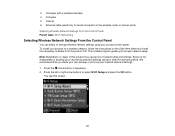
... guides you make your own backup or print out your network data and settings. 1. Epson is not responsible for wired connection to select Wi-Fi Setup and press the OK button. We recommend that you through network setup. Press the left or right arrow buttons to the wireless router or access point) Selecting...
... guides you make your own backup or print out your network data and settings. 1. Epson is not responsible for wired connection to select Wi-Fi Setup and press the OK button. We recommend that you through network setup. Press the left or right arrow buttons to the wireless router or access point) Selecting...
User Manual
Page 28
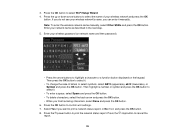
... wireless password (or network name and then password). • Press the arrow buttons to select it manually. Press the power button to select Wi-Fi Setup Wizard. 4. 3. Then press the OK button to highlight a character or a function button displayed on the keypad. Press the OK button to print the network status...
... wireless password (or network name and then password). • Press the arrow buttons to select it manually. Press the power button to select Wi-Fi Setup Wizard. 4. 3. Then press the OK button to highlight a character or a function button displayed on the keypad. Press the OK button to print the network status...
User Manual
Page 29
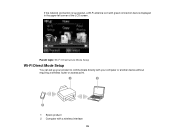
Parent topic: Wi-Fi Infrastructure Mode Setup Wi-Fi Direct Mode Setup You can set up your product to communicate directly with your computer or another device without requiring a wireless router or access point. 1 Epson product 2 Computer with green connection bars is displayed in the upper left corner of the LCD screen. If the network connection is successful, a Wi-Fi antenna icon with a wireless interface 29
Parent topic: Wi-Fi Infrastructure Mode Setup Wi-Fi Direct Mode Setup You can set up your product to communicate directly with your computer or another device without requiring a wireless router or access point. 1 Epson product 2 Computer with green connection bars is displayed in the upper left corner of the LCD screen. If the network connection is successful, a Wi-Fi antenna icon with a wireless interface 29
User Manual
Page 30
When operating in this mode, your product displays a Direct or D connection symbol on the LCD screen. Your product will reconnect to select Wi-Fi Setup and press the OK button. Press the home button, if necessary. 2. You see this mode, your product is not already connected to a wireless network, it ...
When operating in this mode, your product displays a Direct or D connection symbol on the LCD screen. Your product will reconnect to select Wi-Fi Setup and press the OK button. Press the home button, if necessary. 2. You see this mode, your product is not already connected to a wireless network, it ...

User Manual
Page 31
3. Note: If you change the Wi-Fi Direct password. Press the arrow buttons to change the password. 5. Press the down arrow button, then press the OK button to select Wi-Fi Direct Routerless Setup and press the OK button. 4. Enter your product via Wi-Fi Direct, they will be at least 8 and no more than 22 characters long. 31 Note: Your password must be disconnected when you have already connected devices or computers to your Wi-Fi Direct password.
3. Note: If you change the Wi-Fi Direct password. Press the arrow buttons to change the password. 5. Press the down arrow button, then press the OK button to select Wi-Fi Direct Routerless Setup and press the OK button. 4. Enter your product via Wi-Fi Direct, they will be at least 8 and no more than 22 characters long. 31 Note: Your password must be disconnected when you have already connected devices or computers to your Wi-Fi Direct password.
User Manual
Page 33
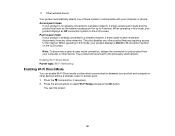
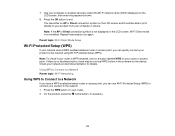
Parent topic: Wi-Fi Direct Mode Setup Wi-Fi Protected Setup (WPS) If your network uses a WPS-enabled wireless router or access point, you can quickly connect your network product documentation for the device. Using WPS ... Connect to a Network If you have a WPS-enabled wireless router or access point, you can use Wi-Fi Protected Setup (WPS) to connect your product to the network using Wi-Fi Protected Setup (WPS). Note: If the AP or Direct connection symbol is no hardware button, there may be able to print...
Parent topic: Wi-Fi Direct Mode Setup Wi-Fi Protected Setup (WPS) If your network uses a WPS-enabled wireless router or access point, you can quickly connect your network product documentation for the device. Using WPS ... Connect to a Network If you have a WPS-enabled wireless router or access point, you can use Wi-Fi Protected Setup (WPS) to connect your product to the network using Wi-Fi Protected Setup (WPS). Note: If the AP or Direct connection symbol is no hardware button, there may be able to print...

User Manual
Page 34
Press the left corner of the LCD screen. Parent topic: Wi-Fi Protected Setup (WPS) 34 Follow the instructions on the LCD screen to complete WPS setup. If the network connection is successful, a Wi-Fi antenna icon with green connection bars is displayed in the upper left or right arrow button, select Wi-Fi Setup, and press OK. 4. Press the up or down arrow button, select Push Button Setup (WPS), then press OK. 5. 3.
Press the left corner of the LCD screen. Parent topic: Wi-Fi Protected Setup (WPS) 34 Follow the instructions on the LCD screen to complete WPS setup. If the network connection is successful, a Wi-Fi antenna icon with green connection bars is displayed in the upper left or right arrow button, select Wi-Fi Setup, and press OK. 4. Press the up or down arrow button, select Push Button Setup (WPS), then press OK. 5. 3.
User Manual
Page 35
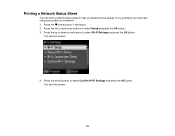
You see this screen: 35 You see this screen: 4. Press the arrow buttons to help you determine the causes of any problems you may have using your product on a network. 1. Printing a Network Status Sheet You can print a network status sheet to select Confirm Wi-Fi Settings and press the OK button. Press the left or right arrow buttons to select Wi-Fi Settings and press the OK button. Press the up or down arrow buttons to select Setup and press the OK button. 3. Press the home button, if necessary. 2.
You see this screen: 35 You see this screen: 4. Press the arrow buttons to help you determine the causes of any problems you may have using your product on a network. 1. Printing a Network Status Sheet You can print a network status sheet to select Confirm Wi-Fi Settings and press the OK button. Press the left or right arrow buttons to select Wi-Fi Settings and press the OK button. Press the up or down arrow buttons to select Setup and press the OK button. 3. Press the home button, if necessary. 2.

User Manual
Page 38
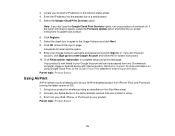
... Network Connections 38 Press the home button, if necessary. 2. You see this screen: 3. Press the left or right arrow buttons to select Wi-Fi Setup and press the OK button. Press the up or down arrow buttons to select Disable Wi-Fi and press the OK button. 4. Press the up...-Fi. Note: Before disabling Wi-Fi features, make a note of your product's SSID (network name) and password, and any network settings selected for the Epson Connect services you change your network connection type or need to disable your network connection. Disabling Wi-Fi Features You may need to solve a problem...
... Network Connections 38 Press the home button, if necessary. 2. You see this screen: 3. Press the left or right arrow buttons to select Wi-Fi Setup and press the OK button. Press the up or down arrow buttons to select Disable Wi-Fi and press the OK button. 4. Press the up...-Fi. Note: Before disabling Wi-Fi features, make a note of your product's SSID (network name) and password, and any network settings selected for the Epson Connect services you change your network connection type or need to disable your network connection. Disabling Wi-Fi Features You may need to solve a problem...

User Manual
Page 76
Selecting Basic Print Settings - Mac OS X Selecting Page Setup Settings - Mac OS X Printing Your Document or Photo - Select the print command in the File menu, or another command. See your product as the Printer ...
Selecting Basic Print Settings - Mac OS X Selecting Page Setup Settings - Mac OS X Printing Your Document or Photo - Select the print command in the File menu, or another command. See your product as the Printer ...


