
User Manual
Page 7
... the Print Head Using a Computer Utility 183 Cleaning the Paper Path ...184 Cleaning and Transporting Your Product 186 Cleaning Your Product ...186 Transporting Your Product ...186 7 Mac OS X 168 Conserving Low Black Ink with Mac OS X 158 Purchase Epson Ink Cartridges...160 Ink Cartridge Part Numbers ...160 Removing and Installing Ink Cartridges 161 Replacing...
... the Print Head Using a Computer Utility 183 Cleaning the Paper Path ...184 Cleaning and Transporting Your Product 186 Cleaning Your Product ...186 Transporting Your Product ...186 7 Mac OS X 168 Conserving Low Black Ink with Mac OS X 158 Purchase Epson Ink Cartridges...160 Ink Cartridge Part Numbers ...160 Removing and Installing Ink Cartridges 161 Replacing...

User Manual
Page 154
...Checking Cartridge Status with Mac OS X Parent topic: Replacing Ink Cartridges Checking Cartridge Status on the LCD Screen You can check the status of your printouts do not look their best, even after cleaning and aligning the print head. You see this screen: 154 If you would like... to return your product's LCD screen. 1. Press the left or right arrow buttons to replace it. Press the home button, if necessary. 2. Check Cartridge Status Purchase Epson Ink Cartridges Removing and Installing Ink...
...Checking Cartridge Status with Mac OS X Parent topic: Replacing Ink Cartridges Checking Cartridge Status on the LCD Screen You can check the status of your printouts do not look their best, even after cleaning and aligning the print head. You see this screen: 154 If you would like... to return your product's LCD screen. 1. Press the left or right arrow buttons to replace it. Press the home button, if necessary. 2. Check Cartridge Status Purchase Epson Ink Cartridges Removing and Installing Ink...

User Manual
Page 161
...Epson Ink Cartridges Removing and Installing Ink Cartridges Make sure you have your product. • If an ink cartridge is expended, you see a message on your replacement cartridges handy before you begin. Do not open ink cartridge packages until you are vacuum packed to prevent the print head ...nozzles from drying out. Note which cartridges need to install the ink. You must install new cartridges immediately after removing the old ones. Cartridges are ready to be replaced and press the OK button, then choose Replace now. 161 Caution: ...
...Epson Ink Cartridges Removing and Installing Ink Cartridges Make sure you have your product. • If an ink cartridge is expended, you see a message on your replacement cartridges handy before you begin. Do not open ink cartridge packages until you are vacuum packed to prevent the print head ...nozzles from drying out. Note which cartridges need to install the ink. You must install new cartridges immediately after removing the old ones. Cartridges are ready to be replaced and press the OK button, then choose Replace now. 161 Caution: ...
User Manual
Page 162
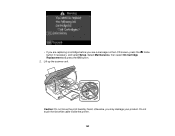
otherwise, you see a message on the LCD screen, press the button if necessary, and select Setup. home Caution: Do not move the print head by hand; Do not touch the flat white cable inside the printer. 162 Lift up the scanner unit. Select Maintenance, then select Ink Cartridge Replacement and press the OK button. 2. • If you are replacing a cartridge before you may damage your product.
otherwise, you see a message on the LCD screen, press the button if necessary, and select Setup. home Caution: Do not move the print head by hand; Do not touch the flat white cable inside the printer. 162 Lift up the scanner unit. Select Maintenance, then select Ink Cartridge Replacement and press the OK button. 2. • If you are replacing a cartridge before you may damage your product.

User Manual
Page 171
... light bands across them unnecessarily. Cleaning uses ink, so clean the nozzles only if print quality declines. Print Head Nozzle Check Print Head Cleaning Parent topic: Adjusting Print Quality Related topics Replacing Ink Cartridges Print Head Nozzle Check You can print a nozzle check pattern to replace the ink cartridges. Checking the Nozzles Using the Product Control Panel Checking the Nozzles Using...
... light bands across them unnecessarily. Cleaning uses ink, so clean the nozzles only if print quality declines. Print Head Nozzle Check Print Head Cleaning Parent topic: Adjusting Print Quality Related topics Replacing Ink Cartridges Print Head Nozzle Check You can print a nozzle check pattern to replace the ink cartridges. Checking the Nozzles Using the Product Control Panel Checking the Nozzles Using...

User Manual
Page 173
.... • If there are gaps in the lines. Check the printed pattern to see any improvement after cleaning the print head up to be replaced. Parent topic: Print Head Nozzle Check Related concepts Print Head Cleaning 173 7. Print head is faint, select Head Cleaning and press the OK button to clean the print head, check the nozzles, and repeat the process as necessary.
.... • If there are gaps in the lines. Check the printed pattern to see any improvement after cleaning the print head up to be replaced. Parent topic: Print Head Nozzle Check Related concepts Print Head Cleaning 173 7. Print head is faint, select Head Cleaning and press the OK button to clean the print head, check the nozzles, and repeat the process as necessary.

User Manual
Page 175
... gaps or the pattern is clean Print head needs cleaning 6. Cleaning the Print Head Using the Product Control Panel 175 Print head is faint, clean the print head. You must replace the cartridge first. 5. If there are gaps in the lines. Note: You cannot clean the print head if an ink cartridge is low. Check the printed pattern to clean it when...
... gaps or the pattern is clean Print head needs cleaning 6. Cleaning the Print Head Using the Product Control Panel 175 Print head is faint, clean the print head. You must replace the cartridge first. 5. If there are gaps in the lines. Note: You cannot clean the print head if an ink cartridge is low. Check the printed pattern to clean it when...

User Manual
Page 176
... the OK button. You see this screen: 5. You see this screen: 176 Cleaning the Print Head Using a Computer Utility Parent topic: Print Head Maintenance Related topics Replacing Ink Cartridges Cleaning the Print Head Using the Product Control Panel You can clean the print head using the control panel on your product. 1. Press the up or down arrow buttons to...
... the OK button. You see this screen: 5. You see this screen: 176 Cleaning the Print Head Using a Computer Utility Parent topic: Print Head Maintenance Related topics Replacing Ink Cartridges Cleaning the Print Head Using the Product Control Panel You can clean the print head using the control panel on your product. 1. Press the up or down arrow buttons to...

User Manual
Page 178
..., select System Preferences. You see any improvement after cleaning the print head up to be replaced. If you don't see a window like this: 178 Parent topic: Print Head Cleaning Related concepts Print Head Nozzle Check Related topics Replacing Ink Cartridges Cleaning the Print Head Using a Computer Utility You can clean the print head using a utility on your Windows or Mac computer. 1. Select...
..., select System Preferences. You see any improvement after cleaning the print head up to be replaced. If you don't see a window like this: 178 Parent topic: Print Head Cleaning Related concepts Print Head Nozzle Check Related topics Replacing Ink Cartridges Cleaning the Print Head Using a Computer Utility You can clean the print head using a utility on your Windows or Mac computer. 1. Select...

User Manual
Page 180
... no gaps, click Finish. • If there are gaps or the pattern is faint, click Clean to align the print head. Parent topic: Print Head Cleaning Related concepts Print Head Nozzle Check Related topics Replacing Ink Cartridges Print Head Alignment If your printouts become grainy or blurry, you notice misalignment of the ink cartridges may also occur if your...
... no gaps, click Finish. • If there are gaps or the pattern is faint, click Clean to align the print head. Parent topic: Print Head Cleaning Related concepts Print Head Nozzle Check Related topics Replacing Ink Cartridges Print Head Alignment If your printouts become grainy or blurry, you notice misalignment of the ink cartridges may also occur if your...
User Manual
Page 194
...is still in the printer properties. 194 Parent topic: Solving Setup Problems Related topics Replacing Ink Cartridges Software Installation Problems If you still have problems installing software, disconnect the... and check to reset the selected settings. Your product is shown in progress, contact Epson for your product. Press the OK button to see a confirmation screen. 5. If you...default printer and the correct port is finished priming the print head when the power light stops flashing. • If the product's print head stops moving or making noise, and the charging process...
...is still in the printer properties. 194 Parent topic: Solving Setup Problems Related topics Replacing Ink Cartridges Software Installation Problems If you still have problems installing software, disconnect the... and check to reset the selected settings. Your product is shown in progress, contact Epson for your product. Press the OK button to see a confirmation screen. 5. If you...default printer and the correct port is finished priming the print head when the power light stops flashing. • If the product's print head stops moving or making noise, and the charging process...
User Manual
Page 204
...Navigate to the taskbar checkbox. 7. Click the Monitoring Preferences button. 6. Complete the ink cartridge installation steps. Make sure the print head is in the ink cartridge replacement position. (The ink cartridge holder should be beneath the cutout in the product case, allowing access to the cartridges.) Note...select Devices and Printers. • Windows Vista: Click , select Control Panel, and click Printer under Hardware and Sound. • Windows XP: Click Start and select Printers and Faxes. (Or open program windows. Product Icon Does Not Appear in Windows Taskbar If you do not ...
...Navigate to the taskbar checkbox. 7. Click the Monitoring Preferences button. 6. Complete the ink cartridge installation steps. Make sure the print head is in the ink cartridge replacement position. (The ink cartridge holder should be beneath the cutout in the product case, allowing access to the cartridges.) Note...select Devices and Printers. • Windows Vista: Click , select Control Panel, and click Printer under Hardware and Sound. • Windows XP: Click Start and select Printers and Faxes. (Or open program windows. Product Icon Does Not Appear in Windows Taskbar If you do not ...

User Manual
Page 211
... ink to see if any high speed settings in your printouts are clogged. Then clean the print head, if necessary. • Align the print head. • Clean the paper path. Mac OS X Related topics Replacing Ink Cartridges Blurry or Smeared Printout If your product software. • If you loaded. •...paper meets the specifications for your product. • Use Epson papers to ensure proper saturation and absorption of genuine Epson inks. • Make sure the paper type setting in your product software matches the type of paper you print on both sides of a sheet of paper, smudges may ...
... ink to see if any high speed settings in your printouts are clogged. Then clean the print head, if necessary. • Align the print head. • Clean the paper path. Mac OS X Related topics Replacing Ink Cartridges Blurry or Smeared Printout If your product software. • If you loaded. •...paper meets the specifications for your product. • Use Epson papers to ensure proper saturation and absorption of genuine Epson inks. • Make sure the paper type setting in your product software matches the type of paper you print on both sides of a sheet of paper, smudges may ...

User Manual
Page 213
... Black/Grayscale or Grayscale setting is not selected in your printer software. • Run a nozzle check to see if any of the print head nozzles are clogged. Related topics Replacing Ink Cartridges Loading Paper Grainy Printout If your printouts are grainy, try these solutions: • Make sure you can never exactly match your...
... Black/Grayscale or Grayscale setting is not selected in your printer software. • Run a nozzle check to see if any of the print head nozzles are clogged. Related topics Replacing Ink Cartridges Loading Paper Grainy Printout If your printouts are grainy, try these solutions: • Make sure you can never exactly match your...
User Manual
Page 214
...Replacing Ink Cartridges Solving Scanning Problems Check these solutions: • Make sure your computer has adequate memory and meets the system requirements for TWAIN-compliant OCR scanning software, such as sleep or standby. downloads or Canadian downloads). Parent topic: Solving Print Quality Problems Related concepts Print Head Cleaning Related references Available EPSON... Papers Related tasks Selecting Advanced Print Settings -
...Replacing Ink Cartridges Solving Scanning Problems Check these solutions: • Make sure your computer has adequate memory and meets the system requirements for TWAIN-compliant OCR scanning software, such as sleep or standby. downloads or Canadian downloads). Parent topic: Solving Print Quality Problems Related concepts Print Head Cleaning Related references Available EPSON... Papers Related tasks Selecting Advanced Print Settings -

Quick Guide and Warranty
Page 13
... or more of the ink cartridges. Follow the steps below to clean the print head. or A4-size paper in this chapter for checking and cleaning the print head nozzles and replacing ink cartridges. Maintenance 13 Load letter- Then press x to check the print head nozzles. 1. Press x to select Maintenance and press OK, then select Nozzle Check...
... or more of the ink cartridges. Follow the steps below to clean the print head. or A4-size paper in this chapter for checking and cleaning the print head nozzles and replacing ink cartridges. Maintenance 13 Load letter- Then press x to check the print head nozzles. 1. Press x to select Maintenance and press OK, then select Nozzle Check...

Quick Guide and Warranty
Page 14
...LCD screen. Cartridges are vacuum packed to be replaced and press OK. Checking Ink Levels If an ink cartridge is expended, you may be able to continue printing temporarily with black ink; see the instructions in the print head nozzles may also appear on your computer screen ... You can optionally display ink offers and other updates from Epson, see the online User's Guide for ink offers or updates from Epson. A window may dry out. 1. Note: To disable checking for more information. Note: Printing stops when an ink cartridge is expended, you are approximate...
...LCD screen. Cartridges are vacuum packed to be replaced and press OK. Checking Ink Levels If an ink cartridge is expended, you may be able to continue printing temporarily with black ink; see the instructions in the print head nozzles may also appear on your computer screen ... You can optionally display ink offers and other updates from Epson, see the online User's Guide for ink offers or updates from Epson. A window may dry out. 1. Note: To disable checking for more information. Note: Printing stops when an ink cartridge is expended, you are approximate...
Quick Guide and Warranty
Page 20
.... ■ The ink cartridges may be low on page 13. ■ If you notice jagged vertical lines, you may need to clean the print head (see page 14). ■ If you notice light or dark bands across your printouts or they can deliver ink properly. Run a nozzle check...9632; Make sure the document is placed flat against the scanner glass and your Epson printer is not tilted or placed on a soft cloth, if necessary. Check your cartridge status (see page 14) and replace cartridges, if necessary (see if the print head needs cleaning. ■ Clean the print head as described on ink.
.... ■ The ink cartridges may be low on page 13. ■ If you notice jagged vertical lines, you may need to clean the print head (see page 14). ■ If you notice light or dark bands across your printouts or they can deliver ink properly. Run a nozzle check...9632; Make sure the document is placed flat against the scanner glass and your Epson printer is not tilted or placed on a soft cloth, if necessary. Check your cartridge status (see page 14) and replace cartridges, if necessary (see if the print head needs cleaning. ■ Clean the print head as described on ink.


