User Manual
Page 3
Top...15 Product Parts - Mac OS X 21 Epson Connect Solutions for Smartphones, Tablets, and More 22 Using Epson Email Print ...23 Using the Epson iPrint Mobile App 23 Using Epson Remote Print ...23 Using Epson Scan to Cloud...24 Using Google Cloud Print ...24 Using AirPrint ...25 Wi-Fi Networking ...26 Wi-...29 Enabling Wi-Fi Direct Mode ...30 Wi-Fi Protected Setup (WPS)...33 Using WPS to Connect to a Network 33 Printing a Network Status Sheet...35 3 Contents XP-410 User's Guide...11 Product Basics ...12 Setting Up the Control Panel ...12 Control Panel Buttons and Lights 12 Adjusting Control...
Top...15 Product Parts - Mac OS X 21 Epson Connect Solutions for Smartphones, Tablets, and More 22 Using Epson Email Print ...23 Using the Epson iPrint Mobile App 23 Using Epson Remote Print ...23 Using Epson Scan to Cloud...24 Using Google Cloud Print ...24 Using AirPrint ...25 Wi-Fi Networking ...26 Wi-...29 Enabling Wi-Fi Direct Mode ...30 Wi-Fi Protected Setup (WPS)...33 Using WPS to Connect to a Network 33 Printing a Network Status Sheet...35 3 Contents XP-410 User's Guide...11 Product Basics ...12 Setting Up the Control Panel ...12 Control Panel Buttons and Lights 12 Adjusting Control...

User Manual
Page 4
...39 Loading Paper for Documents ...39 Loading Paper for Photos ...42 Loading Envelopes ...45 Paper Loading Capacity ...48 Available EPSON Papers...49 Borderless Paper Type Compatibility 50 Paper or Media Type Settings ...51 Placing Originals on the Product ...52 ...54 Paper Type Settings - Windows 66 Selecting Print Layout Options - Windows 70 4 Windows 60 Basic Print Options - Windows 63 Advanced Print Quality Settings - Windows 67 Selecting a Printing Preset - Windows 63 Selecting Advanced Print Settings - Windows 65 Advanced Print Options - Copying...56 Copying Options ...57...
...39 Loading Paper for Documents ...39 Loading Paper for Photos ...42 Loading Envelopes ...45 Paper Loading Capacity ...48 Available EPSON Papers...49 Borderless Paper Type Compatibility 50 Paper or Media Type Settings ...51 Placing Originals on the Product ...52 ...54 Paper Type Settings - Windows 66 Selecting Print Layout Options - Windows 70 4 Windows 60 Basic Print Options - Windows 63 Advanced Print Quality Settings - Windows 67 Selecting a Printing Preset - Windows 63 Selecting Advanced Print Settings - Windows 65 Advanced Print Options - Copying...56 Copying Options ...57...
User Manual
Page 5
... Scan Button Settings 90 Starting a Scan Using the Epson Scan Icon 90 Starting a Scan from a Scanning Program 92 Selecting Epson Scan Settings ...94 Scan Modes...94 Selecting the Scan Mode...95 Scanning in Office Mode...107 5 Mac OS X 76 Print Quality Settings - Mac OS X 80 Selecting Print Layout Options - Full Auto Mode 98 Scanning...
... Scan Button Settings 90 Starting a Scan Using the Epson Scan Icon 90 Starting a Scan from a Scanning Program 92 Selecting Epson Scan Settings ...94 Scan Modes...94 Selecting the Scan Mode...95 Scanning in Office Mode...107 5 Mac OS X 76 Print Quality Settings - Mac OS X 80 Selecting Print Layout Options - Full Auto Mode 98 Scanning...
User Manual
Page 6
...112 Available Image Types - Professional Mode 118 Selecting a Scan Size - Office Mode 109 Available Image Adjustments - Photo Mode 141 Printing Photo Layouts From a Memory Card 141 Photo Layout Options ...144 Scanning to Your Computer 145 6 Professional Mode 115 Available Image ...Card Types ...134 Memory Card File Specifications 134 Removing a Memory Card...135 Printing from a Memory Card ...136 Viewing and Printing Photos...136 Viewing and Printing Individual Photos 136 Viewing and Printing Individual Photos Using the Slide Show 138 Cropping Photos Displayed on a Memory ...
...112 Available Image Types - Professional Mode 118 Selecting a Scan Size - Office Mode 109 Available Image Adjustments - Photo Mode 141 Printing Photo Layouts From a Memory Card 141 Photo Layout Options ...144 Scanning to Your Computer 145 6 Professional Mode 115 Available Image ...Card Types ...134 Memory Card File Specifications 134 Removing a Memory Card...135 Printing from a Memory Card ...136 Viewing and Printing Photos...136 Viewing and Printing Individual Photos 136 Viewing and Printing Individual Photos Using the Slide Show 138 Cropping Photos Displayed on a Memory ...

User Manual
Page 7
... OS X 168 Conserving Low Black Ink with Mac OS X 158 Purchase Epson Ink Cartridges...160 Ink Cartridge Part Numbers ...160 Removing and Installing Ink Cartridges 161 Replacing Ink Cartridges Using a Computer Utility 166 Printing With Black Ink and Expended Color Cartridges 167 Printing With Expended Color Cartridges - Windows 168 Printing With Expended Color Cartridges -
... OS X 168 Conserving Low Black Ink with Mac OS X 158 Purchase Epson Ink Cartridges...160 Ink Cartridge Part Numbers ...160 Removing and Installing Ink Cartridges 161 Replacing Ink Cartridges Using a Computer Utility 166 Printing With Black Ink and Expended Color Cartridges 167 Printing With Expended Color Cartridges - Windows 168 Printing With Expended Color Cartridges -
User Manual
Page 8
...or Access Point 195 Network Software Cannot Find Product on a Network 196 Product Does Not Appear in Mac OS X Printer Window 197 Cannot Print Over a Network...198 Cannot Scan Over a Network ...198 Solving Copying Problems ...199 Product Makes Noise, But Nothing Copies 199 Product Makes......200 Paper Jam Problems ...201 Paper Ejection Problems ...202 Solving Problems Printing from a Computer 202 Nothing Prints ...203 Product Icon Does Not Appear in Windows Taskbar 204 Error After Cartridge Replacement 204 Printing is Slow ...205 Solving Page Layout and Content Problems 206 Inverted Image...
...or Access Point 195 Network Software Cannot Find Product on a Network 196 Product Does Not Appear in Mac OS X Printer Window 197 Cannot Print Over a Network...198 Cannot Scan Over a Network ...198 Solving Copying Problems ...199 Product Makes Noise, But Nothing Copies 199 Product Makes......200 Paper Jam Problems ...201 Paper Ejection Problems ...202 Solving Problems Printing from a Computer 202 Nothing Prints ...203 Product Icon Does Not Appear in Windows Taskbar 204 Error After Cartridge Replacement 204 Printing is Slow ...205 Solving Page Layout and Content Problems 206 Inverted Image...
User Manual
Page 9
...Printout ...210 Solving Print Quality Problems ...210 White or Dark Lines in Printout ...210 Blurry or Smeared Printout ...211 Faint Printout or Printout Has Gaps 212 Grainy Printout...213 Incorrect Colors ...213 Solving Scanning Problems ...214 Scanning Software Does Not Operate Correctly 214 Cannot Start Epson Scan ...215 ... 219 Scanned Image Edges are Cropped 220 Solving Memory Card Problems...220 Memory Card Does Not Fit Into a Slot 220 Cannot View or Print Photos from a Memory Card 220 Cannot Transfer Photos To or From a Memory Card 221 When to Get Help...223 9 Windows 222 Uninstalling...
...Printout ...210 Solving Print Quality Problems ...210 White or Dark Lines in Printout ...210 Blurry or Smeared Printout ...211 Faint Printout or Printout Has Gaps 212 Grainy Printout...213 Incorrect Colors ...213 Solving Scanning Problems ...214 Scanning Software Does Not Operate Correctly 214 Cannot Start Epson Scan ...215 ... 219 Scanned Image Edges are Cropped 220 Solving Memory Card Problems...220 Memory Card Does Not Fit Into a Slot 220 Cannot View or Print Photos from a Memory Card 220 Cannot Transfer Photos To or From a Memory Card 221 When to Get Help...223 9 Windows 222 Uninstalling...
User Manual
Page 10
Technical Specifications ...225 Windows System Requirements ...225 Mac System Requirements ...226 Printing Specifications ...226 Scanning Specifications ...226 Paper Specifications ...227 Printable Area Specifications ...228 Ink Cartridge Specifications...229 Memory Card Specifications ...230 Dimension Specifications ...231 Electrical Specifications .........238 Trademarks ...242 Copyright Notice...242 libTIFF Software Acknowledgment 243 A Note Concerning Responsible Use of Copyrighted Materials 243 Default Delay Times for Power Management for Epson Products 243 Copyright Attribution ...244 10
Technical Specifications ...225 Windows System Requirements ...225 Mac System Requirements ...226 Printing Specifications ...226 Scanning Specifications ...226 Paper Specifications ...227 Printable Area Specifications ...228 Ink Cartridge Specifications...229 Memory Card Specifications ...230 Dimension Specifications ...231 Electrical Specifications .........238 Trademarks ...242 Copyright Notice...242 libTIFF Software Acknowledgment 243 A Note Concerning Responsible Use of Copyrighted Materials 243 Default Delay Times for Power Management for Epson Products 243 Copyright Attribution ...244 10

User Manual
Page 12
Setting Up the Control Panel Product Parts Locations The Power Off and Sleep Timers Epson Connect Solutions for Smartphones, Tablets, and More Using Google Cloud Print Using AirPrint Setting Up the Control Panel See these sections to set up the control panel for use. Product Basics See these sections to learn ...
Setting Up the Control Panel Product Parts Locations The Power Off and Sleep Timers Epson Connect Solutions for Smartphones, Tablets, and More Using Google Cloud Print Using AirPrint Setting Up the Control Panel See these sections to set up the control panel for use. Product Basics See these sections to learn ...
User Manual
Page 21
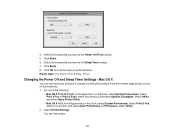
.... Select Utility. 2. Click OK to change the time period before the printer enters sleep mode or turns off automatically. 1. Select Print & Fax or Print & Scan, select your product, and select Open Print Queue or Print Queue. Click Send. 6. Mac OS X You can use the printer software to close the open program windows. 4. Select the...
.... Select Utility. 2. Click OK to change the time period before the printer enters sleep mode or turns off automatically. 1. Select Print & Fax or Print & Scan, select your product, and select Open Print Queue or Print Queue. Click Send. 6. Mac OS X You can use the printer software to close the open program windows. 4. Select the...
User Manual
Page 22
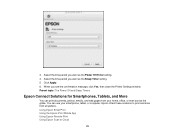
...and More You can use your home, office, or even across the globe. Epson offers these solutions to Cloud 22 When you want as the Power Off Timer setting. 4. You can print documents, photos, emails, and web pages from anywhere:. 3. Select the time ...period you want as the Sleep Timer setting. 5. Using Epson Email Print Using the Epson iPrint Mobile App Using Epson Remote Print Using Epson Scan to print and scan from your smartphone, tablet,...
...and More You can use your home, office, or even across the globe. Epson offers these solutions to Cloud 22 When you want as the Power Off Timer setting. 4. You can print documents, photos, emails, and web pages from anywhere:. 3. Select the time ...period you want as the Sleep Timer setting. 5. Using Epson Email Print Using the Epson iPrint Mobile App Using Epson Remote Print Using Epson Scan to print and scan from your smartphone, tablet,...
User Manual
Page 23
... 3. You can change these printing options by default. Download Epson iPrint from the Apple App Store or Google Play. 4. Parent topic: Product Basics Using Epson Email Print With Epson Email Print, you can print from any attachments print by logging into your Epson product. Set up your smartphone,... tablet, or laptop. The Epson iPrint Mobile App lets you installed your device, send ...
... 3. You can change these printing options by default. Download Epson iPrint from the Apple App Store or Google Play. 4. Parent topic: Product Basics Using Epson Email Print With Epson Email Print, you can print from any attachments print by logging into your Epson product. Set up your smartphone,... tablet, or laptop. The Epson iPrint Mobile App lets you installed your device, send ...
User Manual
Page 24
...with the email address and password you can also print from your Apple or Android device to scan, select the setting for printing, and enter this address during Remote Print setup. 4. Note: Make sure your Epson printer and computer are setting up your product for... up your destination list. 6. Parent topic: Epson Connect Solutions for Scan to the Epson Connect web page with Epson Connect. 3. Download and install the Remote Print software. 3. After registering, sign in your application and choose the Remote Print driver for instructions on the Start Here sheet....
...with the email address and password you can also print from your Apple or Android device to scan, select the setting for printing, and enter this address during Remote Print setup. 4. Note: Make sure your Epson printer and computer are setting up your product for... up your destination list. 6. Parent topic: Epson Connect Solutions for Scan to the Epson Connect web page with Epson Connect. 3. Download and install the Remote Print software. 3. After registering, sign in your application and choose the Remote Print driver for instructions on the Start Here sheet....
User Manual
Page 25
...click Next. 8. Parent topic: Product Basics Using AirPrint AirPrint allows you to wirelessly print to your AirPrint-enabled product from any Chromebook, computer, Apple or Android device with internet access. Visit Epson Support for a list of supported apps. Note: If you don't have an account..., click Sign up your product. 6. A separate browser window opens. 9. Your product is using Google Cloud Print, or the Google Cloud Print website for more information on -...
...click Next. 8. Parent topic: Product Basics Using AirPrint AirPrint allows you to wirelessly print to your AirPrint-enabled product from any Chromebook, computer, Apple or Android device with internet access. Visit Epson Support for a list of supported apps. Note: If you don't have an account..., click Sign up your product. 6. A separate browser window opens. 9. Your product is using Google Cloud Print, or the Google Cloud Print website for more information on -...

User Manual
Page 26
Wi-Fi Infrastructure Mode Setup Wi-Fi Direct Mode Setup Wi-Fi Protected Setup (WPS) Printing a Network Status Sheet Changing or Updating Network Connections Wi-Fi Infrastructure Mode Setup You can be connected to your computer over a wireless or wired network. 1 Epson product 2 Wireless router or access point 26 Wi-Fi Networking See these sections to communicate with your computer using a wireless router or access point. The wireless router or access point can set up your product to use your product on a Wi-Fi network.
Wi-Fi Infrastructure Mode Setup Wi-Fi Direct Mode Setup Wi-Fi Protected Setup (WPS) Printing a Network Status Sheet Changing or Updating Network Connections Wi-Fi Infrastructure Mode Setup You can be connected to your computer over a wireless or wired network. 1 Epson product 2 Wireless router or access point 26 Wi-Fi Networking See these sections to communicate with your computer using a wireless router or access point. The wireless router or access point can set up your product to use your product on a Wi-Fi network.
User Manual
Page 27
...this product may cause loss of this screen: 27 We recommend that you through network setup. Note: Breakdown or repair of network data and settings. Epson is not responsible for wired connection to select Wi-Fi Setup and press the OK button. To install your network data and settings. 1. 3 ... backing up or recovering data and settings during or after the warranty period. The installer program guides you make your own backup or print out your product on a wireless network, follow the instructions on the Start Here sheet and install the necessary software from the product CD.
...this product may cause loss of this screen: 27 We recommend that you through network setup. Note: Breakdown or repair of network data and settings. Epson is not responsible for wired connection to select Wi-Fi Setup and press the OK button. To install your network data and settings. 1. 3 ... backing up or recovering data and settings during or after the warranty period. The installer program guides you make your own backup or print out your product on a wireless network, follow the instructions on the Start Here sheet and install the necessary software from the product CD.
User Manual
Page 28
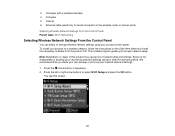
...network name manually, select Other SSIDs and press the OK button. Press the power button to cancel the report. 28 Press the stop button to print the network status report. Enter your wireless password (or network name and then password). • Press the arrow buttons to select it manually. Then... enter it . • To change the case of your wireless network's name, you want to confirm wi-fi settings. 7. Press the OK button to print a network status report, or No if not, and press the OK button. 8. Enter your network name as described in the next step. 5. Then press...
...network name manually, select Other SSIDs and press the OK button. Press the power button to cancel the report. 28 Press the stop button to print the network status report. Enter your wireless password (or network name and then password). • Press the arrow buttons to select it manually. Then... enter it . • To change the case of your wireless network's name, you want to confirm wi-fi settings. 7. Press the OK button to print a network status report, or No if not, and press the OK button. 8. Enter your network name as described in the next step. 5. Then press...
User Manual
Page 33
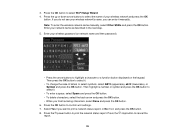
... product, press the home button, if necessary. 33 Note: If the AP or Direct connection symbol is no hardware button, there may be able to print directly to try again. Check your router or access point. Note: To check if your router is not enabled. Use your computer or device. Repeat...
... product, press the home button, if necessary. 33 Note: If the AP or Direct connection symbol is no hardware button, there may be able to print directly to try again. Check your router or access point. Note: To check if your router is not enabled. Use your computer or device. Repeat...
User Manual
Page 35
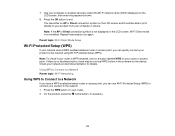
You see this screen: 4. Press the home button, if necessary. 2. Press the arrow buttons to select Setup and press the OK button. 3. Press the left or right arrow buttons to select Confirm Wi-Fi Settings and press the OK button. You see this screen: 35 Press the up or down arrow buttons to help you determine the causes of any problems you may have using your product on a network. 1. Printing a Network Status Sheet You can print a network status sheet to select Wi-Fi Settings and press the OK button.
You see this screen: 4. Press the home button, if necessary. 2. Press the arrow buttons to select Setup and press the OK button. 3. Press the left or right arrow buttons to select Confirm Wi-Fi Settings and press the OK button. You see this screen: 35 Press the up or down arrow buttons to help you determine the causes of any problems you may have using your product on a network. 1. Printing a Network Status Sheet You can print a network status sheet to select Wi-Fi Settings and press the OK button.
User Manual
Page 36
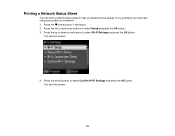
... Utility You can select your product's built-in Web Config utility from a computer or other device that is also displayed. 5. Press the start button to print the network status sheet. (Press the back button if you want to cancel the operation.) Examine the settings shown on the network status sheet to...
... Utility You can select your product's built-in Web Config utility from a computer or other device that is also displayed. 5. Press the start button to print the network status sheet. (Press the back button if you want to cancel the operation.) Examine the settings shown on the network status sheet to...


