
User Manual
Page 8
... Panel 192 Checking the Nozzles Using a Computer Utility 195 Print Head Cleaning ...196 Cleaning the Print Head Using the Product Control Panel 197 Cleaning the Print Head Using a Computer Utility 198 Print Head Alignment ...201 Aligning the Print Head Using the Product Control Panel 201 Aligning the Print Head Using a Computer Utility 203 Cleaning the Paper Path ...205 Cleaning...
... Panel 192 Checking the Nozzles Using a Computer Utility 195 Print Head Cleaning ...196 Cleaning the Print Head Using the Product Control Panel 197 Cleaning the Print Head Using a Computer Utility 198 Print Head Alignment ...201 Aligning the Print Head Using the Product Control Panel 201 Aligning the Print Head Using a Computer Utility 203 Cleaning the Paper Path ...205 Cleaning...

User Manual
Page 175
... topic: Replacing Ink Cartridges Checking Cartridge Status on the LCD Screen You can check the status of your used Epson branded ink cartridges responsibly and in accordance with Windows Check Cartridge Status Your product and its printing software will let... you would like to return your used ink cartridges to Epson for proper disposal, please go to epson.com/recycle for more than six months old, or if your product's LCD screen. 1. Check... your ink cartridges using your printouts do not look their best, even after cleaning and aligning the print head.
... topic: Replacing Ink Cartridges Checking Cartridge Status on the LCD Screen You can check the status of your used Epson branded ink cartridges responsibly and in accordance with Windows Check Cartridge Status Your product and its printing software will let... you would like to return your used ink cartridges to Epson for proper disposal, please go to epson.com/recycle for more than six months old, or if your product's LCD screen. 1. Check... your ink cartridges using your printouts do not look their best, even after cleaning and aligning the print head.
User Manual
Page 192
...you don't clean them , you may not be able to clean or align the print head. Checking the Nozzles Using the Product Control Panel Checking the Nozzles Using a Computer Utility Parent topic: Print Head Maintenance Checking the Nozzles Using the Product Control Panel You can check for ... sheets of plain paper in the product. 2. Press the arrow buttons to clean the print head nozzles. You must replace the cartridge first. Print Head Maintenance Print Head Alignment Cleaning the Paper Path Print Head Maintenance If your print quality declines, you may need to select Setup and press the OK ...
...you don't clean them , you may not be able to clean or align the print head. Checking the Nozzles Using the Product Control Panel Checking the Nozzles Using a Computer Utility Parent topic: Print Head Maintenance Checking the Nozzles Using the Product Control Panel You can check for ... sheets of plain paper in the product. 2. Press the arrow buttons to clean the print head nozzles. You must replace the cartridge first. Print Head Maintenance Print Head Alignment Cleaning the Paper Path Print Head Maintenance If your print quality declines, you may need to select Setup and press the OK ...
User Manual
Page 201
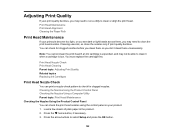
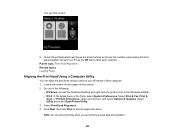
... Maintenance and press the OK button. Print Head Alignment If your product. 1. Aligning the Print Head Using the Product Control Panel Aligning the Print Head Using a Computer Utility Parent topic: Adjusting Print Quality Related concepts Print Head Cleaning Aligning the Print Head Using the Product Control Panel You can align the print head using the control panel on your printouts become...
... Maintenance and press the OK button. Print Head Alignment If your product. 1. Aligning the Print Head Using the Product Control Panel Aligning the Print Head Using a Computer Utility Parent topic: Adjusting Print Quality Related concepts Print Head Cleaning Aligning the Print Head Using the Product Control Panel You can align the print head using the control panel on your printouts become...
User Manual
Page 202
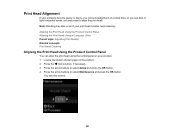
Press the OK button. 202 You see this screen: 6. Press the arrow buttons to print an alignment sheet. Press the OK button to select Head Alignment and press the OK button. Note: Do not cancel printing while you are printing a head alignment pattern. You see this screen: 7. 5.
Press the OK button. 202 You see this screen: 6. Press the arrow buttons to print an alignment sheet. Press the OK button to select Head Alignment and press the OK button. Note: Do not cancel printing while you are printing a head alignment pattern. You see this screen: 7. 5.
User Manual
Page 203
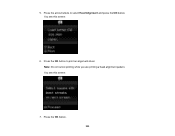
... each set. Check the printed pattern and press the arrow buttons to print an alignment sheet. Select Print Head Alignment. 4. You see this screen: 8. Parent topic: Print Head Alignment Related topics Loading Paper Aligning the Print Head Using a Computer Utility You can align the print head using a utility on your product, and select Options & Supplies. Note: Do not cancel...
... each set. Check the printed pattern and press the arrow buttons to print an alignment sheet. Select Print Head Alignment. 4. You see this screen: 8. Parent topic: Print Head Alignment Related topics Loading Paper Aligning the Print Head Using a Computer Utility You can align the print head using a utility on your product, and select Options & Supplies. Note: Do not cancel...
User Manual
Page 204
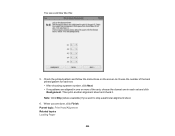
Parent topic: Print Head Alignment Related topics Loading Paper 204 Check the printed pattern and follow the instructions on the screen to skip a particular alignment sheet. 6. Note: Click Skip (where available) if you are aligned in each set and click Realignment. When you want to choose the number of the sets, choose the closest one in one or more of the best printed pattern for each set . • After choosing a pattern number, click Next. • If no patterns are done, click Finish. You see a window like this: 5. Then print another alignment sheet and check it.
Parent topic: Print Head Alignment Related topics Loading Paper 204 Check the printed pattern and follow the instructions on the screen to skip a particular alignment sheet. 6. Note: Click Skip (where available) if you are aligned in each set and click Realignment. When you want to choose the number of the sets, choose the closest one in one or more of the best printed pattern for each set . • After choosing a pattern number, click Next. • If no patterns are done, click Finish. You see a window like this: 5. Then print another alignment sheet and check it.
User Manual
Page 208
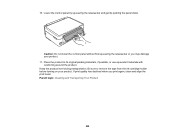
... turning on your product. 11. Caution: Do not lower the control panel without first squeezing the release bar or you print again, clean and align the print head. 10. Place the product in its original packing materials, if possible, or use equivalent materials with cushioning around the product. If print quality has...
... turning on your product. 11. Caution: Do not lower the control panel without first squeezing the release bar or you print again, clean and align the print head. 10. Place the product in its original packing materials, if possible, or use equivalent materials with cushioning around the product. If print quality has...
User Manual
Page 213
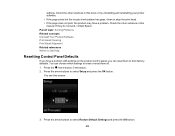
Parent topic: Solving Problems Related concepts Uninstall Your Product Software Print Head Cleaning Print Head Alignment Related references Where to Get Help Resetting Control Panel Defaults If you can choose which settings to select Setup and press the OK button. Press ... print head. • If the page does not print, the product may have a problem with settings on the product control panel, you have a problem. Check the other solutions in this screen: 3. If they do not work, contact Epson. You can reset them all. 1. Press the arrow buttons to reset or reset them...
Parent topic: Solving Problems Related concepts Uninstall Your Product Software Print Head Cleaning Print Head Alignment Related references Where to Get Help Resetting Control Panel Defaults If you can choose which settings to select Setup and press the OK button. Press ... print head. • If the page does not print, the product may have a problem with settings on the product control panel, you have a problem. Check the other solutions in this screen: 3. If they do not work, contact Epson. You can reset them all. 1. Press the arrow buttons to reset or reset them...
User Manual
Page 232
...(also called banding), try these sections if your printouts have problems with print quality, but your image looks fine on your product software. • Align the print head. • You may need to replace the ink cartridges. Windows Selecting Basic Print Settings - Parent topic: Solving Print Quality Problems 232 White or ... notice white or dark lines in your computer screen. Parent topic: Solving Page Layout and Content Problems Related tasks Selecting Basic Print Settings - • Align the print head. • Make sure the product is not printing while tilted or at an angle.
...(also called banding), try these sections if your printouts have problems with print quality, but your image looks fine on your product software. • Align the print head. • You may need to replace the ink cartridges. Windows Selecting Basic Print Settings - Parent topic: Solving Print Quality Problems 232 White or ... notice white or dark lines in your computer screen. Parent topic: Solving Page Layout and Content Problems Related tasks Selecting Basic Print Settings - • Align the print head. • Make sure the product is not printing while tilted or at an angle.

User Manual
Page 233
Related concepts Print Head Cleaning Print Head Alignment Related references Paper or Media Type Settings - Place it is printed. • Avoid handling printouts on glossy paper right after printing to allow the ink ... first. • Run a nozzle check to ensure proper saturation and absorption of genuine Epson inks. • Make sure the paper type setting in all directions. 233 Windows Selecting Printing Preferences - Then clean the print head, if necessary. • Align the print head. • Clean the paper path. Note: Your product will contain a lighter image...
Related concepts Print Head Cleaning Print Head Alignment Related references Paper or Media Type Settings - Place it is printed. • Avoid handling printouts on glossy paper right after printing to allow the ink ... first. • Run a nozzle check to ensure proper saturation and absorption of genuine Epson inks. • Make sure the paper type setting in all directions. 233 Windows Selecting Printing Preferences - Then clean the print head, if necessary. • Align the print head. • Clean the paper path. Note: Your product will contain a lighter image...

User Manual
Page 234
... Related tasks Selecting Basic Print Settings - Windows Selecting Basic Print Settings - Parent topic: Solving Print Quality Problems Related concepts Print Head Cleaning Print Head Alignment Related references Available Epson Papers Paper Specifications Related tasks Selecting Basic Print Settings - OS X Selecting Printing Preferences - OS X Cleaning the Paper Path Faint Printout or Printout Has Gaps If...
... Related tasks Selecting Basic Print Settings - Windows Selecting Basic Print Settings - Parent topic: Solving Print Quality Problems Related concepts Print Head Cleaning Print Head Alignment Related references Available Epson Papers Paper Specifications Related tasks Selecting Basic Print Settings - OS X Selecting Printing Preferences - OS X Cleaning the Paper Path Faint Printout or Printout Has Gaps If...

User Manual
Page 235
...the resolution is 300 dpi (dots per inch) and you increased the image size. Parent topic: Solving Print Quality Problems Related concepts Print Head Alignment Related tasks Selecting Basic Print Settings - Note: Higher resolution settings result in an image-editing program, you need to process and print. ...OS X Selecting Additional Layout and Print Options - Then clean the print head, if necessary. • Align the print head. • You may be low resolution and not result in a high quality printout. • If you enlarged the ...
...the resolution is 300 dpi (dots per inch) and you increased the image size. Parent topic: Solving Print Quality Problems Related concepts Print Head Alignment Related tasks Selecting Basic Print Settings - Note: Higher resolution settings result in an image-editing program, you need to process and print. ...OS X Selecting Additional Layout and Print Options - Then clean the print head, if necessary. • Align the print head. • You may be low resolution and not result in a high quality printout. • If you enlarged the ...


