User Manual
Page 4
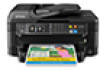
... Guide Basic information and troubleshooting. If you don't have a User's Guide icon, go to www.epson.com/recycle for end of Google Inc. Toll or long distance charges may be trademarks of Seiko Epson Corporation. WF-2750/WF-2760 replacement ink cartridges Color Standard-capacity High-capacity Black 220 220XL Cyan 220 220XL Magenta 220 220XL Yellow...
... Guide Basic information and troubleshooting. If you don't have a User's Guide icon, go to www.epson.com/recycle for end of Google Inc. Toll or long distance charges may be trademarks of Seiko Epson Corporation. WF-2750/WF-2760 replacement ink cartridges Color Standard-capacity High-capacity Black 220 220XL Cyan 220 220XL Magenta 220 220XL Yellow...
User Manual
Page 8
...Faxes Automatically...202 Receiving Faxes Manually...202 Receiving a Fax by Polling ...202 Viewing a Fax on the LCD Screen...203 Replacing Ink Cartridges ...205 Check Cartridge Status ...205 Checking Cartridge Status on the LCD Screen 205 Checking Cartridge Status with Windows 206 Checking... Cartridge Status with OS X 209 Purchase Epson Ink Cartridges...210 Ink Cartridge Part Numbers ...210 Removing and Installing Ink Cartridges 211 Printing with Black Ink and Expended Color Cartridges 215 Printing with Expended Color Cartridges -
...Faxes Automatically...202 Receiving Faxes Manually...202 Receiving a Fax by Polling ...202 Viewing a Fax on the LCD Screen...203 Replacing Ink Cartridges ...205 Check Cartridge Status ...205 Checking Cartridge Status on the LCD Screen 205 Checking Cartridge Status with Windows 206 Checking... Cartridge Status with OS X 209 Purchase Epson Ink Cartridges...210 Ink Cartridge Part Numbers ...210 Removing and Installing Ink Cartridges 211 Printing with Black Ink and Expended Color Cartridges 215 Printing with Expended Color Cartridges -

User Manual
Page 9
... for Software Updates...240 Product Status Messages ...241 Running a Product Check ...242 Resetting Control Panel Defaults ...244 Solving Setup Problems ...245 Noise After Ink Installation ...245 Software Installation Problems ...245 Solving Network Problems ...246 Product Cannot Connect to a Wireless Router or Access Point 246 Network Software Cannot Find......264 Solving Problems Printing from a Computer 264 Nothing Prints ...265 Product Icon Does Not Appear in Windows Taskbar 265 Error After Cartridge Replacement 266 Printing is Slow ...266 Solving Page Layout and Content Problems 267 9
... for Software Updates...240 Product Status Messages ...241 Running a Product Check ...242 Resetting Control Panel Defaults ...244 Solving Setup Problems ...245 Noise After Ink Installation ...245 Software Installation Problems ...245 Solving Network Problems ...246 Product Cannot Connect to a Wireless Router or Access Point 246 Network Software Cannot Find......264 Solving Problems Printing from a Computer 264 Nothing Prints ...265 Product Icon Does Not Appear in Windows Taskbar 265 Error After Cartridge Replacement 266 Printing is Slow ...266 Solving Page Layout and Content Problems 267 9
User Manual
Page 205
... look their best, even after cleaning and aligning the print head. Check Cartridge Status Purchase Epson Ink Cartridges Removing and Installing Ink Cartridges Printing with Black Ink and Expended Color Cartridges Conserving Low Black Ink with OS X Parent topic: Replacing Ink Cartridges Checking Cartridge Status on the LCD Screen Checking Cartridge Status with Windows Checking Cartridge Status...
... look their best, even after cleaning and aligning the print head. Check Cartridge Status Purchase Epson Ink Cartridges Removing and Installing Ink Cartridges Printing with Black Ink and Expended Color Cartridges Conserving Low Black Ink with OS X Parent topic: Replacing Ink Cartridges Checking Cartridge Status on the LCD Screen Checking Cartridge Status with Windows Checking Cartridge Status...
User Manual
Page 206
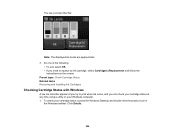
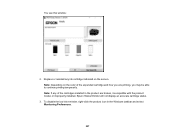
... low ink reminder appears if you can check your cartridge status at any time using a utility on the screen. To check your Windows computer. 1. Do one of the following: • To exit, select OK. • If you need to print when ink is low, and you try to replace an ink cartridge, ...select Cartridge(s) Replacement and follow the instructions on your cartridge status, access the Windows Desktop and double-click the product icon in the...
... low ink reminder appears if you can check your cartridge status at any time using a utility on the screen. To check your Windows computer. 1. Do one of the following: • To exit, select OK. • If you need to print when ink is low, and you try to replace an ink cartridge, ...select Cartridge(s) Replacement and follow the instructions on your cartridge status, access the Windows Desktop and double-click the product icon in the...
User Manual
Page 207
Note: Depending on the screen. To disable the low ink reminder, right-click the product icon in the product are printing, you may be able to continue printing temporarily. Replace or reinstall any of the expended cartridge and how you are broken, incompatible with the product model, or improperly installed, Epson Status Monitor will not display an accurate cartridge status. 3. You see this window: 2. Note: If any ink cartridge indicated on the color of the cartridges installed in the Windows taskbar and select Monitoring Preferences. 207
Note: Depending on the screen. To disable the low ink reminder, right-click the product icon in the product are printing, you may be able to continue printing temporarily. Replace or reinstall any of the expended cartridge and how you are broken, incompatible with the product model, or improperly installed, Epson Status Monitor will not display an accurate cartridge status. 3. You see this window: 2. Note: If any ink cartridge indicated on the color of the cartridges installed in the Windows taskbar and select Monitoring Preferences. 207
User Manual
Page 210
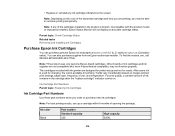
... settings, paper type, frequency of use up a cartridge within 6 months of opening the package. sales) or epson.ca (Canadian sales). Note: This product uses only genuine Epson-brand cartridges. Ink Cartridge Part Numbers Parent topic: Replacing Ink Cartridges Ink Cartridge Part Numbers Use these part numbers when you may not function properly. Yields vary considerably based...
... settings, paper type, frequency of use up a cartridge within 6 months of opening the package. sales) or epson.ca (Canadian sales). Note: This product uses only genuine Epson-brand cartridges. Ink Cartridge Part Numbers Parent topic: Replacing Ink Cartridges Ink Cartridge Part Numbers Use these part numbers when you may not function properly. Yields vary considerably based...

User Manual
Page 211
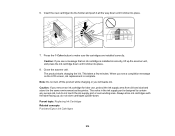
... from drying out. Caution: Leave your old cartridges in the printer until you are ready to install the ink. Note which cartridges need to be replaced, then select Proceed and follow the instructions on the screen. • If you see a message on the.... Setup > Maintenance > Ink Cartridge Replacement and press the 211 Ink color Cyan Magenta Yellow Part number Standard-capacity 220 220 220 High-capacity 220XL 220XL 220XL Parent topic: Purchase Epson Ink Cartridges Removing and Installing Ink Cartridges Make sure you have your replacement cartridges handy before you are...
... from drying out. Caution: Leave your old cartridges in the printer until you are ready to install the ink. Note which cartridges need to be replaced, then select Proceed and follow the instructions on the screen. • If you see a message on the.... Setup > Maintenance > Ink Cartridge Replacement and press the 211 Ink color Cyan Magenta Yellow Part number Standard-capacity 220 220 220 High-capacity 220XL 220XL 220XL Parent topic: Purchase Epson Ink Cartridges Removing and Installing Ink Cartridges Make sure you have your replacement cartridges handy before you are...
User Manual
Page 214
... or you see a message that an ink cartridge is designed to make sure the cartridges are installed correctly. This takes a few minutes. Parent topic: Replacing Ink Cartridges Related concepts Purchase Epson Ink Cartridges 214 When you will waste ink. The valve in the same environment as... the printer. Close the scanner unit. Press the Color button to contain any excess ink, but do not store cartridges ...
... or you see a message that an ink cartridge is designed to make sure the cartridges are installed correctly. This takes a few minutes. Parent topic: Replacing Ink Cartridges Related concepts Purchase Epson Ink Cartridges 214 When you will waste ink. The valve in the same environment as... the printer. Close the scanner unit. Press the Color button to contain any excess ink, but do not store cartridges ...

User Manual
Page 215
... that you can temporarily print in Black to print your product's control panel. Select the Black/Grayscale checkbox. 7. Epson Status Monitor 3 displays a print message. 9. Windows Printing with Black Ink and Expended Color Cartridges 215 Select Plain Paper/Bright White Paper or Envelope as possible for future printing. Click OK.... the print job using your document. Note: If the message screen appears on another computer on an envelope. OS X Parent topic: Replacing Ink Cartridges Printing with Expended Color Cartridges - Access the print settings in your print application...
... that you can temporarily print in Black to print your product's control panel. Select the Black/Grayscale checkbox. 7. Epson Status Monitor 3 displays a print message. 9. Windows Printing with Black Ink and Expended Color Cartridges 215 Select Plain Paper/Bright White Paper or Envelope as possible for future printing. Click OK.... the print job using your document. Note: If the message screen appears on another computer on an envelope. OS X Parent topic: Replacing Ink Cartridges Printing with Expended Color Cartridges - Access the print settings in your print application...

User Manual
Page 218
Parent topic: Replacing Ink Cartridges 218 • Click Disable this feature, it remains disabled until you install a new black ink cartridge. Note: If you disable this feature to continue using the remaining black ink.
Parent topic: Replacing Ink Cartridges 218 • Click Disable this feature, it remains disabled until you install a new black ink cartridge. Note: If you disable this feature to continue using the remaining black ink.

User Manual
Page 219
...product. 1. You can check for clogged nozzles. Print Head Nozzle Check Print Head Cleaning Parent topic: Adjusting Print Quality Related topics Replacing Ink Cartridges Print Head Nozzle Check You can check the print head nozzles using the control panel on your printouts become too light, or... you see dark or light bands across them unnecessarily. Press the home button, if necessary. 219 You must replace the cartridge first. Checking the Nozzles Using the Product Control Panel Checking the Nozzles Using a Computer Utility Parent topic: Print Head Maintenance...
...product. 1. You can check for clogged nozzles. Print Head Nozzle Check Print Head Cleaning Parent topic: Adjusting Print Quality Related topics Replacing Ink Cartridges Print Head Nozzle Check You can check the print head nozzles using the control panel on your printouts become too light, or... you see dark or light bands across them unnecessarily. Press the home button, if necessary. 219 You must replace the cartridge first. Checking the Nozzles Using the Product Control Panel Checking the Nozzles Using a Computer Utility Parent topic: Print Head Maintenance...
User Manual
Page 222
...Windows: Access the Windows Desktop and right-click the product icon in the product. 2. Load a few sheets of the ink cartridges may be old or damaged and needs to be replaced. Then try cleaning the print head again. Select Print & Fax, Print & Scan, or Printers & Scanners, select ...or the Dock, select System Preferences. 9. Parent topic: Print Head Nozzle Check Related concepts Print Head Cleaning Related tasks Removing and Installing Ink Cartridges Related topics Loading Paper Checking the Nozzles Using a Computer Utility You can check the print head nozzles using a utility on the ...
...Windows: Access the Windows Desktop and right-click the product icon in the product. 2. Load a few sheets of the ink cartridges may be old or damaged and needs to be replaced. Then try cleaning the print head again. Select Print & Fax, Print & Scan, or Printers & Scanners, select ...or the Dock, select System Preferences. 9. Parent topic: Print Head Nozzle Check Related concepts Print Head Cleaning Related tasks Removing and Installing Ink Cartridges Related topics Loading Paper Checking the Nozzles Using a Computer Utility You can check the print head nozzles using a utility on the ...

User Manual
Page 224
If you don't see if there are gaps in the lines. If there are no gaps, click Finish. 5. Check the printed pattern to see any improvement after cleaning the print head up to be replaced. 224 Then try cleaning the print head again. Print head is faint, clean the print head. If there are gaps or the pattern is clean Print head needs cleaning 6. If quality still does not improve, one of the ink cartridges may be old or damaged and needs to 4 times, wait at least 6 hours.
If you don't see if there are gaps in the lines. If there are no gaps, click Finish. 5. Check the printed pattern to see any improvement after cleaning the print head up to be replaced. 224 Then try cleaning the print head again. Print head is faint, clean the print head. If there are gaps or the pattern is clean Print head needs cleaning 6. If quality still does not improve, one of the ink cartridges may be old or damaged and needs to 4 times, wait at least 6 hours.
User Manual
Page 225
You must replace the cartridge first. Cleaning the Print Head Using the Product Control Panel Cleaning the Print Head Using a Computer Utility Parent topic: Print Head Maintenance Related tasks Removing and Installing Ink Cartridges Cleaning the Print Head Using the Product Control Panel You can ...Select Print Head Cleaning. 225 Parent topic: Print Head Nozzle Check Related concepts Print Head Cleaning Related tasks Removing and Installing Ink Cartridges Related topics Loading Paper Print Head Cleaning If print quality has declined and the nozzle check pattern indicates clogged nozzles, you...
You must replace the cartridge first. Cleaning the Print Head Using the Product Control Panel Cleaning the Print Head Using a Computer Utility Parent topic: Print Head Maintenance Related tasks Removing and Installing Ink Cartridges Cleaning the Print Head Using the Product Control Panel You can ...Select Print Head Cleaning. 225 Parent topic: Print Head Nozzle Check Related concepts Print Head Cleaning Related tasks Removing and Installing Ink Cartridges Related topics Loading Paper Print Head Cleaning If print quality has declined and the nozzle check pattern indicates clogged nozzles, you...

User Manual
Page 226
.... If quality still does not improve, one of plain paper in the product. 226 Load a few sheets of the ink cartridges may damage it. 7. Parent topic: Print Head Cleaning Related tasks Cleaning the Print Head Using a Computer Utility Checking... the Nozzles Using the Product Control Panel Removing and Installing Ink Cartridges Cleaning the Print Head Using a Computer Utility You can clean the print head using a utility on the screen... Press the Color button to confirm that the print head is finished, you may be replaced.
.... If quality still does not improve, one of plain paper in the product. 226 Load a few sheets of the ink cartridges may damage it. 7. Parent topic: Print Head Cleaning Related tasks Cleaning the Print Head Using a Computer Utility Checking... the Nozzles Using the Product Control Panel Removing and Installing Ink Cartridges Cleaning the Print Head Using a Computer Utility You can clean the print head using a utility on the screen... Press the Color button to confirm that the print head is finished, you may be replaced.
User Manual
Page 229
Then try cleaning the print head again. Note: Banding may also occur if your product. 1. Load a few sheets of the ink cartridges may need cleaning. If you don't see dark or light horizontal bands, you see any improvement after cleaning the print head up to 4 times... Print Head Cleaning Related tasks Cleaning the Print Head Using the Product Control Panel Checking the Nozzles Using the Product Control Panel Removing and Installing Ink Cartridges Print Head Alignment If your printouts become grainy or blurry, you notice misalignment of vertical lines, or you may be old or damaged ...
Then try cleaning the print head again. Note: Banding may also occur if your product. 1. Load a few sheets of the ink cartridges may need cleaning. If you don't see dark or light horizontal bands, you see any improvement after cleaning the print head up to 4 times... Print Head Cleaning Related tasks Cleaning the Print Head Using the Product Control Panel Checking the Nozzles Using the Product Control Panel Removing and Installing Ink Cartridges Print Head Alignment If your printouts become grainy or blurry, you notice misalignment of vertical lines, or you may be old or damaged ...

User Manual
Page 237
... you need to help prevent the print head from printing. 8. Removing the cartridges can dry out the print head and may leak. • Leave the ink cartridges installed. Note: Before storing your product for transportation as described here. Store your product or transport it a long distance, prepare it upside down; Open... of the ADF. Caution: During transportation and storage, follow these guidelines: • Avoid tilting the product, placing it vertically, or turning it for a long period, replace low, expended, or expired ink to store your product in a cool, dry place. 237
... you need to help prevent the print head from printing. 8. Removing the cartridges can dry out the print head and may leak. • Leave the ink cartridges installed. Note: Before storing your product for transportation as described here. Store your product or transport it a long distance, prepare it upside down; Open... of the ADF. Caution: During transportation and storage, follow these guidelines: • Avoid tilting the product, placing it vertically, or turning it for a long period, replace low, expended, or expired ink to store your product in a cool, dry place. 237

User Manual
Page 241
... printing, press one of the buttons.) A printer's ink pad is at the end of its service life. If you connected the product to your product. no paper jam, contact Epson for a paper jam. There is replaced. Connect your product using a USB cable and try ...its service life. Turn off the Dial Tone Detection setting. Communication error There is dark, press the screen to replace the following ink Replace the indicated ink cartridge(s). Contact Epson to your product. If the error continues, check for support. cartridge(s). Note: If the screen is a problem...
... printing, press one of the buttons.) A printer's ink pad is at the end of its service life. If you connected the product to your product. no paper jam, contact Epson for a paper jam. There is replaced. Connect your product using a USB cable and try ...its service life. Turn off the Dial Tone Detection setting. Communication error There is dark, press the screen to replace the following ink Replace the indicated ink cartridge(s). Contact Epson to your product. If the error continues, check for support. cartridge(s). Note: If the screen is a problem...
User Manual
Page 266
...8226; If you are using Windows 7, close the open program windows. 4. Click the checkbox for your computer instead. 266 Remove and reinsert the replaced ink cartridge, making sure to move it all the way into its slot. 3. resolution image, you are printing a high- Click OK to close... If you are not using OS X, make sure you download and install the Epson printer driver. • Make sure Quiet Mode is turned off. • Clear space on replacing an ink cartridge in the ink cartridge replacement position, follow these solutions: • Make sure your system meets the requirements ...
...8226; If you are using Windows 7, close the open program windows. 4. Click the checkbox for your computer instead. 266 Remove and reinsert the replaced ink cartridge, making sure to move it all the way into its slot. 3. resolution image, you are printing a high- Click OK to close... If you are not using OS X, make sure you download and install the Epson printer driver. • Make sure Quiet Mode is turned off. • Clear space on replacing an ink cartridge in the ink cartridge replacement position, follow these solutions: • Make sure your system meets the requirements ...


