User Manual
Page 3
...and other countries. User's Guide Trademarks Trademarks ® ❏ EPSON is a registered trademark, and EPSON EXCEED YOUR VISION or EXCEED YOUR VISION is a trademark of Seiko Epson Corporation. ❏ EPSON Scan software is a registered trademark of Intel Corporation. AirPrint and the ...ANY KIND, EXPRESS, IMPLIED OR OTHERWISE, INCLUDING WITHOUT LIMITATION, ANY WARRANTY OF MERCHANTABILITY OR FITNESS FOR A PARTICULAR PURPOSE. Epson disclaims any purpose is hereby granted without the specific, prior written permission of the Independent JPEG Group. ❏ libtiff Copyright...
...and other countries. User's Guide Trademarks Trademarks ® ❏ EPSON is a registered trademark, and EPSON EXCEED YOUR VISION or EXCEED YOUR VISION is a trademark of Seiko Epson Corporation. ❏ EPSON Scan software is a registered trademark of Intel Corporation. AirPrint and the ...ANY KIND, EXPRESS, IMPLIED OR OTHERWISE, INCLUDING WITHOUT LIMITATION, ANY WARRANTY OF MERCHANTABILITY OR FITNESS FOR A PARTICULAR PURPOSE. Epson disclaims any purpose is hereby granted without the specific, prior written permission of the Independent JPEG Group. ❏ libtiff Copyright...

User Manual
Page 7
... tips and restrictions on a network. c PR Important: Instructions that must be followed carefully to avoid bodily injury. Descriptions Used in the various Epson software applications. IN As well as the manuals above, see the help included in this printer. Depending on the model and situation. 7 User...) Provides you with instructions to ensure the safe use of this Manual ❏ Screenshots of the printer driver and the EPSON Scan (scanner driver) screens are from Windows 8.1 or Mac OS X v10.9.x. The content displayed on the screens varies depending on your equipment.
... tips and restrictions on a network. c PR Important: Instructions that must be followed carefully to avoid bodily injury. Descriptions Used in the various Epson software applications. IN As well as the manuals above, see the help included in this printer. Depending on the model and situation. 7 User...) Provides you with instructions to ensure the safe use of this Manual ❏ Screenshots of the printer driver and the EPSON Scan (scanner driver) screens are from Windows 8.1 or Mac OS X v10.9.x. The content displayed on the screens varies depending on your equipment.

User Manual
Page 13
User's Guide B Edge guides C Paper cassette Printer Basics Feeds the paper straight into the printer. Place the originals. Open when replacing ink cartridges or removing jammed paper inside the printer. Install the ink cartridges. A B C PRELIMINARY Document cover Scanner glass Control panel Blocks external light while scanning. Loads paper. Ink is ejected from the print head nozzles underneath. 13 Slide to the edges of the paper. Operates the printer. A Scanner unit B Ink cartridge holder Scans placed originals.
User's Guide B Edge guides C Paper cassette Printer Basics Feeds the paper straight into the printer. Place the originals. Open when replacing ink cartridges or removing jammed paper inside the printer. Install the ink cartridges. A B C PRELIMINARY Document cover Scanner glass Control panel Blocks external light while scanning. Loads paper. Ink is ejected from the print head nozzles underneath. 13 Slide to the edges of the paper. Operates the printer. A Scanner unit B Ink cartridge holder Scans placed originals.
User Manual
Page 15
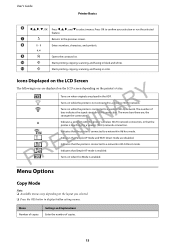
J Starts printing, copying, scanning, and faxing in color. Turns on when originals are , the stronger the connection. The number of bars indicates the signal strength of copies. 15 Indicates a ... hoc mode. Turns on the layout you selected. ❏ Press the OK button to confirm your selection or run the selected feature. K Starts printing, copying, scanning, and faxing in black and white. Turns on the LCD Screen PRELIMINARY The following icons are disabled. Indicates that Simple AP mode is not connected...
J Starts printing, copying, scanning, and faxing in color. Turns on when originals are , the stronger the connection. The number of bars indicates the signal strength of copies. 15 Indicates a ... hoc mode. Turns on the layout you selected. ❏ Press the OK button to confirm your selection or run the selected feature. K Starts printing, copying, scanning, and faxing in black and white. Turns on the LCD Screen PRELIMINARY The following icons are disabled. Indicates that Simple AP mode is not connected...

User Manual
Page 16
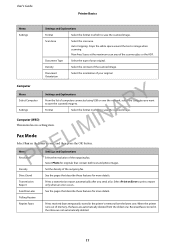
... slower Density Set the density of an ID card and copies onto one sheet. Document Size Zoom 2-Sided Document Orientation Quality ID Card Scans both sides of your original. Select the size of the paper. 2-up as shown below , and select Portrait from Document Orientation.... When placing originals in the Epson Connect Server. 16 Scan Mode Cloud Menu Destination Settings and Explanations Select a destination that has been registered in the ADF, insert them into the feeder ...
... slower Density Set the density of an ID card and copies onto one sheet. Document Size Zoom 2-Sided Document Orientation Quality ID Card Scans both sides of your original. Select the size of the paper. 2-up as shown below , and select Portrait from Document Orientation.... When placing originals in the Epson Connect Server. 16 Scan Mode Cloud Menu Destination Settings and Explanations Select a destination that has been registered in the ADF, insert them into the feeder ...
User Manual
Page 17
...Settings Settings and Explanations From the list of your original. Transmission Report Prints a transmission report automatically after you want to save the scanned image to. Received faxes stored in the inbox are automatically deleted from the latest one . Menu Resolution Settings and Explanations Select ...using USB or over the network, select the computer you send a fax. Format Select the format in which to save the scanned image. Scan Area Select the scan area. Fax Mode Select Fax on Error to print a report only when an error occurs. Select Photo for more details....
...Settings Settings and Explanations From the list of your original. Transmission Report Prints a transmission report automatically after you want to save the scanned image to. Received faxes stored in the inbox are automatically deleted from the latest one . Menu Resolution Settings and Explanations Select ...using USB or over the network, select the computer you send a fax. Format Select the format in which to save the scanned image. Scan Area Select the scan area. Fax Mode Select Fax on Error to print a report only when an error occurs. Select Photo for more details....
User Manual
Page 21
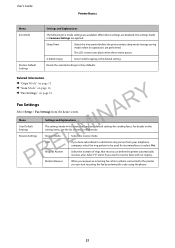
... Basics Menu Eco Mode Restore Default Settings Settings and Explanations The following Eco mode settings are performed. Related Information & "Copy Mode" on page 15 PRELIMINARY & "Scan Mode" on page 16 & "Fax Settings" on the setting items, see the list of rings that must occur before the printer enters sleep mode (energy...
... Basics Menu Eco Mode Restore Default Settings Settings and Explanations The following Eco mode settings are performed. Related Information & "Copy Mode" on page 15 PRELIMINARY & "Scan Mode" on page 16 & "Fax Settings" on the setting items, see the list of rings that must occur before the printer enters sleep mode (energy...
User Manual
Page 31
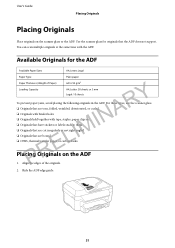
... Loading Capacity A4, Letter: 30 sheets or 3 mm Legal: 10 sheets Y To prevent paper jams, avoid placing the following originals in the ADF. You can scan multiple originals at the same time with tape, staples, paper clips etc. IN ❏ Originals that are bound ❏ OHPs, thermal transfer paper, or carbon...
... Loading Capacity A4, Letter: 30 sheets or 3 mm Legal: 10 sheets Y To prevent paper jams, avoid placing the following originals in the ADF. You can scan multiple originals at the same time with tape, staples, paper clips etc. IN ❏ Originals that are bound ❏ OHPs, thermal transfer paper, or carbon...

User Manual
Page 32
... c Important: PRELIMINARY ❏ Do not load originals above the line just under the d symbol inside the ADF edge guide. ❏ Do not add originals while scanning. 4.
... c Important: PRELIMINARY ❏ Do not load originals above the line just under the d symbol inside the ADF edge guide. ❏ Do not add originals while scanning. 4.

User Manual
Page 33
...of the scanner glass is given to the originals in the ADF and on the scannerglass. 3. Open the document cover. Note: Remove the originals after scanning or copying. If you leave the originals on the scanner glass for a long time, they may stick to the corner mark. User's Guide 1. Removeany... dust orstains on the scanner glass, priority is not scanned. ❏ When originals are placed in the ADF. 4. Note: ❏ A range of 1.5 mm from the edges of the glass. 33 Close the ...
...of the scanner glass is given to the originals in the ADF and on the scannerglass. 3. Open the document cover. Note: Remove the originals after scanning or copying. If you leave the originals on the scanner glass for a long time, they may stick to the corner mark. User's Guide 1. Removeany... dust orstains on the scanner glass, priority is not scanned. ❏ When originals are placed in the ADF. 4. Note: ❏ A range of 1.5 mm from the edges of the glass. 33 Close the ...

User Manual
Page 38
... from the pop-up menu. Select the amount of the paper. Select Print Settings from the menu > Printers & Scanners (or Print & Scan, Print & Fax), remove the printer, and then add the printer again. 6. Click Print. 38 When printing with no margins are printed around...you loaded. ❏ Expansion: Available when selecting a borderless paper size. In borderless printing, the print data is not displayed, the Epson printer driver has not been installed correctly. User's Guide Printing 4. Make the following settings. ❏ Media Type: Select the type of gray. 7.
... from the pop-up menu. Select the amount of the paper. Select Print Settings from the menu > Printers & Scanners (or Print & Scan, Print & Fax), remove the printer, and then add the printer again. 6. Click Print. 38 When printing with no margins are printed around...you loaded. ❏ Expansion: Available when selecting a borderless paper size. In borderless printing, the print data is not displayed, the Epson printer driver has not been installed correctly. User's Guide Printing 4. Make the following settings. ❏ Media Type: Select the type of gray. 7.

User Manual
Page 57
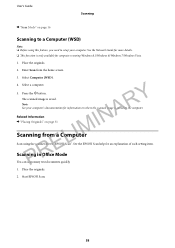
... displayed on the control panel. Related Information & "Placing Originals" on page 31 & "Epson Event Manager" on your computer before using Epson Connect. User's Guide Scanning Scanning Scanning Using the Control Panel Scanning to the Cloud You can be displayed on the printer's control panel. ❏ When ... which you want to save format by using Epson Event Manager. ❏ When the printer is connected to a network, up to 20 computers can send scanned images to a Computer c A Important: IN Make sure you have installed the EPSON Scan and Epson Event Manager on page 99 57 IM 1. ...
... displayed on the control panel. Related Information & "Placing Originals" on page 31 & "Epson Event Manager" on your computer before using Epson Connect. User's Guide Scanning Scanning Scanning Using the Control Panel Scanning to the Cloud You can be displayed on the printer's control panel. ❏ When ... which you want to save format by using Epson Event Manager. ❏ When the printer is connected to a network, up to 20 computers can send scanned images to a Computer c A Important: IN Make sure you have installed the EPSON Scan and Epson Event Manager on page 99 57 IM 1. ...
User Manual
Page 58
... a computer. 5. Note: R See your computer. Place the originals. 2. Enter Scan from a CoLmpuIteMr Scan using this feature, you need to setup your computer's documentation for computers running Windows 8.1/Windows 8/Windows 7/Windows Vista. 1. See the EPSON Scan help for an explanation of each setting item. Start EPSON Scan. 58 Select Computer (WSD). 4. Place the originals. 2. A Related Information IN...
... a computer. 5. Note: R See your computer. Place the originals. 2. Enter Scan from a CoLmpuIteMr Scan using this feature, you need to setup your computer's documentation for computers running Windows 8.1/Windows 8/Windows 7/Windows Vista. 1. See the EPSON Scan help for an explanation of each setting item. Start EPSON Scan. 58 Select Computer (WSD). 4. Place the originals. 2. A Related Information IN...
User Manual
Page 59
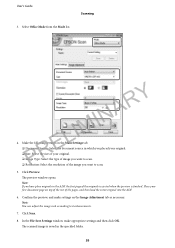
... your original. ❏ Size: Select the size of your first document page on top of the rest of the image you want to scan. ❏ Resolution: Select the resolution of the pages, and then load the entire original into the ADF. 6. Note: You can adjust...Click Preview. Make the following settings on the Image Adjustment tab as making text enhancements. 7. The scanned image is finished. Confirm the preview, and make appropriate settings and then click OK. Click Scan. 8. Select Office Mode from the Mode list. Place your original. ❏ Image Type: Select...
... your original. ❏ Size: Select the size of your first document page on top of the rest of the image you want to scan. ❏ Resolution: Select the resolution of the pages, and then load the entire original into the ADF. 6. Note: You can adjust...Click Preview. Make the following settings on the Image Adjustment tab as making text enhancements. 7. The scanned image is finished. Confirm the preview, and make appropriate settings and then click OK. Click Scan. 8. Select Office Mode from the Mode list. Place your original. ❏ Image Type: Select...
User Manual
Page 60
Place the originals. StartEPSONScan. 60 PRELIMINARY 2. User's Guide Scanning Note: When you select PDF as the Image Format setting, you can scan images while adjusting the quality and color. Click Options, select the Security tab, and then make settings. This mode is recommended for advanced users. 1. Related Information & "Placing Originals" on page 31 & "EPSON Scan (Scanner Driver)" on page 98 Scanning in Professional Mode You can set a password to protect the file.
Place the originals. StartEPSONScan. 60 PRELIMINARY 2. User's Guide Scanning Note: When you select PDF as the Image Format setting, you can scan images while adjusting the quality and color. Click Options, select the Security tab, and then make settings. This mode is recommended for advanced users. 1. Related Information & "Placing Originals" on page 31 & "EPSON Scan (Scanner Driver)" on page 98 Scanning in Professional Mode You can set a password to protect the file.
User Manual
Page 61
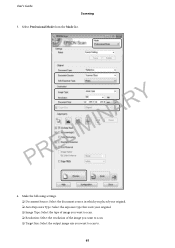
PRELIMINARY 4. Make the following settings. ❏ Document Source: Select the document source in which you placed your original. ❏ Auto Exposure Type: Select the exposure type that suits your original. ❏ Image Type: Select the type of image you want to scan. ❏ Resolution: Select the resolution of the image you want to scan. ❏ Target Size: Select the output image size you want to scan to. 61 User's Guide Scanning 3. Select Professional Mode from the Mode list.
PRELIMINARY 4. Make the following settings. ❏ Document Source: Select the document source in which you placed your original. ❏ Auto Exposure Type: Select the exposure type that suits your original. ❏ Image Type: Select the type of image you want to scan. ❏ Resolution: Select the resolution of the image you want to scan. ❏ Target Size: Select the output image size you want to scan to. 61 User's Guide Scanning 3. Select Professional Mode from the Mode list.
User Manual
Page 62
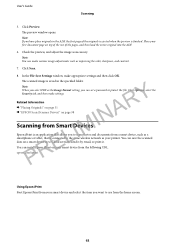
...tab, and then make appropriate settings and then click OK. L You can save the scanned data on page 98 Scanning from Smart DIevMices INA Epson iPrint is connected to scan photos and documents from your printer. The scanned image is finished. Note: When you want to Cloud services, send it by email,... or print it. Y Related Information R & "Placing Originals" on page 31 & "EPSON Scan (Scanner Driver)" on a smart device or to use from the following URL. Place your first document page on your smart device from the home screen....
...tab, and then make appropriate settings and then click OK. L You can save the scanned data on page 98 Scanning from Smart DIevMices INA Epson iPrint is connected to scan photos and documents from your printer. The scanned image is finished. Note: When you want to Cloud services, send it by email,... or print it. Y Related Information R & "Placing Originals" on page 31 & "EPSON Scan (Scanner Driver)" on a smart device or to use from the following URL. Place your first document page on your smart device from the home screen....
User Manual
Page 63
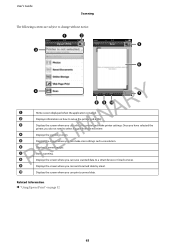
... such as resolution. I Displays the screen where you can send scanned data by email. Related Information & "Using Epson iPrint" on how to select it again from the next time. Displays scanned images. Displays the scanning screen. J Displays the screen where you can print scanned data. Displays the screen where you can make printer settings. Displays...
... such as resolution. I Displays the screen where you can send scanned data by email. Related Information & "Using Epson iPrint" on how to select it again from the next time. Displays scanned images. Displays the scanning screen. J Displays the screen where you can print scanned data. Displays the screen where you can make printer settings. Displays...
User Manual
Page 70
... the entry registered last in the group is dialed using the connected telephone, it takes longer to send a fax because the printer performs scanning and sending simultaneously. Press the OK button, and then make settings such as the resolution and the sending method as necessary. 5. Related...originals. Note: When a number is displayed. ❏ To delete the recipient you set an external access code in color because the printer performs scanning and sending simultaneously. While the printer is sending a color fax, you cannot use the other features. Note: You can send a fax by ...
... the entry registered last in the group is dialed using the connected telephone, it takes longer to send a fax because the printer performs scanning and sending simultaneously. Press the OK button, and then make settings such as the resolution and the sending method as necessary. 5. Related...originals. Note: When a number is displayed. ❏ To delete the recipient you set an external access code in color because the printer performs scanning and sending simultaneously. While the printer is sending a color fax, you cannot use the other features. Note: You can send a fax by ...
User Manual
Page 71
... feature, however, it takes longer to send is specified. 1. SelectOn,andthenpresstheOKbutton. 6. Note: Until the fax is temporarily stored in monochrome, the scanned document is sent at the specified time, you cannot send other faxes. PRELIMINARY 5. Press the x button. Therefore, sending a lot of pages...fax at a specified time. Specify the recipient. 4. You can be sent when the time to send the fax because the printer performs scanning and sending simultaneously. Sending a Fax from a Computer You can send faxes from the home screen. 3. Only monochrome faxes can avoid this...
... feature, however, it takes longer to send is specified. 1. SelectOn,andthenpresstheOKbutton. 6. Note: Until the fax is temporarily stored in monochrome, the scanned document is sent at the specified time, you cannot send other faxes. PRELIMINARY 5. Press the x button. Therefore, sending a lot of pages...fax at a specified time. Specify the recipient. 4. You can be sent when the time to send the fax because the printer performs scanning and sending simultaneously. Sending a Fax from a Computer You can send faxes from the home screen. 3. Only monochrome faxes can avoid this...


