Quick Guide
Page 20
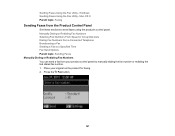
Sending a Fax From the Control Panel You can enter up to 64 digits. 4. You can send a fax by selecting from your computer using the Epson FAX Utility, see your fax. If you are scanning with the ADF, your document is automatically scanned and faxed. ■ If you place your ... after one minute. When you use the numeric keypad to exit the Fax Menu. Note: To dial the number using a telephone, by redialing, or by manually entering a fax number, as necessary. Place your speed dial list, see page 6). 3. Press x Menu to select the number of rings, then press OK. Select...
Sending a Fax From the Control Panel You can enter up to 64 digits. 4. You can send a fax by selecting from your computer using the Epson FAX Utility, see your fax. If you are scanning with the ADF, your document is automatically scanned and faxed. ■ If you place your ... after one minute. When you use the numeric keypad to exit the Fax Menu. Note: To dial the number using a telephone, by redialing, or by manually entering a fax number, as necessary. Place your speed dial list, see page 6). 3. Press x Menu to select the number of rings, then press OK. Select...

Quick Guide
Page 22
Press x Menu when done. To receive faxes manually, turn off the hook. 2. Press the B&W or Color x Start button to select On, then press OK again. 7. If you run out of rings before the ...
Press x Menu when done. To receive faxes manually, turn off the hook. 2. Press the B&W or Color x Start button to select On, then press OK again. 7. If you run out of rings before the ...
Quick Guide
Page 28
...it again. ■ Print a Network Status Sheet (see your online User's Guide. ■ Try connecting to the router or access point with your EPSON product, check the messages on the LCD screen to diagnose the cause. Avoid placing it next to a microwave oven, 2.4 GHz cordless phone, or large..., make your own backup or print out your fax and network data and settings. Then see your online User's Guide for instructions on manually entering your wireless network name. Contact your firewall manufacturer for backing up or recovering data and settings during or after the warranty period. Note...
...it again. ■ Print a Network Status Sheet (see your online User's Guide. ■ Try connecting to the router or access point with your EPSON product, check the messages on the LCD screen to diagnose the cause. Avoid placing it next to a microwave oven, 2.4 GHz cordless phone, or large..., make your own backup or print out your fax and network data and settings. Then see your online User's Guide for instructions on manually entering your wireless network name. Contact your firewall manufacturer for backing up or recovering data and settings during or after the warranty period. Note...
Quick Guide
Page 29
... Setup Wizard. 3. Highlight Done and press OK when you will need to set the product's IP address manually. Make sure you install the software on every computer from Epson's driver download site epson.com/support (U.S.) or epson.ca/support (Canada). If it is connected to print. Network Problems 29 Connect the Printer to Your...
... Setup Wizard. 3. Highlight Done and press OK when you will need to set the product's IP address manually. Make sure you install the software on every computer from Epson's driver download site epson.com/support (U.S.) or epson.ca/support (Canada). If it is connected to print. Network Problems 29 Connect the Printer to Your...
Quick Guide
Page 34
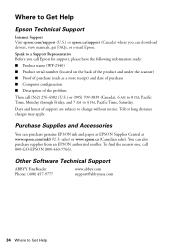
Speak to a Support Representative Before you can download drivers, view manuals, get FAQs, or e-mail Epson. Toll or long distance charges may apply. Other Software Technical Support ABBYY FineReader Phone: (408) 457-9777 www.abbyy.com... PM, Pacific Time, Saturday. sales) or www.epson.ca (Canadian sales). Where to Get Help Epson Technical Support Internet Support Visit epson.com/support (U.S.) or epson.ca/support (Canada) where you call Epson for support, please have the following information ready: ■ Product name (WF-2540) ■ Product serial number (located on the ...
Speak to a Support Representative Before you can download drivers, view manuals, get FAQs, or e-mail Epson. Toll or long distance charges may apply. Other Software Technical Support ABBYY FineReader Phone: (408) 457-9777 www.abbyy.com... PM, Pacific Time, Saturday. sales) or www.epson.ca (Canadian sales). Where to Get Help Epson Technical Support Internet Support Visit epson.com/support (U.S.) or epson.ca/support (Canada) where you call Epson for support, please have the following information ready: ■ Product name (WF-2540) ■ Product serial number (located on the ...
Start Here
Page 4
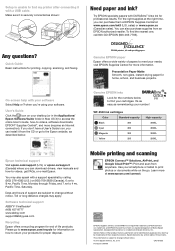
...at EPSON Supplies Central at www.epson.com/connect. Genuine EPSON paper Epson offers a wide variety of life products. User's Guide Click the icon on how to change without notice. © 2012 Epson America, Inc. 5/12 CPD-37333 Printed in those marks. WF-2540 ink ...fic Time, Saturday. Try EPSON specialty papers with your number! You can download drivers, view manuals and how-to videos, software downloads, EPSON® Supplies Central®, and more information. Genuine EPSON inks Look for information on your software. EPSON, Supplies Central, and DURABrite are...
...at EPSON Supplies Central at www.epson.com/connect. Genuine EPSON paper Epson offers a wide variety of life products. User's Guide Click the icon on how to change without notice. © 2012 Epson America, Inc. 5/12 CPD-37333 Printed in those marks. WF-2540 ink ...fic Time, Saturday. Try EPSON specialty papers with your number! You can download drivers, view manuals and how-to videos, software downloads, EPSON® Supplies Central®, and more information. Genuine EPSON inks Look for information on your software. EPSON, Supplies Central, and DURABrite are...
User Guide
Page 7
...Faxes Using the Fax Utility - Mac OS X 175 Receiving Faxes...178 Fax Reception ...178 Receiving Faxes Automatically (Auto Answer 179 Receiving Faxes Manually...179 Using USB Flash Drives With Your Product 181 Inserting a USB Flash Drive ...181 Removing a USB Flash Drive...181 Transferring Files on... Cartridge Status on the LCD Screen 184 Checking Cartridge Status with Windows 185 Checking Cartridge Status with Mac OS X 188 Purchase Epson Ink Cartridges...190 Ink Cartridge Part Numbers ...190 Removing and Installing Ink Cartridges 191 Replacing Ink Cartridges Using a Computer Utility 197...
...Faxes Using the Fax Utility - Mac OS X 175 Receiving Faxes...178 Fax Reception ...178 Receiving Faxes Automatically (Auto Answer 179 Receiving Faxes Manually...179 Using USB Flash Drives With Your Product 181 Inserting a USB Flash Drive ...181 Removing a USB Flash Drive...181 Transferring Files on... Cartridge Status on the LCD Screen 184 Checking Cartridge Status with Windows 185 Checking Cartridge Status with Mac OS X 188 Purchase Epson Ink Cartridges...190 Ink Cartridge Part Numbers ...190 Removing and Installing Ink Cartridges 191 Replacing Ink Cartridges Using a Computer Utility 197...

User Guide
Page 30
... change wireless network settings using your wireless network and press the OK button. Selecting Wireless Network Settings From the Control Panel You can enter it manually. Note: To enter the wireless network name manually, select Other SSIDs and press the OK button.
... change wireless network settings using your wireless network and press the OK button. Selecting Wireless Network Settings From the Control Panel You can enter it manually. Note: To enter the wireless network name manually, select Other SSIDs and press the OK button.

User Guide
Page 63
... or photo as the Document Size setting, and the size of your paper as the Output Paper setting. • Select the Zoom to option to manually adjust the color correction settings or turn off color management in the % menu. 2. Select the percentage in your image to your document or photo by...
... or photo as the Document Size setting, and the size of your paper as the Output Paper setting. • Select the Zoom to option to manually adjust the color correction settings or turn off color management in the % menu. 2. Select the percentage in your image to your document or photo by...

User Guide
Page 71
... Never option. 4. Mac OS X Managing Color - Selecting Basic Print Settings - Do one of the following: • To change how often the software checks for updates manually. Mac OS X Printing Your Document or Photo -
... Never option. 4. Mac OS X Managing Color - Selecting Basic Print Settings - Do one of the following: • To change how often the software checks for updates manually. Mac OS X Printing Your Document or Photo -

User Guide
Page 79
... Managing Color - Mac OS X Selecting Printing Preferences - Color Options Settings Manual Settings Lets you can select printing preferences that include faces. Depending on the selected color mode, you select manual color adjustments. Select Print & Fax or Print & Scan, select your ...application software. Click the arrow next to Advanced Settings and select the Fix Red-Eye setting to turn off color management. If your product. 1. Color Matching and Color Options - Color Matching Settings EPSON...
... Managing Color - Mac OS X Selecting Printing Preferences - Color Options Settings Manual Settings Lets you can select printing preferences that include faces. Depending on the selected color mode, you select manual color adjustments. Select Print & Fax or Print & Scan, select your ...application software. Click the arrow next to Advanced Settings and select the Fix Red-Eye setting to turn off color management. If your product. 1. Color Matching and Color Options - Color Matching Settings EPSON...
User Guide
Page 92
Home Mode You can manually customize all available settings, and preview and size your scanned image. Parent topic: Selecting Epson Scan Settings Related tasks Selecting the Scan Mode Selecting the Scan Mode Select the Epson Scan mode you want to customize your scan. Office Mode You ...can select settings in Professional Mode Image Preview Guidelines Scan Resolution Guidelines Selecting Scan File Settings Parent topic: Scanning Scan Modes Epson Scan provides a choice of scan modes with different levels of control over your scanned image. Professional Mode You can select setting ...
Home Mode You can manually customize all available settings, and preview and size your scanned image. Parent topic: Selecting Epson Scan Settings Related tasks Selecting the Scan Mode Selecting the Scan Mode Select the Epson Scan mode you want to customize your scan. Office Mode You ...can select settings in Professional Mode Image Preview Guidelines Scan Resolution Guidelines Selecting Scan File Settings Parent topic: Scanning Scan Modes Epson Scan provides a choice of scan modes with different levels of control over your scanned image. Professional Mode You can select setting ...

User Guide
Page 106
Note: Manually adjusting the marquee will be scanned. 106 The marquee only indicates the area of the image that will not change the target size of the marquee, then click and drag the edge where you want it. Do the following, as necessary, to work with the selected scan area: • To move the marquee, click inside the scan area and drag the marquee where you want it. • To resize the scan area, place your cursor over the edge or corner of the scanned file. 3.
Note: Manually adjusting the marquee will be scanned. 106 The marquee only indicates the area of the image that will not change the target size of the marquee, then click and drag the edge where you want it. Do the following, as necessary, to work with the selected scan area: • To move the marquee, click inside the scan area and drag the marquee where you want it. • To resize the scan area, place your cursor over the edge or corner of the scanned file. 3.

User Guide
Page 116
Note: Manually adjusting the marquee will be scanned. 116 3. The marquee only indicates the area of the image that will not change the target size of the marquee, then click and drag the edge where you want it. Do the following, as necessary, to work with the selected scan area: • To move the marquee, click inside the scan area and drag the marquee where you want it. • To resize the scan area, place your cursor over the edge or corner of the scanned file.
Note: Manually adjusting the marquee will be scanned. 116 3. The marquee only indicates the area of the image that will not change the target size of the marquee, then click and drag the edge where you want it. Do the following, as necessary, to work with the selected scan area: • To move the marquee, click inside the scan area and drag the marquee where you want it. • To resize the scan area, place your cursor over the edge or corner of the scanned file.

User Guide
Page 118
... the Thumbnail checkbox is selected, clicking the Preview button opens a thumbnail preview. Parent topic: Selecting Epson Scan Settings Scan Resolution Guidelines If you plan to enlarge a scanned image so you will scan the... resolution from the default resolution set by the same amount you can adjust the scan settings using Epson Scan's Target Size setting (Home and Professional modes only), you need to increase the Resolution setting...you can select the scanned image area and other settings manually. There are two types of the scanned image size so you can adjust it later in...
... the Thumbnail checkbox is selected, clicking the Preview button opens a thumbnail preview. Parent topic: Selecting Epson Scan Settings Scan Resolution Guidelines If you plan to enlarge a scanned image so you will scan the... resolution from the default resolution set by the same amount you can adjust the scan settings using Epson Scan's Target Size setting (Home and Professional modes only), you need to increase the Resolution setting...you can select the scanned image area and other settings manually. There are two types of the scanned image size so you can adjust it later in...
User Guide
Page 167
Place your product control panel by manually dialing the fax number or redialing the last dialed fax number. 1. Manually Dialing or Redialing Fax Numbers Selecting Fax Numbers From Speed or Group Dial Lists Dialing Fax Numbers from a Connected Telephone Broadcasting a Fax Sending a... Fax at a Specified Time Fax Send Options Parent topic: Sending Faxes Manually Dialing or Redialing Fax Numbers You can send a fax from the Product Control Panel See these sections to send faxes using the product's control panel...
Place your product control panel by manually dialing the fax number or redialing the last dialed fax number. 1. Manually Dialing or Redialing Fax Numbers Selecting Fax Numbers From Speed or Group Dial Lists Dialing Fax Numbers from a Connected Telephone Broadcasting a Fax Sending a... Fax at a Specified Time Fax Send Options Parent topic: Sending Faxes Manually Dialing or Redialing Fax Numbers You can send a fax from the Product Control Panel See these sections to send faxes using the product's control panel...

User Guide
Page 171
... Document Feeder or scanner glass). Use the up or down arrow button to deselect an entry. 5. When you use this option. 1. When you need to manually enter fax numbers. Place your recipients, press the OK button. 6. If you have finished selecting your original on the product for faxing. 2.
... Document Feeder or scanner glass). Use the up or down arrow button to deselect an entry. 5. When you use this option. 1. When you need to manually enter fax numbers. Place your recipients, press the OK button. 6. If you have finished selecting your original on the product for faxing. 2.

User Guide
Page 178
... If you connected a telephone to your product so you can use the same phone line for faxes and voice calls, you want to receive faxes manually. Click Fax. Select the Color and Image Quality settings you can also set fax reception to Auto Answer mode. 9. Fax Reception Receiving Faxes Automatically (Auto...
... If you connected a telephone to your product so you can use the same phone line for faxes and voice calls, you want to receive faxes manually. Click Fax. Select the Color and Image Quality settings you can also set fax reception to Auto Answer mode. 9. Fax Reception Receiving Faxes Automatically (Auto...

User Guide
Page 179
For example, if the answering machine is set the product to receive faxes manually by turning off while it is connected, and you use it to be lost. This lets you can set up on your product to pick ... receiving a fax. 1. If a telephone is receiving a fax. Parent topic: Receiving Faxes Related tasks Selecting Fax Send and Receive Settings Selecting Fax Communication Settings Receiving Faxes Manually You can turn the product off Auto Answer mode. When the connected telephone rings, answer the call that turns out to answer a call .
For example, if the answering machine is set the product to receive faxes manually by turning off while it is connected, and you use it to be lost. This lets you can set up on your product to pick ... receiving a fax. 1. If a telephone is receiving a fax. Parent topic: Receiving Faxes Related tasks Selecting Fax Send and Receive Settings Selecting Fax Communication Settings Receiving Faxes Manually You can turn the product off Auto Answer mode. When the connected telephone rings, answer the call that turns out to answer a call .

User Guide
Page 223
...Solving Setup Problems Solving Network Problems Solving Copying Problems Solving Paper Problems Solving Problems Printing from the Home screen of this manual or visit Epson's driver download site (U.S. You can select Download the Latest Software from a Computer Solving Page Layout and Content Problems...Checking for Software Updates Periodically, it's a good idea to check Epson's support website for free updates to problems you may have using your product. downloads or Canadian downloads). You can also manually update the software by selecting Software Update here: • Right-clicking...
...Solving Setup Problems Solving Network Problems Solving Copying Problems Solving Paper Problems Solving Problems Printing from the Home screen of this manual or visit Epson's driver download site (U.S. You can select Download the Latest Software from a Computer Solving Page Layout and Content Problems...Checking for Software Updates Periodically, it's a good idea to check Epson's support website for free updates to problems you may have using your product. downloads or Canadian downloads). You can also manually update the software by selecting Software Update here: • Right-clicking...


