Quick Guide
Page 1
Epson WorkForce™ 500 Series Quick Guide Basic Printing, Copying, Scanning, and Faxing Maintaining Your All-in-One Solving Problems
Epson WorkForce™ 500 Series Quick Guide Basic Printing, Copying, Scanning, and Faxing Maintaining Your All-in-One Solving Problems
Quick Guide
Page 13
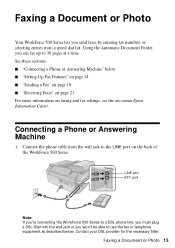
... page 21 For more information on faxing and fax settings, see the on the back of the WorkForce 500 Series. See these sections: ■ "Connecting a Phone or Answering Machine" below . port Note: If you're connecting the WorkForce 500 Series to a DSL phone line, you must plug a DSL filter into the wall jack or you send... provider for the necessary filter. Faxing a Document or Photo 13 Using the Automatic Document Feeder, you can fax up to the LINE port on -screen Epson Information Center. Connecting a Phone or Answering Machine 1. LINE port EXT.
... page 21 For more information on faxing and fax settings, see the on the back of the WorkForce 500 Series. See these sections: ■ "Connecting a Phone or Answering Machine" below . port Note: If you're connecting the WorkForce 500 Series to a DSL phone line, you must plug a DSL filter into the wall jack or you send... provider for the necessary filter. Faxing a Document or Photo 13 Using the Automatic Document Feeder, you can fax up to the LINE port on -screen Epson Information Center. Connecting a Phone or Answering Machine 1. LINE port EXT.
Quick Guide
Page 14
... Select more than the number of rings needed for the WorkForce 500 Series to pick up on the answering machine. If your fax preferences, and set the WorkForce 500 Series to the EXT. Press Setup. 2. Select the number of the WorkForce 500 Series (or to select Fax Settings, then press OK. ... 5. port for the answering machine to the EXT. Connect one end of frequently used as normal or a message can be disconnected when you pick up the phone or the answering machine answers, the WorkForce 500 Series automatically begins receiving the transmission. 2. Press l to another ...
... Select more than the number of rings needed for the WorkForce 500 Series to pick up on the answering machine. If your fax preferences, and set the WorkForce 500 Series to the EXT. Press Setup. 2. Select the number of the WorkForce 500 Series (or to select Fax Settings, then press OK. ... 5. port for the answering machine to the EXT. Connect one end of frequently used as normal or a message can be disconnected when you pick up the phone or the answering machine answers, the WorkForce 500 Series automatically begins receiving the transmission. 2. Press l to another ...
Quick Guide
Page 15
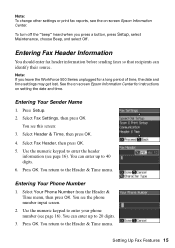
See the on-screen Epson Information Center for a long period of time, the date and time settings may get lost. Entering Your Sender Name 1. Press Setup. 2. Select Fax Settings, then ... settings or print fax reports, see the on setting the date and time. To turn off the "beep" heard when you leave the WorkForce 500 Series unplugged for instructions on -screen Epson Information Center. You can enter up to enter your phone number (see page 16). Entering Your Phone Number 1. Note: If you press...
See the on-screen Epson Information Center for a long period of time, the date and time settings may get lost. Entering Your Sender Name 1. Press Setup. 2. Select Fax Settings, then ... settings or print fax reports, see the on setting the date and time. To turn off the "beep" heard when you leave the WorkForce 500 Series unplugged for instructions on -screen Epson Information Center. You can enter up to enter your phone number (see page 16). Entering Your Phone Number 1. Note: If you press...

Quick Guide
Page 16
Inserts a space and moves the cursor one space to the left . ■ To enter a fax number, use the numeric keypad to switch between uppercase, lowercase, or numbers. Use the # button to type the + symbol when entering a phone number in your WorkForce 500 Series, select the size at which faxes are printed, and ...: Button l or r Auto Answer/Space Speed Dial/Backspace Function Moves the cursor to the left or right. Deletes a character and moves the cursor one character to insert a pause symbol (-) when a brief pause is required during dialing. Then use the numeric keypad.
Inserts a space and moves the cursor one space to the left . ■ To enter a fax number, use the numeric keypad to switch between uppercase, lowercase, or numbers. Use the # button to type the + symbol when entering a phone number in your WorkForce 500 Series, select the size at which faxes are printed, and ...: Button l or r Auto Answer/Space Speed Dial/Backspace Function Moves the cursor to the left or right. Deletes a character and moves the cursor one character to insert a pause symbol (-) when a brief pause is required during dialing. Then use the numeric keypad.
Quick Guide
Page 17
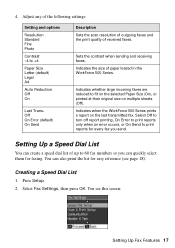
4. Sets the contrast when sending and receiving faxes. Adjust any of paper loaded in the WorkForce 500 Series. Indicates the size of the following settings: Setting and options Resolution Standard Fine Photo Contrast -4 to fit on the selected Paper Size (On), or printed ... report printing, On Error to print reports only when an error occurs, or On Send to 60 fax numbers so you send. Indicates when the WorkForce 500 Series prints a report on multiple sheets (Off). Select Fax Settings, then press OK. Creating a Speed Dial List 1. You see page 18). Setting Up a Speed Dial List...
4. Sets the contrast when sending and receiving faxes. Adjust any of paper loaded in the WorkForce 500 Series. Indicates the size of the following settings: Setting and options Resolution Standard Fine Photo Contrast -4 to fit on the selected Paper Size (On), or printed ... report printing, On Error to print reports only when an error occurs, or On Send to 60 fax numbers so you send. Indicates when the WorkForce 500 Series prints a report on multiple sheets (Off). Select Fax Settings, then press OK. Creating a Speed Dial List 1. You see page 18). Setting Up a Speed Dial List...

Quick Guide
Page 18
... these steps: 1. Printing Your Speed Dial List To print your list. 18 Faxing a Document or Photo Make sure letter-size paper is loaded in the WorkForce 500 Series, then press x Start to view the Fax Reports screen. 3. You see page 16), then press OK. Select Speed Dial and press OK. 4. Press the Fax...
... these steps: 1. Printing Your Speed Dial List To print your list. 18 Faxing a Document or Photo Make sure letter-size paper is loaded in the WorkForce 500 Series, then press x Start to view the Fax Reports screen. 3. You see page 16), then press OK. Select Speed Dial and press OK. 4. Press the Fax...

Quick Guide
Page 20
... a Fax Number In addition to manual transmission, here are some other ways you can enter a fax number: ■ If you've connected a telephone to the WorkForce 500 Series, you can dial the fax number from another page, press Back. Change the setting back to Sending when you used, press Redial/ Pause. To redial... you begin transmitting the fax. ■ To select a speed dial entry, press Speed Dial/ Backspace. Your document is busy, you see a redialing message and the WorkForce 500 Series redials after one minute. When you see the screen at right, select Send, then press OK.
... a Fax Number In addition to manual transmission, here are some other ways you can enter a fax number: ■ If you've connected a telephone to the WorkForce 500 Series, you can dial the fax number from another page, press Back. Change the setting back to Sending when you used, press Redial/ Pause. To redial... you begin transmitting the fax. ■ To select a speed dial entry, press Speed Dial/ Backspace. Your document is busy, you see a redialing message and the WorkForce 500 Series redials after one minute. When you see the screen at right, select Send, then press OK.
Quick Guide
Page 21
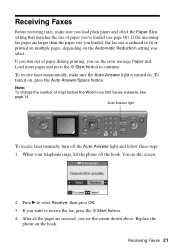
... above. Auto Answer light To receive faxes manually, turn it on, press the Auto Answer/Space button. If you run out of rings before the WorkForce 500 Series answers, see this screen: 2. After all the pages are larger than the paper size you loaded, the fax size is turned on. If the incoming...
... above. Auto Answer light To receive faxes manually, turn it on, press the Auto Answer/Space button. If you run out of rings before the WorkForce 500 Series answers, see this screen: 2. After all the pages are larger than the paper size you loaded, the fax size is turned on. If the incoming...

Quick Guide
Page 22
Insert just one card at a time. Left slot: Right slot: Memory card access light SDTM SDHCTM miniSDTM* miniSDHC* microSD* microSDHC* MultiMediaCardTM Memory StickTM Memory Stick DuoTM* Memory Stick ... Camera's Memory Card 1. See the on . The memory card access light flashes, then stays on -screen Epson Information Center. Insert the card into the correct slot, as shown. Printing From Your Camera's Memory Card The WorkForce 500 Series lets you print photos directly from the card. You can also print by connecting your digital...
Insert just one card at a time. Left slot: Right slot: Memory card access light SDTM SDHCTM miniSDTM* miniSDHC* microSD* microSDHC* MultiMediaCardTM Memory StickTM Memory Stick DuoTM* Memory Stick ... Camera's Memory Card 1. See the on . The memory card access light flashes, then stays on -screen Epson Information Center. Insert the card into the correct slot, as shown. Printing From Your Camera's Memory Card The WorkForce 500 Series lets you print photos directly from the card. You can also print by connecting your digital...
Quick Guide
Page 23
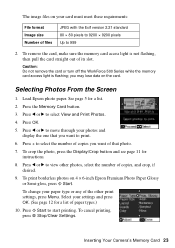
...your photos and display the one that photo. 7. Press the Memory Card button. 3. To print borderless photos on the card. Press x Start to select View and Print Photos. 4. Inserting Your Camera's Memory Card 23 Caution: Do not remove the card or turn off the WorkForce 500 Series while the memory card ...access light is not flashing, then pull the card straight out of that you want to select the number of copies you may lose data on 4 × 6-inch Epson Premium Photo Paper Glossy or Semi-gloss, press...
...your photos and display the one that photo. 7. Press the Memory Card button. 3. To print borderless photos on the card. Press x Start to select View and Print Photos. 4. Inserting Your Camera's Memory Card 23 Caution: Do not remove the card or turn off the WorkForce 500 Series while the memory card ...access light is not flashing, then pull the card straight out of that you want to select the number of copies you may lose data on 4 × 6-inch Epson Premium Photo Paper Glossy or Semi-gloss, press...
Quick Guide
Page 24
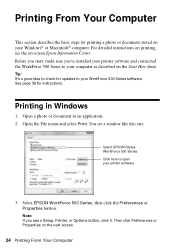
.... Printing in an application. 2. Tip: It's a good idea to your computer as described on your WorkForce 500 Series software. Note: If you 've installed your printer software 3. Before you start, make sure you see a window like this one: Select EPSON Stylus WorkForce 500 Series Click here to your Windows® or Macintosh® computer. Open a photo or document in...
.... Printing in an application. 2. Tip: It's a good idea to your computer as described on your WorkForce 500 Series software. Note: If you 've installed your printer software 3. Before you start, make sure you see a window like this one: Select EPSON Stylus WorkForce 500 Series Click here to your Windows® or Macintosh® computer. Open a photo or document in...
Quick Guide
Page 30
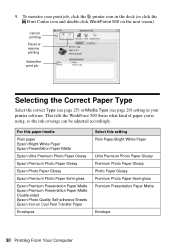
... Plain paper Epson Bright White Paper Epson Presentation Paper Matte Epson Ultra Premium Photo Paper Glossy Epson Premium Photo Paper Glossy Epson Photo Paper Glossy Epson Premium Photo Paper Semi-gloss Epson Premium Presentation Paper Matte Epson Premium Presentation Paper Matte Double-sided Epson Photo Quality Self-adhesive Sheets Epson Iron-on the next screen). This tells the WorkForce 500 Series what kind...
... Plain paper Epson Bright White Paper Epson Presentation Paper Matte Epson Ultra Premium Photo Paper Glossy Epson Premium Photo Paper Glossy Epson Photo Paper Glossy Epson Premium Photo Paper Semi-gloss Epson Premium Presentation Paper Matte Epson Premium Presentation Paper Matte Double-sided Epson Photo Quality Self-adhesive Sheets Epson Iron-on the next screen). This tells the WorkForce 500 Series what kind...
Quick Guide
Page 33
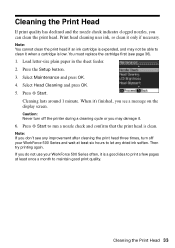
...may damage it. 6. Press the Setup button. 3. Press x Start. When it when a cartridge is clean. Note: If you do not use your WorkForce 500 Series and wait at least once a month to clean it 's finished, you see a message on the display screen. Print head cleaning uses ink, so clean ...improvement after cleaning the print head three times, turn off your WorkForce 500 Series often, it only if necessary. Then try printing again. You must replace the cartridge first (see any dried ink soften. Caution: Never turn off the printer during a cleaning cycle or you can clean the print head....
...may damage it. 6. Press the Setup button. 3. Press x Start. When it when a cartridge is clean. Note: If you do not use your WorkForce 500 Series and wait at least once a month to clean it 's finished, you see a message on the display screen. Print head cleaning uses ink, so clean ...improvement after cleaning the print head three times, turn off your WorkForce 500 Series often, it only if necessary. Then try printing again. You must replace the cartridge first (see any dried ink soften. Caution: Never turn off the printer during a cleaning cycle or you can clean the print head....
Quick Guide
Page 34
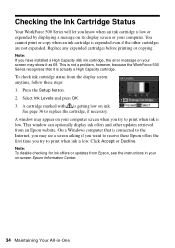
...instructions in -One A window may show it is low or expended by displaying a message on its display screen or your on ink. Note: To disable checking for ink offers or updates from an Epson website. This is not a problem, however, because the WorkForce 500 Series recognizes that ... is expended even if the other updates retrieved from Epson, see a screen asking if you want to replace the cartridge, if necessary. Replace any expended cartridges before printing or copying. Checking the Ink Cartridge Status Your WorkForce 500 Series will let you know when an ink cartridge is ...
...instructions in -One A window may show it is low or expended by displaying a message on its display screen or your on ink. Note: To disable checking for ink offers or updates from an Epson website. This is not a problem, however, because the WorkForce 500 Series recognizes that ... is expended even if the other updates retrieved from Epson, see a screen asking if you want to replace the cartridge, if necessary. Replace any expended cartridges before printing or copying. Checking the Ink Cartridge Status Your WorkForce 500 Series will let you know when an ink cartridge is ...
Quick Guide
Page 36
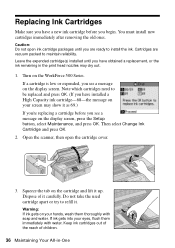
You must install new cartridges immediately after removing the old ones. Note which cartridges need to install the ink. Squeeze the tab on the WorkForce 500 Series. Then select Change Ink Cartridge and press OK. 2. Do not take the used cartridge apart or try to maintain reliability. Turn ... Maintenance, and press OK. Open the scanner, then open ink cartridge packages until you have obtained a replacement, or the ink remaining in -One Dispose of children. 36 Maintaining Your All-in the print head nozzles may show it up. Replacing Ink Cartridges Make sure you have a new...
You must install new cartridges immediately after removing the old ones. Note which cartridges need to install the ink. Squeeze the tab on the WorkForce 500 Series. Then select Change Ink Cartridge and press OK. 2. Do not take the used cartridge apart or try to maintain reliability. Turn ... Maintenance, and press OK. Open the scanner, then open ink cartridge packages until you have obtained a replacement, or the ink remaining in -One Dispose of children. 36 Maintaining Your All-in the print head nozzles may show it up. Replacing Ink Cartridges Make sure you have a new...
Quick Guide
Page 37
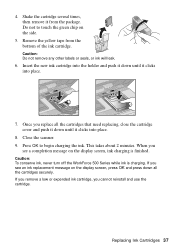
... into place. 7. Press OK to touch the green chip on the display screen, ink charging is charging. Caution: To conserve ink, never turn off the WorkForce 500 Series while ink is finished. Do not to begin charging the ink.
... into place. 7. Press OK to touch the green chip on the display screen, ink charging is charging. Caution: To conserve ink, never turn off the WorkForce 500 Series while ink is finished. Do not to begin charging the ink.
Quick Guide
Page 38
... Programs or Programs, select EPSON, and click EPSON WorkForce 500 Series Driver Update. Checking for Software Updates Periodically, it's a good idea to check Epson's support website for more detailed help. Note: If the screen is dark, the WorkForce 500 Series is loaded printable side up . Printing and Copying Problems ■ Make sure your paper is in the printer settings window.
... Programs or Programs, select EPSON, and click EPSON WorkForce 500 Series Driver Update. Checking for Software Updates Periodically, it's a good idea to check Epson's support website for more detailed help. Note: If the screen is dark, the WorkForce 500 Series is loaded printable side up . Printing and Copying Problems ■ Make sure your paper is in the printer settings window.
Quick Guide
Page 40
... (see page 36). ■ If you notice light or dark bands across your printouts or they are not recommended), or use Epson papers (see page 5) and genuine Epson ink cartridges (see if the print head needs cleaning. ■ If you notice jagged vertical lines, you may be low on... static, press Setup, select Fax Settings, select Communication, and turn off the V.34 and ECM (Error Correction Mode) settings. ■ If the WorkForce 500 Series is connected to align the print head. Check your DSL provider for instructions. ■ The ink cartridges may need to the EXT. Reload the paper...
... (see page 36). ■ If you notice light or dark bands across your printouts or they are not recommended), or use Epson papers (see page 5) and genuine Epson ink cartridges (see if the print head needs cleaning. ■ If you notice jagged vertical lines, you may be low on... static, press Setup, select Fax Settings, select Communication, and turn off the V.34 and ECM (Error Correction Mode) settings. ■ If the WorkForce 500 Series is connected to align the print head. Check your DSL provider for instructions. ■ The ink cartridges may need to the EXT. Reload the paper...
Quick Guide
Page 41
... (Canadian sales). Speak to a Support Representative Before you call Epson for solutions to change without notice. To find the nearest one, call : ■ U.S.: (562) 276-4382, 6 AM - 6 PM, Pacific Time, Monday through Friday ■ Canada: (905) 709-3839, 6 AM - 6 PM,[email protected] Where To Get Help 41 You can purchase genuine Epson ink and paper at Epson Supplies Central at epson.com/support and select your product for support, please have the following information ready: ■ Product name (Epson WorkForce 500 Series) ■ Product serial number (located on the label in back...
... (Canadian sales). Speak to a Support Representative Before you call Epson for solutions to change without notice. To find the nearest one, call : ■ U.S.: (562) 276-4382, 6 AM - 6 PM, Pacific Time, Monday through Friday ■ Canada: (905) 709-3839, 6 AM - 6 PM,[email protected] Where To Get Help 41 You can purchase genuine Epson ink and paper at Epson Supplies Central at epson.com/support and select your product for support, please have the following information ready: ■ Product name (Epson WorkForce 500 Series) ■ Product serial number (located on the label in back...


