
Quick Guide
Page 3
Maintaining Your All-in-One 32 Checking the Print Head Nozzles 32 Cleaning the Print Head 33 Checking the Ink Cartridge Status 34 Purchasing Epson Ink Cartridges 35 Replacing Ink Cartridges 36 Solving Problems 38 Checking for Software Updates 38 Problems and Solutions 38 Where To Get Help 41 Notices 42 Contents 3
Maintaining Your All-in-One 32 Checking the Print Head Nozzles 32 Cleaning the Print Head 33 Checking the Ink Cartridge Status 34 Purchasing Epson Ink Cartridges 35 Replacing Ink Cartridges 36 Solving Problems 38 Checking for Software Updates 38 Problems and Solutions 38 Where To Get Help 41 Notices 42 Contents 3

Quick Guide
Page 32
... plain paper in -One Select Nozzle Check and press OK. 5. Checking the Print Head Nozzles If your printouts are gaps or the pattern is faint, press x Start to see the on-screen Epson Information Center. If there are faint or have gaps in them, the print head nozzles may be clogged. ...head nozzles: 1. Nozzles are gaps in the lines. Maintaining Your All-in-One Follow the steps here to continue printing. To align the print head, if necessary, see if there are clean Nozzles need cleaning 7. If there are no gaps, press OK to check and clean the print head, and replace ...
... plain paper in -One Select Nozzle Check and press OK. 5. Checking the Print Head Nozzles If your printouts are gaps or the pattern is faint, press x Start to see the on-screen Epson Information Center. If there are faint or have gaps in them, the print head nozzles may be clogged. ...head nozzles: 1. Nozzles are gaps in the lines. Maintaining Your All-in-One Follow the steps here to continue printing. To align the print head, if necessary, see if there are clean Nozzles need cleaning 7. If there are no gaps, press OK to check and clean the print head, and replace ...
Quick Guide
Page 33
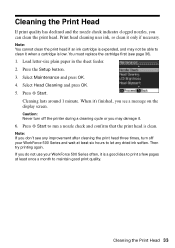
... the Setup button. 3. Select Head Cleaning and press OK. 5. Cleaning lasts around 1 minute. You must replace the cartridge first (see any improvement after cleaning the print head three times, turn off your WorkForce 500 Series often, it is clean. Press x Start. When it's finished, you may not be able to ...uses ink, so clean it only if necessary. Caution: Never turn off the printer during a cleaning cycle or you see a message on the display screen. If you can clean the print head. Press x Start to run a nozzle check and confirm that the print head is a good idea to print a ...
... the Setup button. 3. Select Head Cleaning and press OK. 5. Cleaning lasts around 1 minute. You must replace the cartridge first (see any improvement after cleaning the print head three times, turn off your WorkForce 500 Series often, it is clean. Press x Start. When it's finished, you may not be able to ...uses ink, so clean it only if necessary. Caution: Never turn off the printer during a cleaning cycle or you see a message on the display screen. If you can clean the print head. Press x Start to run a nozzle check and confirm that the print head is a good idea to print a ...
Quick Guide
Page 36
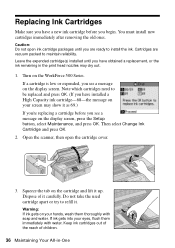
...as 69.) If you're replacing a cartridge before you have obtained a replacement, or the ink remaining in -One Note which cartridges need to maintain reliability. Dispose of children. 36 Maintaining Your All-in the print head nozzles may show it up. Warning:...ones. Open the scanner, then open ink cartridge packages until you begin. Squeeze the tab on the WorkForce 500 Series. If a cartridge is low or expended, you see a message on your eyes, flush them thoroughly with water. Leave the expended cartridge(s) installed until you are vacuum packed to be replaced...
...as 69.) If you're replacing a cartridge before you have obtained a replacement, or the ink remaining in -One Note which cartridges need to maintain reliability. Dispose of children. 36 Maintaining Your All-in the print head nozzles may show it up. Warning:...ones. Open the scanner, then open ink cartridge packages until you begin. Squeeze the tab on the WorkForce 500 Series. If a cartridge is low or expended, you see a message on your eyes, flush them thoroughly with water. Leave the expended cartridge(s) installed until you are vacuum packed to be replaced...
Quick Guide
Page 40
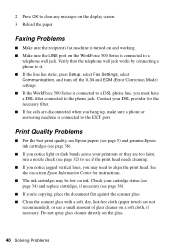
...glass with a soft, dry, lint-free cloth (paper towels are too faint, run a nozzle check (see page 32) to the phone jack. Press OK to the EXT. Print Quality Problems ■...; For the best print quality, use Epson papers (see page 5) and genuine Epson ink cartridges (see page 36). ■ If you may be low on a soft ...If the WorkForce 500 Series is connected to a DSL phone line, you hang up, make sure a phone or answering machine is connected to align the print head. Contact your cartridge status (see page 34) and replace cartridges,...
...glass with a soft, dry, lint-free cloth (paper towels are too faint, run a nozzle check (see page 32) to the phone jack. Press OK to the EXT. Print Quality Problems ■...; For the best print quality, use Epson papers (see page 5) and genuine Epson ink cartridges (see page 36). ■ If you may be low on a soft ...If the WorkForce 500 Series is connected to a DSL phone line, you hang up, make sure a phone or answering machine is connected to align the print head. Contact your cartridge status (see page 34) and replace cartridges,...


