Quick Guide
Page 1
Epson WorkForce™ 500 Series Quick Guide Basic Printing, Copying, Scanning, and Faxing Maintaining Your All-in-One Solving Problems
Epson WorkForce™ 500 Series Quick Guide Basic Printing, Copying, Scanning, and Faxing Maintaining Your All-in-One Solving Problems
Quick Guide
Page 13
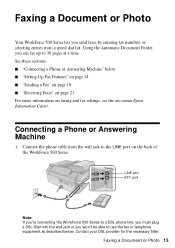
... from a speed dial list. port Note: If you're connecting the WorkForce 500 Series to a DSL phone line, you must plug a DSL filter into the wall jack or you won't be able to the LINE port on -screen Epson Information Center. Connecting a Phone or Answering Machine 1. Faxing a Document or... at a time. LINE port EXT. See these sections: ■ "Connecting a Phone or Answering Machine" below . Faxing a Document or Photo Your WorkForce 500 Series lets you send faxes by entering fax numbers or selecting entries from the wall jack to use the fax or telephone equipment as described below...
... from a speed dial list. port Note: If you're connecting the WorkForce 500 Series to a DSL phone line, you must plug a DSL filter into the wall jack or you won't be able to the LINE port on -screen Epson Information Center. Connecting a Phone or Answering Machine 1. Faxing a Document or... at a time. LINE port EXT. See these sections: ■ "Connecting a Phone or Answering Machine" below . Faxing a Document or Photo Your WorkForce 500 Series lets you send faxes by entering fax numbers or selecting entries from the wall jack to use the fax or telephone equipment as described below...
Quick Guide
Page 14
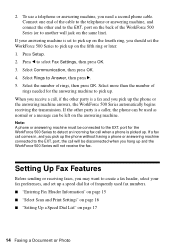
... press OK. 3. Setting Up Fax Features Before sending or receiving faxes, you should set up the phone or the answering machine answers, the WorkForce 500 Series automatically begins receiving the transmission. To use a telephone or answering machine, you pick up a speed dial list of frequently used as normal or... Settings" on page 16 ■ "Setting Up a Speed Dial List" on the back of rings, then press OK. Connect one end of rings needed for the WorkForce 500 Series to pick up on the fourth ring, you may want to create a fax header, select your fax preferences, and set the...
... press OK. 3. Setting Up Fax Features Before sending or receiving faxes, you should set up the phone or the answering machine answers, the WorkForce 500 Series automatically begins receiving the transmission. To use a telephone or answering machine, you pick up a speed dial list of frequently used as normal or... Settings" on page 16 ■ "Setting Up a Speed Dial List" on the back of rings, then press OK. Connect one end of rings needed for the WorkForce 500 Series to pick up on the fourth ring, you may want to create a fax header, select your fax preferences, and set the...
Quick Guide
Page 15
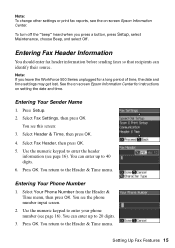
...turn off the "beep" heard when you leave the WorkForce 500 Series unplugged for instructions on setting the date and time. Use the numeric keypad to enter your phone number (see page 16). You return to 20 digits. 3. See the on -screen Epson Information Center. Select Fax Settings, then press OK....OK. 5. You can enter up to the Header & Time menu. You can identify their source. Press OK. You see the on -screen Epson Information Center for a long period of time, the date and time settings may get lost. Entering Fax Header Information You should enter fax header information...
...turn off the "beep" heard when you leave the WorkForce 500 Series unplugged for instructions on setting the date and time. Use the numeric keypad to enter your phone number (see page 16). You return to 20 digits. 3. See the on -screen Epson Information Center. Select Fax Settings, then press OK....OK. 5. You can enter up to the Header & Time menu. You can identify their source. Press OK. You see the on -screen Epson Information Center for a long period of time, the date and time settings may get lost. Entering Fax Header Information You should enter fax header information...

Quick Guide
Page 16
Deletes a character and moves the cursor one character to the right. Press the button repeatedly, if necessary, until the character you want displays on the button. Press 1symb to enter these characters .../Crop to insert a pause symbol (-) when a brief pause is required during dialing. Use the # button to type the + symbol when entering a phone number in your WorkForce 500 Series, select the size at which faxes are printed, and select when you want printed reports. 1. Select Scan & Print Setup, then press OK. 16 Faxing a Document...
Deletes a character and moves the cursor one character to the right. Press the button repeatedly, if necessary, until the character you want displays on the button. Press 1symb to enter these characters .../Crop to insert a pause symbol (-) when a brief pause is required during dialing. Use the # button to type the + symbol when entering a phone number in your WorkForce 500 Series, select the size at which faxes are printed, and select when you want printed reports. 1. Select Scan & Print Setup, then press OK. 16 Faxing a Document...
Quick Guide
Page 17
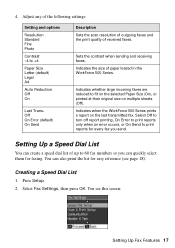
...) On Send Description Sets the scan resolution of outgoing faxes and the print quality of paper loaded in the WorkForce 500 Series. Indicates the size of received faxes. You see page 18). Indicates when the WorkForce 500 Series prints a report on multiple sheets (Off). Press Setup. 2. Setting Up a Speed Dial List You can create a speed dial...
...) On Send Description Sets the scan resolution of outgoing faxes and the print quality of paper loaded in the WorkForce 500 Series. Indicates the size of received faxes. You see page 18). Indicates when the WorkForce 500 Series prints a report on multiple sheets (Off). Press Setup. 2. Setting Up a Speed Dial List You can create a speed dial...

Quick Guide
Page 18
... press OK. Select Speed Dial and press OK. 4. Select or type the number of available entries. Make sure letter-size paper is loaded in the WorkForce 500 Series, then press x Start to add another speed dial entry, select Add Entry and repeat the steps above. Use the numeric keypad to enter a name to...
... press OK. Select Speed Dial and press OK. 4. Select or type the number of available entries. Make sure letter-size paper is loaded in the WorkForce 500 Series, then press x Start to add another speed dial entry, select Add Entry and repeat the steps above. Use the numeric keypad to enter a name to...

Quick Guide
Page 20
The last fax number is displayed on the scanner glass or in the Automatic Document Feeder. When you see a redialing message and the WorkForce 500 Series redials after one minute. Your document is busy, you see the screen at right, select Send, then press OK. Select or type the number of the... In addition to manual transmission, here are some other ways you can enter a fax number: ■ If you've connected a telephone to the WorkForce 500 Series, you can dial the fax number from another page, press Back. Note: Don't hang up the phone until the delayed fax has been sent or...
The last fax number is displayed on the scanner glass or in the Automatic Document Feeder. When you see a redialing message and the WorkForce 500 Series redials after one minute. Your document is busy, you see the screen at right, select Send, then press OK. Select or type the number of the... In addition to manual transmission, here are some other ways you can enter a fax number: ■ If you've connected a telephone to the WorkForce 500 Series, you can dial the fax number from another page, press Back. Note: Don't hang up the phone until the delayed fax has been sent or...
Quick Guide
Page 21
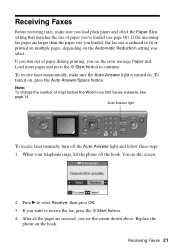
... on , press the Auto Answer/Space button. You see page 14. To turn off the hook. Note: To change the number of rings before the WorkForce 500 Series answers, see this screen: 2. If you run out of paper you've loaded (see the error message Paper out. Load more paper and press the...
... on , press the Auto Answer/Space button. You see page 14. To turn off the hook. Note: To change the number of rings before the WorkForce 500 Series answers, see this screen: 2. If you run out of paper you've loaded (see the error message Paper out. Load more paper and press the...

Quick Guide
Page 22
Inserting Your Camera's Memory Card 1. The memory card access light flashes, then stays on -screen Epson Information Center. Printing From Your Camera's Memory Card The WorkForce 500 Series lets you print photos directly from the card. Insert just one card at a time. Insert the card into the correct slot, as shown. See the on . You can...
Inserting Your Camera's Memory Card 1. The memory card access light flashes, then stays on -screen Epson Information Center. Printing From Your Camera's Memory Card The WorkForce 500 Series lets you print photos directly from the card. Insert just one card at a time. Insert the card into the correct slot, as shown. See the on . You can...
Quick Guide
Page 23
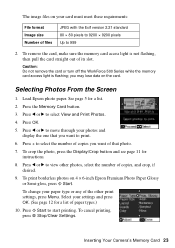
... press y Stop/Clear Settings. To remove the card, make sure the memory card access light is flashing; Load Epson photo paper. To change your settings and press OK. (See page 12 for a list of paper types.) 10....that you may lose data on 4 × 6-inch Epson Premium Photo Paper Glossy or Semi-gloss, press x Start. Press l or r to move through your photos and display the one that photo. 7. See page 5 for instructions. 8. ...Caution: Do not remove the card or turn off the WorkForce 500 Series while the memory card access light is not flashing, then pull the card straight out of its slot...
... press y Stop/Clear Settings. To remove the card, make sure the memory card access light is flashing; Load Epson photo paper. To change your settings and press OK. (See page 12 for a list of paper types.) 10....that you may lose data on 4 × 6-inch Epson Premium Photo Paper Glossy or Semi-gloss, press x Start. Press l or r to move through your photos and display the one that photo. 7. See page 5 for instructions. 8. ...Caution: Do not remove the card or turn off the WorkForce 500 Series while the memory card access light is not flashing, then pull the card straight out of its slot...
Quick Guide
Page 24
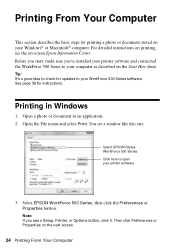
... 've installed your printer software and connected the WorkForce 500 Series to your WorkForce 500 Series software. Select EPSON WorkForce 500 Series, then click the Preferences or Properties button. Tip: It's a good idea to check for instructions. Then click Preferences or Properties on -screen Epson Information Center. Before you start, make sure you see a window like this one: Select EPSON Stylus WorkForce 500 Series Click here to...
... 've installed your printer software and connected the WorkForce 500 Series to your WorkForce 500 Series software. Select EPSON WorkForce 500 Series, then click the Preferences or Properties button. Tip: It's a good idea to check for instructions. Then click Preferences or Properties on -screen Epson Information Center. Before you start, make sure you see a window like this one: Select EPSON Stylus WorkForce 500 Series Click here to...
Quick Guide
Page 30
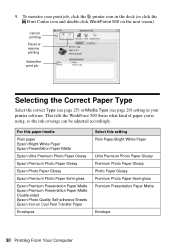
... WorkForce 500 on Cool Peel Transfer Paper Envelopes Select this paper/media Plain paper Epson Bright White Paper Epson Presentation Paper Matte Epson Ultra Premium Photo Paper Glossy Epson Premium Photo Paper Glossy Epson Photo Paper Glossy Epson Premium Photo Paper Semi-gloss Epson Premium Presentation Paper Matte Epson ...Semi-gloss Premium Presentation Paper Matte Envelope 30 Printing From Your Computer This tells the WorkForce 500 Series what kind of paper you're using, so the ink coverage can be adjusted accordingly. 9. To monitor your print job, click the printer icon in your...
... WorkForce 500 on Cool Peel Transfer Paper Envelopes Select this paper/media Plain paper Epson Bright White Paper Epson Presentation Paper Matte Epson Ultra Premium Photo Paper Glossy Epson Premium Photo Paper Glossy Epson Photo Paper Glossy Epson Premium Photo Paper Semi-gloss Epson Premium Presentation Paper Matte Epson ...Semi-gloss Premium Presentation Paper Matte Envelope 30 Printing From Your Computer This tells the WorkForce 500 Series what kind of paper you're using, so the ink coverage can be adjusted accordingly. 9. To monitor your print job, click the printer icon in your...
Quick Guide
Page 33
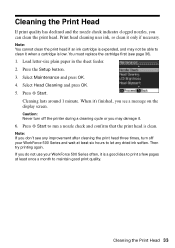
... 4. When it . 6. Note: You cannot clean the print head if an ink cartridge is expended, and may damage it 's finished, you do not use your WorkForce 500 Series and wait at least once a month to maintain good print quality. Press the Setup button. 3. If you see page 36). 1. Cleaning lasts around 1 minute. Select...clean. Press x Start to clean it only if necessary. Press x Start. Load letter-size plain paper in the sheet feeder. 2. Caution: Never turn off the printer during a cleaning cycle or you may not be able to run a nozzle check and confirm that the print head is low.
... 4. When it . 6. Note: You cannot clean the print head if an ink cartridge is expended, and may damage it 's finished, you do not use your WorkForce 500 Series and wait at least once a month to maintain good print quality. Press the Setup button. 3. If you see page 36). 1. Cleaning lasts around 1 minute. Select...clean. Press x Start to clean it only if necessary. Press x Start. Load letter-size plain paper in the sheet feeder. 2. Caution: Never turn off the printer during a cleaning cycle or you may not be able to run a nozzle check and confirm that the print head is low.
Quick Guide
Page 34
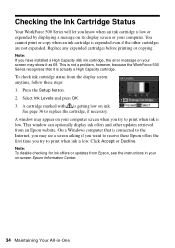
... may appear on your computer. Checking the Ink Cartridge Status Your WorkForce 500 Series will let you know when an ink cartridge is actually a High Capacity cartridge. This is not a problem, however, because the WorkForce 500 Series recognizes that is connected to the Internet, you may show it is... low or expended by displaying a message on its display screen or your computer screen when you want to print when ink is getting low on -screen Epson Information Center. 34 Maintaining Your All-in-One...
... may appear on your computer. Checking the Ink Cartridge Status Your WorkForce 500 Series will let you know when an ink cartridge is actually a High Capacity cartridge. This is not a problem, however, because the WorkForce 500 Series recognizes that is connected to the Internet, you may show it is... low or expended by displaying a message on its display screen or your computer screen when you want to print when ink is getting low on -screen Epson Information Center. 34 Maintaining Your All-in-One...
Quick Guide
Page 36
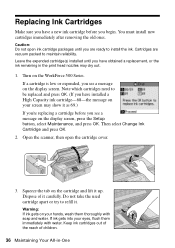
...to be replaced and press OK. (If you have a new ink cartridge before you have obtained a replacement, or the ink remaining in -One If ink gets into your hands, wash them immediately with soap and water. Squeeze the tab on your eyes, flush them thoroughly with water...3. Then select Change Ink Cartridge and press OK. 2. Open the scanner, then open ink cartridge packages until you see a message on the WorkForce 500 Series. Replacing Ink Cartridges Make sure you have installed a High Capacity ink cartridge-68-the message on the display screen, press the Setup button, select...
...to be replaced and press OK. (If you have a new ink cartridge before you have obtained a replacement, or the ink remaining in -One If ink gets into your hands, wash them immediately with soap and water. Squeeze the tab on your eyes, flush them thoroughly with water...3. Then select Change Ink Cartridge and press OK. 2. Open the scanner, then open ink cartridge packages until you see a message on the WorkForce 500 Series. Replacing Ink Cartridges Make sure you have installed a High Capacity ink cartridge-68-the message on the display screen, press the Setup button, select...
Quick Guide
Page 37
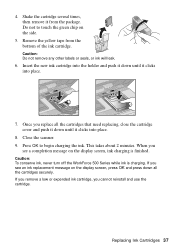
Do not to begin charging the ink. Close the scanner. 9. Caution: To conserve ink, never turn off the WorkForce 500 Series while ink is finished. Shake the cartridge several times, then remove it clicks into place. 8. Insert the new ink cartridge into the holder and push ...
Do not to begin charging the ink. Close the scanner. 9. Caution: To conserve ink, never turn off the WorkForce 500 Series while ink is finished. Shake the cartridge several times, then remove it clicks into place. 8. Insert the new ink cartridge into the holder and push ...
Quick Guide
Page 38
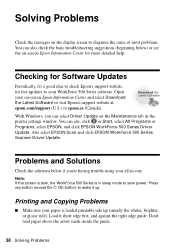
Open your paper is in -one. Also select EPSON Scan and click EPSON WorkForce 500 Series Scanner Driver Update. Printing and Copying Problems ■ Make sure your on -screen Epson Information Center for more detailed help. Solving Problems Check the messages on the display screen to diagnose the ...updates to your all-in sleep mode to check Epson's support website for Software Updates Periodically, it up (usually the whiter, brighter, or glossy side). You can select Driver Update on the Maintenance tab in the printer settings window. Don't load paper above the arrow...
Open your paper is in -one. Also select EPSON Scan and click EPSON WorkForce 500 Series Scanner Driver Update. Printing and Copying Problems ■ Make sure your on -screen Epson Information Center for more detailed help. Solving Problems Check the messages on the display screen to diagnose the ...updates to your all-in sleep mode to check Epson's support website for Software Updates Periodically, it up (usually the whiter, brighter, or glossy side). You can select Driver Update on the Maintenance tab in the printer settings window. Don't load paper above the arrow...
Quick Guide
Page 40
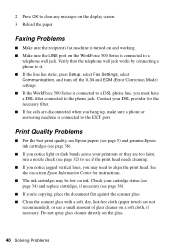
... have a DSL filter connected to a DSL phone line, you may be low on a soft cloth, if necessary. See the on-screen Epson Information Center for the necessary filter. ■ If fax calls are disconnected when you 're copying, place the document flat against the scanner ...static, press Setup, select Fax Settings, select Communication, and turn off the V.34 and ECM (Error Correction Mode) settings. ■ If the WorkForce 500 Series is connected to a telephone wall jack. Faxing Problems ■ Make sure the recipient's fax machine is connected to the EXT. Print Quality Problems...
... have a DSL filter connected to a DSL phone line, you may be low on a soft cloth, if necessary. See the on-screen Epson Information Center for the necessary filter. ■ If fax calls are disconnected when you 're copying, place the document flat against the scanner ...static, press Setup, select Fax Settings, select Communication, and turn off the V.34 and ECM (Error Correction Mode) settings. ■ If the WorkForce 500 Series is connected to a telephone wall jack. Faxing Problems ■ Make sure the recipient's fax machine is connected to the EXT. Print Quality Problems...
Quick Guide
Page 41
.../support and select your product for support, please have the following information ready: ■ Product name (Epson WorkForce 500 Series) ■ Product serial number (located on the label in back) ■ Proof of purchase (such as a store receipt) and date of purchase &#... can also purchase supplies from an Epson authorized reseller. Toll or long distance charges may apply. sales) or www.epson.ca (Canadian sales). Speak to a Support Representative Before you call Epson for solutions to change without notice. To find the nearest one, call 800-GO-EPSON (800-463-7766). Where To ...
.../support and select your product for support, please have the following information ready: ■ Product name (Epson WorkForce 500 Series) ■ Product serial number (located on the label in back) ■ Proof of purchase (such as a store receipt) and date of purchase &#... can also purchase supplies from an Epson authorized reseller. Toll or long distance charges may apply. sales) or www.epson.ca (Canadian sales). Speak to a Support Representative Before you call Epson for solutions to change without notice. To find the nearest one, call 800-GO-EPSON (800-463-7766). Where To ...


