Quick Guide
Page 26
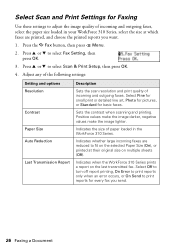
..., negative values make the image lighter. Press u or d to select Scan & Print Setup, then press OK. 4. Sets the contrast when scanning and printing. Indicates the size of incoming and outgoing faxes. Select Off to turn off report printing, On Error to print reports only when an ..., or Standard for every fax you want. 1. Indicates when the WorkForce 310 Series prints a report on the selected Paper Size (On), or printed at which faxes are printed, and choose the printed reports you send. 26 Faxing a Document Select Scan and Print Settings for Faxing Use these settings to adjust...
..., negative values make the image lighter. Press u or d to select Scan & Print Setup, then press OK. 4. Sets the contrast when scanning and printing. Indicates the size of incoming and outgoing faxes. Select Off to turn off report printing, On Error to print reports only when an ..., or Standard for every fax you want. 1. Indicates when the WorkForce 310 Series prints a report on the selected Paper Size (On), or printed at which faxes are printed, and choose the printed reports you send. 26 Faxing a Document Select Scan and Print Settings for Faxing Use these settings to adjust...
Quick Guide
Page 27
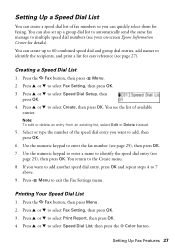
...to 60 combined speed dial and group dial entries, add names to select Fax Setting, then press OK. 3. Press the K Fax button, then press x Menu. 2. Press u or d to multiple speed dial numbers (see your on-screen Epson Information Center for details). Note: To edit or delete an entry from...then press OK. 4. Press u or d to the Create menu. 8. You return to select Fax Setting, then press OK. 3. You can create up a group dial list to automatically send the same fax message to select Speed Dial Setup, then press OK. 4. Press u or d to identify the recipients, and print a list...
...to 60 combined speed dial and group dial entries, add names to select Fax Setting, then press OK. 3. Press the K Fax button, then press x Menu. 2. Press u or d to multiple speed dial numbers (see your on-screen Epson Information Center for details). Note: To edit or delete an entry from...then press OK. 4. Press u or d to the Create menu. 8. You return to select Fax Setting, then press OK. 3. You can create up a group dial list to automatically send the same fax message to select Speed Dial Setup, then press OK. 4. Press u or d to identify the recipients, and print a list...
Quick Guide
Page 30
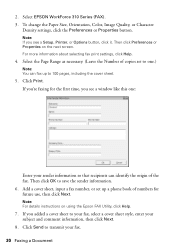
... Add a cover sheet, input a fax number, or set to one : Enter your sender information so that recipients can fax up to your fax, select a cover sheet style, enter your fax. 30 Faxing a Document If you see a Setup, Printer, or Options button, click it. ...one .) Note: You can identify the origin of numbers for the first time, you added a cover sheet to 100 pages, including the cover sheet. 5. Note: If you 're faxing for future use, then click Next. Note: For details instructions on the next screen. Click Send to save the sender information. 6. Select EPSON WorkForce...
... Add a cover sheet, input a fax number, or set to one : Enter your sender information so that recipients can fax up to your fax, select a cover sheet style, enter your fax. 30 Faxing a Document If you see a Setup, Printer, or Options button, click it. ...one .) Note: You can identify the origin of numbers for the first time, you added a cover sheet to 100 pages, including the cover sheet. 5. Note: If you 're faxing for future use, then click Next. Note: For details instructions on the next screen. Click Send to save the sender information. 6. Select EPSON WorkForce...
Start Here
Page 5
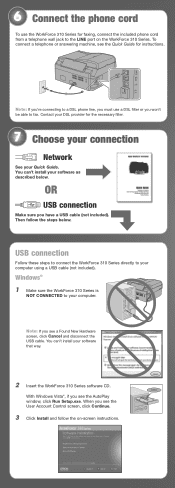
... . Then follow the on the WorkForce 310 Series. Windows® 1 Make sure the WorkForce 310 Series is NOT CONNECTED to your... the WorkForce 310 Series directly to your Quick Guide. You can 't install your software that way. 2 Insert the WorkForce 310 ...Series software CD. Note: If you won't be able to the LINE port on -screen instructions. Note: If you're connecting to a DSL phone line, you must use the WorkForce 310 Series for faxing..., connect the included phone cord from a telephone wall jack to fax. With Windows Vista...
... . Then follow the on the WorkForce 310 Series. Windows® 1 Make sure the WorkForce 310 Series is NOT CONNECTED to your... the WorkForce 310 Series directly to your Quick Guide. You can 't install your software that way. 2 Insert the WorkForce 310 ...Series software CD. Note: If you won't be able to the LINE port on -screen instructions. Note: If you're connecting to a DSL phone line, you must use the WorkForce 310 Series for faxing..., connect the included phone cord from a telephone wall jack to fax. With Windows Vista...


