
OT-WL02 Technical Reference Guide
Page 18
Running Epson TM Utility 1 Run the Epson TM Utility 2 Set from a Windows Computer Necessary Items Prepare the following items. • TM printer: • Computer for setting: • Utility for setting: Wireless LAN unit is installed Computer equipped with Windows 8/7/Vista/XP/2000, and a wireless LAN function EpsonNet Config 18 Enter the passkey. Setting up from "Wi-Fi Setup Wizard" in the menu. Setup and Operation Work flow Select the network you want to connect to. Perform a test print.
Running Epson TM Utility 1 Run the Epson TM Utility 2 Set from a Windows Computer Necessary Items Prepare the following items. • TM printer: • Computer for setting: • Utility for setting: Wireless LAN unit is installed Computer equipped with Windows 8/7/Vista/XP/2000, and a wireless LAN function EpsonNet Config 18 Enter the passkey. Setting up from "Wi-Fi Setup Wizard" in the menu. Setup and Operation Work flow Select the network you want to connect to. Perform a test print.

OT-WL02 Technical Reference Guide
Page 19
...on printer are the following values. When connecting to enter a pass phrase appears, enter "12345678". If the window to the printer is complete, setup the Wireless LAN by using the EpsonNet Config. Chapter 2 Installation Follow the steps below to connect the printer. 1 Turn on the printer. 2 ...Activate Windows Wireless Network Connection and select [EPSON_Printer] as the connection device on the power for the printer you are setting multiple TM printers, only turn on the screen that appears. You cannot set multiple printers at ...
...on printer are the following values. When connecting to enter a pass phrase appears, enter "12345678". If the window to the printer is complete, setup the Wireless LAN by using the EpsonNet Config. Chapter 2 Installation Follow the steps below to connect the printer. 1 Turn on the printer. 2 ...Activate Windows Wireless Network Connection and select [EPSON_Printer] as the connection device on the power for the printer you are setting multiple TM printers, only turn on the screen that appears. You cannot set multiple printers at ...

OT-WL05 Technical Reference Guide
Page 16
Setting up from a Smart Device Necessary Items Prepare the following items. TM printer fitted with this product Device for setting: iOS or AndroidTM device Utility for setting: Epson TM Utility for iOS or Epson TM Utility for Android Running Epson TM Utility 1 Run the Epson TM Utility 2 Set from "Wi-Fi Setup Wizard" in the menu. Setup and Operation Work flow Select the network you want to connect to. Perform a test print. 16 Enter the passkey.
Setting up from a Smart Device Necessary Items Prepare the following items. TM printer fitted with this product Device for setting: iOS or AndroidTM device Utility for setting: Epson TM Utility for iOS or Epson TM Utility for Android Running Epson TM Utility 1 Run the Epson TM Utility 2 Set from "Wi-Fi Setup Wizard" in the menu. Setup and Operation Work flow Select the network you want to connect to. Perform a test print. 16 Enter the passkey.

OT-WL05 Technical Reference Guide
Page 17
...Utility for the printer you are the following items. TM printer fitted with this product is complete, setup the Wireless LAN by using EpsonNet Config is explained here. 1 Turn on the computer. 2 Activate Windows Wireless Network Connection and select [EPSON_Printer] as the connection device on the...Config, see the manual for your computer. If you are setting multiple TM printers, only turn on the power for setting: EpsonNet Config or EpsonNet Config (Web version) The setup procedure using the EpsonNet Config or EpsonNet Config (Web version). For downloading and ...
...Utility for the printer you are the following items. TM printer fitted with this product is complete, setup the Wireless LAN by using EpsonNet Config is explained here. 1 Turn on the computer. 2 Activate Windows Wireless Network Connection and select [EPSON_Printer] as the connection device on the...Config, see the manual for your computer. If you are setting multiple TM printers, only turn on the power for setting: EpsonNet Config or EpsonNet Config (Web version) The setup procedure using the EpsonNet Config or EpsonNet Config (Web version). For downloading and ...

UB-E03 Users Manual
Page 3
...and a wireless LAN interface. 3 Connection Set the setting of the host PC to match the network setting that initialization starts is printed (approximately for 10 seconds). You can modify the parameters by... the command prompt. Because the default IP addresses for all the printers are two ways for the setup. For details, see the UB-E03 Technical Reference Guide. ❏ Using a Web browser 1. ...'s setting. ❏ Using the TMNet Win Config The TMNet Win Config is reported on a TM printer with the status sheet. The browser displays an opening screen. 4. Then, hold it down...
...and a wireless LAN interface. 3 Connection Set the setting of the host PC to match the network setting that initialization starts is printed (approximately for 10 seconds). You can modify the parameters by... the command prompt. Because the default IP addresses for all the printers are two ways for the setup. For details, see the UB-E03 Technical Reference Guide. ❏ Using a Web browser 1. ...'s setting. ❏ Using the TMNet Win Config The TMNet Win Config is reported on a TM printer with the status sheet. The browser displays an opening screen. 4. Then, hold it down...
UB-E04 Users Manual
Page 7
... starts is fixed to hold down the push button for more than 3 seconds to enable settings. In the User authentication screen, enter "epson" for the network connection. If a parameter is changed, press [Send] to send settings to the printer has been correctly done by inputting the ping command...the EpsonNet Config from one printer at a time. Because the default IP addresses for the setup. You can check whether the connection to the printer. 4. For customers in North America: http://www.epson.com/support/ For customers in each menu. You can check setting values necessary (IP address...
... starts is fixed to hold down the push button for more than 3 seconds to enable settings. In the User authentication screen, enter "epson" for the network connection. If a parameter is changed, press [Send] to send settings to the printer has been correctly done by inputting the ping command...the EpsonNet Config from one printer at a time. Because the default IP addresses for the setup. You can check whether the connection to the printer. 4. For customers in North America: http://www.epson.com/support/ For customers in each menu. You can check setting values necessary (IP address...

UB-R04 Technical Reference Guide
Page 55
...set. • SNMP : SNMP is used to acquire the status and set the TM printer by the dedicated setup utility (EpsonNet Config) or driver software OPOS/APD. Chapter 5 UB-R04 Specifications ...or the universal MIB administration tool. User Name Password "epson" (User name cannot be set with a password 5 You can be changed.) Default :epson Type of characters settable :ASCII characters Number of characters...acquire the status and set the TM printer by using the EpsonNet Config. 55 The HTTP/HTTPS protocol is used to acquire and change the network parameter of the UB-R04. ...
...set. • SNMP : SNMP is used to acquire the status and set the TM printer by the dedicated setup utility (EpsonNet Config) or driver software OPOS/APD. Chapter 5 UB-R04 Specifications ...or the universal MIB administration tool. User Name Password "epson" (User name cannot be set with a password 5 You can be changed.) Default :epson Type of characters settable :ASCII characters Number of characters...acquire the status and set the TM printer by using the EpsonNet Config. 55 The HTTP/HTTPS protocol is used to acquire and change the network parameter of the UB-R04. ...
TM-T88IV Technical Reference Guide
Page 51
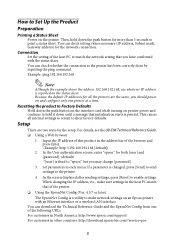
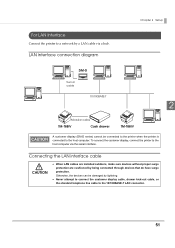
.... 51 For LAN Interface Connect the printer to a network by a LAN cable via the serial interface. To connect the customer display, connect the printer to the host computer via a hub. LAN interface connection diagram Chapter 2 Setup DM-D Serial cable 10/100BASE-T 2 Modular cable TM-T88IV Cash drawer TM-T88IV A customer display (DM-D series) cannot be damaged...
.... 51 For LAN Interface Connect the printer to a network by a LAN cable via the serial interface. To connect the customer display, connect the printer to the host computer via a hub. LAN interface connection diagram Chapter 2 Setup DM-D Serial cable 10/100BASE-T 2 Modular cable TM-T88IV Cash drawer TM-T88IV A customer display (DM-D series) cannot be damaged...

