
OT-WL02 Technical Reference Guide
Page 17
... user's manual for the printer or the interface unit. Chapter 2 Installation Connecting to the Network The method for connecting the wireless LAN unit to the network differs if you use a TM printer that supports the SimpleAP mode or a TM printer that does not support the SimpleAP mode. • Connecting a TM printer that supports the SimpleAP mode to the network • Setting up from a Smart Device • Setting up from a Windows Computer • Connecting a TM printer that does not support the SimpleAP mode to the network...
... user's manual for the printer or the interface unit. Chapter 2 Installation Connecting to the Network The method for connecting the wireless LAN unit to the network differs if you use a TM printer that supports the SimpleAP mode or a TM printer that does not support the SimpleAP mode. • Connecting a TM printer that supports the SimpleAP mode to the network • Setting up from a Smart Device • Setting up from a Windows Computer • Connecting a TM printer that does not support the SimpleAP mode to the network...

OT-WL02 Technical Reference Guide
Page 19
Default settings on printer are setting. If the window to the printer is complete, setup the Wireless LAN by using the EpsonNet Config. You cannot set multiple printers at the same time. For downloading and installation of the setting computer. 19 Network mode SimpleAP mode SSID EPSON_Printer Pass phrase 12345678 IP Address 192.168.192.168 An example of Connection Screen 2 • For the setting method for the computer for setting, see "Software" on page 23 3 Start...
Default settings on printer are setting. If the window to the printer is complete, setup the Wireless LAN by using the EpsonNet Config. You cannot set multiple printers at the same time. For downloading and installation of the setting computer. 19 Network mode SimpleAP mode SSID EPSON_Printer Pass phrase 12345678 IP Address 192.168.192.168 An example of Connection Screen 2 • For the setting method for the computer for setting, see "Software" on page 23 3 Start...
OT-WL02 Technical Reference Guide
Page 23
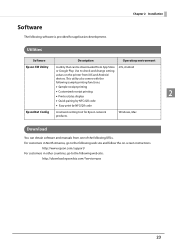
... printing • Printer status display 2 • Quick pairing by NFC/QR code • Easy print by NFC/QR code EpsonNet Config A network setting tool for application development. Utilities Software Description Operating environment Epson TM Utility A utility that can obtain software and manuals from App Store iOS, Android or Google Play. Windows, Mac Download You can be downloaded from one of the following web site: http://download.epson-biz.com/?service=pos 23 Chapter 2 Installation Software The following software...
... printing • Printer status display 2 • Quick pairing by NFC/QR code • Easy print by NFC/QR code EpsonNet Config A network setting tool for application development. Utilities Software Description Operating environment Epson TM Utility A utility that can obtain software and manuals from App Store iOS, Android or Google Play. Windows, Mac Download You can be downloaded from one of the following web site: http://download.epson-biz.com/?service=pos 23 Chapter 2 Installation Software The following software...
UB-R04 Technical Reference Guide
Page 21
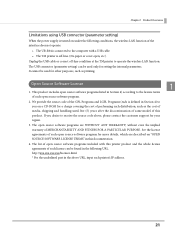
... the TM printer to the computer with this documentation. 4. without even the implied warranty of open source software programs included with a USB cable. • The TM printer is off-line. (No paper or cover open source software program. 2. If you on "OPEN SOURCE SOFTWARE LICENSE TERMS" in the following conditions, the wireless LAN function of the interface does not operate. • The UB-R04 is connected to operate the wireless LAN...
... the TM printer to the computer with this documentation. 4. without even the implied warranty of open source software programs included with a USB cable. • The TM printer is off-line. (No paper or cover open source software program. 2. If you on "OPEN SOURCE SOFTWARE LICENSE TERMS" in the following conditions, the wireless LAN function of the interface does not operate. • The UB-R04 is connected to operate the wireless LAN...
UB-R04 Technical Reference Guide
Page 30
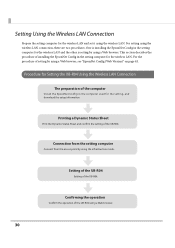
.... Connection from the setting computer Connect from the access point by using a Web browser, see "EpsonNet Config (Web Version)" on page 41. Setting of the UB-R04 Setting of the UB-R04. Confirming the operation Confirm the operation of setting by using the infrastructure mode. This section describes the procedure of the computer Install the EpsonNet Config in the setting computer for the setting, and download the setup information. Printing a Dynamic Status Sheet Print the Dynamic Status Sheet...
.... Connection from the setting computer Connect from the access point by using a Web browser, see "EpsonNet Config (Web Version)" on page 41. Setting of the UB-R04 Setting of the UB-R04. Confirming the operation Confirm the operation of setting by using the infrastructure mode. This section describes the procedure of the computer Install the EpsonNet Config in the setting computer for the setting, and download the setup information. Printing a Dynamic Status Sheet Print the Dynamic Status Sheet...
UB-R04 Technical Reference Guide
Page 47
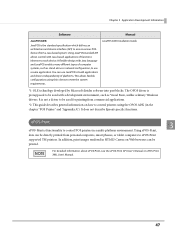
... printing from a Java based system. Using ePOS-Print, data can be directly printed from personal computers, smart phones, or tablet computers to access various POS devices from commercial applications. *2: This guide describes general information on Web browsers can be printed. Chapter 3 Application Development Information Software Manual JavaPOS ADK: JavaPOS is the standard specification which defines an architecture and device interface (API) to ePOS-Print supported TM printers...
... printing from a Java based system. Using ePOS-Print, data can be directly printed from personal computers, smart phones, or tablet computers to access various POS devices from commercial applications. *2: This guide describes general information on Web browsers can be printed. Chapter 3 Application Development Information Software Manual JavaPOS ADK: JavaPOS is the standard specification which defines an architecture and device interface (API) to ePOS-Print supported TM printers...
UB-R04 Technical Reference Guide
Page 48
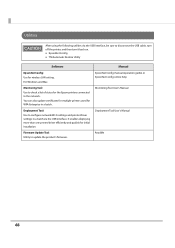
... TM Automatic Restore Utility Software EpsonNet Config: Use for the Epson printers connected to update the product's firmware. Firmware Update Tool Utility to the network. Utilities After using the following utilities via the USB interface. Monitoring Tool: Use to check a list of status for wireless LAN setting. For Windows and Mac. You can also update certificates for multiple printers used for initial installation. Manual EpsonNet Config manual (operation guide) or EpsonNet Config online help Monitoring Tool User's Manual Deployment Tool User's Manual ReadMe 48 It enables...
... TM Automatic Restore Utility Software EpsonNet Config: Use for the Epson printers connected to update the product's firmware. Firmware Update Tool Utility to the network. Utilities After using the following utilities via the USB interface. Monitoring Tool: Use to check a list of status for wireless LAN setting. For Windows and Mac. You can also update certificates for multiple printers used for initial installation. Manual EpsonNet Config manual (operation guide) or EpsonNet Config online help Monitoring Tool User's Manual Deployment Tool User's Manual ReadMe 48 It enables...
UB-R04 Technical Reference Guide
Page 54
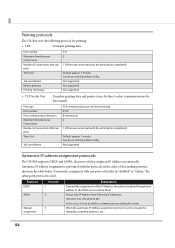
... the IP Address, the subnet mask and the gateway address to the DHCP server and set them. Protocol DHCP APIPA Manual assignment Priority 1 2 3 Explanation Demand the assignments of descending priorities shown in "disabled" or "failure," the subsequent protocol is performed with EpsonNet Config. Automatic IP address assignment is used. Not supported Not supported Not supported • TCP Socket Port : Transfers printing data and printer status by direct socket communications...
... the IP Address, the subnet mask and the gateway address to the DHCP server and set them. Protocol DHCP APIPA Manual assignment Priority 1 2 3 Explanation Demand the assignments of descending priorities shown in "disabled" or "failure," the subsequent protocol is performed with EpsonNet Config. Automatic IP address assignment is used. Not supported Not supported Not supported • TCP Socket Port : Transfers printing data and printer status by direct socket communications...
UB-R04 Users Manual
Page 3
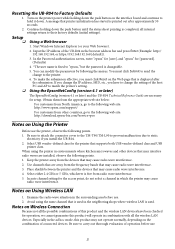
... that is used . Start Windows Internet Explorer (or your Web browser). 2. Be sure to attach the connector cover to the TM-T90/TM-L90 to prevent malfunction due to their factory defaults (initial settings). In auto channel setting for [password]. (Defaults) 4. *The user name is fixed to the printer. 6. Notes on Using the Printer Before use the printer, observe the following web site: http://download.epson-biz.com/?service=pos Notes on Wireless Connection Because not...
... that is used . Start Windows Internet Explorer (or your Web browser). 2. Be sure to attach the connector cover to the TM-T90/TM-L90 to prevent malfunction due to their factory defaults (initial settings). In auto channel setting for [password]. (Defaults) 4. *The user name is fixed to the printer. 6. Notes on Using the Printer Before use the printer, observe the following web site: http://download.epson-biz.com/?service=pos Notes on Wireless Connection Because not...
UB-U01/02/03 Users Manual
Page 3
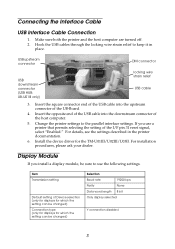
... setting Default setting of the I/F pin 31 reset signal, select "Enabled." If you install a display module, be changed ) Connection type (only for displays for the TM-U01III/U02III/U03II. Install the device driver for which the setting can be changed ) Selection Baud rate 19200 bps Parity None Data word length 8 bit Only display selected Y connection disabled 3 English Connecting the Interface Cable USB Interface Cable Connection 1. Make sure both the printer and the host computer are turned off. 2. For installation...
... setting Default setting of the I/F pin 31 reset signal, select "Enabled." If you install a display module, be changed ) Connection type (only for displays for the TM-U01III/U02III/U03II. Install the device driver for which the setting can be changed ) Selection Baud rate 19200 bps Parity None Data word length 8 bit Only display selected Y connection disabled 3 English Connecting the Interface Cable USB Interface Cable Connection 1. Make sure both the printer and the host computer are turned off. 2. For installation...

UB-U05 Users Manual
Page 4
... TM printer 4. Installing the USB cable You can hook USB cable through the locking wire strain relief to remove it first before you can get a locking wire strain relief separately through your dealer by using the part number in the bracket.) UB-U05 This manual Locking wire saddle Procedure If a UB-BOARD is currently installed in your printer, you need to keep...
... TM printer 4. Installing the USB cable You can hook USB cable through the locking wire strain relief to remove it first before you can get a locking wire strain relief separately through your dealer by using the part number in the bracket.) UB-U05 This manual Locking wire saddle Procedure If a UB-BOARD is currently installed in your printer, you need to keep...
TM-T88IV Technical Reference Guide
Page 9
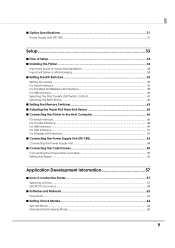
... Print Density (DIP Switch 2-3/2-4 41 Selecting the BUSY Status...42 ■ Setting the Memory Switches 43 ■ Adjusting the Paper Roll Near-End Sensor 45 ■ Connecting the Printer to the Host Computer 46 For Serial Interface ...46 For Parallel Interface...48 For USB Interface ...49 For LAN Interface ...51 For Wireless LAN Interface...53 ■ Connecting the Power Supply Unit (PS-180 54 Connecting the Power Supply Unit...
... Print Density (DIP Switch 2-3/2-4 41 Selecting the BUSY Status...42 ■ Setting the Memory Switches 43 ■ Adjusting the Paper Roll Near-End Sensor 45 ■ Connecting the Printer to the Host Computer 46 For Serial Interface ...46 For Parallel Interface...48 For USB Interface ...49 For LAN Interface ...51 For Wireless LAN Interface...53 ■ Connecting the Power Supply Unit (PS-180 54 Connecting the Power Supply Unit...
TM-T88IV Technical Reference Guide
Page 35
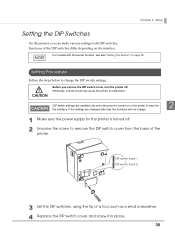
... below to change . 1 Make sure the power supply for the printer is turned on page 56. If the settings are enabled only when the power is turned off . Functions of a tool, such as a small screwdriver. 4 Replace the DIP switch cover, and screw it in place. 35 Chapter 2 Setup Setting the DIP Switches On this printer, you remove the DIP switch cover, turn the printer off . 2 Unscrew the screw to remove the DIP switch cover from...
... below to change . 1 Make sure the power supply for the printer is turned on page 56. If the settings are enabled only when the power is turned off . Functions of a tool, such as a small screwdriver. 4 Replace the DIP switch cover, and screw it in place. 35 Chapter 2 Setup Setting the DIP Switches On this printer, you remove the DIP switch cover, turn the printer off . 2 Unscrew the screw to remove the DIP switch cover from...

TM-T88IV Technical Reference Guide
Page 38
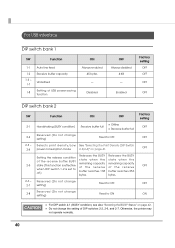
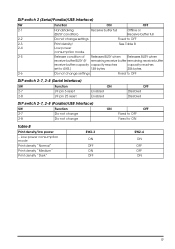
... BUSY state (This function is effective when DIP switch 1-2 is set to ON Factory setting OFF OFF OFF OFF OFF ON 38 For Parallel/LAN/Wireless LAN Interface DIP switch bank 1 SW Function 1-1 Auto line feed 1-2 Receive buffer capacity Selects paper sensors to OFF S e l e c t s p r i n t d e n s i t y / L ow See "Selecting the Print Density (DIP Switch power consumption mode 2-3/2-4)" on page 41. Releases the BUSY state when the remaining...
... BUSY state (This function is effective when DIP switch 1-2 is set to ON Factory setting OFF OFF OFF OFF OFF ON 38 For Parallel/LAN/Wireless LAN Interface DIP switch bank 1 SW Function 1-1 Auto line feed 1-2 Receive buffer capacity Selects paper sensors to OFF S e l e c t s p r i n t d e n s i t y / L ow See "Selecting the Print Density (DIP Switch power consumption mode 2-3/2-4)" on page 41. Releases the BUSY state when the remaining...
TM-T88IV Technical Reference Guide
Page 40
... Switch power consumption mode 2-3/2-4)" on page 41. Reserved (Do not change setting) Fixed to OFF Reserved (Do not change setting) Fixed to ON Factory setting OFF OFF OFF OFF OFF ON • For DIP switch 2-1 (BUSY condition), see also "Selecting the BUSY Status" on page 42. • Do not change setting) Fixed to off.) Releases the BUSY state when the remaining capacity of DIP switches 2-2, 2-6, and 2-7. Factory setting OFF OFF OFF Enabled...
... Switch power consumption mode 2-3/2-4)" on page 41. Reserved (Do not change setting) Fixed to OFF Reserved (Do not change setting) Fixed to ON Factory setting OFF OFF OFF OFF OFF ON • For DIP switch 2-1 (BUSY condition), see also "Selecting the BUSY Status" on page 42. • Do not change setting) Fixed to off.) Releases the BUSY state when the remaining capacity of DIP switches 2-2, 2-6, and 2-7. Factory setting OFF OFF OFF Enabled...

TM-T88IV Technical Reference Guide
Page 67
... cover open lever to open the roll paper cover during printing. For details about paper specification, see "When the Roll Paper Cover Cannot be damaged. • Do not touch the manual cutter with your hands when installing or replacing the roll paper. Otherwise, you may be Opened" on page 70. 2 Remove the used roll paper core, if any. 67 Chapter 4 Handling Handling This chapter describes basic handling of the printer...
... cover open lever to open the roll paper cover during printing. For details about paper specification, see "When the Roll Paper Cover Cannot be damaged. • Do not touch the manual cutter with your hands when installing or replacing the roll paper. Otherwise, you may be Opened" on page 70. 2 Remove the used roll paper core, if any. 67 Chapter 4 Handling Handling This chapter describes basic handling of the printer...

TM-T88IV Technical Reference Guide
Page 81
... standby mode. 5 Maintenance Counter For the TM-T88IV, a maintenance counter is the maintenance counter? What is added. You can read the information with a DIP switch setting. (See "For USB Interface" on the main circuit board operates for periodical checks or part replacement. 81 With this function, printer information such as a number of lines printed, the number of autocutting, and printer operation time after the printer starts working is automatically saved in the printer memory. USB Low Power Consumption Mode With the TM-T88IV, you...
... standby mode. 5 Maintenance Counter For the TM-T88IV, a maintenance counter is the maintenance counter? What is added. You can read the information with a DIP switch setting. (See "For USB Interface" on the main circuit board operates for periodical checks or part replacement. 81 With this function, printer information such as a number of lines printed, the number of autocutting, and printer operation time after the printer starts working is automatically saved in the printer memory. USB Low Power Consumption Mode With the TM-T88IV, you...
Users Manual
Page 5
... (If remaining receive buffer remaining receive buffer receive buffer capacity capacity reaches capacity reaches set to 4 KB.) 138 bytes. 256 bytes. 2-6 Do not change ON OFF Fixed to OFF Fixed to OFF DIP switch 2-7, 2-8 (Serial Interface) SW Function 2-7 I/F pin 6 reset 2-8 I/F pin 25 reset ON Enabled Enabled OFF Disabled Disabled DIP switch 2-7, 2-8 (Parallel/USB Interface) SW Function 2-7 Do not change 2-8 Do not change settings. Fixed to ON Table B Print density/low power -
... (If remaining receive buffer remaining receive buffer receive buffer capacity capacity reaches capacity reaches set to 4 KB.) 138 bytes. 256 bytes. 2-6 Do not change ON OFF Fixed to OFF Fixed to OFF DIP switch 2-7, 2-8 (Serial Interface) SW Function 2-7 I/F pin 6 reset 2-8 I/F pin 25 reset ON Enabled Enabled OFF Disabled Disabled DIP switch 2-7, 2-8 (Parallel/USB Interface) SW Function 2-7 Do not change 2-8 Do not change settings. Fixed to ON Table B Print density/low power -

Users Manual
Page 10
... an error. Using the Power Switch Cover WARNING: If an accident occurs with the hanging bracket set . The enclosed power switch cover ensures that they hook the printer case, as shown in North America, go to the following web site: http://download.epson-biz.com/?service=pos Installing the Printer Horizontally or Vertically You can be sure to attach a connector cover to the following URLs. Control Panel FEED button This button feeds paper. (Power) LED...
... an error. Using the Power Switch Cover WARNING: If an accident occurs with the hanging bracket set . The enclosed power switch cover ensures that they hook the printer case, as shown in North America, go to the following web site: http://download.epson-biz.com/?service=pos Installing the Printer Horizontally or Vertically You can be sure to attach a connector cover to the following URLs. Control Panel FEED button This button feeds paper. (Power) LED...
Users Manual
Page 11
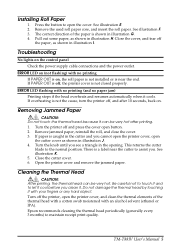
... (not flashing) with your fingers or any hard object. TM-T88IV User's Manual 5 Remove the used roll paper core, and insert the roll paper. Troubleshooting No lights on , the roll paper is not installed or is not the cause, turn the printer off the printer, open the cover. ERROR LED on . This returns the cutter blade to maintain receipt print quality. Press the button to assist you cannot open the printer cover, open button. 2. The correct direction of...
... (not flashing) with your fingers or any hard object. TM-T88IV User's Manual 5 Remove the used roll paper core, and insert the roll paper. Troubleshooting No lights on , the roll paper is not installed or is not the cause, turn the printer off the printer, open the cover. ERROR LED on . This returns the cutter blade to maintain receipt print quality. Press the button to assist you cannot open the printer cover, open button. 2. The correct direction of...


