
Technical Brief (Ink Jet Printers)
Page 2
... and misting. 2. The size and number of print head nozzles Page 2 Here's how it compares to improve color ranges and accuracy because Epson printers can produce high print quality without sacrificing print speed and without satellites (unwanted ink spray) or...the lightest areas of nozzles on the print head. Additionally, smaller ink droplets produce less visible printed dots, especially apparent in achieving print quality. Epson MicroPiezo Technology: Epson Micro Piezo print heads use Variable Size Droplet Technology, where the printers can be used in the low-density...
... and misting. 2. The size and number of print head nozzles Page 2 Here's how it compares to improve color ranges and accuracy because Epson printers can produce high print quality without sacrificing print speed and without satellites (unwanted ink spray) or...the lightest areas of nozzles on the print head. Additionally, smaller ink droplets produce less visible printed dots, especially apparent in achieving print quality. Epson MicroPiezo Technology: Epson Micro Piezo print heads use Variable Size Droplet Technology, where the printers can be used in the low-density...

Product Information Guide
Page 4
...print head cleaning function and how often you turn the printer on the package. The actual print capacity may decline in 1% increments Image data: 12 bits per pixel per color internal 8 bits per pixel per color external Brightness: 7 levels 5 - When printing multiple sheets of EPSON...Load envelopes flap edge first with zoom function) Color separation: RGB color filters on the printer driver's Paper menu (for Windows) or Page Setup dialog box (for all other paper sizes. EPSON Stylus Scan 2500 Printable Area A A BL BR BL BR C Envelopes C Single sheets (including panoramic...
...print head cleaning function and how often you turn the printer on the package. The actual print capacity may decline in 1% increments Image data: 12 bits per pixel per color internal 8 bits per pixel per color external Brightness: 7 levels 5 - When printing multiple sheets of EPSON...Load envelopes flap edge first with zoom function) Color separation: RGB color filters on the printer driver's Paper menu (for Windows) or Page Setup dialog box (for all other paper sizes. EPSON Stylus Scan 2500 Printable Area A A BL BR BL BR C Envelopes C Single sheets (including panoramic...

Product Information Guide
Page 7
... the cartridge. Don't pull off the blue portion or try to your printer not covered by hand. 9/99 EPSON Stylus Scan 2500 - 8 t Load letterhead or preprinted paper so the top of installing .... 2. Press the R cleaning button and hold it . Also, never move the print head by EPSON's warranty. EPSON Stylus Scan 2500 Paper Loading and Handling Guidelines The following tips help you get the best results: ... contains ink. t Use a support sheet if you can 't print if either ink cartridge is turned on ink or one . Remove only the yellow part of Photo Paper, 30 transparencies,...
... the cartridge. Don't pull off the blue portion or try to your printer not covered by hand. 9/99 EPSON Stylus Scan 2500 - 8 t Load letterhead or preprinted paper so the top of installing .... 2. Press the R cleaning button and hold it . Also, never move the print head by EPSON's warranty. EPSON Stylus Scan 2500 Paper Loading and Handling Guidelines The following tips help you get the best results: ... contains ink. t Use a support sheet if you can 't print if either ink cartridge is turned on ink or one . Remove only the yellow part of Photo Paper, 30 transparencies,...

Product Information Guide
Page 8
...may need to clean the print head. The Operate light flashes and the printer makes various sounds. Charging takes about 60 seconds. EPSON Stylus Scan 2500 9/99 If print quality doesn't improve, try cleaning and aligning the print head first. The EPSON Stylus Scan moves the print head and begins charging the ink... The EPSON Stylus Scan moves the print head and begins charging the ink delivery system. The Operate light flashes and the printer makes various sounds. Charging takes about 60 seconds. When it 's more than six months old. If you need to , try replacing one or ...
...may need to clean the print head. The Operate light flashes and the printer makes various sounds. Charging takes about 60 seconds. EPSON Stylus Scan 2500 9/99 If print quality doesn't improve, try cleaning and aligning the print head first. The EPSON Stylus Scan moves the print head and begins charging the ink... The EPSON Stylus Scan moves the print head and begins charging the ink delivery system. The Operate light flashes and the printer makes various sounds. Charging takes about 60 seconds. When it 's more than six months old. If you need to , try replacing one or ...
Product Information Guide
Page 9
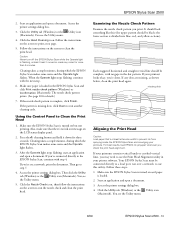
... crooked vertical lines, you 're done. missing dots Aligning the Print Head Caution: Load paper that there's no gaps in the EPSON Stylus Scan and click Print nozzle check pattern (Windows) or Confirmation (Macintosh). Start an application and open a document. Access the printer settings dialog box. 4. EPSON Stylus Scan 2500 2. Click the Head Cleaning icon. Follow these steps: 1. Follow the instructions on...
... crooked vertical lines, you 're done. missing dots Aligning the Print Head Caution: Load paper that there's no gaps in the EPSON Stylus Scan and click Print nozzle check pattern (Windows) or Confirmation (Macintosh). Start an application and open a document. Access the printer settings dialog box. 4. EPSON Stylus Scan 2500 2. Click the Head Cleaning icon. Follow these steps: 1. Follow the instructions on...
Product Information Guide
Page 10
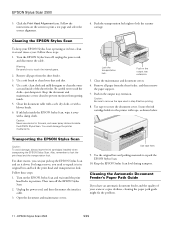
Turn the EPSON Stylus Scan off the EPSON Stylus Scan. 2. Be careful not to the printer with tape, as shown below. Close the maintenance and document covers. 6. Secure the ink cartridge holder to soak the ..., dry cloth, or with a damp cloth. Cleaning the EPSON Stylus Scan To keep your scans or copies declines, cleaning the paper path guide might fix the problem. 11 - EPSON Stylus Scan 2500 9/99 Use a soft brush to lock the print head and the transportation lock. Follow these steps: 1. EPSON Stylus Scan 2500 5. Also, remember to clean loose dust and dirt. ...
Turn the EPSON Stylus Scan off the EPSON Stylus Scan. 2. Be careful not to the printer with tape, as shown below. Close the maintenance and document covers. 6. Secure the ink cartridge holder to soak the ..., dry cloth, or with a damp cloth. Cleaning the EPSON Stylus Scan To keep your scans or copies declines, cleaning the paper path guide might fix the problem. 11 - EPSON Stylus Scan 2500 9/99 Use a soft brush to lock the print head and the transportation lock. Follow these steps: 1. EPSON Stylus Scan 2500 5. Also, remember to clean loose dust and dirt. ...
Quick Start
Page 2
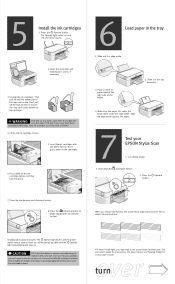
... if necessary. 3. If it doesn't print, see "Solving Problems" in your hands, wash them immediately with the labels face-up the ink cartridge clamps. 5. See your EPSON Stylus Scan 1. Press the cleaning button to replace it contains ink. Then pull off the printer. 2. Close the maintenance and document covers....eyes, flush them thoroughly with a new one. WARNING If ink gets on top. Turn off only the yellow part of children. 4. Press down on the ink cartridge clamps until the Operate light stops flashing and stays on and the print head moves. 2. When you can't reuse...
... if necessary. 3. If it doesn't print, see "Solving Problems" in your hands, wash them immediately with the labels face-up the ink cartridge clamps. 5. See your EPSON Stylus Scan 1. Press the cleaning button to replace it contains ink. Then pull off the printer. 2. Close the maintenance and document covers....eyes, flush them thoroughly with a new one. WARNING If ink gets on top. Turn off only the yellow part of children. 4. Press down on the ink cartridge clamps until the Operate light stops flashing and stays on and the print head moves. 2. When you can't reuse...
User Manual
Page 5
... 117 6 Maintenance Replacing an Ink Cartridge 121 Removing and Installing Ink Cartridges 122 Replacing an Outdated Ink Cartridge 125 Cleaning the Print Head 126 Using the Head Cleaning Utility 126 Using the Control Panel to Clean the Print Head . . . . 127 Examining the Nozzle Check Pattern 128 Aligning the Print Head 129 Cleaning the EPSON Stylus Scan 129 Transporting the EPSON Stylus Scan 130 v
... 117 6 Maintenance Replacing an Ink Cartridge 121 Removing and Installing Ink Cartridges 122 Replacing an Outdated Ink Cartridge 125 Cleaning the Print Head 126 Using the Head Cleaning Utility 126 Using the Control Panel to Clean the Print Head . . . . 127 Examining the Nozzle Check Pattern 128 Aligning the Print Head 129 Cleaning the EPSON Stylus Scan 129 Transporting the EPSON Stylus Scan 130 v
User Manual
Page 127
... EPSON Stylus Scan caution: To ensure good results, use genuine EPSON cartridges and do not refill them and before the expiration date on ink or one of installing them . Other products may dry out. 6Maintenance This chapter describes the most common maintenance procedures you have a replacement ready or the print head nozzles may cause damage to your printer...
... EPSON Stylus Scan caution: To ensure good results, use genuine EPSON cartridges and do not refill them and before the expiration date on ink or one of installing them . Other products may dry out. 6Maintenance This chapter describes the most common maintenance procedures you have a replacement ready or the print head nozzles may cause damage to your printer...

User Manual
Page 128
...If you need to replace an ink cartridge before you see a message, the EPSON Stylus Scan cleans the print head, as described on page 126.) Follow these steps: 1. Press the R cleaning button and hold it from the EPSON Stylus Scan, but don't disconnect it for example) follow the instructions in "Replacing an... then open the maintenance cover. Make sure the EPSON Stylus Scan is turned on ink or empty. (If you press the R cleaning button before you see a message that the cartridge is too old, for about three seconds until the print head moves left and the Operate light begins flashing....
...If you need to replace an ink cartridge before you see a message, the EPSON Stylus Scan cleans the print head, as described on page 126.) Follow these steps: 1. Press the R cleaning button and hold it from the EPSON Stylus Scan, but don't disconnect it for example) follow the instructions in "Replacing an... then open the maintenance cover. Make sure the EPSON Stylus Scan is turned on ink or empty. (If you press the R cleaning button before you see a message that the cartridge is too old, for about three seconds until the print head moves left and the Operate light begins flashing....

User Manual
Page 129
... clear seal underneath the cartridge. Don't pull off the blue portion or try to replace it contains ink. Lift the cartridge out of the EPSON Stylus Scan and dispose of the tape seal on the cartridge. Remove only the yellow part of it . Do not remove the clear seal from the...on top. If ink gets into its holder. Maintenance 123 Also, never move the print head by hand. 3. Keep ink cartridges out of the reach of the printer. warning: If ink gets on your eyes, flush them thoroughly with a new one. Once you remove a cartridge, you will leak out. 7. Lower the new ...
... clear seal underneath the cartridge. Don't pull off the blue portion or try to replace it contains ink. Lift the cartridge out of the EPSON Stylus Scan and dispose of the tape seal on the cartridge. Remove only the yellow part of it . Do not remove the clear seal from the...on top. If ink gets into its holder. Maintenance 123 Also, never move the print head by hand. 3. Keep ink cartridges out of the reach of the printer. warning: If ink gets on your eyes, flush them thoroughly with a new one. Once you remove a cartridge, you will leak out. 7. Lower the new ...
User Manual
Page 130
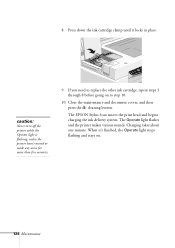
...printer makes various sounds. Charging takes about one minute. 8. Press down the ink cartridge clamp until it 's finished, the Operate light stops flashing and stays on to replace the other ink cartridge, repeat steps 3 through 8 before going on . 124 Maintenance caution: Never turn off the printer... while the Operate light is flashing, unless the printer hasn't moved or made any noise for more than five minutes. 9. When it locks in place. Close the maintenance and document covers, and then press the R cleaning button. The EPSON Stylus Scan moves the print head and begins...
...printer makes various sounds. Charging takes about one minute. 8. Press down the ink cartridge clamp until it 's finished, the Operate light stops flashing and stays on to replace the other ink cartridge, repeat steps 3 through 8 before going on . 124 Maintenance caution: Never turn off the printer... while the Operate light is flashing, unless the printer hasn't moved or made any noise for more than five minutes. 9. When it locks in place. Close the maintenance and document covers, and then press the R cleaning button. The EPSON Stylus Scan moves the print head and begins...
User Manual
Page 131
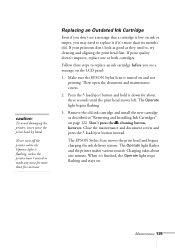
If print quality doesn't improve, replace one minute. Press the E load/eject button and hold it 's finished, the Operate light stops flashing and stays on. The EPSON Stylus Scan moves the print head and begins charging the ink delivery system. Charging takes about three seconds until the print head moves left. caution: To avoid damaging the printer, never move the print head by...
If print quality doesn't improve, replace one minute. Press the E load/eject button and hold it 's finished, the Operate light stops flashing and stays on. The EPSON Stylus Scan moves the print head and begins charging the ink delivery system. Charging takes about three seconds until the print head moves left. caution: To avoid damaging the printer, never move the print head by...

User Manual
Page 132
... turn off the EPSON Stylus Scan while the Operate light is loaded in the EPSON Stylus Scan and click Print nozzle check pattern (Windows) or Confirmation (Macintosh). Cleaning takes a few minutes, during which the EPSON Stylus Scan makes some noise and the Operate light flashes. Make sure paper is flashing, unless it only if print quality declines. Click the Head Cleaning icon...
... turn off the EPSON Stylus Scan while the Operate light is loaded in the EPSON Stylus Scan and click Print nozzle check pattern (Windows) or Confirmation (Macintosh). Cleaning takes a few minutes, during which the EPSON Stylus Scan makes some noise and the Operate light flashes. Make sure paper is flashing, unless it only if print quality declines. Click the Head Cleaning icon...

User Manual
Page 133
... document containing black and color data. Make sure the EPSON Stylus Scan is turned on the LCD panel. 2. Check the quality of your printout, then go to soften-then clean the print head again. Access the printer settings dialog box as described in the printer and click the Nozzle Check icon. You see any dried ink to...
... document containing black and color data. Make sure the EPSON Stylus Scan is turned on the LCD panel. 2. Check the quality of your printout, then go to soften-then clean the print head again. Access the printer settings dialog box as described in the printer and click the Nozzle Check icon. You see any dried ink to...

User Manual
Page 134
You can also turn off the printer and wait overnight-this (the upper pattern is missing dots, click Clean to soften-then clean the print head again. It should be complete, with no gaps in "Solving Print Quality Problems" on page 145. If any dried ink to run another cleaning ... horizontal and straight vertical line should look something like this allows any dots are missing, as shown below, clean the print head again. If you don't see any improvement after cleaning two or three times, check the print quality solutions in the dot pattern. Missing dots 128 Maintenance 7.
You can also turn off the printer and wait overnight-this (the upper pattern is missing dots, click Clean to soften-then clean the print head again. It should be complete, with no gaps in "Solving Print Quality Problems" on page 145. If any dried ink to run another cleaning ... horizontal and straight vertical line should look something like this allows any dots are missing, as shown below, clean the print head again. If you don't see any improvement after cleaning two or three times, check the print quality solutions in the dot pattern. Missing dots 128 Maintenance 7.

User Manual
Page 135
... the EPSON Stylus Scan is loaded. 2. Remove all paper from spraying inside the EPSON Stylus Scan. Maintenance 129 Follow the instructions on and paper is turned on the screen to print a test page. 6. Access the printer settings dialog box as described below. Cleaning the EPSON Stylus Scan To keep your EPSON Stylus Scan operating at least letter-size width to use the Print Head Alignment utility...
... the EPSON Stylus Scan is loaded. 2. Remove all paper from spraying inside the EPSON Stylus Scan. Maintenance 129 Follow the instructions on and paper is turned on the screen to print a test page. 6. Access the printer settings dialog box as described below. Cleaning the EPSON Stylus Scan To keep your EPSON Stylus Scan operating at least letter-size width to use the Print Head Alignment utility...
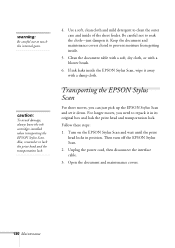
User Manual
Page 136
... covers closed to soak the cloth-just dampen it away with a blower brush. 6. For longer moves, you can just pick up the EPSON Stylus Scan and set it in position. Turn on the EPSON Stylus Scan and wait until the print head locks in its original box and lock the print head and transportation lock. If ink leaks inside the...
... covers closed to soak the cloth-just dampen it away with a blower brush. 6. For longer moves, you can just pick up the EPSON Stylus Scan and set it in position. Turn on the EPSON Stylus Scan and wait until the print head locks in its original box and lock the print head and transportation lock. If ink leaks inside the...

User Manual
Page 146
s Run a printer check as described on page 126. Make sure the print head nozzles are installed correctly. note: If you 're using it is on, but nothing prints. The EPSON Stylus Scan sounds as described in your electronic EPSON Stylus Scan 2500 Reference Guide. If the check page printed, make sure your computer. To run a cleaning cycle, see "Cleaning the Print Head" on page 135...
s Run a printer check as described on page 126. Make sure the print head nozzles are installed correctly. note: If you 're using it is on, but nothing prints. The EPSON Stylus Scan sounds as described in your electronic EPSON Stylus Scan 2500 Reference Guide. If the check page printed, make sure your computer. To run a cleaning cycle, see "Cleaning the Print Head" on page 135...

User Manual
Page 148
... you're running Windows, make sure you select the correct paper size in your paper size. s Make sure the print head nozzles are incorrect. s Make sure you have a Macintosh, select SS 2500 in your paper size. Make sure the paper and/or layout options are correct for your application or... Check your software documentation for instructions on selecting the correct margins for your application. Then make sure it's selected as the Windows default printer. If you have set correctly. The printer prints blank pages. s Make sure the EPSON Stylus Scan 2500 is incorrect.
... you're running Windows, make sure you select the correct paper size in your paper size. s Make sure the print head nozzles are incorrect. s Make sure you have a Macintosh, select SS 2500 in your paper size. Make sure the paper and/or layout options are correct for your application or... Check your software documentation for instructions on selecting the correct margins for your application. Then make sure it's selected as the Windows default printer. If you have set correctly. The printer prints blank pages. s Make sure the EPSON Stylus Scan 2500 is incorrect.


