Product Brochure
Page 2
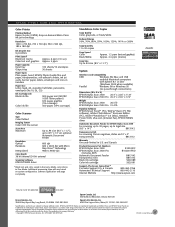
.... 5 ppm Paper Capacity Input tray Output tray 100 sheets/10 envelopes 30 sheets Paper Types Plain paper, bond, EPSON Photo Quality film and paper, transparencies, self-adhesive sheets, ink jet cards, banner paper, labels, envelopes and iron-on transfers Paper Size Letter, legal, A4, executive half-letter, panoramic, envelopes (No.10, DL, C5) Ink Cartridge Life Black ink life Color ink life 900 pages text (ISO/IEC 10561 letter pattern) 634 pages graphics (5% coverage) 300 pages (15% coverage) Color Scanner Type Color flatbed Imaging Sensor Color CCD line sensor Scan Area Maximum...
.... 5 ppm Paper Capacity Input tray Output tray 100 sheets/10 envelopes 30 sheets Paper Types Plain paper, bond, EPSON Photo Quality film and paper, transparencies, self-adhesive sheets, ink jet cards, banner paper, labels, envelopes and iron-on transfers Paper Size Letter, legal, A4, executive half-letter, panoramic, envelopes (No.10, DL, C5) Ink Cartridge Life Black ink life Color ink life 900 pages text (ISO/IEC 10561 letter pattern) 634 pages graphics (5% coverage) 300 pages (15% coverage) Color Scanner Type Color flatbed Imaging Sensor Color CCD line sensor Scan Area Maximum...

Product Information Guide
Page 2
... that you have problems installing them. EPSON Stylus Scan 2500 9/99 Contact Apple if you install iMac Update 1.1. If your iMac is running Mac OS 8.1, you need to a built-in USB port t Mac OS 8.1 or later (OS 8.5 or later recommended) t At least 32MB of available memory (64MB recommended) t At least 50MB of free hard drive space (100MB recommended) t VGA or better monitor (24-bit color recommended) t Double-speed (2x...
... that you have problems installing them. EPSON Stylus Scan 2500 9/99 Contact Apple if you install iMac Update 1.1. If your iMac is running Mac OS 8.1, you need to a built-in USB port t Mac OS 8.1 or later (OS 8.5 or later recommended) t At least 32MB of available memory (64MB recommended) t At least 50MB of free hard drive space (100MB recommended) t VGA or better monitor (24-bit color recommended) t Double-speed (2x...

Product Information Guide
Page 4
... per pixel per color external Brightness: 7 levels 5 - Before printing large jobs using this setting, print a single sheet to your software.) Scanning resolution: 600 dpi (main) 2400 dpi (sub) Output resolution: 50 dpi to 9600 dpi (50 to 200% in the expanded area. EPSON Stylus Scan 2500 9/99 EPSON Stylus Scan 2500 Printable Area A A BL BR BL BR C Envelopes C Single sheets (including panoramic size) and index cards A The minimum top margin is 0.12 inch...
... per pixel per color external Brightness: 7 levels 5 - Before printing large jobs using this setting, print a single sheet to your software.) Scanning resolution: 600 dpi (main) 2400 dpi (sub) Output resolution: 50 dpi to 9600 dpi (50 to 200% in the expanded area. EPSON Stylus Scan 2500 9/99 EPSON Stylus Scan 2500 Printable Area A A BL BR BL BR C Envelopes C Single sheets (including panoramic size) and index cards A The minimum top margin is 0.12 inch...
Product Information Guide
Page 6
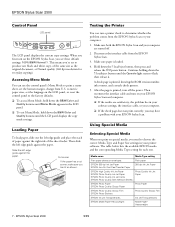
... Photo Quality Glossy Film EPSON Ink Jet Transparencies Ink Jet Transparencies EPSON Matte Paper-Heavyweight Matte Paper- Accessing Menu Mode You can run a printer check to the factory defaults. Disconnect the interface cable from U.S. Testing the Printer You can use the control panel's Menu Mode to choose the correct Media Type and Paper Size settings in your computer are satisfactory, the problem lies in the LCD panel. After the page is printed, turn on the LCD panel, or reset the control panel to determine whether the problem comes from the EPSON Stylus Scan...
... Photo Quality Glossy Film EPSON Ink Jet Transparencies Ink Jet Transparencies EPSON Matte Paper-Heavyweight Matte Paper- Accessing Menu Mode You can run a printer check to the factory defaults. Disconnect the interface cable from U.S. Testing the Printer You can use the control panel's Menu Mode to choose the correct Media Type and Paper Size settings in your computer are satisfactory, the problem lies in the LCD panel. After the page is printed, turn on the LCD panel, or reset the control panel to determine whether the problem comes from the EPSON Stylus Scan...

Product Information Guide
Page 7
... printer not covered by hand. 9/99 EPSON Stylus Scan 2500 - 8 Also, never move the print head by EPSON's warranty. Remove only the yellow part of installing them and before the expiration date on page 9. document cover maintenance cover internal cover 4. t Use a support sheet if you can replace a cartridge whenever you see a message that the cartridge is too old, for about three seconds until the print head moves left edge guide. Replacing an Ink Cartridge When you're low on page 9. Do not remove the clear...
... printer not covered by hand. 9/99 EPSON Stylus Scan 2500 - 8 Also, never move the print head by EPSON's warranty. Remove only the yellow part of installing them and before the expiration date on page 9. document cover maintenance cover internal cover 4. t Use a support sheet if you can replace a cartridge whenever you see a message that the cartridge is too old, for about three seconds until the print head moves left edge guide. Replacing an Ink Cartridge When you're low on page 9. Do not remove the clear...

Product Information Guide
Page 8
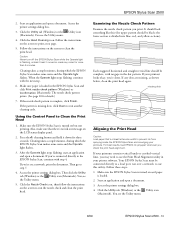
...print head moves left. If print quality doesn't improve, try cleaning and aligning the print head first. Make sure the EPSON Stylus Scan is low on the LCD status display panel. 9 - Then open the document and maintenance covers. 3. Remove the old ink cartridge and install the new cartridge as described in "Removing and Installing Ink Cartridges" on page 8. Don't press the R cleaning button, however. 5. Close the maintenance and document covers and press the E load/eject button. When it 's finished, the Operate light stops flashing and stays on . 9. The EPSON Stylus Scan moves the print...
...print head moves left. If print quality doesn't improve, try cleaning and aligning the print head first. Make sure the EPSON Stylus Scan is low on the LCD status display panel. 9 - Then open the document and maintenance covers. 3. Remove the old ink cartridge and install the new cartridge as described in "Removing and Installing Ink Cartridges" on page 8. Don't press the R cleaning button, however. 5. Close the maintenance and document covers and press the E load/eject button. When it 's finished, the Operate light stops flashing and stays on . 9. The EPSON Stylus Scan moves the print...
Product Information Guide
Page 9
... turned on the LCD status display panel. 2. If your printouts. If your printouts contain vertical bands or crooked vertical lines, you 're on but not printing. If the nozzle check pattern is missing dots, click Clean to the EPSON Stylus Scan, continue with the next step. 6. Using the Control Panel to step 7. 4. For best results, load EPSON ink jet paper whenever you print. Click the Utility tab (Windows) or the Utility icon (Macintosh). Make sure the EPSON Stylus Scan is loaded. 2. Access the printer settings...
... turned on the LCD status display panel. 2. If your printouts. If your printouts contain vertical bands or crooked vertical lines, you 're on but not printing. If the nozzle check pattern is missing dots, click Clean to the EPSON Stylus Scan, continue with the next step. 6. Using the Control Panel to step 7. 4. For best results, load EPSON ink jet paper whenever you print. Click the Utility tab (Windows) or the Utility icon (Macintosh). Make sure the EPSON Stylus Scan is loaded. 2. Access the printer settings...
Product Information Guide
Page 10
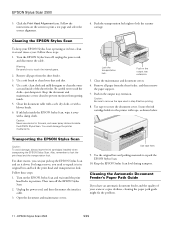
... the cable. EPSON Stylus Scan 2500 5. Remove all paper from getting inside the EPSON Stylus Scan, wipe it several times a year. Secure the ink cartridge holder to print a test page and select the correct alignment. 4. Turn on the screen to the printer with a blower brush. 6. Unplug the power cord, and then disconnect the interface cable. 3. Cleaning the Automatic Document Feeder's Paper Path Guide If you need to prevent moisture from the sheet feeder, and then remove the paper support. 7. Turn the EPSON Stylus Scan off the EPSON Stylus Scan. 2. Caution: Never use...
... the cable. EPSON Stylus Scan 2500 5. Remove all paper from getting inside the EPSON Stylus Scan, wipe it several times a year. Secure the ink cartridge holder to print a test page and select the correct alignment. 4. Turn on the screen to the printer with a blower brush. 6. Unplug the power cord, and then disconnect the interface cable. 3. Cleaning the Automatic Document Feeder's Paper Path Guide If you need to prevent moisture from the sheet feeder, and then remove the paper support. 7. Turn the EPSON Stylus Scan off the EPSON Stylus Scan. 2. Caution: Never use...

Product Support Bulletin(s)
Page 1
...: If you have the Stylus Scan 2500/2500Pro, you can use the setup installer on the label. The product code for this CD is the first time that came with a USB cable and turn it must use the Windows 2000 drivers. Therefore, when you have sufficient access rights to the next step. 1 If the code says CPD-9146, you need the updated Printing and Scanning Software CD. In order for these...
...: If you have the Stylus Scan 2500/2500Pro, you can use the setup installer on the label. The product code for this CD is the first time that came with a USB cable and turn it must use the Windows 2000 drivers. Therefore, when you have sufficient access rights to the next step. 1 If the code says CPD-9146, you need the updated Printing and Scanning Software CD. In order for these...

Product Support Bulletin(s)
Page 2
... see the Software Setup window. 13) Click once on the Epson_ss2500 CD icon. Double-click the ss2500 folder. If you have the Stylus Scan 2500, double-click on the Add Software button. Set the search parameters to continue the installation. 7) Select "Install from list or specific location" and click Next. 8) On the next screen uncheck "Search removable media". Click the Continue Anyway button. 11) Once the driver files have a check mark...
... see the Software Setup window. 13) Click once on the Epson_ss2500 CD icon. Double-click the ss2500 folder. If you have the Stylus Scan 2500, double-click on the Add Software button. Set the search parameters to continue the installation. 7) Select "Install from list or specific location" and click Next. 8) On the next screen uncheck "Search removable media". Click the Continue Anyway button. 11) Once the driver files have a check mark...
Product Support Bulletin(s)
Page 3
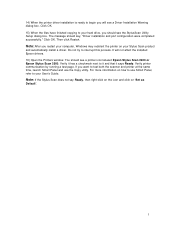
..., Windows may redetect the printer on "Set as Default". 3 The message should say Ready, then right-click on the icon and click on your User's Guide. Note: If the Stylus Scan does not say , "Driver installation and port configuration were completed successfully." 14) When the printer driver installation is ready to begin you will not affect the installed Epson drivers. 16) Open the Printers window. Click OK. Note: After you want to test...
..., Windows may redetect the printer on "Set as Default". 3 The message should say Ready, then right-click on the icon and click on your User's Guide. Note: If the Stylus Scan does not say , "Driver installation and port configuration were completed successfully." 14) When the printer driver installation is ready to begin you will not affect the installed Epson drivers. 16) Open the Printers window. Click OK. Note: After you want to test...
Product Support Bulletin(s)
Page 9
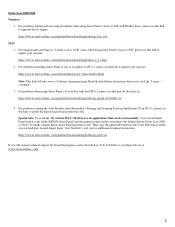
... your hard disk. For problems when using Smart Panel's Scan to update your software. Launch Smart Panel. For image quality problems or "Cannot scan to OCR" errors when using Smart Panel's Scan to OCR with FaxSTF 6.0, please use this link for the latest fix. http://www.newsoftinc.com/patch/download/english/ocr_01.hqx 2. For problems running the Auto-Installer from their web site at (510) 445-8616 or visit their own folders (Epson Stylus Scan...
... your hard disk. For problems when using Smart Panel's Scan to update your software. Launch Smart Panel. For image quality problems or "Cannot scan to OCR" errors when using Smart Panel's Scan to OCR with FaxSTF 6.0, please use this link for the latest fix. http://www.newsoftinc.com/patch/download/english/ocr_01.hqx 2. For problems running the Auto-Installer from their web site at (510) 445-8616 or visit their own folders (Epson Stylus Scan...
Product Support Bulletin(s)
Page 11
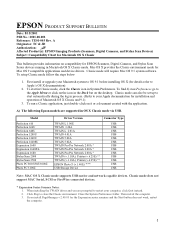
... USB TWAIN 4.01A USB TWAIN 5.02A USB TWAIN 5.02A USB TWAIN Pro/Pro Network 2.00A * USB TWAIN Pro/Pro Network 2.00A * USB TWAIN Pro/Pro Network 2.00A * USB TWAIN (v.1.10A); Mac OS X provides the Classic environment mode for EPSON Scanners, Digital Cameras, and Stylus Scan Series devices running in the Dock bar on it or a document created with the application. First install or upgrade your Apple documentation for the Expression series scanners and the Start button does not work, restart...
... USB TWAIN 4.01A USB TWAIN 5.02A USB TWAIN 5.02A USB TWAIN Pro/Pro Network 2.00A * USB TWAIN Pro/Pro Network 2.00A * USB TWAIN Pro/Pro Network 2.00A * USB TWAIN (v.1.10A); Mac OS X provides the Classic environment mode for EPSON Scanners, Digital Cameras, and Stylus Scan Series devices running in the Dock bar on it or a document created with the application. First install or upgrade your Apple documentation for the Expression series scanners and the Start button does not work, restart...

Quick Start
Page 1
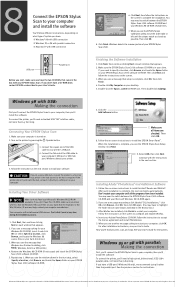
paper support software ink cartridges If you have the EPSON Stylus Scan 2500 Pro model, you check the system and location requirements and follow all the parts. CAUTION Make sure you should also have all the safety instructions in your User's Guide. If you need a cable to connect the printer to lock the transportation lock before you have these parts: usgeur'isde User's Guide media pack printer automatic document feeder (ADF) ADF paper support ADF paper guide unfhoereld 2 Attach the paper support 3 Release the transportation...
paper support software ink cartridges If you have the EPSON Stylus Scan 2500 Pro model, you check the system and location requirements and follow all the parts. CAUTION Make sure you should also have all the safety instructions in your User's Guide. If you need a cable to connect the printer to lock the transportation lock before you have these parts: usgeur'isde User's Guide media pack printer automatic document feeder (ADF) ADF paper support ADF paper guide unfhoereld 2 Attach the paper support 3 Release the transportation...
Quick Start
Page 3
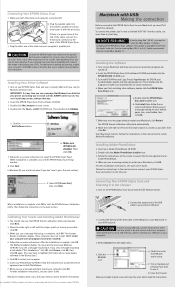
..., the next one begins automatically. Your computer will install several times. 7. Windows 95 or 98 with the hub, connect it rather than the parallel port. EPSON and EPSON Stylus are checked. If you 'll connect the EPSON Stylus Scan to configure and register WinFax. 4. Click the Add Software button. 7. Follow the on the screen to your hard disk drive.) 3. If the printer doesn't work with parallel: Making the connection First, you see the EPSON Screen Calibration utility, move the...
..., the next one begins automatically. Your computer will install several times. 7. Windows 95 or 98 with the hub, connect it rather than the parallel port. EPSON and EPSON Stylus are checked. If you 'll connect the EPSON Stylus Scan to configure and register WinFax. 4. Click the Add Software button. 7. Follow the on the screen to your hard disk drive.) 3. If the printer doesn't work with parallel: Making the connection First, you see the EPSON Screen Calibration utility, move the...
Quick Start
Page 4
... again. (You may need to restart your Macintosh, click Restart. Make sure both the printer and computer are checked. When you see a message that you see a message asking to install the iMac Update 1.0 before installing the EPSON Stylus Scan software. If you install iMac Update 1.1. Insert your User's Guide for instructions. Follow the instructions in the Chooser 1. Follow the instructions on your printer's USB port. 3. Connect the flat end of the USB cable to install Adobe PhotoDeluxe.
... again. (You may need to restart your Macintosh, click Restart. Make sure both the printer and computer are checked. When you see a message that you see a message asking to install the iMac Update 1.0 before installing the EPSON Stylus Scan software. If you install iMac Update 1.1. Insert your User's Guide for instructions. Follow the instructions in the Chooser 1. Follow the instructions on your printer's USB port. 3. Connect the flat end of the USB cable to install Adobe PhotoDeluxe.
User Manual
Page 9
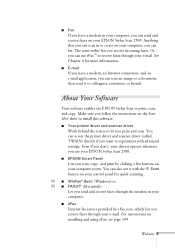
... screen. s eFax Internet fax service provided by clicking a few buttons on your e-mail. You can also use it to experiment with the ] Scan button on the Start Here sheet to install this software: s Your printer driver and scanner driver Work behind the scenes to print, scan, and copy. You can access the printer driver and scanner driver (called TWAIN) directly if you use eFax™ to receive faxes through your EPSON Stylus Scan 2500. For instructions...
... screen. s eFax Internet fax service provided by clicking a few buttons on your e-mail. You can also use it to experiment with the ] Scan button on the Start Here sheet to install this software: s Your printer driver and scanner driver Work behind the scenes to print, scan, and copy. You can access the printer driver and scanner driver (called TWAIN) directly if you use eFax™ to receive faxes through your EPSON Stylus Scan 2500. For instructions...
User Manual
Page 45
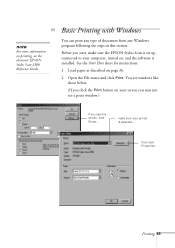
... see windows like those below. (If you click the Print button on your printer is installed. Load paper as described on , and the software is selected... then click Properties. Open the File menu and click Print. Printing 39 W Basic Printing with Windows note: For more information on printing, see this section. make sure the EPSON Stylus Scan is set up, connected to your computer, turned on page 36. 2. Before you see the electronic EPSON Stylus Scan 2500 Reference Guide.
... see windows like those below. (If you click the Print button on your printer is installed. Load paper as described on , and the software is selected... then click Properties. Open the File menu and click Print. Printing 39 W Basic Printing with Windows note: For more information on printing, see this section. make sure the EPSON Stylus Scan is set up, connected to your computer, turned on page 36. 2. Before you see the electronic EPSON Stylus Scan 2500 Reference Guide.
User Manual
Page 52
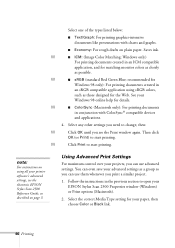
... EPSON Stylus Scan 2500 Reference Guide, as a group so you can use them whenever you need to open your projects, you can use advanced settings. Then click OK (or Print) to start printing. Using Advanced Print Settings For maximum control over your EPSON Stylus Scan 2500 Properties window (Windows) or Print options (Macintosh). 2. Select the correct Media Type setting for details. You can even save your paper, then choose Color or Black Ink. 46 Printing W s sRGB (standard Red Green Blue; Select any other settings you print...
... EPSON Stylus Scan 2500 Reference Guide, as a group so you can use them whenever you need to open your projects, you can use advanced settings. Then click OK (or Print) to start printing. Using Advanced Print Settings For maximum control over your EPSON Stylus Scan 2500 Properties window (Windows) or Print options (Macintosh). 2. Select the correct Media Type setting for details. You can even save your paper, then choose Color or Black Ink. 46 Printing W s sRGB (standard Red Green Blue; Select any other settings you print...

User Manual
Page 159
... Start Here sheet. To uninstall the parallel scanner driver, click Start, point to Easy Install and select Remove. 6. Then follow the instructions on your software, follow the instructions on the screen. 6. Double-click My Computer, then double-click the Control Panel icon. 4. Select the EPSON Stylus Scan 2500 printer icon and click OK. Double-click the EPSON Stylus Scan 2500 icon in Windows (Parallel Connection) 1. Then follow the instructions on your software, follow the instructions on the screen. 3. Insert the EPSON Stylus Scan 2500...
... Start Here sheet. To uninstall the parallel scanner driver, click Start, point to Easy Install and select Remove. 6. Then follow the instructions on your software, follow the instructions on the screen. 6. Double-click My Computer, then double-click the Control Panel icon. 4. Select the EPSON Stylus Scan 2500 printer icon and click OK. Double-click the EPSON Stylus Scan 2500 icon in Windows (Parallel Connection) 1. Then follow the instructions on your software, follow the instructions on the screen. 3. Insert the EPSON Stylus Scan 2500...

