Product Brochure
Page 1
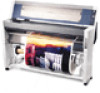
... the reason we created the wide-format EPSON Stylus Pro 9000 Series. With its remarkable speed and incredibly durable print engine, the EPSON Stylus Pro 9000 Series provides a set of tools that exceed...print head for astounding image quality • 1440 x 720 dpi for more expensive, continuous flow ink jet printers • Prints up to 66 square feet-per -hour than direct competitors can communicate new ideas, demonstrate new concepts, and make an unforgettable impact. EPSON Stylus® Pro 9000 Series Print Engine Display signage. Total throughput times depend upon print engine...
... the reason we created the wide-format EPSON Stylus Pro 9000 Series. With its remarkable speed and incredibly durable print engine, the EPSON Stylus Pro 9000 Series provides a set of tools that exceed...print head for astounding image quality • 1440 x 720 dpi for more expensive, continuous flow ink jet printers • Prints up to 66 square feet-per -hour than direct competitors can communicate new ideas, demonstrate new concepts, and make an unforgettable impact. EPSON Stylus® Pro 9000 Series Print Engine Display signage. Total throughput times depend upon print engine...
Product Brochure
Page 4
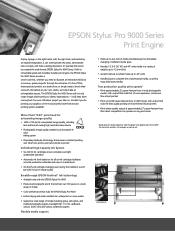
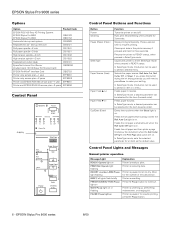
..., pump unit, flushing box, head cleaner, cap assembly Electrical Requirements Voltage: Frequency: Current: Power consumption: 120 V 50 to 60 Hz 1.0A Approx. 100W (operating) 30W (Standby) Energy Star compliant Product/Accessories Part Numbers EPSON Stylus Pro 9000 Fiery X2 Printing System EPSON Stylus Pro 9000 Print Engine only C277011S C277011B EPSON Stylus Pro 9500 Fiery X2 Printing System EPSON Stylus Pro 9500 Print Engine only C381011S C381011B EPSON RS-5100 Fiery X2...
..., pump unit, flushing box, head cleaner, cap assembly Electrical Requirements Voltage: Frequency: Current: Power consumption: 120 V 50 to 60 Hz 1.0A Approx. 100W (operating) 30W (Standby) Energy Star compliant Product/Accessories Part Numbers EPSON Stylus Pro 9000 Fiery X2 Printing System EPSON Stylus Pro 9000 Print Engine only C277011S C277011B EPSON Stylus Pro 9500 Fiery X2 Printing System EPSON Stylus Pro 9500 Print Engine only C381011S C381011B EPSON RS-5100 Fiery X2...
Product Information Guide
Page 1
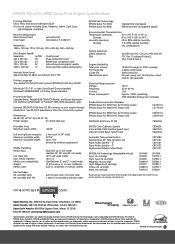
...in standby mode Note: This product is also designed for your printer's voltage. 8/00 EPSON Stylus Pro 9000 series - 1 Check the label on 44-inch paper printable width Print direction Bidirectional or unidirectional (user-selectable) Control code ESC/P® Raster Line spacing 1/6 inch... ink cartridge compartment ink cartridge compartment Macintosh serial interface connector parallel interface connector Engine Reliability Total print volume 18,000 B1 images, 30% coverage Print head life Two billion dots per nozzle Periodic maintenance Waste ink system requires replacement ...
...in standby mode Note: This product is also designed for your printer's voltage. 8/00 EPSON Stylus Pro 9000 series - 1 Check the label on 44-inch paper printable width Print direction Bidirectional or unidirectional (user-selectable) Control code ESC/P® Raster Line spacing 1/6 inch... ink cartridge compartment ink cartridge compartment Macintosh serial interface connector parallel interface connector Engine Reliability Total print volume 18,000 B1 images, 30% coverage Print head life Two billion dots per nozzle Periodic maintenance Waste ink system requires replacement ...
Product Information Guide
Page 6
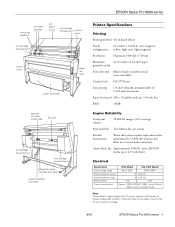
... Roll Auto Cut light is receiving data. Feeds the roll paper and then prints a page line below the document when the Roll Cutter Off light and Print Page Line option are on and off. Printer is on . EPSON Stylus Pro 9000 series 8/00 Runs print head cleaning when pressed for an item as the default value. In SelecType...
... Roll Auto Cut light is receiving data. Feeds the roll paper and then prints a page line below the document when the Roll Cutter Off light and Print Page Line option are on and off. Printer is on . EPSON Stylus Pro 9000 series 8/00 Runs print head cleaning when pressed for an item as the default value. In SelecType...
Product Information Guide
Page 7
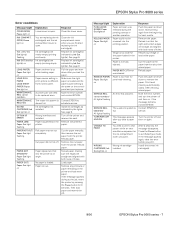
... both rows of holes. After cleaning, reload paper. Install the correct ink cartridge(s). 8/00 EPSON Stylus Pro 9000 series - 7 Response Close the lower cover. Ink cartridge(s) are nearly empty (printing continues). See page 9. Wrong interface card installed. Remove the jammed paper. Roll paper was ...paper. If the message appears again, clear the error before you load the paper. Note the error number and contact EPSON. Print head cleaning automatically starts. You tried to schedule service. Load paper. Turn the printer off and then on Explanation Paper set...
... both rows of holes. After cleaning, reload paper. Install the correct ink cartridge(s). 8/00 EPSON Stylus Pro 9000 series - 7 Response Close the lower cover. Ink cartridge(s) are nearly empty (printing continues). See page 9. Wrong interface card installed. Remove the jammed paper. Roll paper was ...paper. If the message appears again, clear the error before you load the paper. Note the error number and contact EPSON. Print head cleaning automatically starts. You tried to schedule service. Load paper. Turn the printer off and then on Explanation Paper set...
Product Information Guide
Page 8
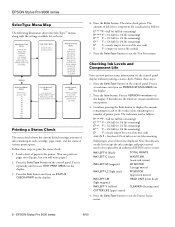
...-C (cyan) INK LEFT-M (magenta) INK LEFT-LC (light cyan) INK LEFT-LM (light magenta) INK LEFT-Y (yellow) CUTTER LIFE (paper cutter) TOTAL PRINTS WASTE INK (waste ink system) CR MOTOR (carriage motor) PF MOTOR (paper feed motor) HEAD UNIT (print head) CLEANER (cleaning unit) 4. Press the SelecType button to print the status check: 1. EPSON Stylus Pro 9000 series 8/00
...-C (cyan) INK LEFT-M (magenta) INK LEFT-LC (light cyan) INK LEFT-LM (light magenta) INK LEFT-Y (yellow) CUTTER LIFE (paper cutter) TOTAL PRINTS WASTE INK (waste ink system) CR MOTOR (carriage motor) PF MOTOR (paper feed motor) HEAD UNIT (print head) CLEANER (cleaning unit) 4. Press the SelecType button to print the status check: 1. EPSON Stylus Pro 9000 series 8/00
Product Information Guide
Page 10
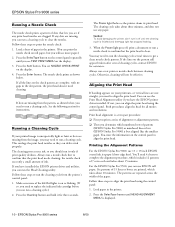
... light or faint or dots are missing from the printer's control panel: 1. Six patterns of paper in the printer. 2. EPSON Stylus Pro 9000 series 8/00 The cleaning process uses ink, so you can use the Print Head Alignment utility if you can align the print head using the control panel: 1. Otherwise, cleaning will use 13 × 19-inch...
... light or faint or dots are missing from the printer's control panel: 1. Six patterns of paper in the printer. 2. EPSON Stylus Pro 9000 series 8/00 The cleaning process uses ink, so you can use the Print Head Alignment utility if you can align the print head using the control panel: 1. Otherwise, cleaning will use 13 × 19-inch...
Product Information Guide
Page 12
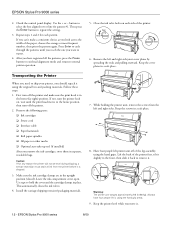
... the leg assembly, using the original box and packing materials. EPSON Stylus Pro 9000 series 8/00 button to normal printer operation. 5. Keep the cover plates in the upright position (closed). First turn off the printer and make a consistent choice as you can't make sure the print head is shipped. 3. Keep the screws in place. Then press...
... the leg assembly, using the original box and packing materials. EPSON Stylus Pro 9000 series 8/00 button to normal printer operation. 5. Keep the cover plates in the upright position (closed). First turn off the printer and make a consistent choice as you can't make sure the print head is shipped. 3. Keep the screws in place. Then press...
Product Information Guide
Page 13
...used cartridges. Relock the casters and extend the stabilizer knobs after moving the printer, the print head nozzles may need to run a cleaning cycle (see page 10) and realign the print head (see the Assembly and Setup Instructions, and note the following points: ❏ Don... removed, make sure the printer is almost empty. ❏ If the ink lines were drained, EPSON recommends installing new cartridges. Whenever you start printing after moving . 8/00 EPSON Stylus Pro 9000 series - 13 Release the front casters and retract the stabilizer knobs. Carefully roll the printer to its...
...used cartridges. Relock the casters and extend the stabilizer knobs after moving the printer, the print head nozzles may need to run a cleaning cycle (see page 10) and realign the print head (see the Assembly and Setup Instructions, and note the following points: ❏ Don... removed, make sure the printer is almost empty. ❏ If the ink lines were drained, EPSON recommends installing new cartridges. Whenever you start printing after moving . 8/00 EPSON Stylus Pro 9000 series - 13 Release the front casters and retract the stabilizer knobs. Carefully roll the printer to its...
User Manual
Page 5
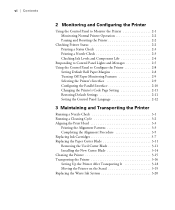
... Monitor the Printer 2-1 Monitoring Normal Printer Operation 2-2 Pausing and Resetting the Printer 2-2 Checking Printer Status 2-2 Printing a Status Check 2-3 Printing a Nozzle Check 2-3 Checking Ink Levels and Component Life 2-4 Responding to Control Panel Lights and Messages 2-5 ...Panel Language 2-12 3 Maintaining and Transporting the Printer Running a Nozzle Check 3-1 Running a Cleaning Cycle 3-2 Aligning the Print Head 3-3 Printing the Alignment Patterns 3-3 Completing the Alignment Procedure 3-5 Replacing Ink Cartridges 3-7 Replacing the Paper Cutter Blade 3-11 Removing the...
... Monitor the Printer 2-1 Monitoring Normal Printer Operation 2-2 Pausing and Resetting the Printer 2-2 Checking Printer Status 2-2 Printing a Status Check 2-3 Printing a Nozzle Check 2-3 Checking Ink Levels and Component Life 2-4 Responding to Control Panel Lights and Messages 2-5 ...Panel Language 2-12 3 Maintaining and Transporting the Printer Running a Nozzle Check 3-1 Running a Cleaning Cycle 3-2 Aligning the Print Head 3-3 Printing the Alignment Patterns 3-3 Completing the Alignment Procedure 3-5 Replacing Ink Cartridges 3-7 Replacing the Paper Cutter Blade 3-11 Removing the...
User Manual
Page 7
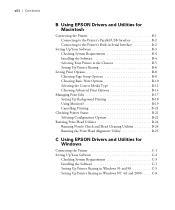
... Correct Media Type B-12 Choosing Advanced Print Options B-14 Managing Print Jobs B-17 Setting Up Background Printing B-18 Using Monitor3 B-19 Cancelling Printing B-21 Checking Printer Status B-21 Selecting Configuration Options B-22 Running Print Head Utilities B-24 Running Nozzle Check and Head Cleaning Utilities B-24 Running the Print Head Alignment Utility B-25 C Using EPSON Drivers and Utilities for Windows Connecting...
... Correct Media Type B-12 Choosing Advanced Print Options B-14 Managing Print Jobs B-17 Setting Up Background Printing B-18 Using Monitor3 B-19 Cancelling Printing B-21 Checking Printer Status B-21 Selecting Configuration Options B-22 Running Print Head Utilities B-24 Running Nozzle Check and Head Cleaning Utilities B-24 Running the Print Head Alignment Utility B-25 C Using EPSON Drivers and Utilities for Windows Connecting...
User Manual
Page 8
... Progress Meter C-20 Using the Spool Manager C-21 Checking Printer Status C-21 Using Status Monitor 2 (EPSON Stylus Pro 9000 C-22 Status Monitor 3 (EPSON Stylus Pro 9500 C-23 Setting Monitoring Preferences C-24 Running Printer Utilities C-26 Running Nozzle Check and Head Cleaning Utilities C-26 Running the Print Head Alignment Utility C-27 Running the Speed and Progress Configuration Utility C-29 Index -ix
... Progress Meter C-20 Using the Spool Manager C-21 Checking Printer Status C-21 Using Status Monitor 2 (EPSON Stylus Pro 9000 C-22 Status Monitor 3 (EPSON Stylus Pro 9500 C-23 Setting Monitoring Preferences C-24 Running Printer Utilities C-26 Running Nozzle Check and Head Cleaning Utilities C-26 Running the Print Head Alignment Utility C-27 Running the Speed and Progress Configuration Utility C-29 Index -ix
User Manual
Page 11
... also includes the documentation listed below. • The EPSON Stylus Pro 9000/9500 Assembly and Setup Instructions describe how to unpack and assemble the printer, install ink cartridges and paper, and prepare for printing. • The EPSON Stylus Pro 9000 Series Quick Reference Guide provides a handy summary of the...some of the procedures for daily use and printer maintenance-loading paper, replacing ink cartridges, running cleaning cycles, aligning the print head, and preparing the printer for users and system administrators. • The RIP Station 5100 Getting Started describes how to...
... also includes the documentation listed below. • The EPSON Stylus Pro 9000/9500 Assembly and Setup Instructions describe how to unpack and assemble the printer, install ink cartridges and paper, and prepare for printing. • The EPSON Stylus Pro 9000 Series Quick Reference Guide provides a handy summary of the...some of the procedures for daily use and printer maintenance-loading paper, replacing ink cartridges, running cleaning cycles, aligning the print head, and preparing the printer for users and system administrators. • The RIP Station 5100 Getting Started describes how to...
User Manual
Page 12
...and paper handling. Chapter 4 provides troubleshooting tips and solutions for Windows computers. Appendix C covers the installation and use of EPSON printer drivers and utilities for cleaning and aligning the print head, replacing ink cartridges and the cutter blade, and cleaning and transporting the printer. Chapter 2 explains how to monitor the printer...following information: Chapter 1 gives instructions for installing an optional Ethernet interface card. Appendix A gives instructions for loading roll paper and cut sheets, printing on various media, and using the paper hammock.
...and paper handling. Chapter 4 provides troubleshooting tips and solutions for Windows computers. Appendix C covers the installation and use of EPSON printer drivers and utilities for cleaning and aligning the print head, replacing ink cartridges and the cutter blade, and cleaning and transporting the printer. Chapter 2 explains how to monitor the printer...following information: Chapter 1 gives instructions for installing an optional Ethernet interface card. Appendix A gives instructions for loading roll paper and cut sheets, printing on various media, and using the paper hammock.
User Manual
Page 15
... or the base units of power source indicated on and off using outlets on the same circuit as photocopiers or air control systems that the print head is off the power to properly grounded power outlets. Do not spill liquid on the printer (or RIP Station 5100). • Do not place the...
... or the base units of power source indicated on and off using outlets on the same circuit as photocopiers or air control systems that the print head is off the power to properly grounded power outlets. Do not spill liquid on the printer (or RIP Station 5100). • Do not place the...
User Manual
Page 16
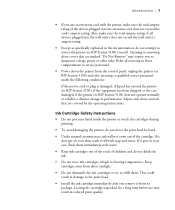
... controls that are covered by hand. • Under normal circumstances, ink will not come out of all servicing in the documentation, do not move the print head by the operating instructions. If it does get on your hand inside the printer or touch the cartridges during.... 7 If it gets in performance. Keep cartridges away from direct sunlight. • Do not dismantle the ink cartridges or try to the print head. • Install the ink cartridge immediately after you remove it off with the printer, make sure the total ampere rating of the cartridge. Introduction | 7 • ...
... controls that are covered by hand. • Under normal circumstances, ink will not come out of all servicing in the documentation, do not move the print head by the operating instructions. If it does get on your hand inside the printer or touch the cartridges during.... 7 If it gets in performance. Keep cartridges away from direct sunlight. • Do not dismantle the ink cartridges or try to the print head. • Install the ink cartridge immediately after you remove it off with the printer, make sure the total ampere rating of the cartridge. Introduction | 7 • ...
User Manual
Page 30
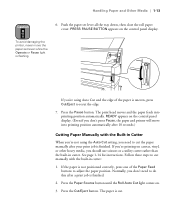
Press the Pause button. READY appears on the control panel display. Press the Cut/Eject button. The print head moves and the paper feeds into printing position automatically after 10 seconds.) Cutting Paper Manually with the built-in cutter: 1. Normally, you don't need to adjust the paper position. Follow these...using the Auto Cut setting, you 're not using Auto Cut and the edge of the Paper Feed buttons to cut the paper manually after a print job is uneven, press Cut/Eject to cut . 1-13 If you don't press Pause, the paper and printer will move the paper set ...
Press the Pause button. READY appears on the control panel display. Press the Cut/Eject button. The print head moves and the paper feeds into printing position automatically after 10 seconds.) Cutting Paper Manually with the built-in cutter: 1. Normally, you don't need to adjust the paper position. Follow these...using the Auto Cut setting, you 're not using Auto Cut and the edge of the Paper Feed buttons to cut the paper manually after a print job is uneven, press Cut/Eject to cut . 1-13 If you don't press Pause, the paper and printer will move the paper set ...

User Manual
Page 33
... PRESS PAUSE BUTTON appears on and roll paper is not loaded for printing. After it while pressing the Paper Feed (-) button. 1-16 Then follow these steps: 1. The print head moves and the sheet feeds into printing position automatically after 10 seconds.) 6. 1-16 | Handling Paper and ...Other Media Before you don't press Pause, the paper and printer will move into printing position automatically. Make sure the right edge...
... PRESS PAUSE BUTTON appears on and roll paper is not loaded for printing. After it while pressing the Paper Feed (-) button. 1-16 Then follow these steps: 1. The print head moves and the sheet feeds into printing position automatically after 10 seconds.) 6. 1-16 | Handling Paper and ...Other Media Before you don't press Pause, the paper and printer will move into printing position automatically. Make sure the right edge...

User Manual
Page 35
...the control panel. (Even if you print on . 3. Follow these instructions when you don't press Pause, the paper and printer will move the paper set lever all the way up to 28 × 40 inches (B1), such as EPSON Posterboard Semigloss. Press the Paper Source ...posterboard is loaded for instructions. Press the Pause button. The print head moves and the paper feeds into printing position automatically after 10 seconds.) 7. 1-18 | Handling Paper and Other Media 5. Note You can print on the control panel display. Print your printouts in the printer. 8. PRESS PAUSE BUTTON appears on...
...the control panel. (Even if you print on . 3. Follow these instructions when you don't press Pause, the paper and printer will move the paper set lever all the way up to 28 × 40 inches (B1), such as EPSON Posterboard Semigloss. Press the Paper Source ...posterboard is loaded for instructions. Press the Pause button. The print head moves and the paper feeds into printing position automatically after 10 seconds.) 7. 1-18 | Handling Paper and Other Media 5. Note You can print on the control panel display. Print your printouts in the printer. 8. PRESS PAUSE BUTTON appears on...
User Manual
Page 37
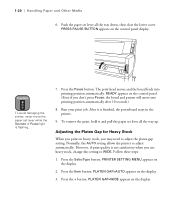
... stays in the printer. 9. Push the paper set lever all the way down, then close the lower cover. The print head moves and the board feeds into printing position automatically after 10 seconds.) 8. After it and pull the paper set lever all the way up. Caution To avoid... damaging the printer, never move into printing position automatically. Press the Pause button. Normally, the AUTO setting allows the printer to WIDE. Follow these steps: 1. PRINTER SETTING MENU ...
... stays in the printer. 9. Push the paper set lever all the way down, then close the lower cover. The print head moves and the board feeds into printing position automatically after 10 seconds.) 8. After it and pull the paper set lever all the way up. Caution To avoid... damaging the printer, never move into printing position automatically. Press the Pause button. Normally, the AUTO setting allows the printer to WIDE. Follow these steps: 1. PRINTER SETTING MENU ...


