
Product Brochure
Page 2
...13.7 lb Epson Stylus NX625 color all colors have to the range of the router being used. SM eco.epson.com Epson America, Inc. 3840 Kilroy Airport Way, Long Beach, CA 90806 Epson Canada, Ltd. 3771 Victoria Park Avenue, Toronto, Ontario M1W 3Z5 www.epson.com www.epson.ca Epson, Epson Stylus and MicroPiezo are... mm x 297 mm) Auto photo restoration, red-eye removal, select and print photos, crop, rotate, enlarge, view and print by Mac®. 6 Display permanence based on ISO/IEC 24711 in default mode printing continuously. and Canada Quick product exchange DURABrite Ultra pigment ink (...
...13.7 lb Epson Stylus NX625 color all colors have to the range of the router being used. SM eco.epson.com Epson America, Inc. 3840 Kilroy Airport Way, Long Beach, CA 90806 Epson Canada, Ltd. 3771 Victoria Park Avenue, Toronto, Ontario M1W 3Z5 www.epson.com www.epson.ca Epson, Epson Stylus and MicroPiezo are... mm x 297 mm) Auto photo restoration, red-eye removal, select and print photos, crop, rotate, enlarge, view and print by Mac®. 6 Display permanence based on ISO/IEC 24711 in default mode printing continuously. and Canada Quick product exchange DURABrite Ultra pigment ink (...

Quick Reference Guide
Page 2
... a Macintosh 14 Selecting the Correct Paper Type 16 Scanning a Document or Photo 17 Quick Scanning From the Control Panel 17 Scanning With Epson Scan Software 18 Scanning With Mac OS X 10.6 19 Maintaining Your Product 20 Checking the Print Head Nozzles 20 Cleaning the Print Head 21 Checking Ink Levels 22 Purchasing...
... a Macintosh 14 Selecting the Correct Paper Type 16 Scanning a Document or Photo 17 Quick Scanning From the Control Panel 17 Scanning With Epson Scan Software 18 Scanning With Mac OS X 10.6 19 Maintaining Your Product 20 Checking the Print Head Nozzles 20 Cleaning the Print Head 21 Checking Ink Levels 22 Purchasing...
Quick Reference Guide
Page 14
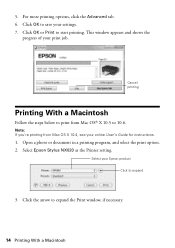
...With a Macintosh Follow the steps below to expand 3. Select your print job. This window appears and shows the progress of your Epson product Click to print from Mac OS X 10.4, see your settings. 7. Click the arrow to start printing. Click OK to 10.6. For more printing options...'re printing from Mac OS® X 10.5 to save your online User's Guide for instructions. 1. Click OK or Print to expand the Print window, if necessary. 14 Printing With a Macintosh Open a photo or document in a printing program, and select the print option. 2. Select Epson Stylus NX620 as the ...
...With a Macintosh Follow the steps below to expand 3. Select your print job. This window appears and shows the progress of your Epson product Click to print from Mac OS X 10.4, see your settings. 7. Click the arrow to start printing. Click OK to 10.6. For more printing options...'re printing from Mac OS® X 10.5 to save your online User's Guide for instructions. 1. Click OK or Print to expand the Print window, if necessary. 14 Printing With a Macintosh Open a photo or document in a printing program, and select the print option. 2. Select Epson Stylus NX620 as the ...

Quick Reference Guide
Page 17
Note: For Mac OS X 10.6, see page 9). 2. ideal for scanning documents ■ Scan to PC (Email) automatically scans a photo, resizes it, launches your email application, and attaches a JPG ... (see "Scanning With Mac OS X 10.6" on page 19. 1. Press the Home button, then press u, d, l, or r to your image is scanned, you see its icon in Windows Explorer or Macintosh Finder, or as an attachment in an email message. Scanning a Document or Photo You can use your Epson Stylus NX620/625 Series to...
Note: For Mac OS X 10.6, see page 9). 2. ideal for scanning documents ■ Scan to PC (Email) automatically scans a photo, resizes it, launches your email application, and attaches a JPG ... (see "Scanning With Mac OS X 10.6" on page 19. 1. Press the Home button, then press u, d, l, or r to your image is scanned, you see its icon in Windows Explorer or Macintosh Finder, or as an attachment in an email message. Scanning a Document or Photo You can use your Epson Stylus NX620/625 Series to...

Quick Reference Guide
Page 18
... directly from any TWAIN-compliant application using the Mode selector in the upper right corner.) Click here to start Epson Scan: ■ Windows: Double-click the EPSON Scan icon on your desktop. ■ Mac OS X 10.4 and 10.5: Open the Applications folder, open the File menu, choose Import or Acquire, and... and save your image to a file. Place your original document or photo on page 19. 1. Click Scan. 18 Scanning With Epson Scan Software For Mac OS X 10.6, see "Scanning With Mac OS X 10.6" on the scanner glass (see the online User's Guide. Or you use it. (You can change the scan...
... directly from any TWAIN-compliant application using the Mode selector in the upper right corner.) Click here to start Epson Scan: ■ Windows: Double-click the EPSON Scan icon on your desktop. ■ Mac OS X 10.4 and 10.5: Open the Applications folder, open the File menu, choose Import or Acquire, and... and save your image to a file. Place your original document or photo on page 19. 1. Click Scan. 18 Scanning With Epson Scan Software For Mac OS X 10.6, see "Scanning With Mac OS X 10.6" on the scanner glass (see the online User's Guide. Or you use it. (You can change the scan...

Quick Reference Guide
Page 19
.... Click the Scan button to begin scanning. Scanning With Mac OS X 10.6 19 Scanning With Mac OS X 10.6 You can scan original documents and photos and save them as Preview and select Import From Scanner from the File menu, then select Epson Stylus NX620 or Epson Stylus NX625. 2. Your image is scanned and you would like to...
.... Click the Scan button to begin scanning. Scanning With Mac OS X 10.6 19 Scanning With Mac OS X 10.6 You can scan original documents and photos and save them as Preview and select Import From Scanner from the File menu, then select Epson Stylus NX620 or Epson Stylus NX625. 2. Your image is scanned and you would like to...

Quick Reference Guide
Page 26
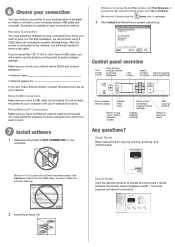
... wireless setup. You must install the software on every computer from which you want to remove the cable. For the first installation, we recommend using Mac OS X 10.6 or don't have trouble setting up your product, see "Network Problems" on page 46. ■ If this section provide detailed instructions for setting...
... wireless setup. You must install the software on every computer from which you want to remove the cable. For the first installation, we recommend using Mac OS X 10.6 or don't have trouble setting up your product, see "Network Problems" on page 46. ■ If this section provide detailed instructions for setting...
Quick Reference Guide
Page 27
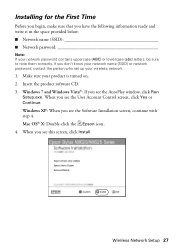
When you see the User Account Control screen, click Yes or Continue. When you see this screen, click Install. Mac OS® X: Double-click the Epson icon. 4. Installing for the First Time Before you begin, make sure that you have the following information ready and write it in the space provided ...
When you see the User Account Control screen, click Yes or Continue. When you see this screen, click Install. Mac OS® X: Double-click the Epson icon. 4. Installing for the First Time Before you begin, make sure that you have the following information ready and write it in the space provided ...

Quick Reference Guide
Page 28
When you see this screen, select Set up the product without using a temporary USB connection. 28 Wireless Network Setup Then skip to "Setting Up With the Product Buttons" on page 33 to set up printer for the first time, then click Next. 7. Mac OS X 10.6: At the next screen, click Next. 5. When you see this screen, select Wireless connection and click Next. 6.
When you see this screen, select Set up the product without using a temporary USB connection. 28 Wireless Network Setup Then skip to "Setting Up With the Product Buttons" on page 33 to set up printer for the first time, then click Next. 7. Mac OS X 10.6: At the next screen, click Next. 5. When you see this screen, select Wireless connection and click Next. 6.

Quick Reference Guide
Page 33
... previous screen, press OK to set up using the product buttons: 1. Wireless Network Setup 33 Setting Up With the Product Buttons If you are using Mac OS X 10.6, or you do not have a USB cable to set it up the product on your wireless network, follow these steps to select Setup...
... previous screen, press OK to set up using the product buttons: 1. Wireless Network Setup 33 Setting Up With the Product Buttons If you are using Mac OS X 10.6, or you do not have a USB cable to set it up the product on your wireless network, follow these steps to select Setup...

Quick Reference Guide
Page 34
.... Wait while the software is installed. 34 Wireless Network Setup Then click Next and go to step 10 on -screen instructions to enter them correctly. Mac OS X 10.6: Skip to step 4. ■ If your network password. 3. If you see a network setup failed message, the network password may have security enabled, click...
.... Wait while the software is installed. 34 Wireless Network Setup Then click Next and go to step 10 on -screen instructions to enter them correctly. Mac OS X 10.6: Skip to step 4. ■ If your network password. 3. If you see a network setup failed message, the network password may have security enabled, click...

Quick Reference Guide
Page 37
Windows 7 and Windows Vista: If you see the User Account Control screen, click Yes or Continue. Setting Up Additional Computers 1. Wireless Network Setup 37 When you see the AutoPlay window, click Run Setup.exe. Insert the product software CD. 3. When you see this screen, select Wireless connection and click Next. Windows XP: When you see the Software Installation screen, continue with step 4. When you see this screen, click Install. 5. Mac OS X: Double-click the Epson icon. 4. Make sure your product is turned on. 2.
Windows 7 and Windows Vista: If you see the User Account Control screen, click Yes or Continue. Setting Up Additional Computers 1. Wireless Network Setup 37 When you see the AutoPlay window, click Run Setup.exe. Insert the product software CD. 3. When you see this screen, select Wireless connection and click Next. Windows XP: When you see the Software Installation screen, continue with step 4. When you see this screen, click Install. 5. Mac OS X: Double-click the Epson icon. 4. Make sure your product is turned on. 2.

Quick Reference Guide
Page 38
Do not select Ask Me Later, Keep Blocking, or Block. 38 Wireless Network Setup Wait while the software is already on page 39. 9. When you see a firewall alert message, click Unblock or Allow to step 13 on my wireless network, then click Next. 7. Note: If you see this screen, select The printer is installed. 8. 6. Mac OS X 10.6: Skip to let EpsonNet Setup continue. When you see the Firewall Warning screen, click Next.
Do not select Ask Me Later, Keep Blocking, or Block. 38 Wireless Network Setup Wait while the software is already on page 39. 9. When you see a firewall alert message, click Unblock or Allow to step 13 on my wireless network, then click Next. 7. Note: If you see this screen, select The printer is installed. 8. 6. Mac OS X 10.6: Skip to let EpsonNet Setup continue. When you see the Firewall Warning screen, click Next.
Quick Reference Guide
Page 40
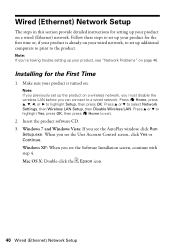
... must disable the wireless LAN before you see the User Account Control screen, click Yes or Continue. Press Home, press u, d, l, or r to exit. 2. Mac OS X: Double-click the Epson icon. 40 Wired (Ethernet) Network Setup Make sure your product is already on your product is turned on. Installing for the First Time...
... must disable the wireless LAN before you see the User Account Control screen, click Yes or Continue. Press Home, press u, d, l, or r to exit. 2. Mac OS X: Double-click the Epson icon. 40 Wired (Ethernet) Network Setup Make sure your product is already on your product is turned on. Installing for the First Time...

Quick Reference Guide
Page 42
Mac OS X 10.6: Skip to step 15 on my Ethernet network, then click Next. 7. Wait while the software is already on page 44. 9. When you see ...
Mac OS X 10.6: Skip to step 15 on my Ethernet network, then click Next. 7. Wait while the software is already on page 44. 9. When you see ...
Quick Reference Guide
Page 46
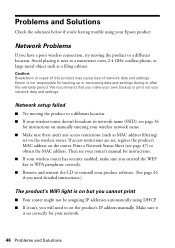
... be assigning IP addresses automatically using your network. 46 Problems and Solutions Network setup failed ■ Try moving the product to obtain the MAC address. Problems and Solutions Check the solutions below if you're having trouble using DHCP. ■ If it next to a microwave oven..., 2.4 GHz cordless phone, or large metal object such as MAC address filtering) set on the wireless router. Epson is not responsible for instructions on the router. Network Problems If you have a poor wireless connection, try moving the product ...
... be assigning IP addresses automatically using your network. 46 Problems and Solutions Network setup failed ■ Try moving the product to obtain the MAC address. Problems and Solutions Check the solutions below if you're having trouble using DHCP. ■ If it next to a microwave oven..., 2.4 GHz cordless phone, or large metal object such as MAC address filtering) set on the wireless router. Epson is not responsible for instructions on the router. Network Problems If you have a poor wireless connection, try moving the product ...

Quick Reference Guide
Page 47
...is not being blocked by your firewall or security software. ■ If you restarted your computer after a few seconds. Check the Timeout Setting in Mac OS X 10.6; see page 19 for scanning instructions. ■ If you cannot scan from the product's control panel, make sure you are ... a communication error may occur. If the scan did not complete, lower the resolution. ■ If network communication was interrupted while starting Epson Scan, exit Epson Scan, and restart it above the arrow marks on the edge guides. ■ Make sure the paper you loaded matches the paper size...
...is not being blocked by your firewall or security software. ■ If you restarted your computer after a few seconds. Check the Timeout Setting in Mac OS X 10.6; see page 19 for scanning instructions. ■ If you cannot scan from the product's control panel, make sure you are ... a communication error may occur. If the scan did not complete, lower the resolution. ■ If network communication was interrupted while starting Epson Scan, exit Epson Scan, and restart it above the arrow marks on the edge guides. ■ Make sure the paper you loaded matches the paper size...
Start Here
Page 3
... on every computer from which you see the AutoPlay window, click Run Setup.exe. If you're using Mac OS® X 10.6 or don't have a USB cable (not included). Macintosh®: Double-click the Epson icon, if necessary. 3 Click Install and follow the on the printer to use the buttons on -screen... to your existing network (wireless or wired) or directly to your computer using a USB cable (not included) to access the online User's Guide, software downloads, Epson Supplies CentralSM, and more (requires an Internet connection). 2 Insert the product CD.
... on every computer from which you see the AutoPlay window, click Run Setup.exe. If you're using Mac OS® X 10.6 or don't have a USB cable (not included). Macintosh®: Double-click the Epson icon, if necessary. 3 Click Install and follow the on the printer to use the buttons on -screen... to your existing network (wireless or wired) or directly to your computer using a USB cable (not included) to access the online User's Guide, software downloads, Epson Supplies CentralSM, and more (requires an Internet connection). 2 Insert the product CD.


