
Product Brochure
Page 1
... • Superior image enhancement tools - automatic, high-speed, two-sided printing • Fast, high-quality scanning up to suit your mobile device - Epson Stylus® NX625 Print | Copy | Scan | Photo | Wi-Fi® Smart. print speeds of 15 ISO ppm (black), 7.2 ISO ppm (color)† •...; Quickly print from your needs • Truly touchable photos and documents - share one ink set • Replace only the color you need - scan and ...
... • Superior image enhancement tools - automatic, high-speed, two-sided printing • Fast, high-quality scanning up to suit your mobile device - Epson Stylus® NX625 Print | Copy | Scan | Photo | Wi-Fi® Smart. print speeds of 15 ISO ppm (black), 7.2 ISO ppm (color)† •...; Quickly print from your needs • Truly touchable photos and documents - share one ink set • Replace only the color you need - scan and ...

Quick Reference Guide
Page 11
...Select With Border to leave a small margin around the image or Borderless to expand the image all Paper Type, Paper Size, Layout, and Quality settings may occur), then press OK. Note: Not all the way to select Layout, and press OK again. See the online User's Guide for details.... 10. Note: Do not pull out paper as it ejects automatically. Note: You cannot print borderless on the options you finish selecting settings, press x Menu to select the setting, then press OK. Then press u or d to the edge of the paper (slight cropping may be available depending on plain paper....
...Select With Border to leave a small margin around the image or Borderless to expand the image all Paper Type, Paper Size, Layout, and Quality settings may occur), then press OK. Note: Not all the way to select Layout, and press OK again. See the online User's Guide for details.... 10. Note: Do not pull out paper as it ejects automatically. Note: You cannot print borderless on the options you finish selecting settings, press x Menu to select the setting, then press OK. Then press u or d to the edge of the paper (slight cropping may be available depending on plain paper....

Quick Reference Guide
Page 13
...From Your Computer 13 For detailed instructions on printing, see page 45. Open a photo or document in Windows 1. Select Epson NX620 Series or Epson Stylus NX620, then click the Preferences or Properties button. 3. To resize your printout or print double-sided, click the Page ...Layout tab. Select the type of document you choose the correct paper Type setting for printing from a Windows or Macintosh® computer. Tip: It's a good idea to your Epson...
...From Your Computer 13 For detailed instructions on printing, see page 45. Open a photo or document in Windows 1. Select Epson NX620 Series or Epson Stylus NX620, then click the Preferences or Properties button. 3. To resize your printout or print double-sided, click the Page ...Layout tab. Select the type of document you choose the correct paper Type setting for printing from a Windows or Macintosh® computer. Tip: It's a good idea to your Epson...
Quick Reference Guide
Page 14
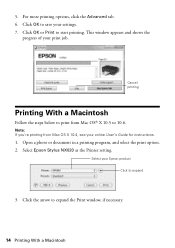
This window appears and shows the progress of your settings. 7. Select Epson Stylus NX620 as the Printer setting. Note: If you're printing from Mac OS® X 10.5 to print from Mac OS X 10.4, see your Epson product Click to start printing. Open a photo or document in a printing program, and select the print option. 2. For more...
This window appears and shows the progress of your settings. 7. Select Epson Stylus NX620 as the Printer setting. Note: If you're printing from Mac OS® X 10.5 to print from Mac OS X 10.4, see your Epson product Click to start printing. Open a photo or document in a printing program, and select the print option. 2. For more...
Quick Reference Guide
Page 15
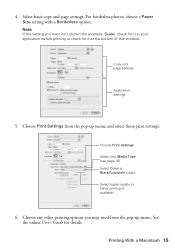
... may need from the pop-up menu. For borderless photos, choose a Paper Size setting with a Borderless option. Copy and page settings Application settings 5. Choose Print Settings from the pop-up menu, and select these print settings: Choose Print Settings Select your application before printing or check for details. Printing With a Macintosh 15 4. Choose any other printing... your Media Type (see page 16) Select Color or Black/Grayscale output Select higher quality or faster printing (if available) 6. Select basic copy and page settings.
... may need from the pop-up menu. For borderless photos, choose a Paper Size setting with a Borderless option. Copy and page settings Application settings 5. Choose Print Settings from the pop-up menu, and select these print settings: Choose Print Settings Select your application before printing or check for details. Printing With a Macintosh 15 4. Choose any other printing... your Media Type (see page 16) Select Color or Black/Grayscale output Select higher quality or faster printing (if available) 6. Select basic copy and page settings.
Quick Reference Guide
Page 16
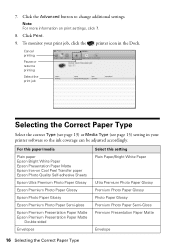
... Quality Self-adhesive Sheets Epson Ultra Premium Photo Paper Glossy Epson Premium Photo Paper Glossy Epson Photo Paper Glossy Epson Premium Photo Paper Semi-gloss Epson Premium Presentation Paper Matte Epson Premium Presentation Paper Matte Double-sided Envelopes Select this paper/media Plain paper Epson Bright White Paper Epson Presentation Paper Matte Epson Iron-on print settings, click ?. 8. 7. To monitor...
... Quality Self-adhesive Sheets Epson Ultra Premium Photo Paper Glossy Epson Premium Photo Paper Glossy Epson Photo Paper Glossy Epson Premium Photo Paper Semi-gloss Epson Premium Presentation Paper Matte Epson Premium Presentation Paper Matte Double-sided Envelopes Select this paper/media Plain paper Epson Bright White Paper Epson Presentation Paper Matte Epson Iron-on print settings, click ?. 8. 7. To monitor...

Quick Reference Guide
Page 19
Your image is scanned and you would like to select scan settings, such as Color Restoration and File Save settings, click Show Details. 3. If you see its icon in the Scan To pop-up menu. Scanning With Mac OS X 10.6 19 Click the Scan button ... OS X 10.6 You can scan original documents and photos and save them as Preview and select Import From Scanner from the File menu, then select Epson Stylus NX620 or Epson Stylus NX625. 2.
Your image is scanned and you would like to select scan settings, such as Color Restoration and File Save settings, click Show Details. 3. If you see its icon in the Scan To pop-up menu. Scanning With Mac OS X 10.6 19 Click the Scan button ... OS X 10.6 You can scan original documents and photos and save them as Preview and select Import From Scanner from the File menu, then select Epson Stylus NX620 or Epson Stylus NX625. 2.

Quick Reference Guide
Page 23
...7766). If cartridges have been exposed to cold temperatures, allow them to room temperature for priming the product. You can purchase genuine Epson ink and paper at Epson Supplies Central at least 3 hours before the expiration date on the cartridge box. Yields vary considerably based on . Store ink ... 23 For print quality, a small amount of ink remains in the cartridge after the "replace cartridge" indicator comes on images printed, print settings, paper type, frequency of use of other products may affect your print quality and could result in a cool, dark place. Use the ...
...7766). If cartridges have been exposed to cold temperatures, allow them to room temperature for priming the product. You can purchase genuine Epson ink and paper at Epson Supplies Central at least 3 hours before the expiration date on the cartridge box. Yields vary considerably based on . Store ink ... 23 For print quality, a small amount of ink remains in the cartridge after the "replace cartridge" indicator comes on images printed, print settings, paper type, frequency of use of other products may affect your print quality and could result in a cool, dark place. Use the ...

Quick Reference Guide
Page 26
... If your product is connected to the network, you 're using a USB cable (not included) to simplify wireless setup. If you will be prompted to set up your product on a wireless network. The on-screen instructions during the installation process help : ■ For wireless network setup, see below. ■ ..., see "Installing for the First Time" on the printer to print. Wireless Network Setup The steps in this section provide detailed instructions for setting up your network connection. After the printer is already on your wireless network and you want to select wireless...
... If your product is connected to the network, you 're using a USB cable (not included) to simplify wireless setup. If you will be prompted to set up your product on a wireless network. The on-screen instructions during the installation process help : ■ For wireless network setup, see below. ■ ..., see "Installing for the First Time" on the printer to print. Wireless Network Setup The steps in this section provide detailed instructions for setting up your network connection. After the printer is already on your wireless network and you want to select wireless...
Quick Reference Guide
Page 27
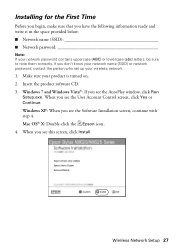
When you don't know your network name (SSID) or network password, contact the person who set up your wireless network. 1. Wireless Network Setup 27 Insert the product software CD. 3. If you see this screen, click Install. When you see the Software ... it in the space provided below: ■ Network name (SSID Network password Note: If your product is turned on. 2. Mac OS® X: Double-click the Epson icon. 4. Installing for the First Time Before you begin, make sure that you see the AutoPlay window, click Run Setup.exe. Make sure your network...
When you don't know your network name (SSID) or network password, contact the person who set up your wireless network. 1. Wireless Network Setup 27 Insert the product software CD. 3. If you see this screen, click Install. When you see the Software ... it in the space provided below: ■ Network name (SSID Network password Note: If your product is turned on. 2. Mac OS® X: Double-click the Epson icon. 4. Installing for the First Time Before you begin, make sure that you see the AutoPlay window, click Run Setup.exe. Make sure your network...

Quick Reference Guide
Page 28
When you see this screen, select Set up the product without using a temporary USB connection. 28 Wireless Network Setup Mac OS X 10.6: At the next screen, click Next. Then skip to "Setting Up With the Product Buttons" on page 33 to set up printer for the first time, then click Next. 7. 5. When you see this screen, select Wireless connection and click Next. 6.
When you see this screen, select Set up the product without using a temporary USB connection. 28 Wireless Network Setup Mac OS X 10.6: At the next screen, click Next. Then skip to "Setting Up With the Product Buttons" on page 33 to set up printer for the first time, then click Next. 7. 5. When you see this screen, select Wireless connection and click Next. 6.

Quick Reference Guide
Page 29
Tip: If you see this screen, select a wireless network setup method, then click Next. At the next screen, click Next. 10. Wireless Network Setup 29 When you need help selecting a wireless network setup method, click Which option should I choose? for more information on page 33. 8. Do one of the following: ■ If you selected Using temporary USB cable connection, continue with "Setting Up With a Temporary USB Cable" on page 30. ■ If you selected Using printer buttons, continue with "Setting Up With the Product Buttons" on setup methods. 9.
Tip: If you see this screen, select a wireless network setup method, then click Next. At the next screen, click Next. 10. Wireless Network Setup 29 When you need help selecting a wireless network setup method, click Which option should I choose? for more information on page 33. 8. Do one of the following: ■ If you selected Using temporary USB cable connection, continue with "Setting Up With a Temporary USB Cable" on page 30. ■ If you selected Using printer buttons, continue with "Setting Up With the Product Buttons" on setup methods. 9.
Quick Reference Guide
Page 30
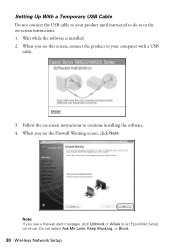
Note: If you see a firewall alert message, click Unblock or Allow to continue installing the software. 4. Setting Up With a Temporary USB Cable Do not connect the USB cable to your computer with a USB cable. 3. Do not select Ask Me Later, Keep Blocking, or Block. 30 Wireless Network Setup Wait while the software is installed. 2. When you see the Firewall Warning screen, click Next. Follow the on -screen instructions. 1. When you see this screen, connect the product to your product until instructed to do so in the on -screen instructions to let EpsonNet Setup continue.
Note: If you see a firewall alert message, click Unblock or Allow to continue installing the software. 4. Setting Up With a Temporary USB Cable Do not connect the USB cable to your computer with a USB cable. 3. Do not select Ask Me Later, Keep Blocking, or Block. 30 Wireless Network Setup Wait while the software is installed. 2. When you see the Firewall Warning screen, click Next. Follow the on -screen instructions. 1. When you see this screen, connect the product to your product until instructed to do so in the on -screen instructions to let EpsonNet Setup continue.

Quick Reference Guide
Page 32
To set up additional computers to print to the product, see the Installation Complete screen, print a test page, then click Finish. 10. When you see "Setting Up Additional Computers" on page 37. 32 Wireless Network Setup Follow the on the screen to install the rest of your computer. 9. When installation is complete, remove the CD and restart your product for the network. 8. Follow the instructions on -screen instructions to remove the USB cable from the product and your software. Wait while EpsonNet Setup configures your computer. 7.
To set up additional computers to print to the product, see the Installation Complete screen, print a test page, then click Finish. 10. When you see "Setting Up Additional Computers" on page 37. 32 Wireless Network Setup Follow the on the screen to install the rest of your computer. 9. When installation is complete, remove the CD and restart your product for the network. 8. Follow the instructions on -screen instructions to remove the USB cable from the product and your software. Wait while EpsonNet Setup configures your computer. 7.

Quick Reference Guide
Page 33
... up using Mac OS X 10.6, or you do not have a USB cable to set up the product on your wireless network, follow these steps to select the name of your wireless network, then press OK. See "Entering Your SSID ... Setup 33 If your network name isn't listed, try the following: ■ Make sure that your router or access point is turned on page 36. Setting Up With the Product Buttons If you are using the product buttons: 1. Press the y Back button to return to the previous screen, press OK to...
... up using Mac OS X 10.6, or you do not have a USB cable to set up the product on your wireless network, follow these steps to select the name of your wireless network, then press OK. See "Entering Your SSID ... Setup 33 If your network name isn't listed, try the following: ■ Make sure that your router or access point is turned on page 36. Setting Up With the Product Buttons If you are using the product buttons: 1. Press the y Back button to return to the previous screen, press OK to...

Quick Reference Guide
Page 34
... setup failed" on -screen instructions to your network password. 4. Follow the on page 46. 5. Note: If the product still doesn't connect to finish selecting network settings. Mac OS X 10.6: Skip to enter them correctly. Follow the instructions on how to enter them correctly. If your network password, click Watch video overview...
... setup failed" on -screen instructions to your network password. 4. Follow the on page 46. 5. Note: If the product still doesn't connect to finish selecting network settings. Mac OS X 10.6: Skip to enter them correctly. Follow the instructions on how to enter them correctly. If your network password, click Watch video overview...

Quick Reference Guide
Page 35
... Additional Computers" on -screen instructions to install the rest of your software. To set up additional computers to print to let EpsonNet Setup continue. Do not select Ask Me Later, Keep Blocking, or Block. 8. When installation is complete, remove ...
... Additional Computers" on -screen instructions to install the rest of your software. To set up additional computers to print to let EpsonNet Setup continue. Do not select Ask Me Later, Keep Blocking, or Block. 8. When installation is complete, remove ...

Quick Reference Guide
Page 37
Insert the product software CD. 3. Windows XP: When you see the AutoPlay window, click Run Setup.exe. Wireless Network Setup 37 Windows 7 and Windows Vista: If you see the User Account Control screen, click Yes or Continue. When you see the Software Installation screen, continue with step 4. Setting Up Additional Computers 1. When you see this screen, select Wireless connection and click Next. Make sure your product is turned on. 2. When you see this screen, click Install. 5. Mac OS X: Double-click the Epson icon. 4.
Insert the product software CD. 3. Windows XP: When you see the AutoPlay window, click Run Setup.exe. Wireless Network Setup 37 Windows 7 and Windows Vista: If you see the User Account Control screen, click Yes or Continue. When you see the Software Installation screen, continue with step 4. Setting Up Additional Computers 1. When you see this screen, select Wireless connection and click Next. Make sure your product is turned on. 2. When you see this screen, click Install. 5. Mac OS X: Double-click the Epson icon. 4.
Quick Reference Guide
Page 40
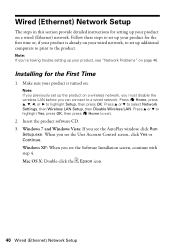
When you see "Network Problems" on your wired network, to set up additional computers to print to highlight Setup, then press OK. Make sure your product is already on page 46. Press u or d to exit. 2. Mac OS X: Double-click the Epson icon. 40 Wired (Ethernet) Network Setup Note: If you can... connect to a wired network. Insert the product software CD. 3. Follow these steps to set up your product for the first time or, if your product is turned on...
When you see "Network Problems" on your wired network, to set up additional computers to print to highlight Setup, then press OK. Make sure your product is already on page 46. Press u or d to exit. 2. Mac OS X: Double-click the Epson icon. 40 Wired (Ethernet) Network Setup Note: If you can... connect to a wired network. Insert the product software CD. 3. Follow these steps to set up your product for the first time or, if your product is turned on...

Quick Reference Guide
Page 42
... 44. 9. When you see this screen, do one of the following: ■ For a first-time installation, choose Set up printer for the first time, then click Next. ■ If the printer has already been set up for network printing and you want to be able to step 15 on my Ethernet network...
... 44. 9. When you see this screen, do one of the following: ■ For a first-time installation, choose Set up printer for the first time, then click Next. ■ If the printer has already been set up for network printing and you want to be able to step 15 on my Ethernet network...


