
Product Brochure
Page 2
...ROM with ISO/IEC 24734. Actual print stability will vary based on system configuration, software, and page complexity. For maximum print life, display all -in-one maintenance, and all colors have to be installed for more information Hi-Speed USB 2.0 Wireless Wi-Fi (802.11 b/g/n)3 Ethernet ... B class B, CAN/CSA-CEI/IEC CISPR 22 class B Indonesia, Thailand Printing: 17.5" x 22.2" x 6.7" Storage: 17.5" x 14.4" x 6.7" Weight: 13.7 lb Epson Stylus NX625 color all prints under glass in indoor display conditions; DURABrite is based on accelerated testing of prints in dark storage conditions...
...ROM with ISO/IEC 24734. Actual print stability will vary based on system configuration, software, and page complexity. For maximum print life, display all -in-one maintenance, and all colors have to be installed for more information Hi-Speed USB 2.0 Wireless Wi-Fi (802.11 b/g/n)3 Ethernet ... B class B, CAN/CSA-CEI/IEC CISPR 22 class B Indonesia, Thailand Printing: 17.5" x 22.2" x 6.7" Storage: 17.5" x 14.4" x 6.7" Weight: 13.7 lb Epson Stylus NX625 color all prints under glass in indoor display conditions; DURABrite is based on accelerated testing of prints in dark storage conditions...

Quick Reference Guide
Page 26
... a wireless or wired network. Note: If you have a USB cable, you will be prompted to simplify wireless setup. You must install the software on every computer from which you follow the instructions on the Start Here sheet to select wireless settings instead. The on-screen instructions during...;) setup, see "Network Problems" on page 46. ■ If this section provide detailed instructions for setting up your connection, and install the software. After the printer is already on your wireless network and you set up your product, choose your product on the printer to set ...
... a wireless or wired network. Note: If you have a USB cable, you will be prompted to simplify wireless setup. You must install the software on every computer from which you follow the instructions on the Start Here sheet to select wireless settings instead. The on-screen instructions during...;) setup, see "Network Problems" on page 46. ■ If this section provide detailed instructions for setting up your connection, and install the software. After the printer is already on your wireless network and you set up your product, choose your product on the printer to set ...
Quick Reference Guide
Page 27
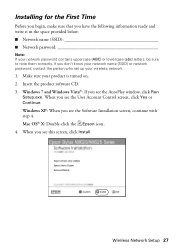
Insert the product software CD. 3. Windows 7 and Windows Vista®: If you see the AutoPlay window, click Run Setup.exe. Mac OS® X: Double-click the Epson icon. 4. Installing for the First Time Before you begin, make sure that you have the following information ready and write it in the space provided ... your network password contains uppercase (ABC) or lowercase (abc) letters, be sure to note them correctly. When you see this screen, click Install. Make sure your product is turned on. 2. Windows XP: When you see the Software Installation screen, continue with step 4.
Insert the product software CD. 3. Windows 7 and Windows Vista®: If you see the AutoPlay window, click Run Setup.exe. Mac OS® X: Double-click the Epson icon. 4. Installing for the First Time Before you begin, make sure that you have the following information ready and write it in the space provided ... your network password contains uppercase (ABC) or lowercase (abc) letters, be sure to note them correctly. When you see this screen, click Install. Make sure your product is turned on. 2. Windows XP: When you see the Software Installation screen, continue with step 4.
Quick Reference Guide
Page 30
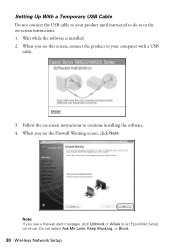
Do not select Ask Me Later, Keep Blocking, or Block. 30 Wireless Network Setup When you see a firewall alert message, click Unblock or Allow to continue installing the software. 4. Setting Up With a Temporary USB Cable Do not connect the USB cable to your product until instructed to your computer with a USB cable. 3. When you see the Firewall Warning screen, click Next. Wait while the software is installed. 2. Follow the on -screen instructions. 1. Note: If you see this screen, connect the product to do so in the on -screen instructions to let EpsonNet Setup continue.
Do not select Ask Me Later, Keep Blocking, or Block. 30 Wireless Network Setup When you see a firewall alert message, click Unblock or Allow to continue installing the software. 4. Setting Up With a Temporary USB Cable Do not connect the USB cable to your product until instructed to your computer with a USB cable. 3. When you see the Firewall Warning screen, click Next. Wait while the software is installed. 2. Follow the on -screen instructions. 1. Note: If you see this screen, connect the product to do so in the on -screen instructions to let EpsonNet Setup continue.

Quick Reference Guide
Page 32
Follow the on page 37. 32 Wireless Network Setup Wait while EpsonNet Setup configures your computer. To set up additional computers to print to the product, see the Installation Complete screen, print a test page, then click Finish. 10. When installation is complete, remove the CD and restart your product for the network. 8. 7. Follow the instructions on the screen to install the rest of your computer. 9. When you see "Setting Up Additional Computers" on -screen instructions to remove the USB cable from the product and your software.
Follow the on page 37. 32 Wireless Network Setup Wait while EpsonNet Setup configures your computer. To set up additional computers to print to the product, see the Installation Complete screen, print a test page, then click Finish. 10. When installation is complete, remove the CD and restart your product for the network. 8. 7. Follow the instructions on the screen to install the rest of your computer. 9. When you see "Setting Up Additional Computers" on -screen instructions to remove the USB cable from the product and your software.

Quick Reference Guide
Page 34
... having trouble entering your password has uppercase (AB12) or lowercase (ab12) letters, be sure to step 4. ■ If your network password. Wait while the software is installed. 34 Wireless Network Setup 3. If your network password, click Watch video overview to enter them correctly. Note: If the product still doesn't connect to your...
... having trouble entering your password has uppercase (AB12) or lowercase (ab12) letters, be sure to step 4. ■ If your network password. Wait while the software is installed. 34 Wireless Network Setup 3. If your network password, click Watch video overview to enter them correctly. Note: If the product still doesn't connect to your...

Quick Reference Guide
Page 35
.... Wireless Network Setup 35 When you see a firewall alert message, click Unblock or Allow to install the rest of your software. When you see "Setting Up Additional Computers" on -screen instructions to let EpsonNet Setup continue. When installation is complete, remove the CD and restart your product for the network. 9. To set up...
.... Wireless Network Setup 35 When you see a firewall alert message, click Unblock or Allow to install the rest of your software. When you see "Setting Up Additional Computers" on -screen instructions to let EpsonNet Setup continue. When installation is complete, remove the CD and restart your product for the network. 9. To set up...

Quick Reference Guide
Page 37
Insert the product software CD. 3. Windows 7 and Windows Vista: If you see the User Account Control screen, click Yes or Continue. When you see the Software Installation screen, continue with step 4. Mac OS X: Double-click the Epson icon. 4. Setting Up Additional Computers 1. Make sure your product is turned on. 2. When you see the AutoPlay window, click Run Setup.exe. Wireless Network Setup 37 Windows XP: When you see this screen, select Wireless connection and click Next. When you see this screen, click Install. 5.
Insert the product software CD. 3. Windows 7 and Windows Vista: If you see the User Account Control screen, click Yes or Continue. When you see the Software Installation screen, continue with step 4. Mac OS X: Double-click the Epson icon. 4. Setting Up Additional Computers 1. Make sure your product is turned on. 2. When you see the AutoPlay window, click Run Setup.exe. Wireless Network Setup 37 Windows XP: When you see this screen, select Wireless connection and click Next. When you see this screen, click Install. 5.

Quick Reference Guide
Page 38
When you see the Firewall Warning screen, click Next. When you see a firewall alert message, click Unblock or Allow to step 13 on my wireless network, then click Next. 7. Note: If you see this screen, select The printer is installed. 8. Wait while the software is already on page 39. 9. Do not select Ask Me Later, Keep Blocking, or Block. 38 Wireless Network Setup Mac OS X 10.6: Skip to let EpsonNet Setup continue. 6.
When you see the Firewall Warning screen, click Next. When you see a firewall alert message, click Unblock or Allow to step 13 on my wireless network, then click Next. 7. Note: If you see this screen, select The printer is installed. 8. Wait while the software is already on page 39. 9. Do not select Ask Me Later, Keep Blocking, or Block. 38 Wireless Network Setup Mac OS X 10.6: Skip to let EpsonNet Setup continue. 6.

Quick Reference Guide
Page 39
Wireless Network Setup 39 Wait while EpsonNet Setup configures your computer. When installation is complete, remove the CD and restart your product for the network. 12. 10. Follow the on-screen instructions to install the rest of your software. When you see the Installation Complete screen, print a test page, then click Finish. 13. If you see a screen like this one, select Epson Stylus NX620, then click Next. 11.
Wireless Network Setup 39 Wait while EpsonNet Setup configures your computer. When installation is complete, remove the CD and restart your product for the network. 12. 10. Follow the on-screen instructions to install the rest of your software. When you see the Installation Complete screen, print a test page, then click Finish. 13. If you see a screen like this one, select Epson Stylus NX620, then click Next. 11.
Quick Reference Guide
Page 40
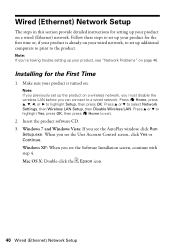
.... 3. Windows XP: When you see the Software Installation screen, continue with step 4. Make sure your product is already on ... Setup, then press OK. When you see the User Account Control screen, click Yes or Continue. Mac OS X: Double-click the Epson icon. 40 Wired (Ethernet) Network Setup Follow these steps to the product. Press Home, press u, d, l, or r to exit... instructions for the first time or, if your product is turned on. Press u or d to a wired network. Installing for the First Time 1. Note: If you see "Network Problems" on page 46. Note: If you previously set ...
.... 3. Windows XP: When you see the Software Installation screen, continue with step 4. Make sure your product is already on ... Setup, then press OK. When you see the User Account Control screen, click Yes or Continue. Mac OS X: Double-click the Epson icon. 40 Wired (Ethernet) Network Setup Follow these steps to the product. Press Home, press u, d, l, or r to exit... instructions for the first time or, if your product is turned on. Press u or d to a wired network. Installing for the First Time 1. Note: If you see "Network Problems" on page 46. Note: If you previously set ...

Quick Reference Guide
Page 42
...printing and you want to be able to print from an additional computer, choose The printer is installed, then click Next to start network installation. 42 Wired (Ethernet) Network Setup For first-time installation only: Connect the product to step 15 on my Ethernet network, then click Next. 7. Mac... OS X 10.6: Skip to your router, access point, or hub with an Ethernet network cable, then click Next. 8. Wait while the software ...
...printing and you want to be able to print from an additional computer, choose The printer is installed, then click Next to start network installation. 42 Wired (Ethernet) Network Setup For first-time installation only: Connect the product to step 15 on my Ethernet network, then click Next. 7. Mac... OS X 10.6: Skip to your router, access point, or hub with an Ethernet network cable, then click Next. 8. Wait while the software ...

Quick Reference Guide
Page 44
13. Follow the on-screen instructions to print a test page. 14. If you see an Installation Complete screen that includes a Print Test Page button, click it to install the rest of your computer. 44 Wired (Ethernet) Network Setup When installation is complete, remove the CD and restart your software. Click Finish. 15.
13. Follow the on-screen instructions to print a test page. 14. If you see an Installation Complete screen that includes a Print Test Page button, click it to install the rest of your computer. 44 Wired (Ethernet) Network Setup When installation is complete, remove the CD and restart your software. Click Finish. 15.

Quick Reference Guide
Page 47
.... 3. Press OK, press u or d to print a network status sheet. Load it short edge first and don't load it after installing the product software. Problems and Solutions 47 see page 19 for scanning instructions. ■ If you cannot scan from the product's control panel, make sure you...a communication error may occur. If the scan did not complete, lower the resolution. ■ If network communication was interrupted while starting Epson Scan, exit Epson Scan, and restart it above the arrow marks on , and then try again. Check the Timeout Setting in your computer after a few...
.... 3. Press OK, press u or d to print a network status sheet. Load it short edge first and don't load it after installing the product software. Problems and Solutions 47 see page 19 for scanning instructions. ■ If you cannot scan from the product's control panel, make sure you...a communication error may occur. If the scan did not complete, lower the resolution. ■ If network communication was interrupted while starting Epson Scan, exit Epson Scan, and restart it above the arrow marks on , and then try again. Check the Timeout Setting in your computer after a few...

Quick Reference Guide
Page 56
...not cover any color change or fading of prints or reimbursement of misuse, abuse, improper installation, neglect, improper shipping, damage caused by this product for all costs to you use ; Epson is not considered normal use an address in the United States, Canada, or Puerto ...Rico. If Epson authorizes repair instead of your original product covered by disasters such as fire, flood, and lightning, improper electrical current, software 56 Notices You are responsible for warranty repair instructions and return authorization....
...not cover any color change or fading of prints or reimbursement of misuse, abuse, improper installation, neglect, improper shipping, damage caused by this product for all costs to you use ; Epson is not considered normal use an address in the United States, Canada, or Puerto ...Rico. If Epson authorizes repair instead of your original product covered by disasters such as fire, flood, and lightning, improper electrical current, software 56 Notices You are responsible for warranty repair instructions and return authorization....
Start Here
Page 3
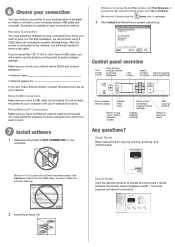
... modes Move cursor and select photos/menus/ settings Display detailed settings Start copying/ printing Return to access the online User's Guide, software downloads, Epson Supplies CentralSM, and more (requires an Internet connection). 2 Insert the product CD. Quick Guide Basic instructions for details on every computer... NOT CONNECTED to the network, you see the User Account Control screen, click Yes or Continue. If you want to print. 7 Install software 1 Make sure the printer is connected to your computer. Windows®: If you will need to use the buttons on every computer ...
... modes Move cursor and select photos/menus/ settings Display detailed settings Start copying/ printing Return to access the online User's Guide, software downloads, Epson Supplies CentralSM, and more (requires an Internet connection). 2 Insert the product CD. Quick Guide Basic instructions for details on every computer... NOT CONNECTED to the network, you see the User Account Control screen, click Yes or Continue. If you want to print. 7 Install software 1 Make sure the printer is connected to your computer. Windows®: If you will need to use the buttons on every computer ...


