Product Brochure
Page 2
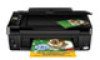
...: 17.7" x 13.5" x 7.2" Weight: 12.3 lb Epson Stylus NX420 color all-in-one, instruction booklets, CD-ROM with manual, two-sided printing1 • Designed to be recycled5 • Epson America, Inc. Black and color print speeds are trademarks of the Microsoft group of companies. See www.epson.com/printspeed for printer startup and a variable amount of ink...
...: 17.7" x 13.5" x 7.2" Weight: 12.3 lb Epson Stylus NX420 color all-in-one, instruction booklets, CD-ROM with manual, two-sided printing1 • Designed to be recycled5 • Epson America, Inc. Black and color print speeds are trademarks of the Microsoft group of companies. See www.epson.com/printspeed for printer startup and a variable amount of ink...
Quick Guide
Page 2
... Paper Type 31 Scanning a Document or Photo 32 Quick Scanning With the Scan Button 32 Scanning With Epson Scan Software 33 Scanning with Mac OS X 10.6 34 Restoring and Correcting Photos 35 Maintaining Your Printer 36 Checking the Print Head Nozzles 36 Cleaning the Print Head 37 Checking Ink Levels 38 Purchasing...
... Paper Type 31 Scanning a Document or Photo 32 Quick Scanning With the Scan Button 32 Scanning With Epson Scan Software 33 Scanning with Mac OS X 10.6 34 Restoring and Correcting Photos 35 Maintaining Your Printer 36 Checking the Print Head Nozzles 36 Cleaning the Print Head 37 Checking Ink Levels 38 Purchasing...
Quick Guide
Page 4
... CD. 2. Mac OS® X: Double-click the Epson icon. 4 Wireless Network Setup Note: If you're having trouble setting up your wireless printer, see "Network Problems" on page 44. ■ If this is already on your printer on a wireless network. When you see the Software Installation screen, continue with ... your wireless network and you need to set up your network password contains uppercase (ABC) or lowercase (abc) letters, be sure to the printer, see "Setting up Additional Computers" on page 14. If you see the User Account Control screen, click Yes or Continue. Windows XP: ...
... CD. 2. Mac OS® X: Double-click the Epson icon. 4 Wireless Network Setup Note: If you're having trouble setting up your wireless printer, see "Network Problems" on page 44. ■ If this is already on your printer on a wireless network. When you see the Software Installation screen, continue with ... your wireless network and you need to set up your network password contains uppercase (ABC) or lowercase (abc) letters, be sure to the printer, see "Setting up Additional Computers" on page 14. If you see the User Account Control screen, click Yes or Continue. Windows XP: ...
Quick Guide
Page 6
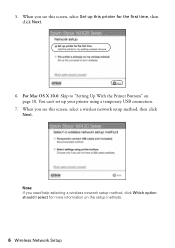
You can't set up this printer for more information on page 10. Note: If you see this screen, select a wireless network setup method, then click Next. 5. When you see this screen, select Set up your printer using a temporary USB connection. 7. When you need help selecting a wireless network setup method, click Which option should I select for the first time, then click Next. 6. For Mac OS X 10.6: Skip to "Setting Up With the Printer Buttons" on the setup methods. 6 Wireless Network Setup
You can't set up this printer for more information on page 10. Note: If you see this screen, select a wireless network setup method, then click Next. 5. When you see this screen, select Set up your printer using a temporary USB connection. 7. When you need help selecting a wireless network setup method, click Which option should I select for the first time, then click Next. 6. For Mac OS X 10.6: Skip to "Setting Up With the Printer Buttons" on the setup methods. 6 Wireless Network Setup
Quick Guide
Page 7
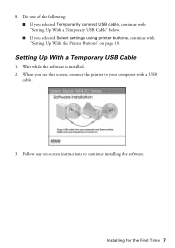
Setting Up With a Temporary USB Cable 1. When you selected Select settings using printer buttons, continue with "Setting Up With the Printer Buttons" on -screen instructions to your computer with a USB cable. 3. Do one of the following: ■ If you selected Temporarily connect USB cable, continue with "Setting Up With a Temporary USB Cable" below. ■ If you see this screen, connect the printer to continue installing the software. Installing for the First Time 7 Follow any on page 10. Wait while the software is installed. 2. 8.
Setting Up With a Temporary USB Cable 1. When you selected Select settings using printer buttons, continue with "Setting Up With the Printer Buttons" on -screen instructions to your computer with a USB cable. 3. Do one of the following: ■ If you selected Temporarily connect USB cable, continue with "Setting Up With a Temporary USB Cable" below. ■ If you see this screen, connect the printer to continue installing the software. Installing for the First Time 7 Follow any on page 10. Wait while the software is installed. 2. 8.
Quick Guide
Page 9
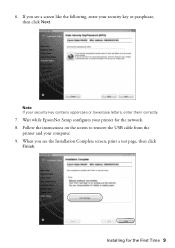
When you see the Installation Complete screen, print a test page, then click Finish. Follow the instructions on the screen to remove the USB cable from the printer and your security key or passphrase, then click Next. Installing for the network. 8. 6. If you see a screen like the following, enter your computer. 9. Wait while EpsonNet Setup configures your security key contains uppercase or lowercase letters, enter them correctly. 7. Note: If your printer for the First Time 9
When you see the Installation Complete screen, print a test page, then click Finish. Follow the instructions on the screen to remove the USB cable from the printer and your security key or passphrase, then click Next. Installing for the network. 8. 6. If you see a screen like the following, enter your computer. 9. Wait while EpsonNet Setup configures your security key contains uppercase or lowercase letters, enter them correctly. 7. Note: If your printer for the First Time 9
Quick Guide
Page 10
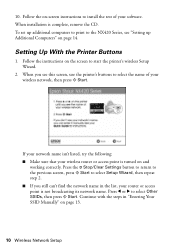
...screen, press x Start to select Setup Wizard, then repeat step 2. ■ If you see "Setting up additional computers to print to the NX420 Series, see this screen, use the printer's buttons to install the rest of your software. When installation is not broadcasting its network name. Press l or r to start the... printer's wireless Setup Wizard. 2. 10. Continue with the steps in the list, your wireless router or access point is turned on the screen to ...
...screen, press x Start to select Setup Wizard, then repeat step 2. ■ If you see "Setting up additional computers to print to the NX420 Series, see this screen, use the printer's buttons to install the rest of your software. When installation is not broadcasting its network name. Press l or r to start the... printer's wireless Setup Wizard. 2. 10. Continue with the steps in the list, your wireless router or access point is turned on the screen to ...
Quick Guide
Page 11
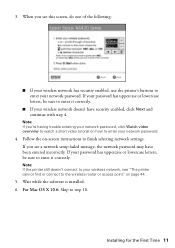
... with step 4. Note: If you see this screen, do one of the following: ■ If your wireless network has security enabled, use the printer's buttons to enter your network password. 4. For Mac OS X 10.6: Skip to the wireless router or access point" on how to finish selecting ...network settings. If you 're having trouble entering your wireless network, see "The printer cannot find or connect to step 10. Note: If the printer still doesn't connect to your network password, click Watch video overview to watch a short video tutorial on page 44....
... with step 4. Note: If you see this screen, do one of the following: ■ If your wireless network has security enabled, use the printer's buttons to enter your network password. 4. For Mac OS X 10.6: Skip to the wireless router or access point" on how to finish selecting ...network settings. If you 're having trouble entering your wireless network, see "The printer cannot find or connect to step 10. Note: If the printer still doesn't connect to your network password, click Watch video overview to watch a short video tutorial on page 44....
Quick Guide
Page 12
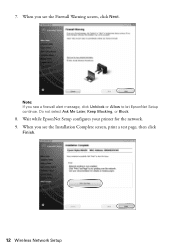
Do not select Ask Me Later, Keep Blocking, or Block. 8. Note: If you see the Firewall Warning screen, click Next. When you see the Installation Complete screen, print a test page, then click Finish. 12 Wireless Network Setup Wait while EpsonNet Setup configures your printer for the network. 9. When you see a firewall alert message, click Unblock or Allow to let EpsonNet Setup continue. 7.
Do not select Ask Me Later, Keep Blocking, or Block. 8. Note: If you see the Firewall Warning screen, click Next. When you see the Installation Complete screen, print a test page, then click Finish. 12 Wireless Network Setup Wait while EpsonNet Setup configures your printer for the network. 9. When you see a firewall alert message, click Unblock or Allow to let EpsonNet Setup continue. 7.
Quick Guide
Page 13
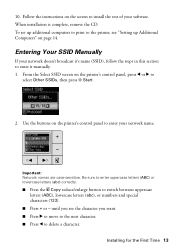
10. To set up Additional Computers" on the printer's control panel, press l or r to the printer, see the character you see "Setting up additional computers to print to select Other SSIDs, then press x Start. 2. From the Select SSID screen on page ... to install the rest of your network name. Important: Network names are case-sensitive. Installing for the First Time 13 Follow the instructions on the printer's control panel to delete a character.
10. To set up Additional Computers" on the printer's control panel, press l or r to the printer, see the character you see "Setting up additional computers to print to select Other SSIDs, then press x Start. 2. From the Select SSID screen on page ... to install the rest of your network name. Important: Network names are case-sensitive. Installing for the First Time 13 Follow the instructions on the printer's control panel to delete a character.
Quick Guide
Page 14
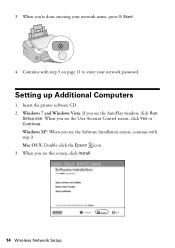
3. Setting up Additional Computers 1. Windows XP: When you see this screen, click Install. 14 Wireless Network Setup Mac OS X: Double-click the Epson icon. 3. Insert the printer software CD. 2. When you see the User Account Control screen, click Yes or Continue. Windows 7 and Windows Vista: If you see the Software Installation screen, continue with step 3 on page 11 to enter your network name, press x Start. 4. When you 're done entering your network password. When you see the AutoPlay window, click Run Setup.exe. Continue with step 3.
3. Setting up Additional Computers 1. Windows XP: When you see this screen, click Install. 14 Wireless Network Setup Mac OS X: Double-click the Epson icon. 3. Insert the printer software CD. 2. When you see the User Account Control screen, click Yes or Continue. Windows 7 and Windows Vista: If you see the Software Installation screen, continue with step 3 on page 11 to enter your network name, press x Start. 4. When you 're done entering your network password. When you see the AutoPlay window, click Run Setup.exe. Continue with step 3.
Quick Guide
Page 15
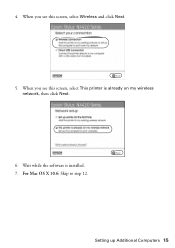
When you see this screen, select Wireless and click Next. 5. Setting up Additional Computers 15 For Mac OS X 10.6: Skip to step 12. When you see this screen, select This printer is installed. 7. Wait while the software is already on my wireless network, then click Next. 6. 4.
When you see this screen, select Wireless and click Next. 5. Setting up Additional Computers 15 For Mac OS X 10.6: Skip to step 12. When you see this screen, select This printer is installed. 7. Wait while the software is already on my wireless network, then click Next. 6. 4.
Quick Guide
Page 16
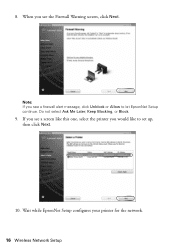
8. Wait while EpsonNet Setup configures your printer for the network. 16 Wireless Network Setup When you see a firewall alert message, click Unblock or Allow to set up, then click Next. 10. Note: If you would like to let EpsonNet Setup continue. Do not select Ask Me Later, Keep Blocking, or Block. 9. If you see a screen like this one, select the printer you see the Firewall Warning screen, click Next.
8. Wait while EpsonNet Setup configures your printer for the network. 16 Wireless Network Setup When you see a firewall alert message, click Unblock or Allow to set up, then click Next. 10. Note: If you would like to let EpsonNet Setup continue. Do not select Ask Me Later, Keep Blocking, or Block. 9. If you see a screen like this one, select the printer you see the Firewall Warning screen, click Next.
Quick Guide
Page 19
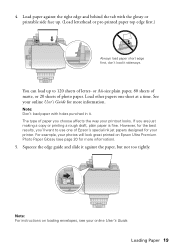
...the glossy or printable side face up to use one sheet at a time. Loading Paper 19 4. If you 'll want to 120 sheets of Epson's special ink jet papers designed for more information. For example, your photos will look great printed on loading envelopes, see page 20 for your ...online User's Guide. Load paper against the paper, but not too tightly. Note: For instructions on Epson Ultra Premium Photo Paper Glossy (see your printer. Load other papers one of letter- See your printout looks. You can load up . (Load letterhead or pre-printed paper top...
...the glossy or printable side face up to use one sheet at a time. Loading Paper 19 4. If you 'll want to 120 sheets of Epson's special ink jet papers designed for more information. For example, your photos will look great printed on loading envelopes, see page 20 for your ...online User's Guide. Load paper against the paper, but not too tightly. Note: For instructions on Epson Ultra Premium Photo Paper Glossy (see your printer. Load other papers one of letter- See your printout looks. You can load up . (Load letterhead or pre-printed paper top...
Quick Guide
Page 24
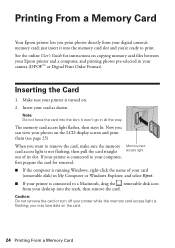
it into the slot; Printing From a Memory Card Your Epson printer lets you print photos directly from your desktop into the trash, ... memory card access light flashes, then stays lit. Caution: Do not remove the card or turn off your printer while the memory card access light is turned on the LCD display screen and print them (see page 25)...photos on . 2. Now you may lose data on copying memory card files between your Epson printer and a computer, and printing photos pre-selected in your printer is not flashing, then pull the card straight out of your card (removable disk) ...
it into the slot; Printing From a Memory Card Your Epson printer lets you print photos directly from your desktop into the trash, ... memory card access light flashes, then stays lit. Caution: Do not remove the card or turn off your printer while the memory card access light is turned on the LCD display screen and print them (see page 25)...photos on . 2. Now you may lose data on copying memory card files between your Epson printer and a computer, and printing photos pre-selected in your printer is not flashing, then pull the card straight out of your card (removable disk) ...
Quick Guide
Page 26
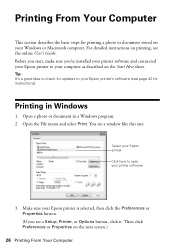
For detailed instructions on the Start Here sheet. Make sure your Epson printer is selected, then click the Preferences or Properties button. (If you 've installed your printer software and connected your Epson printer to open your Windows or Macintosh computer. You see page 42 for printing ...Computer Tip: It's a good idea to check for updates to your Epson printer's software (see a window like this one: Select your Epson printer Click here to your computer as described on printing, see a Setup, Printer, or Options button, click it. Then click Preferences or Properties on...
For detailed instructions on the Start Here sheet. Make sure your Epson printer is selected, then click the Preferences or Properties button. (If you 've installed your printer software and connected your Epson printer to open your Windows or Macintosh computer. You see page 42 for printing ...Computer Tip: It's a good idea to check for updates to your Epson printer's software (see a window like this one: Select your Epson printer Click here to your computer as described on printing, see a Setup, Printer, or Options button, click it. Then click Preferences or Properties on...
Quick Guide
Page 28
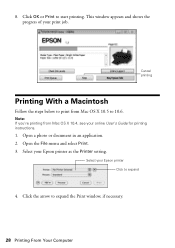
... window, if necessary. 28 Printing From Your Computer Cancel printing Printing With a Macintosh Follow the steps below to print from Mac OS X 10.4, see your Epson printer Click to start printing. Open a photo or document in an application. 2. Select your print job. Select your online User's Guide for printing instructions. 1. Click OK...
... window, if necessary. 28 Printing From Your Computer Cancel printing Printing With a Macintosh Follow the steps below to print from Mac OS X 10.4, see your Epson printer Click to start printing. Open a photo or document in an application. 2. Select your print job. Select your online User's Guide for printing instructions. 1. Click OK...
Quick Guide
Page 31
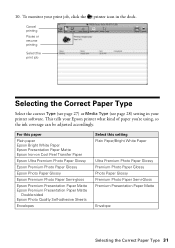
... accordingly. 10. This tells your printer software. For this paper Plain paper Epson Bright White Paper Epson Presentation Paper Matte Epson Iron-on Cool Peel Transfer Paper Epson Ultra Premium Photo Paper Glossy Epson Premium Photo Paper Glossy Epson Photo Paper Glossy Epson Premium Photo Paper Semi-gloss Epson Premium Presentation Paper Matte Epson Premium Presentation Paper Matte Double-sided...
... accordingly. 10. This tells your printer software. For this paper Plain paper Epson Bright White Paper Epson Presentation Paper Matte Epson Iron-on Cool Peel Transfer Paper Epson Ultra Premium Photo Paper Glossy Epson Premium Photo Paper Glossy Epson Photo Paper Glossy Epson Premium Photo Paper Semi-gloss Epson Premium Presentation Paper Matte Epson Premium Presentation Paper Matte Double-sided...
Quick Guide
Page 33
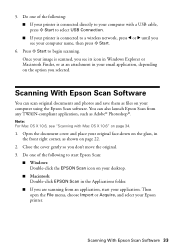
... your computer using the Epson Scan software. Do one of the following : ■ If your printer is connected directly to start your application. Scanning With Epson Scan Software You can also launch Epson Scan from an application, start Epson Scan: ■ Windows: Double-click the EPSON Scan icon on page ... selected. Note: For Mac OS X 10.6, see "Scanning with a USB cable, press x Start to select USB Connection. ■ If your printer is scanned, you see your image is connected to begin scanning. Once your computer name, then press x Start. 6. 5. Close the cover gently ...
... your computer using the Epson Scan software. Do one of the following : ■ If your printer is connected directly to start your application. Scanning With Epson Scan Software You can also launch Epson Scan from an application, start Epson Scan: ■ Windows: Double-click the EPSON Scan icon on page ... selected. Note: For Mac OS X 10.6, see "Scanning with a USB cable, press x Start to select USB Connection. ■ If your printer is scanned, you see your image is connected to begin scanning. Once your computer name, then press x Start. 6. 5. Close the cover gently ...
Quick Guide
Page 36
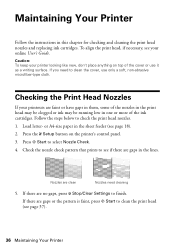
... faint, press x Start to check the print head nozzles. 1. Press x Start to finish. Nozzles are clean Nozzles need to see your printer looking like new, don't place anything on the printer's control panel. 3. If there are gaps in one or more of the ink cartridges. If there are faint or have gaps... F Setup button on top of the nozzles in the print head may be clogged or ink may be running low in the lines. Maintaining Your Printer Follow the instructions in the sheet feeder (see page 37). 36 Maintaining Your...
... faint, press x Start to check the print head nozzles. 1. Press x Start to finish. Nozzles are clean Nozzles need to see your printer looking like new, don't place anything on the printer's control panel. 3. If there are gaps in one or more of the ink cartridges. If there are faint or have gaps... F Setup button on top of the nozzles in the print head may be clogged or ink may be running low in the lines. Maintaining Your Printer Follow the instructions in the sheet feeder (see page 37). 36 Maintaining Your...


