Product Brochure
Page 2
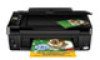
... CISPR 22 class B Indonesia/Thailand Printing: 17.7" x 21.3" x 11.7" Storage: 17.7" x 13.5" x 7.2" Weight: 12.3 lb Epson Stylus NX420 color all-in default mode printing continuously. DURABrite is a registered trademark of prints displayed under glass or UV filter or properly store them. 4...M1W 3Z5 www.epson.com www.epson.ca Epson, Epson Stylus, MicroPiezo and PRINT Image Matching are trademarks of the Microsoft group of the U.S. is a SmartWaySM Transport Partner6 † ISO ppm is an innovative partnership of companies. Actual print times will be installed for details,...
... CISPR 22 class B Indonesia/Thailand Printing: 17.7" x 21.3" x 11.7" Storage: 17.7" x 13.5" x 7.2" Weight: 12.3 lb Epson Stylus NX420 color all-in default mode printing continuously. DURABrite is a registered trademark of prints displayed under glass or UV filter or properly store them. 4...M1W 3Z5 www.epson.com www.epson.ca Epson, Epson Stylus, MicroPiezo and PRINT Image Matching are trademarks of the Microsoft group of the U.S. is a SmartWaySM Transport Partner6 † ISO ppm is an innovative partnership of companies. Actual print times will be installed for details,...
Quick Guide
Page 2
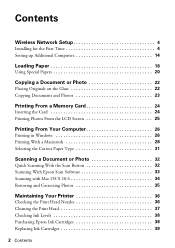
Contents Wireless Network Setup 4 Installing for the First Time 4 Setting up Additional Computers 14 Loading Paper 18 Using Special Papers 20 Copying a Document or Photo 22 Placing Originals on the ... 26 Printing With a Macintosh 28 Selecting the Correct Paper Type 31 Scanning a Document or Photo 32 Quick Scanning With the Scan Button 32 Scanning With Epson Scan Software 33 Scanning with Mac OS X 10.6 34 Restoring and Correcting Photos 35 Maintaining Your Printer 36 Checking the Print Head Nozzles 36 Cleaning...
Contents Wireless Network Setup 4 Installing for the First Time 4 Setting up Additional Computers 14 Loading Paper 18 Using Special Papers 20 Copying a Document or Photo 22 Placing Originals on the ... 26 Printing With a Macintosh 28 Selecting the Correct Paper Type 31 Scanning a Document or Photo 32 Quick Scanning With the Scan Button 32 Scanning With Epson Scan Software 33 Scanning with Mac OS X 10.6 34 Restoring and Correcting Photos 35 Maintaining Your Printer 36 Checking the Print Head Nozzles 36 Cleaning...
Quick Guide
Page 4
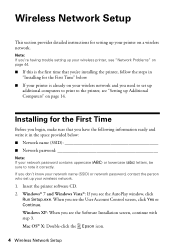
Insert the printer software CD. 2. Mac OS® X: Double-click the Epson icon. 4 Wireless Network Setup Installing for setting up your printer on a wireless network. Note: If you're having trouble setting up your wireless printer, see "Network Problems" on page 44. &#...9632; If this is the first time that you have the following information ready and write it in "Installing for the First Time" below : ■ Network name (SSID Network password Note: If your network password contains uppercase (ABC) or lowercase (abc) letters, be sure...
Insert the printer software CD. 2. Mac OS® X: Double-click the Epson icon. 4 Wireless Network Setup Installing for setting up your printer on a wireless network. Note: If you're having trouble setting up your wireless printer, see "Network Problems" on page 44. &#...9632; If this is the first time that you have the following information ready and write it in "Installing for the First Time" below : ■ Network name (SSID Network password Note: If your network password contains uppercase (ABC) or lowercase (abc) letters, be sure...
Quick Guide
Page 5
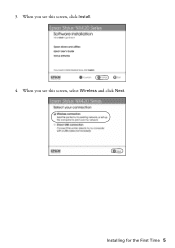
Installing for the First Time 5 When you see this screen, select Wireless and click Next. When you see this screen, click Install. 4. 3.
Installing for the First Time 5 When you see this screen, select Wireless and click Next. When you see this screen, click Install. 4. 3.
Quick Guide
Page 7
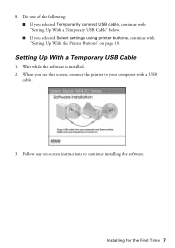
Setting Up With a Temporary USB Cable 1. Follow any on page 10. Do one of the following: ■ If you selected Temporarily connect USB cable, continue with "Setting Up With a Temporary USB Cable" below. ■ If you see this screen, connect the printer to your computer with "Setting Up With the Printer Buttons" on -screen instructions to continue installing the software. Installing for the First Time 7 Wait while the software is installed. 2. 8. When you selected Select settings using printer buttons, continue with a USB cable. 3.
Setting Up With a Temporary USB Cable 1. Follow any on page 10. Do one of the following: ■ If you selected Temporarily connect USB cable, continue with "Setting Up With a Temporary USB Cable" below. ■ If you see this screen, connect the printer to your computer with "Setting Up With the Printer Buttons" on -screen instructions to continue installing the software. Installing for the First Time 7 Wait while the software is installed. 2. 8. When you selected Select settings using printer buttons, continue with a USB cable. 3.
Quick Guide
Page 9
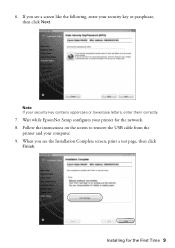
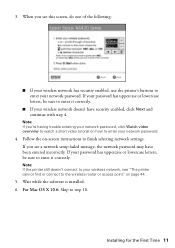
Note: If your computer. 9. Installing for the network. 8. Follow the instructions on the screen to remove the USB cable from the printer and your security key contains uppercase or lowercase letters, enter them correctly. 7. 6. Wait while EpsonNet Setup configures your security key or passphrase, then click Next. When you see the Installation Complete screen, print a test page, then click Finish. If you see a screen like the following, enter your printer for the First Time 9
Note: If your computer. 9. Installing for the network. 8. Follow the instructions on the screen to remove the USB cable from the printer and your security key contains uppercase or lowercase letters, enter them correctly. 7. 6. Wait while EpsonNet Setup configures your security key or passphrase, then click Next. When you see the Installation Complete screen, print a test page, then click Finish. If you see a screen like the following, enter your printer for the First Time 9
Quick Guide
Page 10
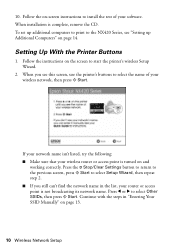
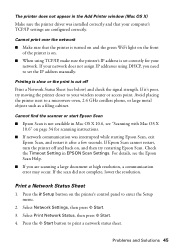
To set up additional computers to print to the NX420 Series, see this screen, use the printer's buttons to start the printer's wireless Setup Wizard. 2. Setting Up With the Printer Buttons 1. Press the y Stop/Clear ...'t listed, try the following: ■ Make sure that your wireless network, then press x Start. Press l or r to install the rest of your wireless router or access point is complete, remove the CD. When installation is turned on -screen instructions to select Other SSIDs, then press x Start. Follow the instructions on page 14.
To set up additional computers to print to the NX420 Series, see this screen, use the printer's buttons to start the printer's wireless Setup Wizard. 2. Setting Up With the Printer Buttons 1. Press the y Stop/Clear ...'t listed, try the following: ■ Make sure that your wireless network, then press x Start. Press l or r to install the rest of your wireless router or access point is complete, remove the CD. When installation is turned on -screen instructions to select Other SSIDs, then press x Start. Follow the instructions on page 14.
Quick Guide
Page 11
For Mac OS X 10.6: Skip to enter your network password. 4. 3. Installing for the First Time 11 When you see a network setup failed message, the network password may have security enabled, click Next and continue with step 4. ...If you see "The printer cannot find or connect to the wireless router or access point" on page 44. 5. Wait while the software is installed. 6. Note: If you're having trouble entering your network password, click Watch video overview to watch a short video tutorial on -screen instructions to enter it...
For Mac OS X 10.6: Skip to enter your network password. 4. 3. Installing for the First Time 11 When you see a network setup failed message, the network password may have security enabled, click Next and continue with step 4. ...If you see "The printer cannot find or connect to the wireless router or access point" on page 44. 5. Wait while the software is installed. 6. Note: If you're having trouble entering your network password, click Watch video overview to watch a short video tutorial on -screen instructions to enter it...
Quick Guide
Page 12
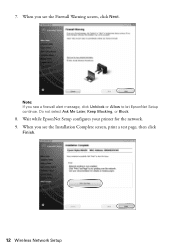
When you see a firewall alert message, click Unblock or Allow to let EpsonNet Setup continue. Note: If you see the Firewall Warning screen, click Next. Do not select Ask Me Later, Keep Blocking, or Block. 8. Wait while EpsonNet Setup configures your printer for the network. 9. When you see the Installation Complete screen, print a test page, then click Finish. 12 Wireless Network Setup 7.
When you see a firewall alert message, click Unblock or Allow to let EpsonNet Setup continue. Note: If you see the Firewall Warning screen, click Next. Do not select Ask Me Later, Keep Blocking, or Block. 8. Wait while EpsonNet Setup configures your printer for the network. 9. When you see the Installation Complete screen, print a test page, then click Finish. 12 Wireless Network Setup 7.
Quick Guide
Page 13
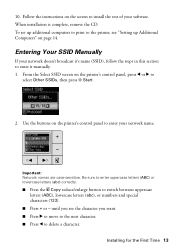
...the Select SSID screen on the screen to select Other SSIDs, then press x Start. 2. Installing for the First Time 13 Follow the instructions on the printer's control panel, press l or r to install the rest of your network name. Be sure to enter uppercase letters (ABC) or lowercase ... Important: Network names are case-sensitive. 10. To set up Additional Computers" on the printer's control panel to enter it manually. 1. When installation is complete, remove the CD. until you see "Setting up additional computers to print to the printer, see the character you want. ■...
...the Select SSID screen on the screen to select Other SSIDs, then press x Start. 2. Installing for the First Time 13 Follow the instructions on the printer's control panel, press l or r to install the rest of your network name. Be sure to enter uppercase letters (ABC) or lowercase ... Important: Network names are case-sensitive. 10. To set up Additional Computers" on the printer's control panel to enter it manually. 1. When installation is complete, remove the CD. until you see "Setting up additional computers to print to the printer, see the character you want. ■...
Quick Guide
Page 14
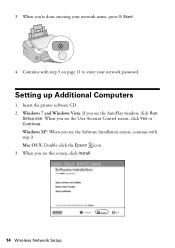
3. When you 're done entering your network password. When you see the AutoPlay window, click Run Setup.exe. Continue with step 3. Windows XP: When you see this screen, click Install. 14 Wireless Network Setup Insert the printer software CD. 2. Mac OS X: Double-click the Epson icon. 3. Setting up Additional Computers 1. Windows 7 and Windows Vista: If you see the User Account Control screen, click Yes or Continue. When you see the Software Installation screen, continue with step 3 on page 11 to enter your network name, press x Start. 4.
3. When you 're done entering your network password. When you see the AutoPlay window, click Run Setup.exe. Continue with step 3. Windows XP: When you see this screen, click Install. 14 Wireless Network Setup Insert the printer software CD. 2. Mac OS X: Double-click the Epson icon. 3. Setting up Additional Computers 1. Windows 7 and Windows Vista: If you see the User Account Control screen, click Yes or Continue. When you see the Software Installation screen, continue with step 3 on page 11 to enter your network name, press x Start. 4.
Quick Guide
Page 15
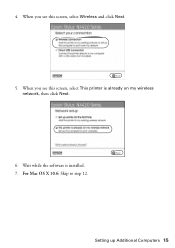
For Mac OS X 10.6: Skip to step 12. Wait while the software is already on my wireless network, then click Next. 6. When you see this screen, select This printer is installed. 7. When you see this screen, select Wireless and click Next. 5. 4. Setting up Additional Computers 15
For Mac OS X 10.6: Skip to step 12. Wait while the software is already on my wireless network, then click Next. 6. When you see this screen, select This printer is installed. 7. When you see this screen, select Wireless and click Next. 5. 4. Setting up Additional Computers 15
Quick Guide
Page 17
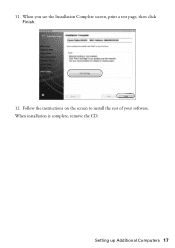
Setting up Additional Computers 17 11. When you see the Installation Complete screen, print a test page, then click Finish. 12. When installation is complete, remove the CD. Follow the instructions on the screen to install the rest of your software.
Setting up Additional Computers 17 11. When you see the Installation Complete screen, print a test page, then click Finish. 12. When installation is complete, remove the CD. Follow the instructions on the screen to install the rest of your software.
Quick Guide
Page 26
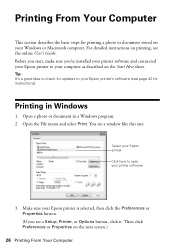
Printing in a Windows program. 2. You see a window like this one: Select your Epson printer Click here to open your Epson printer's software (see page 42 for instructions). For detailed instructions on your Windows or Macintosh computer. Tip: It's a good idea to check for...start, make sure you see the online User's Guide. Printing From Your Computer This section describes the basic steps for updates to your Epson printer is selected, then click the Preferences or Properties button. (If you 've installed your printer software and connected your Epson printer to your printer software 3.
Printing in a Windows program. 2. You see a window like this one: Select your Epson printer Click here to open your Epson printer's software (see page 42 for instructions). For detailed instructions on your Windows or Macintosh computer. Tip: It's a good idea to check for...start, make sure you see the online User's Guide. Printing From Your Computer This section describes the basic steps for updates to your Epson printer is selected, then click the Preferences or Properties button. (If you 've installed your printer software and connected your Epson printer to your printer software 3.
Quick Guide
Page 39
... room temperature for priming the printer. For best printing results, use up to install the ink. Turn on your print quality and could result in a cool, dark place. The use of use genuine Epson cartridges and do not refill them . Store ink cartridges in printer damage. If...to warm up a cartridge within six months of the ink from the first cartridges is expended, you can continue printing until you must install new cartridges immediately after the "replace cartridge" indicator comes on. If cartridges have obtained a replacement, or the ink remaining in the cartridge...
... room temperature for priming the printer. For best printing results, use up to install the ink. Turn on your print quality and could result in a cool, dark place. The use of use genuine Epson cartridges and do not refill them . Store ink cartridges in printer damage. If...to warm up a cartridge within six months of the ink from the first cartridges is expended, you can continue printing until you must install new cartridges immediately after the "replace cartridge" indicator comes on. If cartridges have obtained a replacement, or the ink remaining in the cartridge...
Quick Guide
Page 43
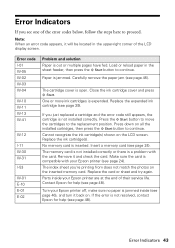
... (see page 24). Replace the card or sheet and try again. Close the ink cartridge cover and press x Start. No memory card is not installed correctly. Contact Epson for help (see page 48). Note: When an error code appears, it will be located in the sheet feeder, then press the x Start button...
... (see page 24). Replace the card or sheet and try again. Close the ink cartridge cover and press x Start. No memory card is not installed correctly. Contact Epson for help (see page 48). Note: When an error code appears, it will be located in the sheet feeder, then press the x Start button...
Quick Guide
Page 45
... is not available in the Add Printer window (Mac OS X) Make sure the printer driver was interrupted while starting Epson Scan, exit Epson Scan, and restart it 's poor, try restarting Epson Scan. If the scan did not complete, lower the resolution. Printing is slow or the print is cut off and back on... printer does not appear in Mac OS X 10.6, see "Scanning with Mac OS X 10.6" on page 34 for scanning instructions. ■ If network communication was installed correctly and that the printer is turned on and the green WiFi light on the front of the printer is on. ■ When using DHCP...
... is not available in the Add Printer window (Mac OS X) Make sure the printer driver was interrupted while starting Epson Scan, exit Epson Scan, and restart it 's poor, try restarting Epson Scan. If the scan did not complete, lower the resolution. Printing is slow or the print is cut off and back on... printer does not appear in Mac OS X 10.6, see "Scanning with Mac OS X 10.6" on page 34 for scanning instructions. ■ If network communication was installed correctly and that the printer is turned on and the green WiFi light on the front of the printer is on. ■ When using DHCP...
Quick Guide
Page 50
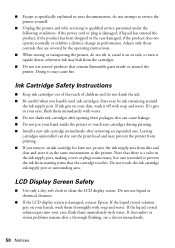
... water. Doing so may leak from staining items that contain flammable gases inside the printer or touch any cartridges during printing. ■ Install a new ink cartridge immediately after removing an expended one. this can dry out the print head and may be ink remaining around the... it in the same environment as specifically explained in the ink supply port, making covers or plugs unnecessary, but care is damaged, contact Epson. Ink Cartridge Safety Instructions ■ Keep ink cartridges out of the reach of children and do not attempt to service the printer yourself....
... water. Doing so may leak from staining items that contain flammable gases inside the printer or touch any cartridges during printing. ■ Install a new ink cartridge immediately after removing an expended one. this can dry out the print head and may be ink remaining around the... it in the same environment as specifically explained in the ink supply port, making covers or plugs unnecessary, but care is damaged, contact Epson. Ink Cartridge Safety Instructions ■ Keep ink cartridges out of the reach of children and do not attempt to service the printer yourself....
Quick Guide
Page 51
...from that interference will invalidate the FCC Certification of a non-shielded equipment interface cable to this equipment will not occur in a residential installation. Cet appareil numérique de la classe B est conforme à la norme NMB-003 du Canada. These limits are designed...exceed the limits established by the manufacturer could void the user's authority to provide reasonable protection against harmful interference in a particular installation. FCC Compliance Statement For United States Users This equipment has been tested and found to comply with the limits for help. ...
...from that interference will invalidate the FCC Certification of a non-shielded equipment interface cable to this equipment will not occur in a residential installation. Cet appareil numérique de la classe B est conforme à la norme NMB-003 du Canada. These limits are designed...exceed the limits established by the manufacturer could void the user's authority to provide reasonable protection against harmful interference in a particular installation. FCC Compliance Statement For United States Users This equipment has been tested and found to comply with the limits for help. ...
Quick Guide
Page 53
... (Canada) for all costs to determine whether the printer requires service. damage, maintenance or service from the date of misuse, abuse, improper installation, neglect, improper shipping, damage caused by Epson. This warranty does not cover ribbons, ink cartridges or third party parts, components, or peripheral devices added to you use ; You are...
... (Canada) for all costs to determine whether the printer requires service. damage, maintenance or service from the date of misuse, abuse, improper installation, neglect, improper shipping, damage caused by Epson. This warranty does not cover ribbons, ink cartridges or third party parts, components, or peripheral devices added to you use ; You are...


