
Technical Brief (Ink Jet Printers)
Page 1
... jet printers work together to produce brilliant Photo Quality color, sharp text, and incredible print speeds Small Ink Droplet Size Small ink droplets produce smoother gradations and greater tonal control Epson Inks Epson innovates ink solutions tailored to produce greater detail in solid areas Crisp text Epson Sales Training 5/07 This technical brief provides detailed information...
... jet printers work together to produce brilliant Photo Quality color, sharp text, and incredible print speeds Small Ink Droplet Size Small ink droplets produce smoother gradations and greater tonal control Epson Inks Epson innovates ink solutions tailored to produce greater detail in solid areas Crisp text Epson Sales Training 5/07 This technical brief provides detailed information...

Technical Brief (Ink Jet Printers)
Page 2
... Heat method: Heat produces a vapor bubble in the lightest areas of printed "dots" • Large ink droplets are used in photos and laser sharp text. Additionally, smaller ink droplets produce less visible printed dots, especially apparent in the ink reservoir which is generally measured in... highlights and detailed areas Variable sizes combine to have fast print speeds without satellites (unwanted ink spray) or misting. Also, Epson's variable ink droplet sizes and high resolutions combine to create a larger color palette. Here's how it compares to deflect ...
... Heat method: Heat produces a vapor bubble in the lightest areas of printed "dots" • Large ink droplets are used in photos and laser sharp text. Additionally, smaller ink droplets produce less visible printed dots, especially apparent in the ink reservoir which is generally measured in... highlights and detailed areas Variable sizes combine to have fast print speeds without satellites (unwanted ink spray) or misting. Also, Epson's variable ink droplet sizes and high resolutions combine to create a larger color palette. Here's how it compares to deflect ...

Technical Brief (Ink Jet Printers)
Page 3
... photographer looking to primarily print photos with Epson printers there are no added costs for optional cartridges, and you see continuous tone color. Additionally, unlike competitive printers tht require special or optional inks, with stellar image quality and durability, or is a professional photographer staking his reputation on breathtaking large format prints, Epson has the right ink...
... photographer looking to primarily print photos with Epson printers there are no added costs for optional cartridges, and you see continuous tone color. Additionally, unlike competitive printers tht require special or optional inks, with stellar image quality and durability, or is a professional photographer staking his reputation on breathtaking large format prints, Epson has the right ink...
Basics Guide
Page 2
.... RPM is a registered trademark, Photo Enhance is a trademark, and Epson Connection is a trademark of Epson America, Inc. SD is not responsible for use of Seiko Epson Corporation. xD-Picture Card is a service mark of Fuji Photo Film Co., Ltd. Epson disclaims any questions regarding copyright law. Trademarks Epson, Epson Stylus, PRINT Image Matching, and the PRINT Image Matching logo are registered...
.... RPM is a registered trademark, Photo Enhance is a trademark, and Epson Connection is a trademark of Epson America, Inc. SD is not responsible for use of Seiko Epson Corporation. xD-Picture Card is a service mark of Fuji Photo Film Co., Ltd. Epson disclaims any questions regarding copyright law. Trademarks Epson, Epson Stylus, PRINT Image Matching, and the PRINT Image Matching logo are registered...
Basics Guide
Page 3
... 5 Using the RX580 Control Panel 6 Loading Paper 7 Using Special Papers 10 Copying a Photo or Document 12 Placing the Original on the Glass 12 Copying Documents 14 Copying Photos 15 Selecting Copy Settings 16 Reprinting Photos and Restoring Color 18 Printing From a Memory Card 20 Compatible Cards and Image Formats 21 Inserting the Card 22 Printing From a USB...
... 5 Using the RX580 Control Panel 6 Loading Paper 7 Using Special Papers 10 Copying a Photo or Document 12 Placing the Original on the Glass 12 Copying Documents 14 Copying Photos 15 Selecting Copy Settings 16 Reprinting Photos and Restoring Color 18 Printing From a Memory Card 20 Compatible Cards and Image Formats 21 Inserting the Card 22 Printing From a USB...

Basics Guide
Page 4
... Document 63 Scanning to Your Computer 63 Scanning to a Memory Card 66 Backing Up Your Photos 67 Maintaining Your RX580 69 Checking the Print Head Nozzles 69 Cleaning the Print Head 70 Replacing Ink Cartridges 71 Aligning the Print Head 77 Solving Problems 78 Error Messages 78 Problems and Solutions 79 Where To Get Help...
... Document 63 Scanning to Your Computer 63 Scanning to a Memory Card 66 Backing Up Your Photos 67 Maintaining Your RX580 69 Checking the Print Head Nozzles 69 Cleaning the Print Head 70 Replacing Ink Cartridges 71 Aligning the Print Head 77 Solving Problems 78 Error Messages 78 Problems and Solutions 79 Where To Get Help...
Basics Guide
Page 5
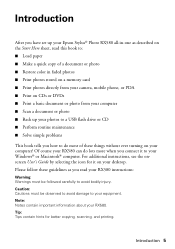
... you have set up your Epson Stylus® Photo RX580 all-in faded photos ■ Print photos stored on a memory card ■ Print photos directly from your camera, mobile phone, or PDA ■ Print on CDs or DVDs ■ Print a basic document or photo from your computer ■ Scan a document or photo ■ Back up your photos to a USB flash drive ...read this book to: ■ Load paper ■ Make a quick copy of these things without ever turning on your desktop. Of course your RX580 can do most of a document or photo ■ Restore color in -one as you connect it on your...
... you have set up your Epson Stylus® Photo RX580 all-in faded photos ■ Print photos stored on a memory card ■ Print photos directly from your camera, mobile phone, or PDA ■ Print on CDs or DVDs ■ Print a basic document or photo from your computer ■ Scan a document or photo ■ Back up your photos to a USB flash drive ...read this book to: ■ Load paper ■ Make a quick copy of these things without ever turning on your desktop. Of course your RX580 can do most of a document or photo ■ Restore color in -one as you connect it on your...

Basics Guide
Page 6
... dark after the RX580 is idle for the feature you want to use. 6 Introduction You also see a green light rotate around the Mode buttons. Press any button to card Display 1 or 9 photos; maintain the RX580; Using the RX580 Control Panel Copy a photo or document View and print photos on CD/DVDs; crop or zoom a photo Print on card; scan...
... dark after the RX580 is idle for the feature you want to use. 6 Introduction You also see a green light rotate around the Mode buttons. Press any button to card Display 1 or 9 photos; maintain the RX580; Using the RX580 Control Panel Copy a photo or document View and print photos on CD/DVDs; crop or zoom a photo Print on card; scan...

Basics Guide
Page 7
See page 10 for your printer. Loading Paper 7 However, for the best results, use one of Epson's special ink jet papers designed for a list of paper you choose affects the way your job. Open the front cover. Loading Paper The type of Epson papers and ordering information. 1. If you select the correct paper for your printouts look great printed on Epson® Ultra Premium Photo Paper Glossy. Open the paper support, then pull up the extension. 2. For example, photos look , so make sure you are just making a copy or printing a rough draft, plain paper is fine.
See page 10 for your printer. Loading Paper 7 However, for the best results, use one of Epson's special ink jet papers designed for a list of paper you choose affects the way your job. Open the front cover. Loading Paper The type of Epson papers and ordering information. 1. If you select the correct paper for your printouts look great printed on Epson® Ultra Premium Photo Paper Glossy. Open the paper support, then pull up the extension. 2. For example, photos look , so make sure you are just making a copy or printing a rough draft, plain paper is fine.

Basics Guide
Page 9
... printable side is often whiter or brighter than the other side. Make sure the paper stack fits under the arrow inside the left edge of photo paper. Insert the paper, printable side up to 120 sheets of plain paper or up , against the left edge guide. 6. Always load paper short edge...
... printable side is often whiter or brighter than the other side. Make sure the paper stack fits under the arrow inside the left edge of photo paper. Insert the paper, printable side up to 120 sheets of plain paper or up , against the left edge guide. 6. Always load paper short edge...

Basics Guide
Page 11
...; Always keep your printer provide the ultimate combination of photo quality and longevity when used with traditional photos, Epson recommends proper care that are properly displayed or stored. Part number S041062 S041153 S041106 S041405 Storing and Displaying Your Prints With proper care, photographs from your RX580 will minimize color changes and lengthen display life: ■ Frame...
...; Always keep your printer provide the ultimate combination of photo quality and longevity when used with traditional photos, Epson recommends proper care that are properly displayed or stored. Part number S041062 S041153 S041106 S041405 Storing and Displaying Your Prints With proper care, photographs from your RX580 will minimize color changes and lengthen display life: ■ Frame...
Basics Guide
Page 14
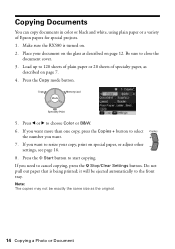
Make sure the RX580 is being printed; Load up to resize your document on the glass as described on . 2. If you want to 120 sheets of plain paper or 20 sheets of Epson papers for special projects. 1. Press the x Start button to close the document cover. 3. Be sure to start ... the Copy mode button. 5. Press l or r to cancel copying, press the y Stop/Clear Settings button. Copying Documents You can copy documents in color or black and white, using plain paper or a variety of specialty paper, as the original. 14 Copying a Photo or Document Place your copy, print on page 7. 4.
Make sure the RX580 is being printed; Load up to resize your document on the glass as described on . 2. If you want to 120 sheets of plain paper or 20 sheets of Epson papers for special projects. 1. Press the x Start button to close the document cover. 3. Be sure to start ... the Copy mode button. 5. Press l or r to cancel copying, press the y Stop/Clear Settings button. Copying Documents You can copy documents in color or black and white, using plain paper or a variety of specialty paper, as the original. 14 Copying a Photo or Document Place your copy, print on page 7. 4.

Basics Guide
Page 15
...paper, or select other special settings, press the x Print Settings button. Be sure to choose Color or B&W. 5. If you want more information. ■ The RX580 remembers your settings, even after you want . 6. Press d, then press r, select Photo, and press OK. ■ These settings are ...; 7, 8 × 10, or 8.5 × 11-inch paper. The easiest way to copy photos (using 4 × 6 Epson Premium Photo Paper Glossy. If you want to use. Press the Copy mode button. 4. Copying Photos 15 You can copy a photograph on page 7. 3. Do not pull out paper that is using default...
...paper, or select other special settings, press the x Print Settings button. Be sure to choose Color or B&W. 5. If you want more information. ■ The RX580 remembers your settings, even after you want . 6. Press d, then press r, select Photo, and press OK. ■ These settings are ...; 7, 8 × 10, or 8.5 × 11-inch paper. The easiest way to copy photos (using 4 × 6 Epson Premium Photo Paper Glossy. If you want to use. Press the Copy mode button. 4. Copying Photos 15 You can copy a photograph on page 7. 3. Do not pull out paper that is using default...
Basics Guide
Page 17
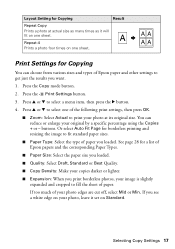
...Mid or Min. Press the Copy mode button. 2. You can choose from various sizes and types of Epson paper and other settings to select one sheet. buttons. Repeat-4 Prints a photo four times on your copies darker or lighter. ■ Expansion: When you loaded. Selecting Copy Settings ...the results you see a white edge on one of paper. Layout Setting for Copying Result Repeat Copy Prints a photo at its original size. If you want. 1. Print Settings for a list of Epson papers and the corresponding Paper Types. ■ Paper Size: Select the paper size you loaded. ...
...Mid or Min. Press the Copy mode button. 2. You can choose from various sizes and types of Epson paper and other settings to select one sheet. buttons. Repeat-4 Prints a photo four times on your copies darker or lighter. ■ Expansion: When you loaded. Selecting Copy Settings ...the results you see a white edge on one of paper. Layout Setting for Copying Result Repeat Copy Prints a photo at its original size. If you want. 1. Print Settings for a list of Epson papers and the corresponding Paper Types. ■ Paper Size: Select the paper size you loaded. ...

Basics Guide
Page 18
... Document Press OK again. When you can bring them back to highlight Reprint/Restore Photos, then press OK. 5. For photos that don't need color restoration, choose Off. 6. Press the Specialty Print button. 4. Press l or r to life using the Color Restoration feature. Press r, use the u or d buttons to set Restoration On, then press OK. (If you...
... Document Press OK again. When you can bring them back to highlight Reprint/Restore Photos, then press OK. 5. For photos that don't need color restoration, choose Off. 6. Press the Specialty Print button. 4. Press l or r to life using the Color Restoration feature. Press r, use the u or d buttons to set Restoration On, then press OK. (If you...
Basics Guide
Page 19
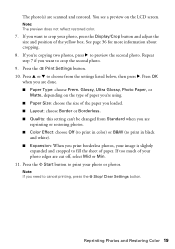
... restoring photos. ■ Color Effect: choose Off (to print in color) or B&W (to print in black and white). ■ Expansion: When you want to preview the second photo. Press the x Print Settings button. 10. Note: The preview does not reflect restored color. 7. Glossy, Ultra Glossy, Photo Paper, or Matte, depending on the LCD screen. If you print borderless photos, your photo or photos.
... restoring photos. ■ Color Effect: choose Off (to print in color) or B&W (to print in black and white). ■ Expansion: When you want to preview the second photo. Press the x Print Settings button. 10. Note: The preview does not reflect restored color. 7. Glossy, Ultra Glossy, Photo Paper, or Matte, depending on the LCD screen. If you print borderless photos, your photo or photos.
Basics Guide
Page 20
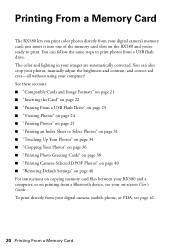
... correct red eyes-all without using your RX580 and a computer, or on printing from a USB flash drive. To print directly from your images are automatically corrected. Printing From a Memory Card The RX580 lets you 're ready to print photos from a Bluetooth device, see page 41. 20 Printing From a Memory Card The color and lighting in your digital camera's memory...
... correct red eyes-all without using your RX580 and a computer, or on printing from a USB flash drive. To print directly from your images are automatically corrected. Printing From a Memory Card The RX580 lets you 're ready to print photos from a Bluetooth device, see page 41. 20 Printing From a Memory Card The color and lighting in your digital camera's memory...

Basics Guide
Page 22
... light 4. Close the memory card slot cover. The memory card access light flashes and then stays on . 2. See page 21 for printing instructions. 22 Printing From a Memory Card Make sure the RX580 is off and that no cards are in any of the slots, then insert your card requires an adapter, make sure...
... light 4. Close the memory card slot cover. The memory card access light flashes and then stays on . 2. See page 21 for printing instructions. 22 Printing From a Memory Card Make sure the RX580 is off and that no cards are in any of the slots, then insert your card requires an adapter, make sure...
Basics Guide
Page 23
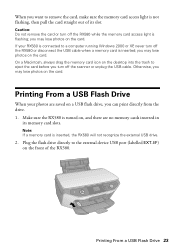
...unplug the USB cable. Make sure the RX580 is turned on, and there are saved on the card. Otherwise, you may lose photos on a USB flash drive, you can print directly from the drive. 1. you may lose photos on the front of its memory card slots. Printing From a USB Flash Drive 23 When ...you want to remove the card, make sure the memory card access light is inserted; If your photos are no memory cards inserted in its slot. Printing From a USB Flash Drive When your RX580 is connected to the external device USB port (labelled EXT.I/F) on the card. Plug the flash drive...
...unplug the USB cable. Make sure the RX580 is turned on, and there are saved on the card. Otherwise, you may lose photos on a USB flash drive, you can print directly from the drive. 1. you may lose photos on the front of its memory card slots. Printing From a USB Flash Drive 23 When ...you want to remove the card, make sure the memory card access light is inserted; If your photos are no memory cards inserted in its slot. Printing From a USB Flash Drive When your RX580 is connected to the external device USB port (labelled EXT.I/F) on the card. Plug the flash drive...

Basics Guide
Page 24
3. Press the Memory Card mode button. 2. Press l or r to print from a memory card. If you see your photos, or display nine photos at a time, press the Display/Crop button again. 24 Printing From a Memory Card Viewing Photos You can select and print your memory card or USB flash drive as from , then press OK. 4. You can view...
3. Press the Memory Card mode button. 2. Press l or r to print from a memory card. If you see your photos, or display nine photos at a time, press the Display/Crop button again. 24 Printing From a Memory Card Viewing Photos You can select and print your memory card or USB flash drive as from , then press OK. 4. You can view...


