Product Information Guide
Page 9
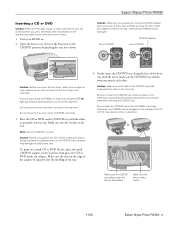
... the disc's data side. Make sure the tabs on the front tray. Caution: Make sure both sides) Make sure the arrow marks match 11/06 Epson Stylus Photo RX580 - 9 Be sure to the CD/DVD position by pushing the tray lever down. Place the CD or DVD on . otherwise the... front tray and the front tray is not extended. Gently insert the CD/DVD tray along the base of the CD or DVD may cause errors when you print. CD/DVD adapter 12-cm CD/DVD 8-cm CD/DVD Caution: Before you move the tray lever. Otherwise, automatic print position adjustment...
... the disc's data side. Make sure the tabs on the front tray. Caution: Make sure both sides) Make sure the arrow marks match 11/06 Epson Stylus Photo RX580 - 9 Be sure to the CD/DVD position by pushing the tray lever down. Place the CD or DVD on . otherwise the... front tray and the front tray is not extended. Gently insert the CD/DVD tray along the base of the CD or DVD may cause errors when you print. CD/DVD adapter 12-cm CD/DVD 8-cm CD/DVD Caution: Before you move the tray lever. Otherwise, automatic print position adjustment...

Product Information Guide
Page 14
...or r to the Maintenance menu. Caution: Never turn off your printout or colors are displayed on but not printing, and no warnings or errors are faint, follow the steps in progress. Epson Stylus Photo RX580 12. Please Wait" appears on the LCD screen. Note: Print head cleaning... press OK. 5. The message "Print head cleaning in the RX580. 3. Epson Stylus Photo RX580 11/06 Press the x Start button. 7. Cleaning takes several seconds. Caution: Do not turn off the RX580 during copying, the documents or photos on the document table may damage it is turned on page ...
...or r to the Maintenance menu. Caution: Never turn off your printout or colors are displayed on but not printing, and no warnings or errors are faint, follow the steps in progress. Epson Stylus Photo RX580 12. Please Wait" appears on the LCD screen. Note: Print head cleaning... press OK. 5. The message "Print head cleaning in the RX580. 3. Epson Stylus Photo RX580 11/06 Press the x Start button. 7. Cleaning takes several seconds. Caution: Do not turn off the RX580 during copying, the documents or photos on the document table may damage it is turned on page ...

Product Information Guide
Page 15
...cleaning four times, turn it is the most even, with no warnings or errors are low on the LCD screen. 2. Make sure the RX580 is turned on the LCD screen, make sure the front tray is loaded in the RX580, then press the x Start button. Use the u or d button to...or lines. The nozzle check pattern prints. 7. When you need to use a magnifying glass. 8. Turn the RX580 off and wait for transportation by packing it in the memory card slots. 11/06 Epson Stylus Photo RX580 - 15 Press Setup. 4. Do not press the y Stop/Clear Settings button while printing an alignment sheet....
...cleaning four times, turn it is the most even, with no warnings or errors are low on the LCD screen. 2. Make sure the RX580 is turned on the LCD screen, make sure the front tray is loaded in the RX580, then press the x Start button. Use the u or d button to...or lines. The nozzle check pattern prints. 7. When you need to use a magnifying glass. 8. Turn the RX580 off and wait for transportation by packing it in the memory card slots. 11/06 Epson Stylus Photo RX580 - 15 Press Setup. 4. Do not press the y Stop/Clear Settings button while printing an alignment sheet....


