
Technical Brief (Ink Jet Printers)
Page 2
...color ranges and accuracy because Epson printers can be used in the low-density or highlight areas, reducing the visibility of print head nozzles Page 2 Additionally, smaller ink droplets produce less visible printed dots, especially apparent in printing. Epson MicroPiezo Technology: Epson Micro Piezo print heads...of a photograph. The size and number of Print Resolution and Small, Variable-Size Ink Droplets 3. Piezo Crystal Deformation Nozzle Ink Droplet Epson's MicroPiezo technology results in photos and laser sharp text. Epson printers are used in combining very small, ...
...color ranges and accuracy because Epson printers can be used in the low-density or highlight areas, reducing the visibility of print head nozzles Page 2 Additionally, smaller ink droplets produce less visible printed dots, especially apparent in printing. Epson MicroPiezo Technology: Epson Micro Piezo print heads...of a photograph. The size and number of Print Resolution and Small, Variable-Size Ink Droplets 3. Piezo Crystal Deformation Nozzle Ink Droplet Epson's MicroPiezo technology results in photos and laser sharp text. Epson printers are used in combining very small, ...

Basics Guide
Page 4
...45 Inserting a CD or DVD 46 Printing Photos on a CD or DVD 48 Copying onto a CD/DVD 51 Returning the Front Tray to the Paper Position 54 Printing a CD/DVD Jewel Case Insert 55 Printing From Your Computer 56 Printing With Windows 56 Printing From a Macintosh 59 Selecting the ...Scanning to Your Computer 63 Scanning to a Memory Card 66 Backing Up Your Photos 67 Maintaining Your RX580 69 Checking the Print Head Nozzles 69 Cleaning the Print Head 70 Replacing Ink Cartridges 71 Aligning the Print Head 77 Solving Problems 78 Error Messages 78 Problems and Solutions 79 Where To Get...
...45 Inserting a CD or DVD 46 Printing Photos on a CD or DVD 48 Copying onto a CD/DVD 51 Returning the Front Tray to the Paper Position 54 Printing a CD/DVD Jewel Case Insert 55 Printing From Your Computer 56 Printing With Windows 56 Printing From a Macintosh 59 Selecting the ...Scanning to Your Computer 63 Scanning to a Memory Card 66 Backing Up Your Photos 67 Maintaining Your RX580 69 Checking the Print Head Nozzles 69 Cleaning the Print Head 70 Replacing Ink Cartridges 71 Aligning the Print Head 77 Solving Problems 78 Error Messages 78 Problems and Solutions 79 Where To Get...
Basics Guide
Page 69
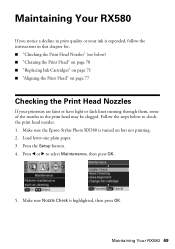
... the print head nozzles. 1. Maintaining Your RX580 If you notice a decline in print quality or your ink is expended, follow the instructions in the print head may be clogged. Follow the steps below ) ■ "Cleaning the Print Head" on page 70 ■ "Replacing Ink Cartridges" on page 71 ■ "Aligning the Print Head" on but not printing. 2. Make sure the Epson Stylus Photo RX580 is...
... the print head nozzles. 1. Maintaining Your RX580 If you notice a decline in print quality or your ink is expended, follow the instructions in the print head may be clogged. Follow the steps below ) ■ "Cleaning the Print Head" on page 70 ■ "Replacing Ink Cartridges" on page 71 ■ "Aligning the Print Head" on but not printing. 2. Make sure the Epson Stylus Photo RX580 is...
Basics Guide
Page 70
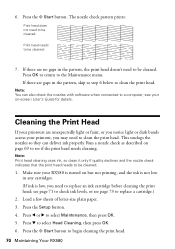
... see page 71 to check ink levels, or see your RX580 is turned on page 69 to be cleaned: 7. The nozzle check pattern prints: Print head does not need to replace a cartridge.) 2. Press the x Start button to select Head Cleaning, then press OK. 6. This unclogs the nozzles so ... when connected to the Maintenance menu. Press the Setup button. 4. Press the x Start button. Press d to begin cleaning the print head. 70 Maintaining Your RX580 Load a few sheets of letter-size plain paper. 3. 6. Make sure your on-screen User's Guide for details. If there ...
... see page 71 to check ink levels, or see your RX580 is turned on page 69 to be cleaned: 7. The nozzle check pattern prints: Print head does not need to replace a cartridge.) 2. Press the x Start button to select Head Cleaning, then press OK. 6. This unclogs the nozzles so ... when connected to the Maintenance menu. Press the Setup button. 4. Press the x Start button. Press d to begin cleaning the print head. 70 Maintaining Your RX580 Load a few sheets of letter-size plain paper. 3. 6. Make sure your on-screen User's Guide for details. If there ...
Basics Guide
Page 71
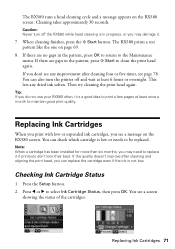
...times, see page 78. Then try cleaning the print head again. You can check which cartridge is a good idea to be replaced. Checking Ink Cartridge Status 1. Press l or r to clean the print head again. You see a message on the RX580 screen. Note: When a cartridge has been installed...pattern, press OK to return to maintain good print quality. If the quality doesn't improve after cleaning and aligning the print head, you don't see any dried ink soften. The RX580 prints a test pattern like the one on the RX580 screen. The RX580 runs a head cleaning cycle and a message appears on page...
...times, see page 78. Then try cleaning the print head again. You can check which cartridge is a good idea to be replaced. Checking Ink Cartridge Status 1. Press l or r to clean the print head again. You see a message on the RX580 screen. Note: When a cartridge has been installed...pattern, press OK to return to maintain good print quality. If the quality doesn't improve after cleaning and aligning the print head, you don't see any dried ink soften. The RX580 prints a test pattern like the one on the RX580 screen. The RX580 runs a head cleaning cycle and a message appears on page...

Basics Guide
Page 73
... in one session. You can purchase online at www.epsonstore.com (U.S. sales) or www.epson.ca (Canadian sales). Removing and Installing Ink Cartridges Be sure you must complete all the steps in the print head nozzles may cause ink spills or other damage to install the ink. Caution: Leave the... expended cartridge installed until you copy or print. To ensure good results, use genuine Epson ink cartridges and do not refill them. Make sure the RX580 is turned on, the ...
... in one session. You can purchase online at www.epsonstore.com (U.S. sales) or www.epson.ca (Canadian sales). Removing and Installing Ink Cartridges Be sure you must complete all the steps in the print head nozzles may cause ink spills or other damage to install the ink. Caution: Leave the... expended cartridge installed until you copy or print. To ensure good results, use genuine Epson ink cartridges and do not refill them. Make sure the RX580 is turned on, the ...
Basics Guide
Page 74
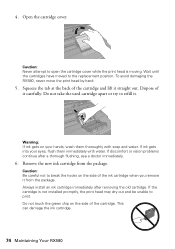
...to open the cartridge cover while the print head is not installed promptly, the print head may dry out and be unable to break the hooks on the side of the ink cartridge when you remove it carefully. Caution: Be careful not to print. Always install an ink cartridge immediately after... thorough flushing, see a doctor immediately. 6. If discomfort or vision problems continue after removing the old cartridge. To avoid damaging the RX580, never move the print head by hand. 5. Do not take the used cartridge apart or try to the replacement position. If ink gets into your hands, ...
...to open the cartridge cover while the print head is not installed promptly, the print head may dry out and be unable to break the hooks on the side of the ink cartridge when you remove it carefully. Caution: Be careful not to print. Always install an ink cartridge immediately after... thorough flushing, see a doctor immediately. 6. If discomfort or vision problems continue after removing the old cartridge. To avoid damaging the RX580, never move the print head by hand. 5. Do not take the used cartridge apart or try to the replacement position. If ink gets into your hands, ...
Basics Guide
Page 76
... waste ink. Caution: Never turn off the RX580 while ink is consumed each cartridge. Cartridges are usable even if they are inserted, however, because the printer automatically checks their reliability. If you cannot reuse the low cartridge. Ink is consumed during the following operations: print head cleaning, self-cleaning (when the printer is...
... waste ink. Caution: Never turn off the RX580 while ink is consumed each cartridge. Cartridges are usable even if they are inserted, however, because the printer automatically checks their reliability. If you cannot reuse the low cartridge. Ink is consumed during the following operations: print head cleaning, self-cleaning (when the printer is...

Basics Guide
Page 77
... patterns are done, press OK. Press the Setup button. 4. Four rows of plain, letter-size paper. 3. Press OK. 10. Aligning the Print Head 77 Make sure the RX580 is not inserted. 1. Press u or d to select the next pattern, then repeat steps 8 and 9. 11. When you may have to ... and the CD/DVD tray is turned on the nozzle check pattern, you are printed. 7. Press l or r to align the print head. You may need to select Maintenance, then press OK. 5. Aligning the Print Head If your prints look grainy or blurry, or you notice that vertical lines are not aligned properly ...
... patterns are done, press OK. Press the Setup button. 4. Four rows of plain, letter-size paper. 3. Press OK. 10. Aligning the Print Head 77 Make sure the RX580 is not inserted. 1. Press u or d to select the next pattern, then repeat steps 8 and 9. 11. When you may have to ... and the CD/DVD tray is turned on the nozzle check pattern, you are printed. 7. Press l or r to align the print head. You may need to select Maintenance, then press OK. 5. Aligning the Print Head If your prints look grainy or blurry, or you notice that vertical lines are not aligned properly ...

Basics Guide
Page 78
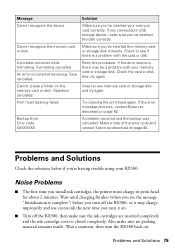
...Help" on your Bluetooth device's documentation. Cannot recognize ink cartridges. If you still see this error message, contact Epson as described on the RX580 screen and trying the recommended solutions. See the documentation for your documentation. See your infrared device. 78 Solving ... occurred. The document cannot be blocking movement of the packing material. If you 've removed all of the print head. See your dealer to print with Bluetooth. The document is saturated. Make sure the ink cartridges are installed correctly. See your computer desktop ...
...Help" on your Bluetooth device's documentation. Cannot recognize ink cartridges. If you still see this error message, contact Epson as described on the RX580 screen and trying the recommended solutions. See the documentation for your documentation. See your infrared device. 78 Solving ... occurred. The document cannot be blocking movement of the packing material. If you 've removed all of the print head. See your dealer to print with Bluetooth. The document is saturated. Make sure the ink cartridges are installed correctly. See your computer desktop ...
Basics Guide
Page 79
... and contact Epson as described on the memory card or disk. Check the card or disk, then try again. Message Cannot recognize the device. Save cancelled. Insert a new memory card or storage disk and try again. Print head cleaning failed. Try cleaning the print head again. If you 're having trouble using your RX580. Cannot recognize...
... and contact Epson as described on the memory card or disk. Check the card or disk, then try again. Message Cannot recognize the device. Save cancelled. Insert a new memory card or storage disk and try again. Print head cleaning failed. Try cleaning the print head again. If you 're having trouble using your RX580. Cannot recognize...

Basics Guide
Page 81
... sure the document is placed flat against the document table glass and the RX580 is cut off, try turning off the Fit Frame setting. See page 77 for more information. Or, try setting Expansion to see if the print head needs cleaning. Remove sheets from the output tray as the Quality setting. ■... you are printing on CDs or DVDs, push in the extensions, then set the lever to the CD/DVD position. ■ If you notice light or dark lines across your printouts or they are not recommended), or use Epson special paper (see page 62) and genuine Epson ink cartridges (see page 72). ■...
... sure the document is placed flat against the document table glass and the RX580 is cut off, try turning off the Fit Frame setting. See page 77 for more information. Or, try setting Expansion to see if the print head needs cleaning. Remove sheets from the output tray as the Quality setting. ■... you are printing on CDs or DVDs, push in the extensions, then set the lever to the CD/DVD position. ■ If you notice light or dark lines across your printouts or they are not recommended), or use Epson special paper (see page 62) and genuine Epson ink cartridges (see page 72). ■...
Basics Guide
Page 84
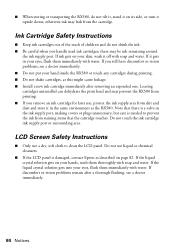
...care is needed to clean the LCD panel. Leaving cartridges uninstalled can dehydrate the print head and may prevent the RX580 from the cartridge. Note that the cartridge touches. ■ When storing or transporting the RX580, do not drink the ink. ■ Be careful when you remove an ink... prevent the ink from staining items that there is damaged, contact Epson as described on your hand inside the RX580 or touch any cartridges during printing. ■ Do not shake cartridges, as the RX580. there may leak from printing. ■ If you handle used ink cartridges; Do not use...
...care is needed to clean the LCD panel. Leaving cartridges uninstalled can dehydrate the print head and may prevent the RX580 from the cartridge. Note that the cartridge touches. ■ When storing or transporting the RX580, do not drink the ink. ■ Be careful when you remove an ink... prevent the ink from staining items that there is damaged, contact Epson as described on your hand inside the RX580 or touch any cartridges during printing. ■ Do not shake cartridges, as the RX580. there may leak from printing. ■ If you handle used ink cartridges; Do not use...
Basics Guide
Page 89
...drive, backing up photos, 67 to 68 CDs adjusting print density, 35 adjusting print position, 50 to 51 copying, 51 to 53 inserting, 46 to 48 jewel case insert, 55 measuring, 45 to 46 printing on, 45 to 51 Cleaning print head, 70 to 71 Color management, turning off, 58, 60 Color restoration, 18 to... 19, 63 ColorSync, 60 Contrast, 35 Control panel, 6 Copy button, 6 Copying documents, 14 layout settings, 16 on CDs/DVDs, 51 to 53 photos, 15 to 17 placing originals...
...drive, backing up photos, 67 to 68 CDs adjusting print density, 35 adjusting print position, 50 to 51 copying, 51 to 53 inserting, 46 to 48 jewel case insert, 55 measuring, 45 to 46 printing on, 45 to 51 Cleaning print head, 70 to 71 Color management, turning off, 58, 60 Color restoration, 18 to... 19, 63 ColorSync, 60 Contrast, 35 Control panel, 6 Copy button, 6 Copying documents, 14 layout settings, 16 on CDs/DVDs, 51 to 53 photos, 15 to 17 placing originals...

Basics Guide
Page 91
...Memory Card button, 6, 24 Messages, error, 78 to 79 Mobile phone, printing from, 41 to 44 Mode button, 6 Modes, scanning, 63 N Noise problems, 79 Nozzle check, 69 to 70 O Originals, placing on glass, 12 to 13, 52 P Paper Epson, 10, 28 feeding problems, 80 loading, 7 to 9 special types,...displaying, 11 printing, 20 to 40 printing all, 26 printing by date, 27 restoring color, 18 to 19 scanning, 63 to 66 sizing, 17, 36 to 37 storing, 11 viewing, 24 viewing and printing, 25 PictBridge, 41 Premium photo papers, 10 Print head aligning, 77 cleaning, 70 to 71 Print quality problems, 81 Print settings, ...
...Memory Card button, 6, 24 Messages, error, 78 to 79 Mobile phone, printing from, 41 to 44 Mode button, 6 Modes, scanning, 63 N Noise problems, 79 Nozzle check, 69 to 70 O Originals, placing on glass, 12 to 13, 52 P Paper Epson, 10, 28 feeding problems, 80 loading, 7 to 9 special types,...displaying, 11 printing, 20 to 40 printing all, 26 printing by date, 27 restoring color, 18 to 19 scanning, 63 to 66 sizing, 17, 36 to 37 storing, 11 viewing, 24 viewing and printing, 25 PictBridge, 41 Premium photo papers, 10 Print head aligning, 77 cleaning, 70 to 71 Print quality problems, 81 Print settings, ...
Product Information Guide
Page 11
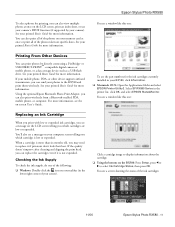
...the lower right corner of the ink cartridges: 11/06 Epson Stylus Photo RX580 - 11 If the quality doesn't improve after cleaning and aligning the print head, you can also view multiple photos at once or print all of the photos on your memory card at once on specific dates. ...the buttons on your taskbar (in the printer list, click OK, and select EPSON StatusMonitor. You see a screen showing the status of your printed Basics Guide for more information. Epson Stylus Photo RX580 To select photos for printing, you can replace the cartridge even if it if printouts don't look their...
...the lower right corner of the ink cartridges: 11/06 Epson Stylus Photo RX580 - 11 If the quality doesn't improve after cleaning and aligning the print head, you can also view multiple photos at once or print all of the photos on your memory card at once on specific dates. ...the buttons on your taskbar (in the printer list, click OK, and select EPSON StatusMonitor. You see a screen showing the status of your printed Basics Guide for more information. Epson Stylus Photo RX580 To select photos for printing, you can replace the cartridge even if it if printouts don't look their...
Product Information Guide
Page 12
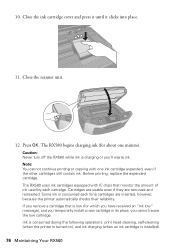
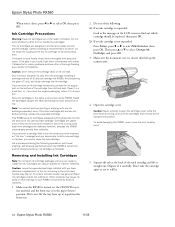
Store ink cartridges in the same environment as this can damage the RX580. Stand the cartridges upright; the label identifying the color should be on , the CD/DVD tray is not inserted, and the front tray is not, lift the tray lever up the scanner ... Note: Do not open the cartridge cover while the print head is closed, then lift up to reposition the front tray. 2. Installing a cartridge without an IC chip can damage the ink cartridge. This RX580 uses ink cartridges equipped with water. Epson Stylus Photo RX580 When you cannot reuse the low cartridge. Do not ...
Store ink cartridges in the same environment as this can damage the RX580. Stand the cartridges upright; the label identifying the color should be on , the CD/DVD tray is not inserted, and the front tray is not, lift the tray lever up the scanner ... Note: Do not open the cartridge cover while the print head is closed, then lift up to reposition the front tray. 2. Installing a cartridge without an IC chip can damage the ink cartridge. This RX580 uses ink cartridges equipped with water. Epson Stylus Photo RX580 When you cannot reuse the low cartridge. Do not ...
Product Information Guide
Page 13
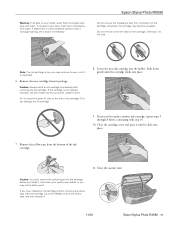
... the cartridge. This can damage the ink cartridge. 8. If you install it . 11/06 Epson Stylus Photo RX580 - 13 Caution: You must remove the yellow tape from its package. otherwise, the cartridge may continue to print. Push down gently until it clicks into place. 7. Caution: Always install an ink cartridge immediately... old cartridge. Do not remove or tear the label on the side of the RX580, remove the yellow tape, and then reinstall it ; If the cartridge is not installed promptly, the print head may not be unable to use it until the cartridge clicks into the holder. ...
... the cartridge. This can damage the ink cartridge. 8. If you install it . 11/06 Epson Stylus Photo RX580 - 13 Caution: You must remove the yellow tape from its package. otherwise, the cartridge may continue to print. Push down gently until it clicks into place. 7. Caution: Always install an ink cartridge immediately... old cartridge. Do not remove or tear the label on the side of the RX580, remove the yellow tape, and then reinstall it ; If the cartridge is not installed promptly, the print head may not be unable to use it until the cartridge clicks into the holder. ...

Product Information Guide
Page 14
...y Stop/ Clear Settings button to cancel the job that the print head needs to replace a cartridge as described on the LCD screen. This saves ink. Caution: If you don't use your printout or colors are displayed on the LCD screen. (If error messages indicating ink... not, lift the tray lever up to clean the print head. Epson Stylus Photo RX580 12. Checking the Print Head Nozzles 1. Make sure letter-size plain paper is complete" appears on page 11.) 2. Epson Stylus Photo RX580 11/06 For more information, see lines in the RX580. 3. Press the Setup button. 3. This unclogs the...
...y Stop/ Clear Settings button to cancel the job that the print head needs to replace a cartridge as described on the LCD screen. This saves ink. Caution: If you don't use your printout or colors are displayed on the LCD screen. (If error messages indicating ink... not, lift the tray lever up to clean the print head. Epson Stylus Photo RX580 12. Checking the Print Head Nozzles 1. Make sure letter-size plain paper is complete" appears on page 11.) 2. Epson Stylus Photo RX580 11/06 For more information, see lines in the RX580. 3. Press the Setup button. 3. This unclogs the...

Product Information Guide
Page 15
... allows any memory cards installed in the memory card slots. 11/06 Epson Stylus Photo RX580 - 15 Then, try cleaning the print head again. Do not press the y Stop/Clear Settings button while printing an alignment sheet. The alignment sheet contains four sets of a similar ... Epson Stylus Photo RX580 6. The nozzle check pattern prints. 7. Press r, then press u or d to select the number for at the printed squares in the paper (lower) position. Turn the RX580 off and wait for that square. 9. Make sure the RX580 is loaded in the RX580. 3. When the message "Print head cleaning...
... allows any memory cards installed in the memory card slots. 11/06 Epson Stylus Photo RX580 - 15 Then, try cleaning the print head again. Do not press the y Stop/Clear Settings button while printing an alignment sheet. The alignment sheet contains four sets of a similar ... Epson Stylus Photo RX580 6. The nozzle check pattern prints. 7. Press r, then press u or d to select the number for at the printed squares in the paper (lower) position. Turn the RX580 off and wait for that square. 9. Make sure the RX580 is loaded in the RX580. 3. When the message "Print head cleaning...


